
SCROLLWORK
Unit III · Lesson 10CUTTING THE QUILL
Professor Quillberry Nocturne
Master Scribe & Illuminator
The Scrollwork Library • School of Evershade
Professor's Introduction

Steady hands, scholars.
In our last lesson, you studied the feather itself: its structure, its curing, and why the scribe chose certain feathers over others. You hold, I hope, a properly prepared quill. Tonight, we do the thing the penknife was made for.
Understand this clearly before we begin. A feather is not a pen. It becomes a pen only under the knife, and the difference between a feather and a pen is a series of small, deliberate cuts, each of which gives the nib one more of its powers. Cut well, and the quill will write for pages. Cut carelessly, and it will blob, scratch, starve, or flood.
There is no shame in a ruined quill. Every scribe in history ruined quills while learning, and the wastebasket of every scriptorium in Europe was full of feathers that taught their cutter something. What I ask of you tonight is not perfection. It is attention, patience, and respect for the blade.
Read the safety instruction before you touch any knife. Then we begin.

Where and when: Ireland, c. 1050 CE — Colmcille's Poem — the Irish Scribes. The pin is this lesson. The line beneath the map is our road: every stop a place where writing changed, every lesson a pin.
Lesson Objectives
By the end of this lesson, students should be able to:
- Name and describe the parts of a cut quill nib: the slit, the tines, the shoulders, the scoop, and the bevel.
- Explain how the slit controls ink flow through capillary action.
- Describe the historical cutting sequence for preparing a quill nib, in order.
- Explain why the slit must be centered, and what happens when it is not.
- Distinguish a square-cut nib from an oblique or pointed cut, and match each to its script.
- Define mending and explain why the penknife never left the scribe's desk.
- Perform practice cuts safely on model materials, and (with supervision) cut a working quill nib.
Reading this lesson: ★ marks the passages to remember. They return on the unit quiz and the class test. Check in questions ask the material back as you go; answer them in your workbook when you meet them.
Working this lesson: Your assignment packet is the first download on this page. Work in it as the lesson moves along, answering each assignment as its subject is taught — or read the lesson through for your notes and take the assignments as homework afterward. Both are proper ways to sit this class. Signposts in the reading tell you where each assignment belongs. Written answers are short answers in your own words; a few honest lines are worth more than a filled page.
Your Assignment Packet
This lesson's assignments live in its packet: the Lexicon Handout (every term, course terms marked ◆), Materials, Guided Practice, the Assignment Manual with its answer key for self-checking, the Reflection Questions, and the Workbook Checklist. Download the packet before you begin and keep it beside you as you read.
The Nib as a Machine
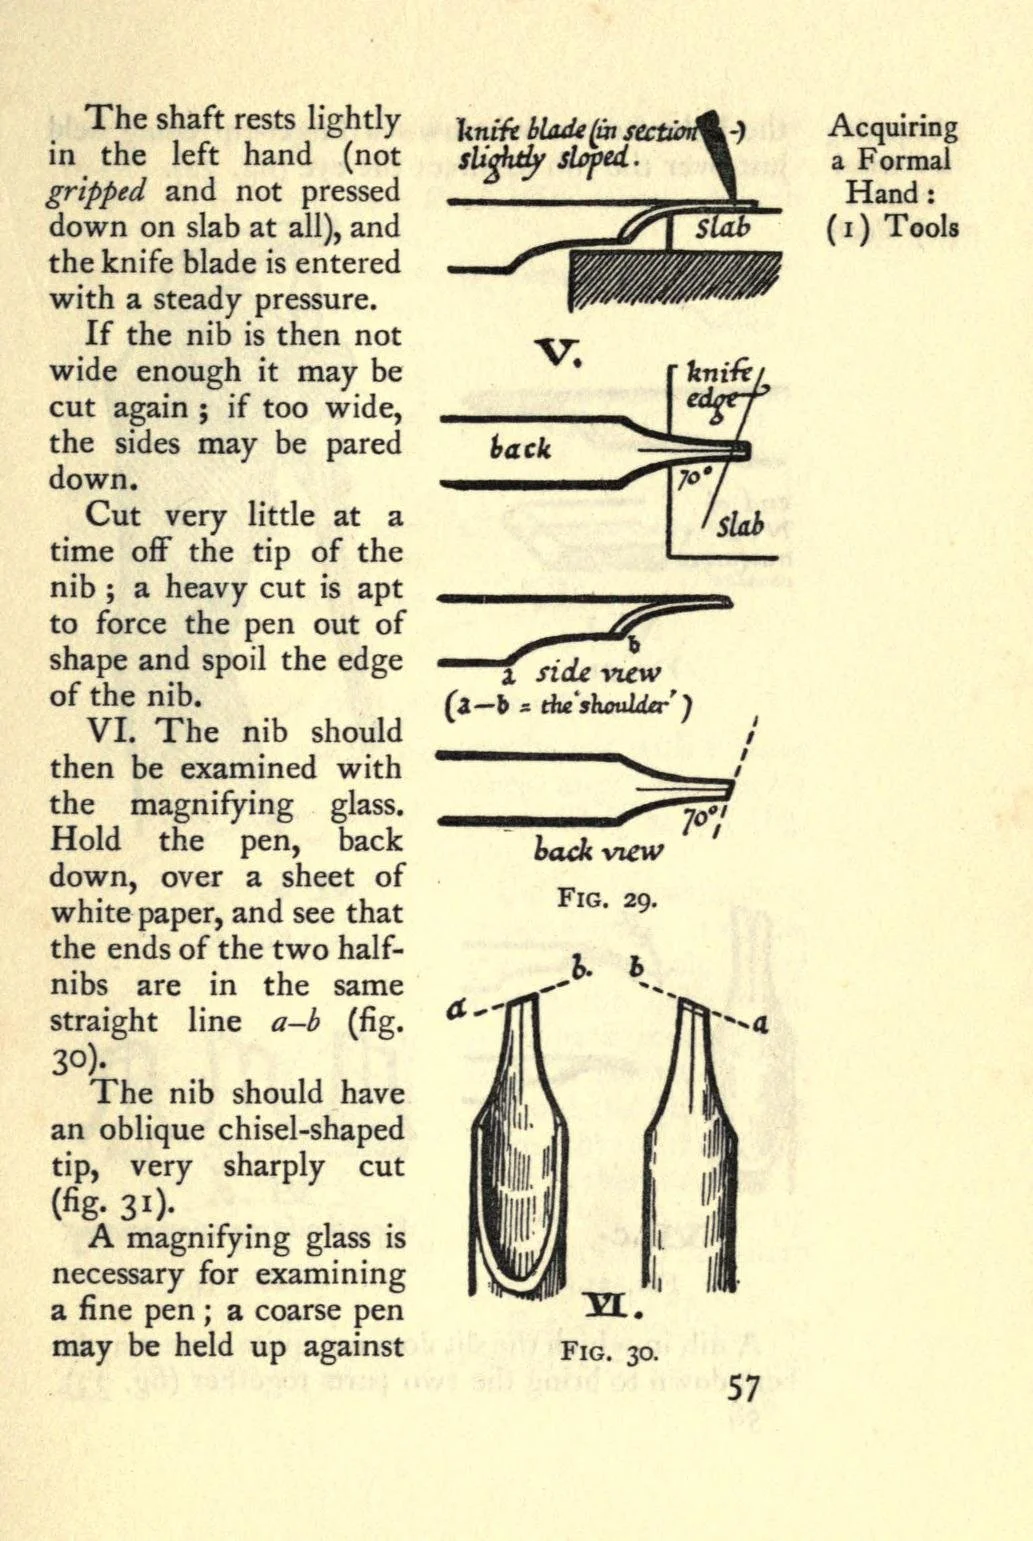
The nib drawn as the machine it is: Johnston's figures label the shoulder where the scoop ends, the 70° bevel across the back, and the two half-nibs a true cut brings level.
Edward Johnston, Writing & Illuminating, & Lettering (1906), p. 57, via the Internet Archive. Public domain.
Look at a properly cut quill nib, and you are looking at a small machine with no moving parts that still manages to do three jobs at once. It must hold ink, release ink at a controlled rate, and make a mark whose character the scribe can predict. Every cut we make tonight serves one of those three jobs.
★ Start at the tip. The bevel is the angled face where the knife last touched the feather. Its shape is the single greatest influence on your line. A square, straight-across bevel meets the page with a flat edge and lays down a broad stroke, the kind that built the blackletter hands and the Roman capitals you will study in Unit IV. An oblique bevel, cut at a slant, gives a nib that writes fine lines with the corner and broader ones with the full edge. A pointed bevel narrows to a fine tip for delicate work. The scribe chose the bevel the way a painter chooses a brush.
★ Above the tip runs the slit, the narrow channel that carries ink from the shaft to the point. The slit works by capillary action, the same force you studied in our first lesson, drawing liquid along the narrow gap between the tines. The tines are the two halves of the nib that the slit divides. They flex apart a hair's breadth under pressure and close again as pressure lifts, and that flexing is part of how the pen meters its ink.
★ Where the shaped nib flares outward to the full width of the shaft, you find the shoulders. They are the nib's structural foundation: the curve that keeps the delicate tip from tearing away from the barrel under the stress of writing. A nib with weak or uneven shoulders will split; a nib with generous, symmetrical shoulders will survive pages of work.
★ Beneath the nib, invisible from above, lies the scoop: a shallow cut on the underside that thins the nib from below. The scoop removes the softer inner material while leaving the harder outer surface of the feather on top, which lightens the nib and tunes its spring. You will not see the scoop when you write, but you will feel it in every line.
Above all of this sits the reservoir, the hollow shaft that holds your dipped ink. A well-cut quill carries enough ink for several lines of writing, which is why medieval scribes could work at speed without constant redipping. The reservoir, the slit, and the tines form one continuous ink system, and the cuts you make tonight are what connect them.
Check in: The nib does three jobs at once. Name them, and name the part chiefly responsible for each.
❦ In your workbook: record the nib as a machine — its parts and the job each one does — in your own way — copy, sketch, or note what matters.
In your packet: Exercise I — Nib Anatomy Diagram ⚒ begins here. Work it now, or mark the place and take it as homework — your choice.
A Brief History of the Cut
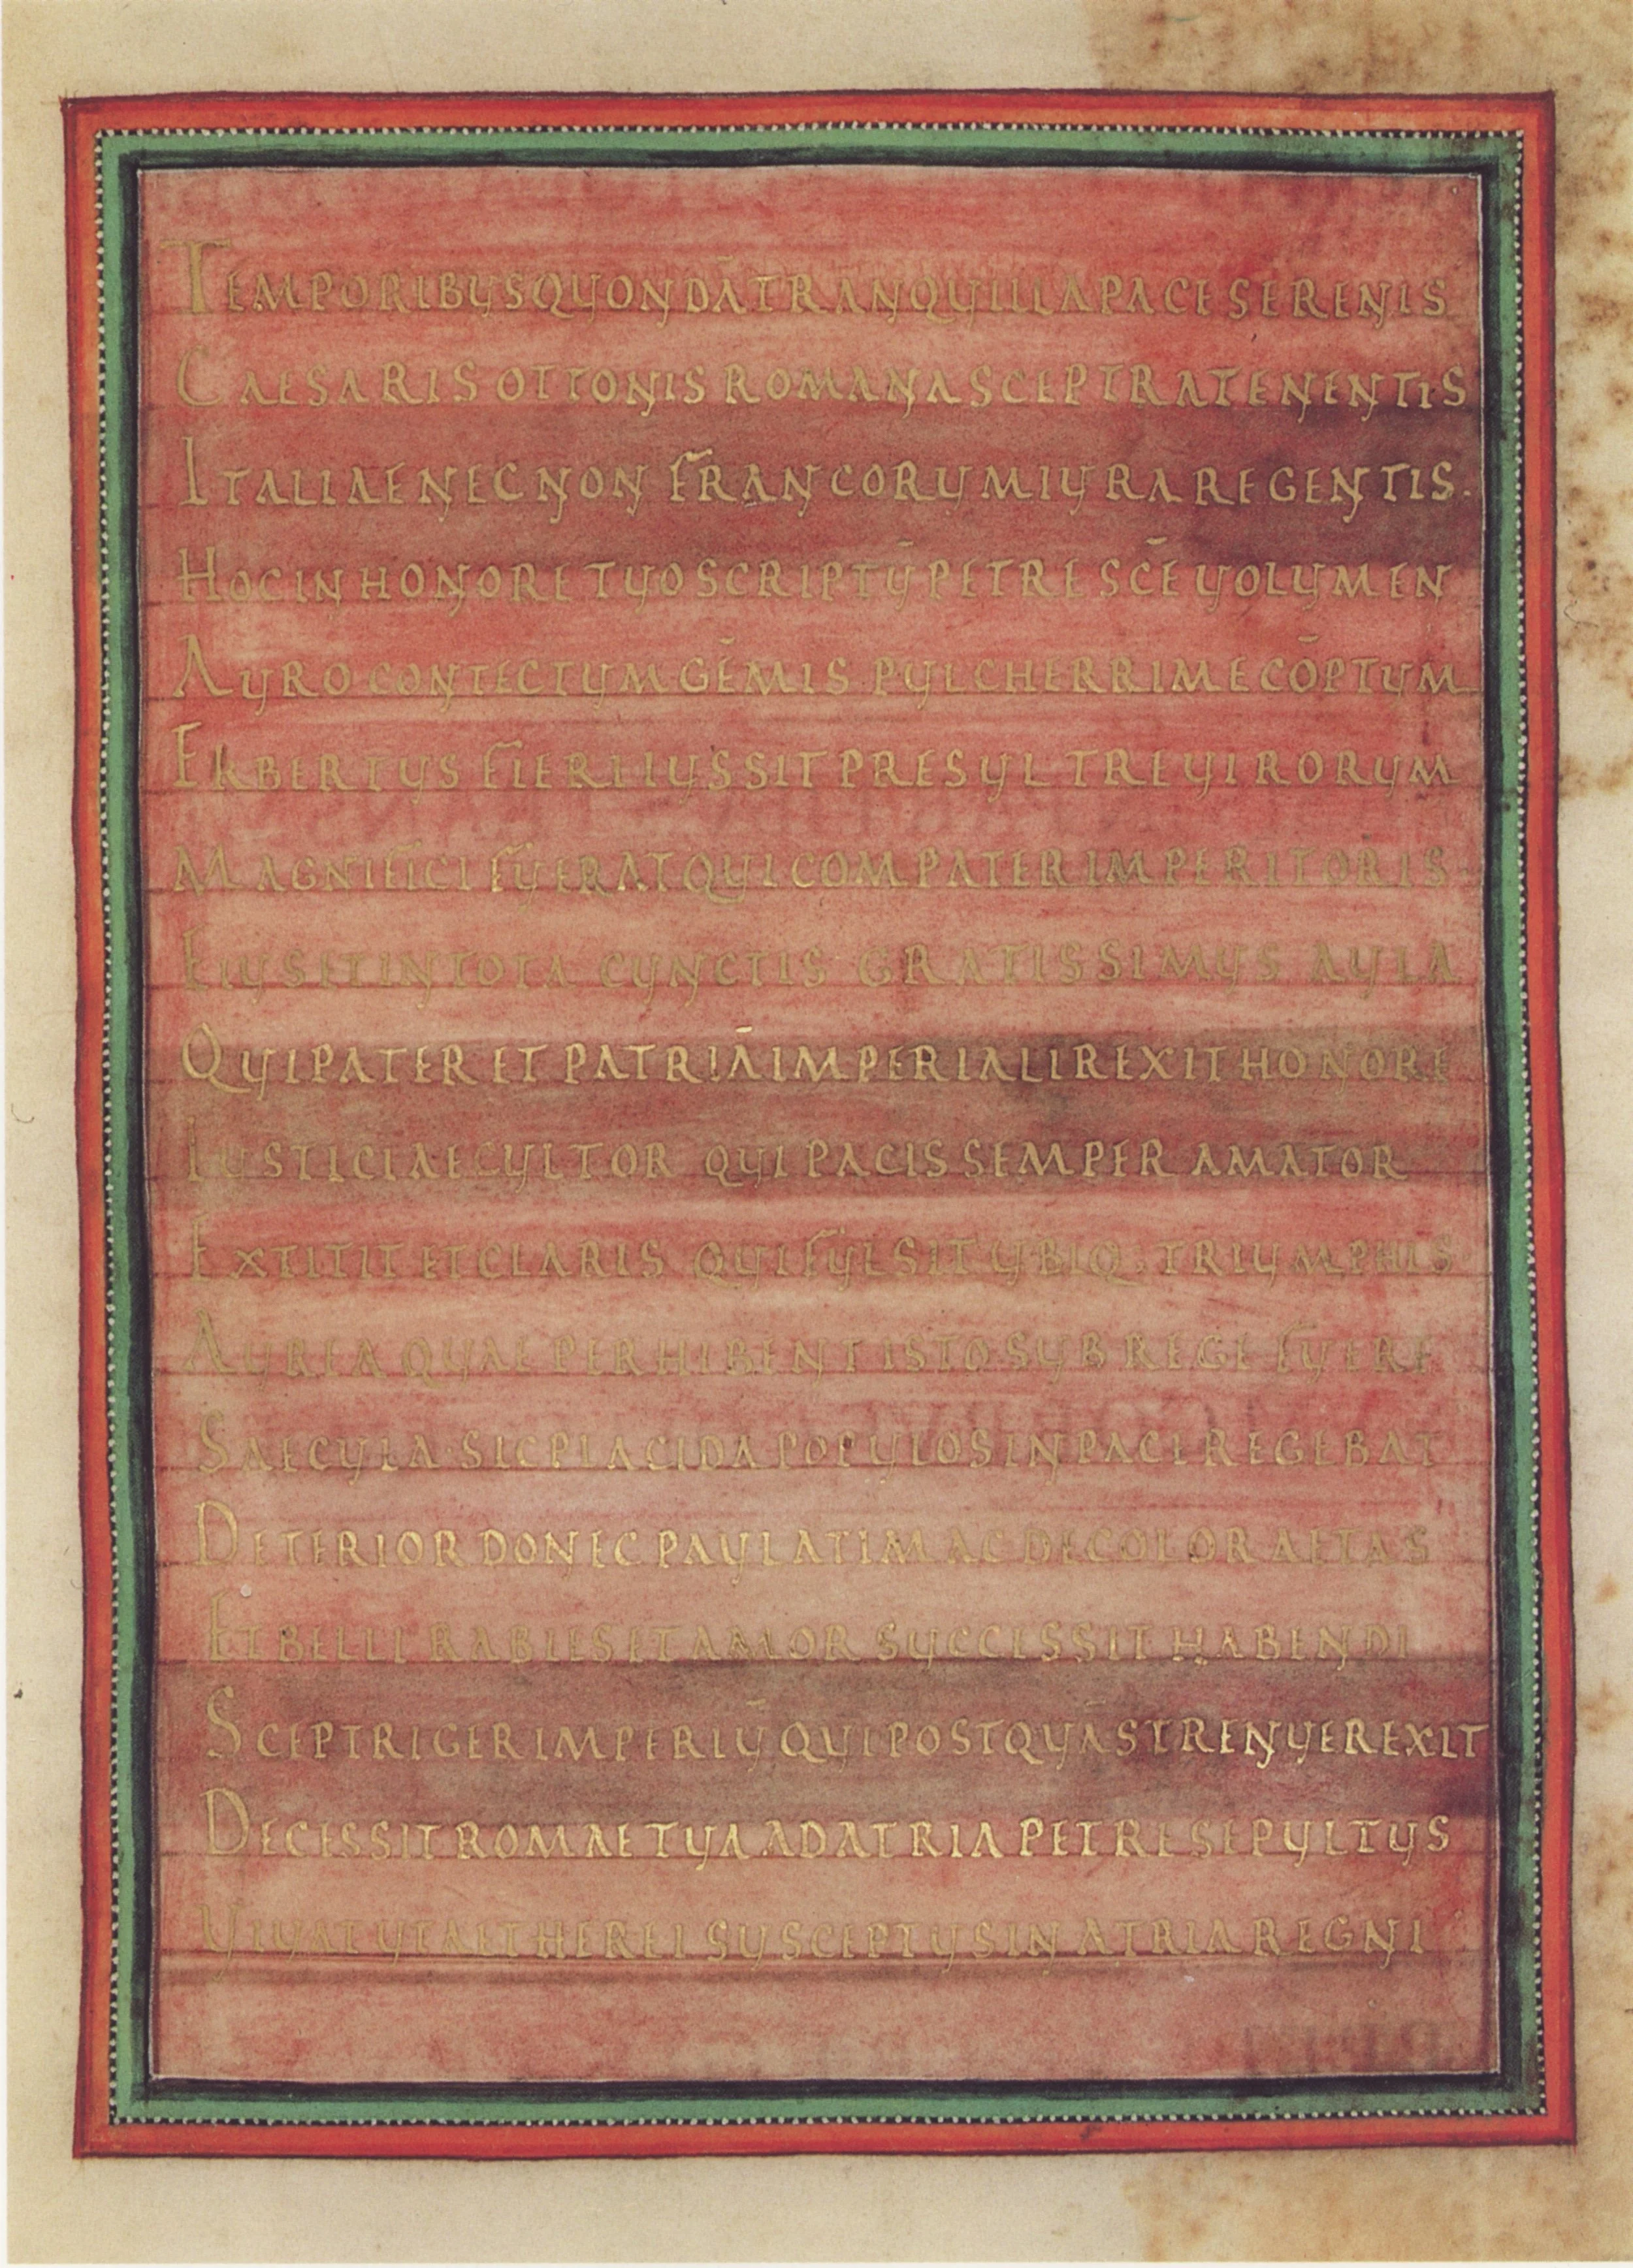
A scribe at work about the year 983: within the great initial of the Registrum Gregorii, St Gregory writes at his desk, one of the earliest pictures of the world every cut quill served.
Registrum Gregorii, Trier, c. 983 (Stadtbibliothek Trier, Hs. 171/1626a), fol. 1r, via Wikimedia Commons. Public domain.
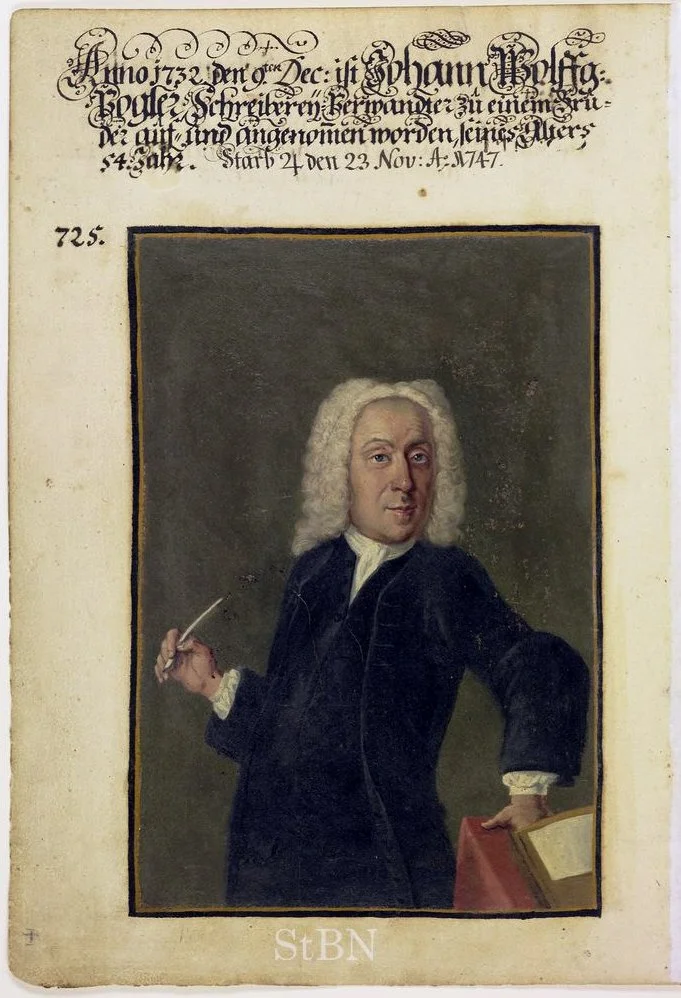
The professional: a Nuremberg scribe of 1732 painted with his cut quill in hand, from the age when one well-kept pen, mended and re-cut, was a working writer's livelihood.
Nuremberg House Book (Mendel II), Stadtbibliothek Nürnberg, via Wikimedia Commons. Public domain.
★ The quill was the dominant writing instrument of Europe for well over a thousand years, from the early Middle Ages until the steel pen began to displace it in the nineteenth century. Every charter, chronicle, gospel book, and love letter of those centuries passed through a nib cut by hand, and the cutting was so central to writing that our word for the knife remembers it: a penknife is, literally, the knife for the pen.
★ We have no single medieval manual that lays out the cutting sequence the way a modern textbook would. What we have instead is a chain of evidence: the cut quills that survive in collections, the illuminations that show scribes trimming nibs at their desks, the worn and recut nibs visible under magnification in manuscript studies, and the unbroken tradition of instruction passed from master to student. In the twentieth century, that tradition was written down by the great teachers of the calligraphy revival. Edward Johnston, whose Writing & Illuminating & Lettering (1906) taught a generation to letter again, includes instruction in cutting quills, tempering them, and even fitting them with ink reservoirs — thin metal strips slipped into the shaft, a fitted extra quite distinct from the hollow shaft itself, which is the reservoir this lesson's terms describe. Marc Drogin, in Medieval Calligraphy: Its History and Technique, records refinements such as cutting the slit slightly to one side so the corner of the nib can pull long ornamental hairlines.
The Irish scribes knew this work intimately. A poem ascribed to Colmcille — composed around the eleventh century, centuries after the saint, and translated by Seamus Heaney — complains in loving detail about the labor: the cramped hand, the tapered quill point, the pen that keeps going "through books, through thick and thin." A thousand years ago, a scribe sat exactly where you sit now, cursing and blessing the same small cuts.
★ One more piece of history before we take up the knife. The quill nib wears down with use, sometimes within pages, and the scribe recut it constantly. This recutting had its own name: mending. To mend a pen meant to cut back the worn tip, lengthen the slit if needed, and reshape the bevel. It is why the penknife never left the desk, and why "mend my pen" appears as a routine request in letters across the centuries. You are not learning a single act tonight. You are learning a maintenance cycle every working scribe performed over and over — sometimes within a few pages of writing.
❦ In your workbook: record the cut's long history — a thousand years of quills, the chain of evidence, and Colmcille's complaint — in your own way — copy, sketch, or note what matters.
Professor Nocturne
Stop here, scholars, and consider what you have just read.
Every cut on the nib answers a requirement of the work. The bevel answers the line. The slit answers the ink. The shoulders answer the strain. The scoop answers the weight. Nothing is decorative. Nothing is arbitrary. The nib is an argument, made in keratin, for the proposition that a tool should do exactly what its work requires and nothing more.
This is the standard I hold you to, not only with the quill but with every tool you will ever pick up in this library. Ask of each one: what is its work, and does its shape serve that work? The scribe who can answer that question can cut any nib, mend any pen, and, in time, design tools of their own.
Now. The knife.
A Sealed Note from Professor Timberclank

Work on the mat, never with the feather held in your hand. Keep your fingers out of the road the blade will travel, cut away from yourself, and stop if the barrel twists. A stopped cut can be begun again.
For the full handling lesson, see Creative Arts Lesson 3, 'Cutting, Scoring & Clamping.'
The Cutting Sequence
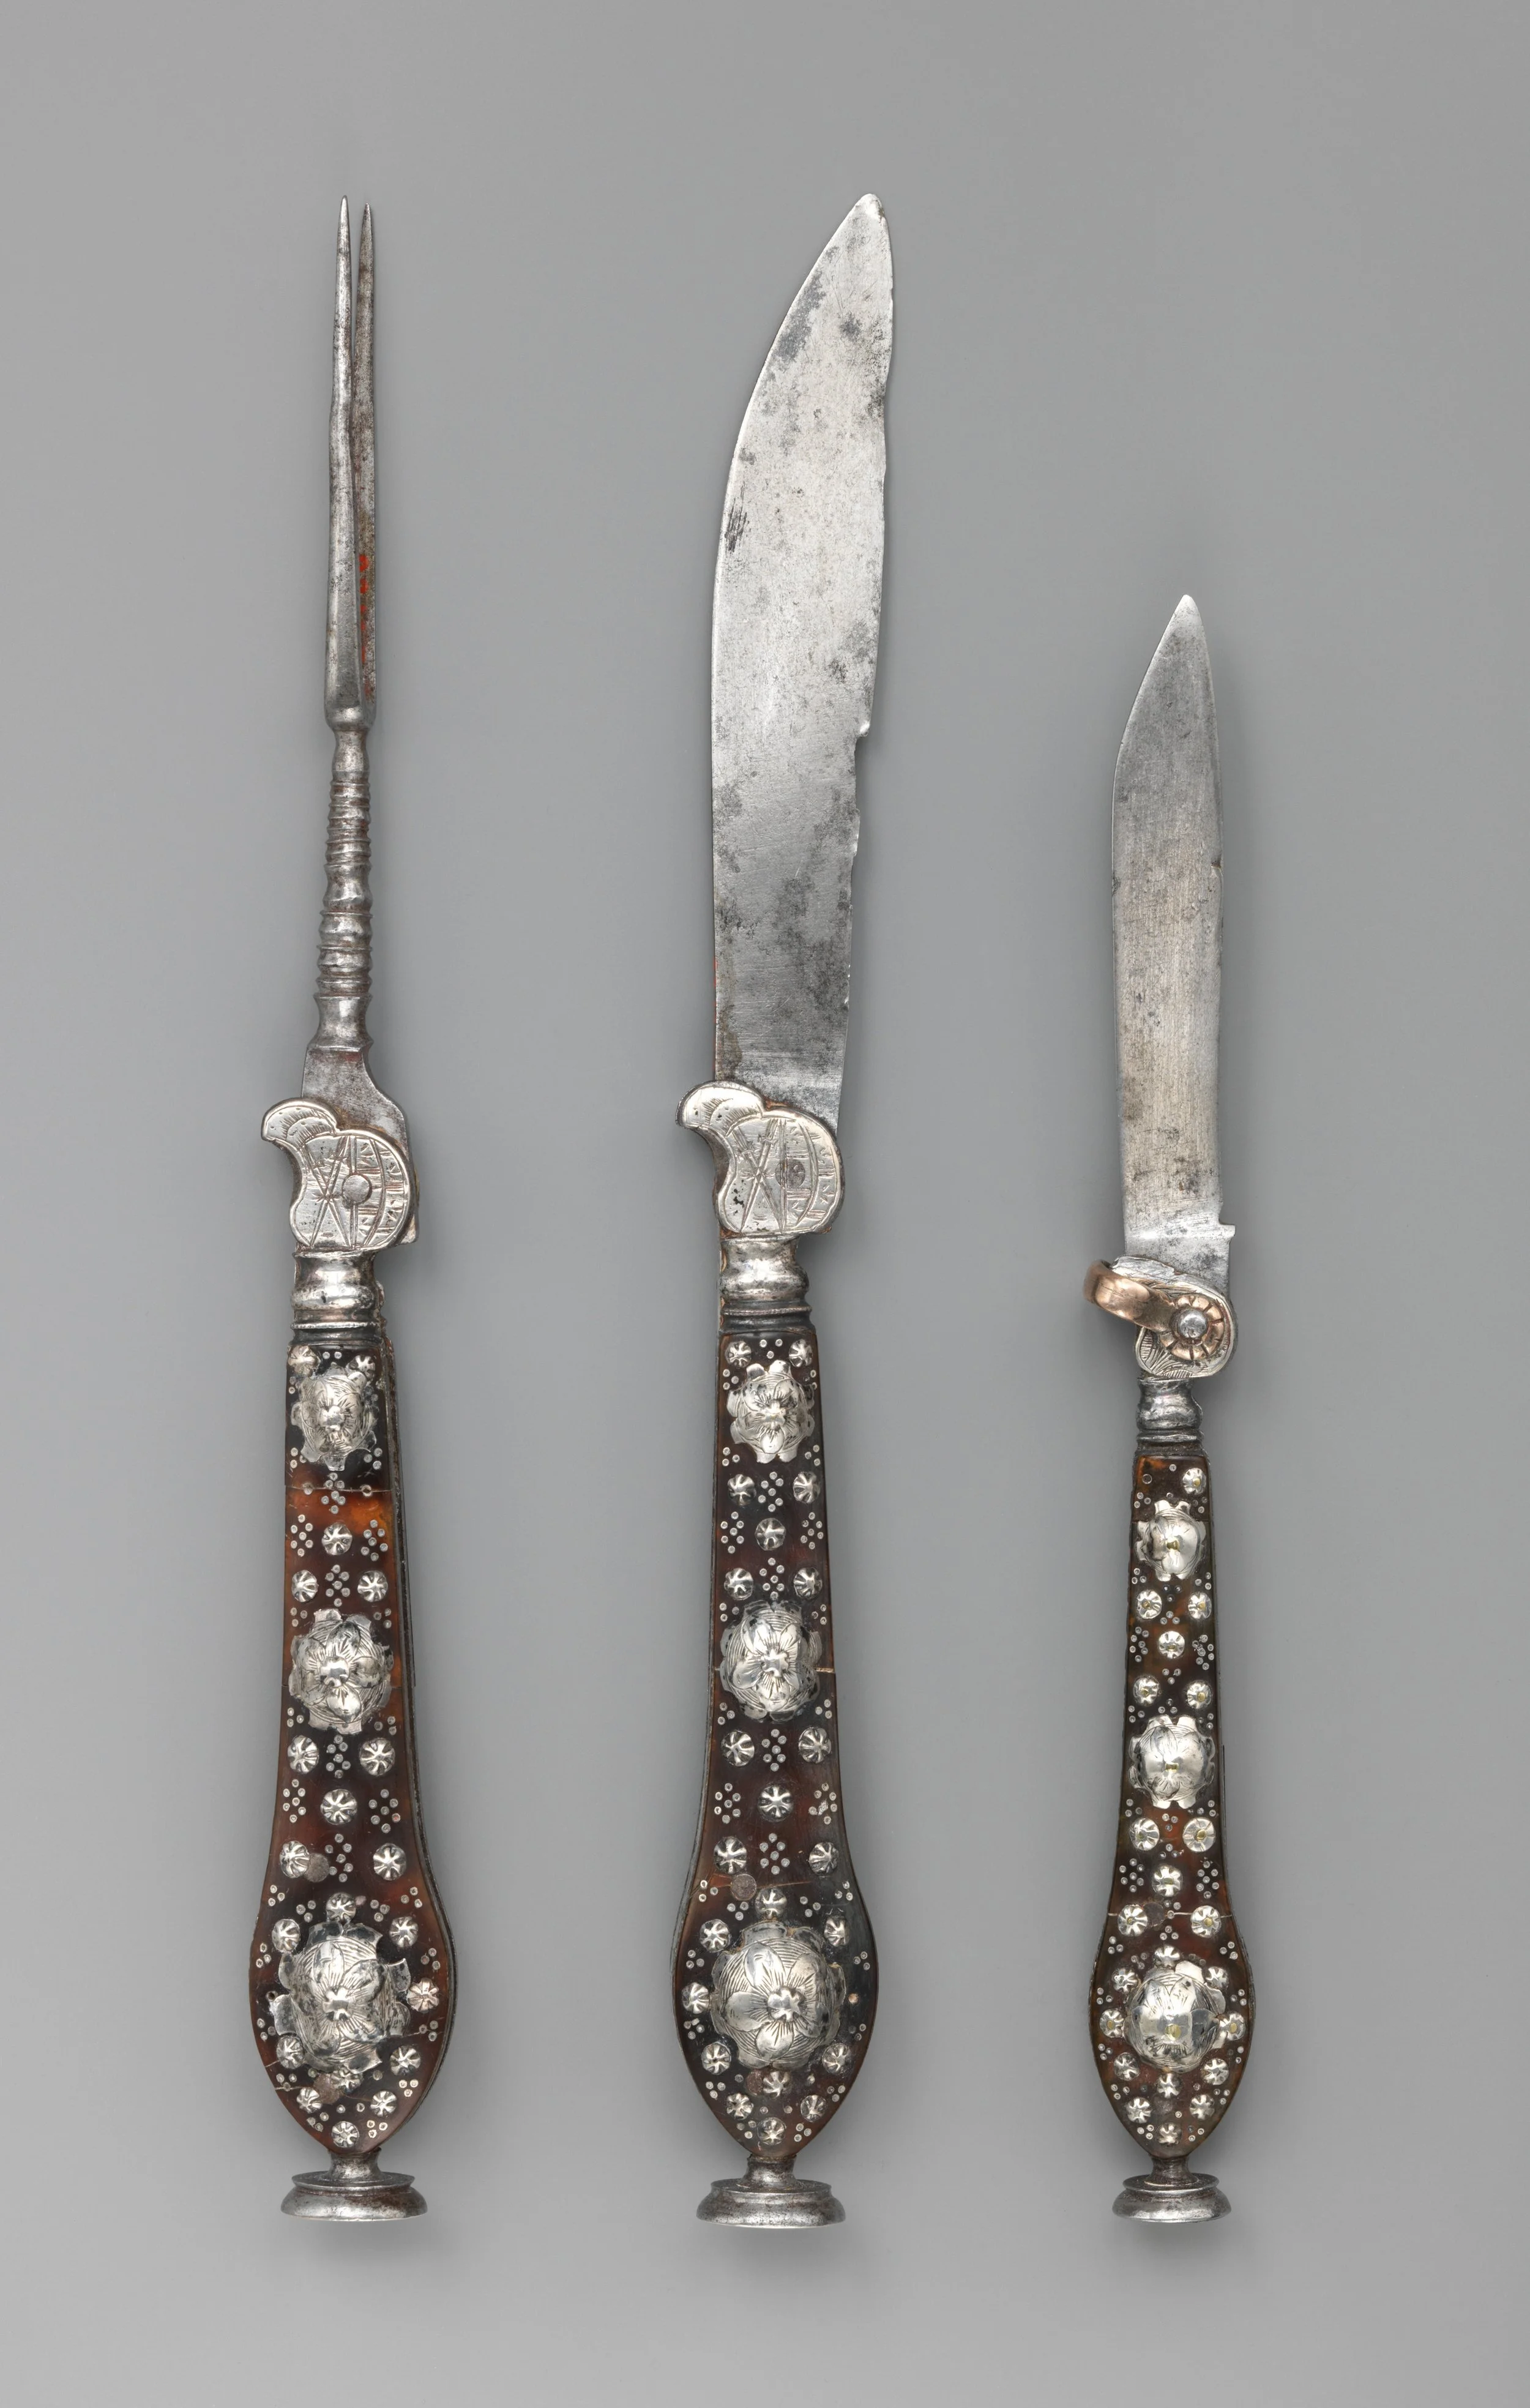
The penknife in its travelling set: fork, knife, and at the right the small pen knife, a short blade made for one job, cutting and mending quills.
Knife, fork, and pen knife, 17th century, The Metropolitan Museum of Art, New York. Public domain (Open Access).
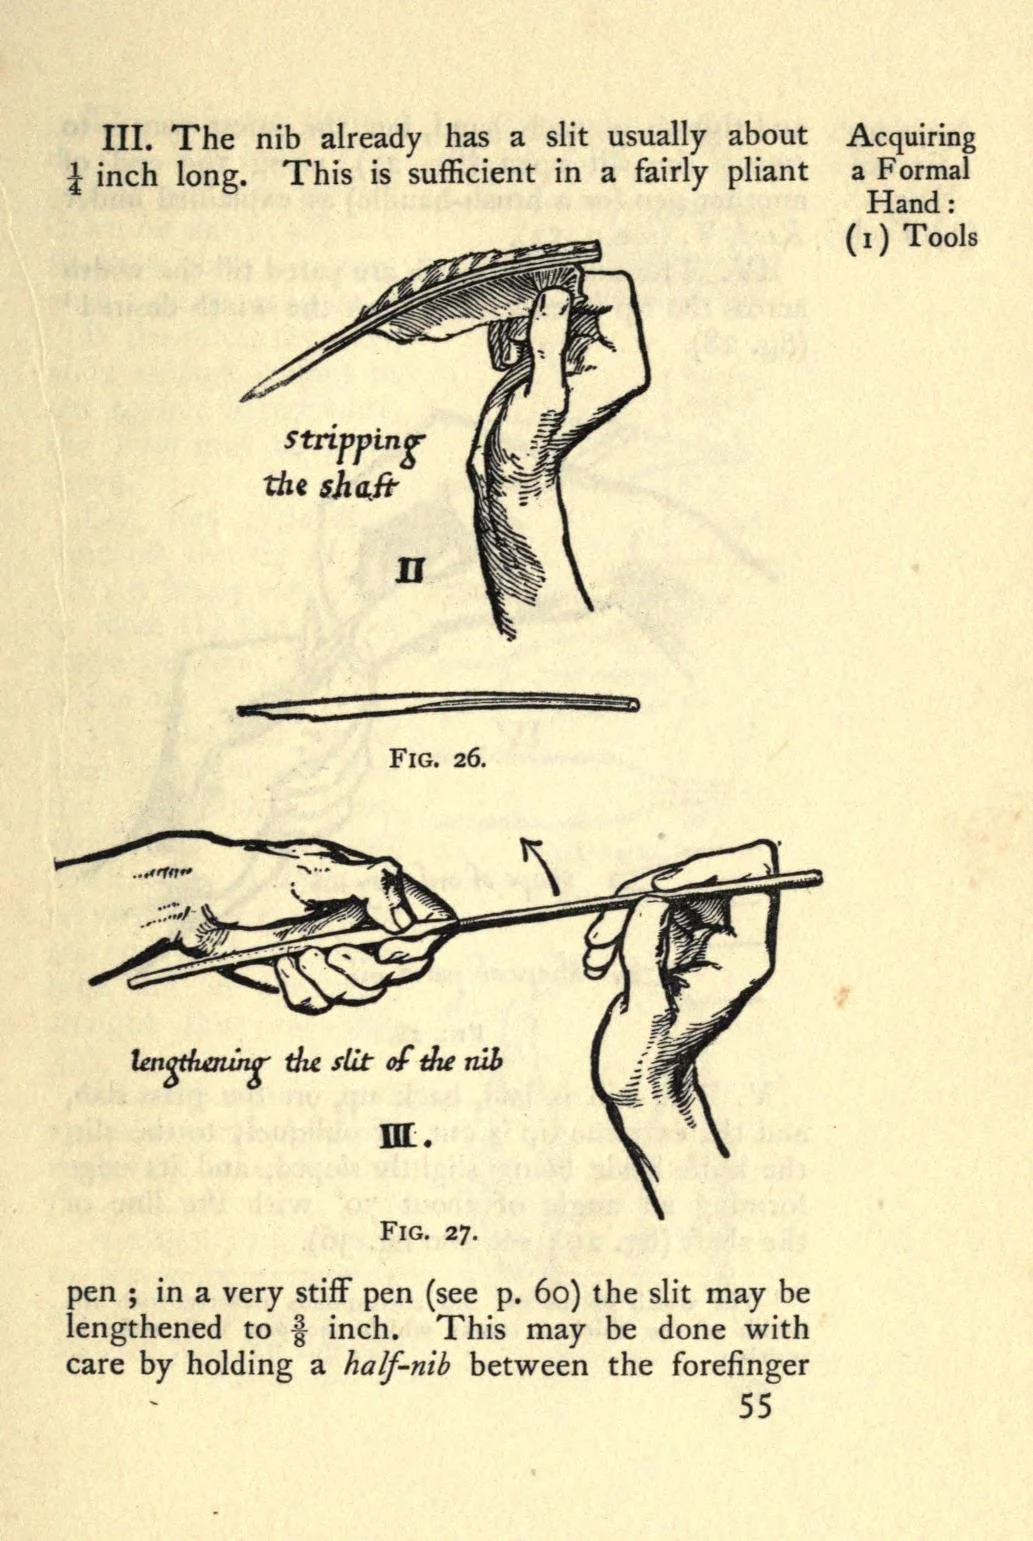
Johnston's own hands at this lesson's work: stripping the shaft, then lengthening the slit of the nib, the first moves of the sequence you are about to practise.
Edward Johnston, Writing & Illuminating, & Lettering (1906), p. 55, via the Internet Archive. Public domain.
What follows is the cutting sequence as taught in the living tradition, the order of operations that turns a cured quill into a pen. Read all the steps before you begin. Work slowly. Keep your fingers behind the blade's path at all times, and cut away from your body.
★ Safety first, and I mean it. Use a sharp blade: a dull knife slips, and a slipping knife is what causes injuries. A craft knife or a dedicated penknife is ideal. Students working at Level One will practice every cut on model materials before touching a feather. Students working at Level Two will cut real quills only with an adult present, only on a stable cutting surface, and only with the blade moving away from the hand that holds the quill. There is no assignment in this class worth a cut finger.
Step one: prepare the shaft. Begin with a cured quill, the kind you prepared in Lesson 9. Strip away the barbs from the lower portion of the shaft for a comfortable grip; the upper feather may be left for beauty or stripped for balance, as you prefer. Clear the dried membrane from inside the lower shaft with the tip of the knife or tweezers.
Step two: shape the underside. Lay the quill on the mat with the underside facing up, held steady by your free hand behind the blade's path. With the knife, make a long, shallow scoop cut along the underside of the tip, removing the softer inner wall and thinning the nib from below. Take thin shavings; you can always remove more, and you cannot put material back.
Step three: form the shoulders. Turn the quill over. Cut away the sides of the tip in smooth curves, flaring outward to the full width of the shaft, forming the shoulders. The nib should now look like a small spade or spearhead: narrow at the writing end, widening to the barrel.
Step four: cut the bevel. Cut the very tip of the nib to the desired shape. For a square broad-edge nib, cut straight across. For general writing, a slight oblique angle suits most hands. The bevel is the last shaping cut, and it defines your line.
★ Step five: cut the slit. This is the most delicate operation. Place the tip of the knife at the center of the bevel and press or draw the blade upward along the middle of the nib, splitting the quill for a short distance, roughly five to ten millimeters. The slit must be centered: an off-center slit feeds one tine more than the other, and the pen will write unevenly, blob on one side, or starve on the other. One clean motion is better than several hesitant ones.
Step six: test and refine. Dip the nib and write. If the line is too broad, trim the bevel narrower. If ink floods, the slit may be too long; if the pen starves, the slit may be too short or clogged. If one tine writes darker than the other, the slit is off-center or the tines are uneven, and the honest remedy is to cut back and begin the tip again. Adjust in small increments.
★ You will notice that the sequence moves from the gross to the fine, from the structural to the delicate. There is a reason for this order: each step depends on the ones before it, and the slit, the most unforgiving cut, comes after the nib's shape is already established. Do not cut the slit first. The tradition puts it fifth for a reason.
Check in: Why does the slit come fifth in the sequence and not first? What must already be true of the nib before that cut is safe to make?
❦ In your workbook: record the cutting sequence in order — shaft, scoop, shoulders, bevel, slit — and the reason the slit waits until fifth, in your own way — copy, sketch, or note what matters.
In your packet: Exercise II — The Cutting Sequence Record ◐ begins here. Work it now, or mark the place and take it as homework — your choice.
Shaping for the Script
Not every nib is cut the same, because not every script asks the same of the pen. The scribe matched the bevel to the hand, and you will do the same when you reach Unit IV.
The square-cut nib, beveled straight across, is the broad-edge pen: the full width of the tip lays down a thick stroke, the corner draws a hairline. This is the nib of blackletter, of uncial, of the Roman capitals. Its line has strong contrast between thick and thin, and it rewards a steady pen angle.
The oblique-cut nib, beveled at a slant, suits the everyday cursive hands and general writing. It is forgiving, versatile, and the cut most beginners should learn first.
The pointed nib, narrowed to a fine tip, serves delicate work: hairlines, ornament, the flourishes you will study in Unit V. It demands a light hand and a well-centered slit, because there is less material to forgive error.
As you cut, remember Drogin's refinement: the slit need not always sit dead center. Advanced cutters sometimes offset it slightly so that one corner of the nib can pull extended hairlines for ornament. Learn the centered slit first. Earn the offset slit later.
❦ In your workbook: record the three bevels — square, oblique, pointed — and the scripts each one serves, in your own way — copy, sketch, or note what matters.
In your packet: Exercise IV — Bevel and Script Matching ⚒ begins here. Work it now, or mark the place and take it as homework — your choice.
Mending: The Pen Outlives the Point
Here is the truth that separates the student from the scribe: the quill nib is consumable. Writing wears the bevel down, the tines blunt, the slit clogs or the tip splits. A hard-used quill might need mending within a few pages. The medieval scribe did not throw the quill away; the scribe mended it.
Mending follows the same logic as the original cutting, shortened. Cut back the worn tip past the damage. Reshape the bevel. If the slit has grown too short relative to the new tip, lengthen it with the same centered motion. Test, refine, and return to work. A single quill could be mended many times, growing shorter with each mending, until too little shaft remained to hold comfortably. Then, and only then, did it retire to the wastebasket that taught you so much.
This is why the penknife never left the desk, and why I told you in Unit I that it was the most versatile tool the scribe owned. Shaper, eraser, third hand, and now: surgeon. The knife that makes the pen also keeps it alive.
Check in: A quill writes worse this morning than it did yesterday. Before reaching for a fresh feather, what does the scribe do, and in what order?
❦ In your workbook: record the mending cycle — cut back, reshape, check the slit — and why the pen outlives its point, in your own way — copy, sketch, or note what matters.
In your packet: Exercise III — The Mending Study ◐ begins here. Work it now, or mark the place and take it as homework — your choice.
Guided Practice
Guided Observation: Reading a Nib
Before you cut, learn to read. Obtain a prepared quill, a manufactured quill pen, or study the detailed photographs linked in the Further Reading section.
Examine the nib with a magnifier if you have one, and record:
- the shape of the bevel: square, oblique, or pointed
- the slit: its length, its straightness, whether it sits centered between the tines
- the tines: are they even in width and length, or does one dominate
- the shoulders: the curve where nib meets shaft, symmetrical or otherwise
- the scoop: turn the nib over and observe the thinning on the underside
Write one sentence for each feature explaining what job it does. Then, if you have a previously cut quill that writes poorly, diagnose it: which feature is at fault, and what cut would correct it? The scribe's eye is trained on the nib before the knife ever moves.
Demonstration: Practice Cuts
Work through these exercises in order. Do not skip the model materials: the motions must live in your hands before a feather is at stake.
Materials note: Level One uses drinking straws, wooden dowels, or sturdy plastic straws as practice stock, plus a craft knife and a cutting mat. Level Two uses real cured quills (prepared in Lesson 9), a sharp penknife or craft knife, a cutting mat, and adult supervision. The safety rules below apply at both levels.
Exercise A: The Scoop Cut (model material)
On a plastic straw, practice the long shallow scoop: lay the straw on the mat and hold it firmly there, fingers behind the blade path, and cut away from you along the underside, removing thin curls. Aim for a smooth, even thinning. Repeat until the motion feels controlled and the shavings come off evenly.
❦ Workbook path: working on paper instead? Sketch the scoop cut in profile three times — before the cut, mid-shaving, and after — labeling the softer inner wall that comes away and the harder outer surface that stays.
Exercise B: Shoulders and Bevel (model material)
On a fresh straw, cut the sides in smooth curves to form shoulders, then cut the tip square across. (A wooden dowel, if you have one, teaches the same shoulder curves in harder stock.) Compare your result to the nib diagram: does the profile flare correctly? Is the bevel straight? Cut three in succession and lay them side by side; consistency is the goal.
❦ Workbook path: working on paper instead? Draw the nib profile three times, side by side as the drill lays them: the sides curving out to the full width of the shaft, the bevel straight across. Beneath each drawing, note where the curve is hardest to keep smooth.
Exercise C: The Slit (model material, then quill)
On a straw nib, practice the centered slit: knife tip at the middle of the bevel, one smooth upward motion. Check centering by sighting down the nib. Then, and only then, with supervision at Level Two, repeat the full sequence on a real cured quill: prepare the shaft, then scoop, shoulders, bevel, slit. Dip, test, refine.
❦ Workbook path: working on paper instead? Draw a bevel face at large scale and mark its exact center; then draw the same bevel with the slit a hair off-center, and write beneath it what the off-center pen would do on the page.
Exercise D: The Mending Drill
Take a worn or deliberately blunted practice nib and mend it: cut back past the damage, reshape the bevel, check the slit length. Time yourself on the third repetition. Speed will come; tonight, accuracy is everything.
❦ Workbook path: working on paper instead? Sketch a blunted nib, then the same nib after the three mending moves — cut back, reshaped bevel, checked slit — labeling what each move removes or restores.
Safety rules, always: blade sharp, not dull. Fingers behind the cutting edge. Cut away from the body. Stable surface, good light. Stop when tired; most slips happen when attention fades. At Level Two, an adult stays within arm's reach for the entire session.
Materials
Level One — household items (practice all cuts on model materials)
- Plastic drinking straws or wooden dowels: your practice stock. Sturdy straws cut most like quill; dowels teach the shoulder curves.
- Craft knife: a sharp craft knife with a fresh blade.
- Cutting mat: a self-healing mat, a thick magazine, or a scrap board.
- Magnifier (optional): a loupe or magnifying glass for reading your nibs.
- Ink and paper: any dip ink and scrap paper for test writing.
Level Two — historically closer (real quill cutting, with supervision)
- Cured quills: prepared in Lesson 9. Bring at least three; you will ruin the first.
- Sharp penknife or craft knife: kept wicked sharp and used for nothing else during the session.
- Cutting mat and tweezers: for clearing membrane from the shaft.
- An adult supervisor: present for the entire session, as above.
- Dip ink and test paper: for the test-and-refine stage.
Level One students perform every cut on model materials and are not expected to cut a feather. The motions, the order, and the diagnosis are the lesson; the feather can wait until supervision is available.
Reflection Questions
Answer the following questions in your workbook.
- Why does the cutting sequence proceed from the scoop to the shoulders to the bevel to the slit, rather than in some other order?
- What happens, mechanically, when the slit is cut off-center?
- Why is a sharp blade safer than a dull one for quill cutting?
- What does the word "penknife" tell us about the historical relationship between the knife and the pen?
- Why did scribes mend quills rather than simply cutting new ones?
- How does the bevel shape determine the character of the written line?
- You have now studied the feather (Lesson 9) and the cutting (Lesson 10). What does the cured but uncut quill lack that only the knife can give it?
Workbook Checklist — Lesson 10
In my workbook I have:
- ☐ named the parts of a cut nib — slit, tines, shoulders, scoop, and bevel — and stated each part's job (Exercise I)
- ☐ explained how the slit carries ink to the writing point by capillary action
- ☐ written out the cutting sequence in order, and why the slit comes fifth, after the nib's shape is established
- ☐ explained why the slit must be centered, and what an off-center slit does to the line
- ☐ matched the square, oblique, and pointed bevels to the scripts each one serves
- ☐ defined mending, and explained why the penknife never left the scribe's desk
- ☐ made my practice cuts safely on model materials, following the safety rules (Demonstration), and — with supervision, at Level Two — cut a working quill nib
☐ Lesson completed Date: ___ Signature: ___
Professor's Review
And so the feather becomes a pen.
Look at what your hands have learned tonight. You can name every part of the nib and state its office. You know the order of the cuts and the reason for the order. You know why the slit must run true, why the bevel shapes the line, why the shoulders bear the strain. And you know the scribe's deepest economy: that the pen is not used up but renewed, mended and mended again, until the shaft itself gives out.
Keep your practice nibs. Date them. In a month's time, cut another and set it beside the first, and you will see your own hand learning in the keratin. That is the quietest and most honest examination this school offers.
Next lesson, we compare the two great families of nibs: the broad edge and the pointed pen. Bring a cut quill. You will need it.
PROFESSOR QUILLBERRY NOCTURNE
Scrollwork Library
Master Scribe & Illuminator
Cross-Class Connections
Creative Arts · Unit I, Lesson 3 — Cutting, Scoring & Clamping
Professor Timberclank's sealed note in this very lesson sends you to his bench for the full handling lesson: the mat, the road the blade travels, the work held fast. His scholars learn the grip and the guard as a craft in itself; mine learn why this knife exists. Take both lessons, and the blade will be honest in your hand.
Creative Arts · Unit I, Lesson 3 — Cutting, Scoring & Clamping
Professor Nocturne's sealed note in this very lesson sends you to my bench for the full handling lesson: the mat, the road the blade travels, the work held fast. My scholars learn the grip and the guard as a craft in itself. Take both lessons, and the blade will be honest in your hand. I will be watching that hand, mind — slowly, and away from the fingers.
PROFESSOR COGBRANCH TIMBERCLANK
Creative Arts Workshop
Runes · Lesson 18 — The Celtic Manuscript Tradition
In Webblethorn's Celtic lesson, the wedge-topped letters of the Insular hand are fossils of the nib you cut tonight: the scribe sets the full width of the nib down and lifts as the stroke climbs, and the ink trails off into a wedge. Read her ascenders after this lesson and you will see your own bevel at work, a thousand years old.
Runes · Lesson 19 — The Birth of Lowercase
Webblethorn's Carolingian scribes wrote their new lowercase with this same feather instrument, and her lesson sends her scholars to this room to learn its cutting — she says the hand and the tool were made for each other. Cut your nib here; then go and write her minuscule with it.
Runes · Lesson 18 — The Celtic Manuscript Tradition
In my Celtic lesson, the wedge-topped letters of the Insular hand are fossils of the nib you cut tonight: the scribe sets the full width of the nib down and lifts as the stroke climbs, and the ink trails off into a wedge. Read my ascenders after this lesson and you will see your own bevel at work, a thousand years old.
Runes · Lesson 19 — The Birth of Lowercase
My Carolingian scribes wrote their new lowercase with this same feather instrument, and my lesson sends my scholars to Professor Nocturne's room to learn its cutting; the hand and the tool were made for each other. Cut your nib in his library, then come and write my minuscule with it.
PROFESSOR THISTLELOOM WEBBLETHORN
Runes & Ancient Writing

Potions · Unit VI, Lesson 48 — Midnight Carbon & Oak Gall Inks
Muddlenook studies the two ink families this nib must carry, and says plainly that the Scriptorium owns the pen and the hand that guides it. His chemistry explains what your slit is metering; this lesson teaches the metering. Read his reactions beside your cutting, and ink and nib explain each other.
Potions · Unit VI, Lesson 48 — Midnight Carbon & Oak Gall Inks
I study the two ink families this nib must carry, and I say plainly that the Scriptorium owns the pen and the hand that guides it. My chemistry explains what your slit is metering; his lesson teaches the metering. Come and read my reactions beside his cutting, and ink and nib will explain each other.
PROFESSOR CRIMBLEBREW MUDDLENOOK
Potions Laboratory • Master Apothecary • Head of House Meridies
Further Reading & Sources
For scholars who want to go deeper into the cutter's art, these are the places I send my own students first.
*Edward Johnston. Writing & Illuminating & Lettering. Pitman, 1906. (Dover reprint, 2017.)* Johnston at Dover Publications The foundational manual of the twentieth-century calligraphy revival. Johnston, who used quills daily, covers cutting quills, tempering them, and fitting ink reservoirs. The chapter on pen-cutting repays close study; his diagrams of the nib are still the clearest ever drawn.
*Marc Drogin. Medieval Calligraphy: Its History and Technique. Dover, 1980.* The standard student introduction to medieval scripts as living technique. Drogin's quill-cutting instruction includes refinements such as offsetting the slit for ornamental hairlines, and his history chapters connect the cut of the nib to the shape of the script.
Dartmouth Ancient Books Lab. "The Writing Instrument (The Reed and Quill) and Ink." Dartmouth: Reed and Quill A student laboratory account of making and writing with quills, including the natural slit of the feather shaft, the 70-degree nib cut, and hands-on observations of ink behavior. Honest about what works and what frustrates.
Browse the Scrollwork shelf in the school Library for readable editions of these works.
A commission is only as true as the pen it assumes. Every height the Desk states is measured in pen widths, so the nib you cut tonight is the ruler the whole plan is drawn with. Cut it as this lesson teaches, then let the Desk plan to its measure.
The Commission DeskPROFESSOR QUILLBERRY NOCTURNE · SCROLLWORK LIBRARY
Submit your work for this lesson using the form below.
CONTINUE IN THE SCROLLWORK LIBRARY
← Previous · Lesson 9: Feather Structure & Curing Next · Lesson 11: Broad Nibs & Pointed Nibs →
Unit III — Quills & Pencraft Scrollwork Library — All 26 Lessons
The rest of Unit III: Lesson 9 · Feather Structure & Curing · Lesson 11 · Broad Nibs & Pointed Nibs