

Creative Arts
Unit VI, Lesson 25Drying Racks, Screens & Bench Furniture
Professor Cogbranch Timberclank
Master Artisan, Head of House Occidens
The Creative Arts Workshop • School of Evershade
Professor's Introduction

Set up your bench, scholars. This lesson builds furniture for other people's work, which is the workshop's oldest job.
A harvest dries well or it molds, and the difference is rarely the plant. It is the air: whether the air can reach every leaf, from below as well as above, in a dry room, out of the sun. The still rooms of the great houses — the working rooms for household compounds: preserves, distilled waters, candles, soap, medicines, and dried herbs and flowers, part laboratory, part store room, wholly practical — solved this with slatted shelves and an adjoining stove room, and the racks and screens this lesson builds are that solution at scholar scale. A rack is a frame carrying slats, mesh, or cords, on which material is spread or hung to dry with air on all sides; a screen is a sheet of mesh stretched in a frame, the harvest lying in one layer with air beneath it on a drying screen, and the same construction sorting by size in a sieve. Professor Fernfoot teaches what to dry and when to cut it, in the Greenhouse. What it lies on while it dries belongs to this bench.
The second half of the lesson furnishes the bench itself. A laboratory bench, like a carpenter's, is defined by how it holds things: the filtration stand that keeps a funnel steady above a vessel, the tray that carries glassware without a wobble, and behind them both the Roman bench with its holdfasts, and the shaving horse, a bench that is also a clamp, sat astride and worked with the feet. A holdfast is a hooked iron bar dropped through a hole in the bench top, set with a mallet tap so its shaft wedges fast and grips the work, and released with a tap on its back; it has been in use since Roman times, on the usual reading of a Herculaneum fresco. Scholars who build the furniture a room works on understand the room differently afterward. Professor Muddlenook's laboratory will hold this lesson's work for years. Build it like it.
Level One scholars will build with screws and brackets under Lesson 4's fastening. Level Two scholars will fit the joints: lapped frames, pegged corners, wedged tenons. Both levels deliver the same racks, screens, stand, and tray.
PROFESSOR COGBRANCH TIMBERCLANK
Creative Arts Workshop
Master Artisan, Head of House Occidens

Lesson Objectives
By the end of this lesson, students should be able to:
- Explain why air must reach drying material from below as well as above, and name the conditions a drying space needs.
- Build a tray or hanging drying rack with a mesh screen fitted true in its frame.
- Explain the still room's place in the great house and how its drying shelves worked.
- Describe the Roman workbench's holding devices: planing stop, bench dog, and holdfast, and how a holdfast is set and released.
- Build a filtration stand and a vessel tray sized to the laboratory bench they will serve.
- Square a frame reliably, checking diagonals, before any rack stock is cut for the real build.
Your Assignment Packet
This lesson's assignments live in its packet: the Lexicon Handout (every term, course terms marked ◆), the Assignment Manual, and the Reflection Questions. Download the packet before you begin and keep it beside you as you read — work from it as each subject is taught, or take the assignments as homework afterward.
The Still Room and the Drying Loft
From medieval times, most great houses, castles, and large establishments in Europe kept a still room: the room where the household's compounds were made and kept. Candles, furniture polish, and soap came out of it, and preserves, syrups, distilled waters, and home medicines, and through it passed the garden's harvest, herbs and flowers preserved for flavoring and use through the winter. The lady of the house was originally in charge of it and taught its skills to her daughters; later it belonged to the housekeeper and the still room maid. It was, in the plainest sense, the house's laboratory and pharmacy in one room, and its records were the household receipt books, handwritten collections valued enough to be bequeathed in wills.
For this lesson, the detail that matters is the drying. A Renaissance still room might have an adjoining stove room, a small stove and slatted shelves for drying, and the principle on those shelves is the whole technique of this lesson: warm, dry air, moving, reaching the material from every side including beneath. Bundles hung from ceilings and racks in lofts served the same end across humbler houses. Drying fails in still, damp air and succeeds in moving dry air, and it has never depended on heat alone. The racks and screens below are the slatted shelves, rebuilt at the scale of a scholar's harvest: one layer, air beneath, out of the sun, checked daily.
Sieves and Screens Through History
The screen is older than the house it dries in. Sifting grain from chaff is among the first food processes there are, and sieves of woven fiber, hair, and pierced skins served farms and kitchens for millennia before wire mesh. The apothecary's bench used the same tool at finer grades, sorting powders and seeds, and the still room's drying screen is the sieve's cousin laid flat and left still: mesh holding material up in the air, letting what should fall, fall.
Wire mesh, woven on looms from the eighteenth century and cheap once steam looms arrived in the industrial age, made screens even and washable, and it is what Level One scholars will use, in stainless or food-safe form, for harvest work. The maker's part is unchanged since the fiber sieves: a frame that holds the mesh flat and taut, corners that stay square, and edges that do not catch, fray, or trap the harvest in a seam. A screen whose frame racks out of square sags, and a sagging screen pools its load in the middle, where the air cannot reach. Squareness is not neatness here. It is function.
The Roman Bench, the Holdfast, and the Horse
The bench under all this furniture deserves its own history. Rome's workbench was a massive table whose genius was holding: a planing stop to brace a board against, holes in the top for pegs and dogs, and the holdfast, a hooked iron whose shaft drops loosely into a bench hole until its hook touches the work, set fast with one mallet tap as the shaft wedges in the hole, released with a tap on its back. A bench dog is a peg standing in a hole in the bench top, against which work is braced, often with a vise or a second dog: the simplest holding device on the bench, and the oldest in spirit. A fresco found at Herculaneum, destroyed since and known from an engraving, is often read as showing the holdfast in use, which would put it in the first century CE at the latest; Joseph Moxon's Mechanick Exercises of 1678 describes and illustrates it for English joiners, and Roubo's great French treatise does the same a century later. Styles of bench multiplied after Rome, English, Moravian, Scandinavian, and Roubo's French pattern among them, but all solve one problem the same way: mass, stops, and grip, so the work holds still and both of the maker's hands are free for the tool.
The shaving horse solves the same problem by becoming the grip. The worker sits astride a bench whose clamp is worked by the feet on a treadle; the head of the clamp traps the stock against the bench top, and both hands are free for the drawknife. Chairmakers and coopers shaped legs and staves this way for centuries, and bodgers, the itinerant turners of the English woods, built their horses from the woodland itself. The horse is in this lesson as a lesson: the best bench furniture is designed backward from the grip it must give. The filtration stand and vessel tray below are designed exactly that way, backward from the funnel and the vessels they must hold steady.
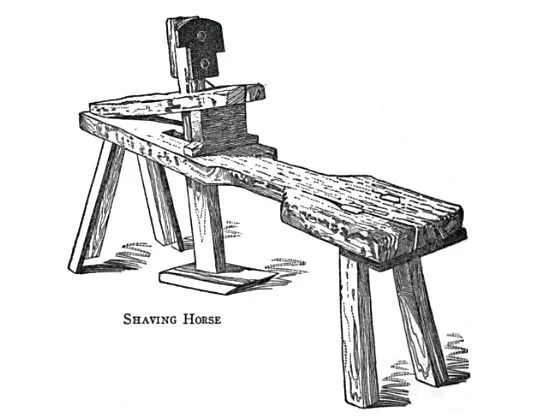
A shaving horse — the sit-astride bench whose foot treadle works a clamp head to grip stock for drawknife and spokeshave work — in a side-view workshop illustration from the *19th Century Knowledge: Carpentry and Woodworking* compilation.
From 19th Century Knowledge: Carpentry and Woodworking (Solon Justus Buck). Public domain, via Wikimedia Commons.
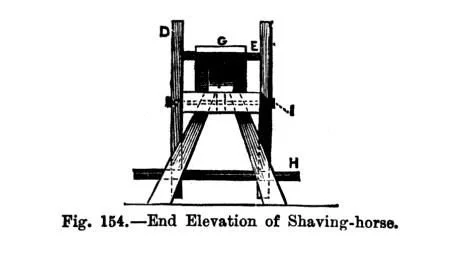
The same shaving horse seen end-on, showing the clamp head and treadle arrangement from the front.
From 19th Century Knowledge: Carpentry and Woodworking (Solon Justus Buck). Public domain, via Wikimedia Commons.
A Sealed Note from Professor Timberclank
This lesson's frames are joined work, and joined work returns us to Lesson 23's saw and Lesson 4's drill, with their rules entire.
Clamp the frame stock. Keep hands behind the cut line and off the saw's road. Drill pilot holes before screws in narrow frame pieces, because a drying rack split at the corner by an unpiloted screw will fail under a wet harvest at the worst hour of the season, which is the hour all preventable failures choose. Stop when a cut binds. We stop, we make it safe, then we begin again.
Two rules of the mesh. Cut wire mesh with snips, never by tearing, and fold or bind every cut edge before the frame is handled barehanded: a raw mesh edge is a row of small knives, and it does not care that the project is nearly done. And fit the screen so it can come out and be washed. A screen fixed forever in its frame will be dirty forever by the second season.
PROFESSOR COGBRANCH TIMBERCLANK
Creative Arts Workshop
Master Artisan, Head of House Occidens
Technique: Frames, Screens, Stands
Squaring a frame. Every build in this lesson is a frame, and every frame is squared the same way. Join the corners, then measure both diagonals corner to corner. Equal diagonals mean square; unequal diagonals name the long corner, which is eased back until they match. Never trust one corner's look. A frame that is out by a quarter inch at the corner is out by the whole harvest's weight at the middle.
The tray rack. Four rails joined at the corners, lapped at Level Two or screwed with pilot holes at Level One, with the mesh stapled or battened across the underside so the top surface sits flat. Battens over the mesh edges serve two purposes: they hold the mesh and they cover its cut edge. Feet or hanging eyes follow the rack's station: feet for a shelf rack, eyes and cords for a hanging one. Size the rack to the shelf or loft it will live in, measured, not guessed.
The hanging rack. A frame hung level from four cords, or a rail with hooks for bundles. Level matters: a hanging rack that tilts slides its load to the low corner. Test it hung and empty, adjust the cords, then load it.
The filtration stand. A base, an upright, and a ring or crossbar at working height that holds the funnel clear above the vessel, steady under a pouring hand. The base must be wide enough that a bumped stand rights itself rather than tipping toward the glass. Build it to the actual funnel and vessel it will serve, measured in the laboratory or from the scholar's own set, and weight the base in wood, not in hope.
The vessel tray. A flat base with a low lip on all four sides, sized to carry the vessels it serves in one layer, with handholds cut or applied at the ends. The lip is a safety device: a vessel that slides meets the lip before it meets the floor. Finish the tray in a finish that wipes clean and tolerates splashes, wax over oil, and renew it as it wears.
Mesh fitting. Cut the mesh a half inch large all round, fold the edges under, and fix it from the center of each side outward, keeping it taut and even. A screen drum-tight is too tight; it should be firm and flat, with the smallest give a fingertip can feel.
Practice Practical: The Tray Corner
This drill is checked for squareness, not speed. All work is in scrap.
- Measure and cut. Bench drill first. From scrap batten, cut four pieces for a small tray frame, two long and two short, measuring the short pieces against the long ones rather than the rule, so the pairs agree.
- Join one corner. Fasten one corner by your level's method: pilot hole and screw at Level One, a fitted lap at Level Two. Keep the faces flush and the outside edges aligned.
- Join the frame and square it. Close the remaining corners loosely, then square the frame by its diagonals before the last fastenings are set home. Adjust until the diagonals match exactly. This is the drill's heart: a frame squared by eye is a frame guessed.
- Fit a practice screen. Cut a piece of mesh or, for the drill, cloth or card punched with holes, a half inch large, fold its edges, and fix it across the frame from the centers outward. It should sit firm and flat.
- Load test. Lay the practice tray across two supports and set a modest weight in its middle: books to the weight of a wet harvest. It should carry without sagging out of square. Note any corner that complains.
- Record and put away. Keep the practice tray, labeled with the date and its diagonal measurements. Note in your workbook what the squaring took: how far out it began, and what brought it true. Tools away, mesh scraps binned, bench clear.
When your diagonals match without being persuaded, your hands have learned what this lesson is for.
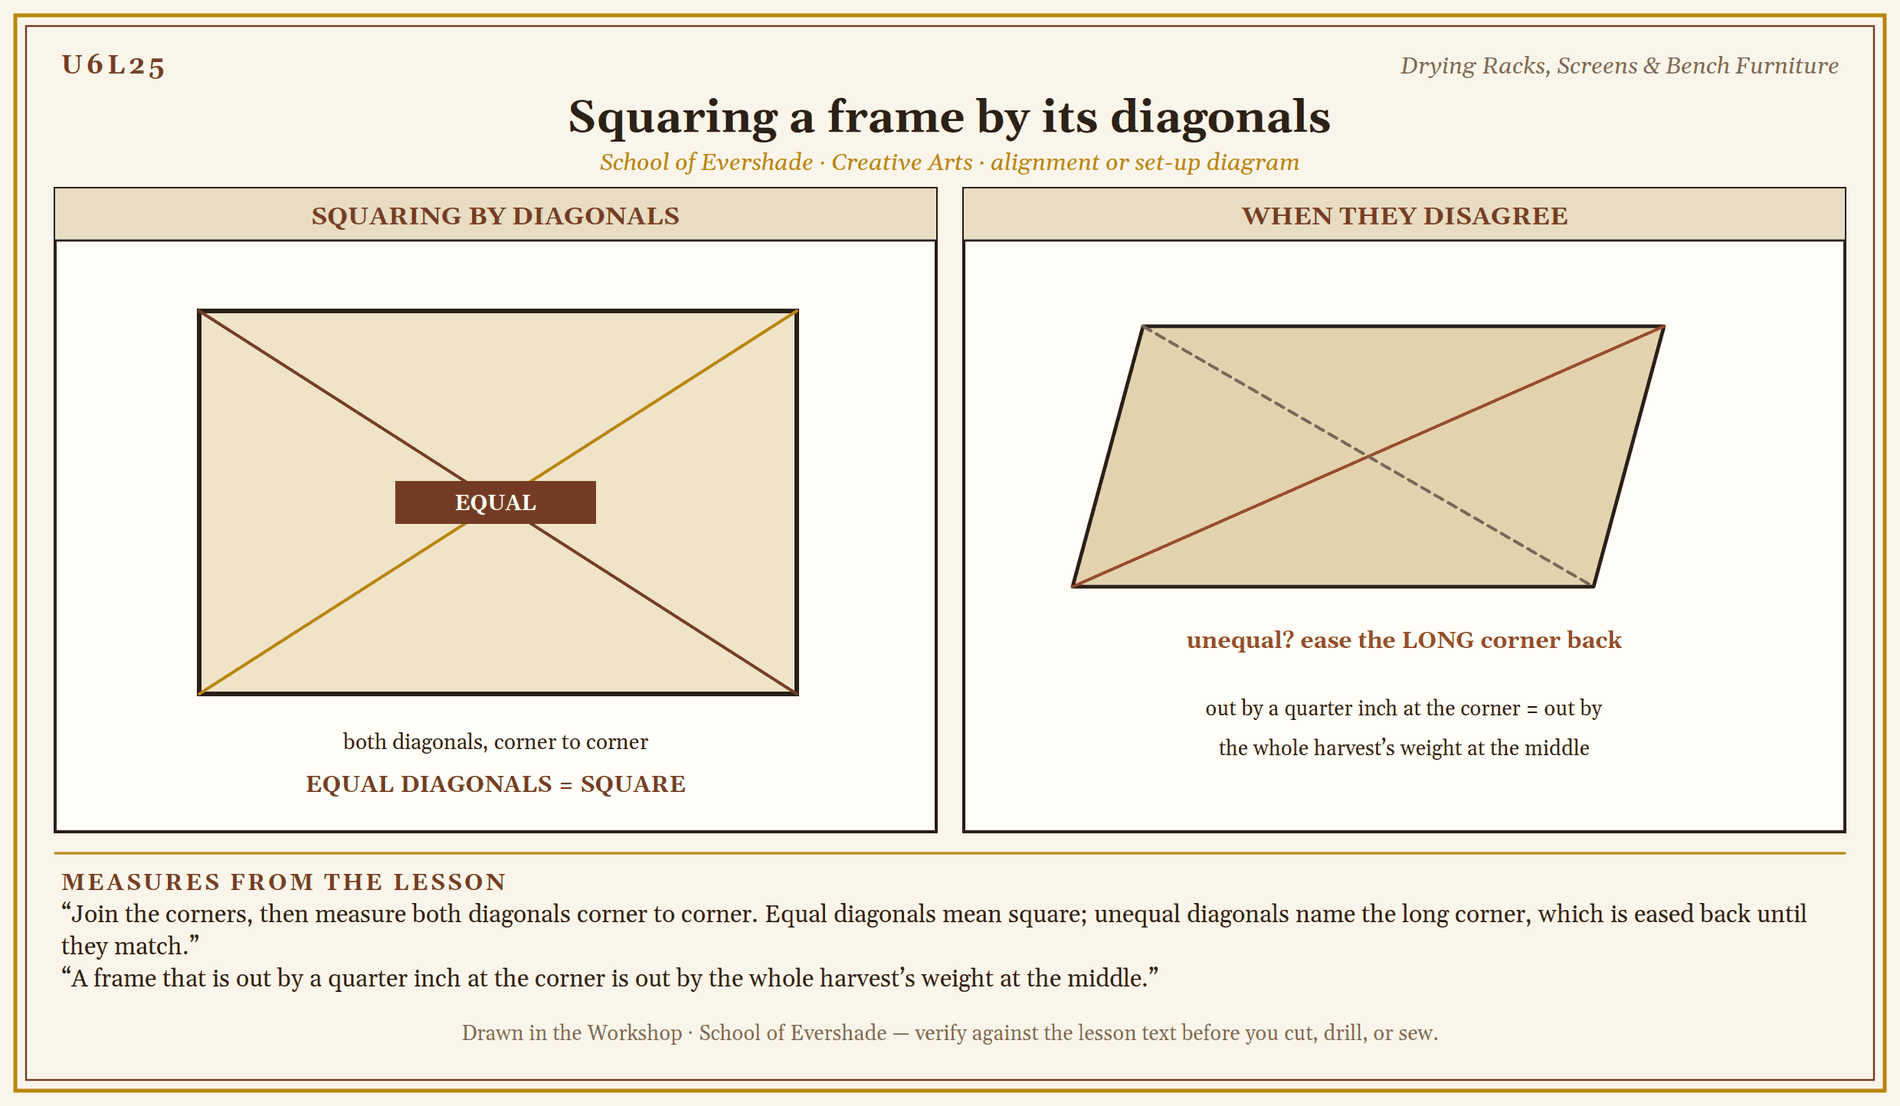
Squaring a frame by its diagonals
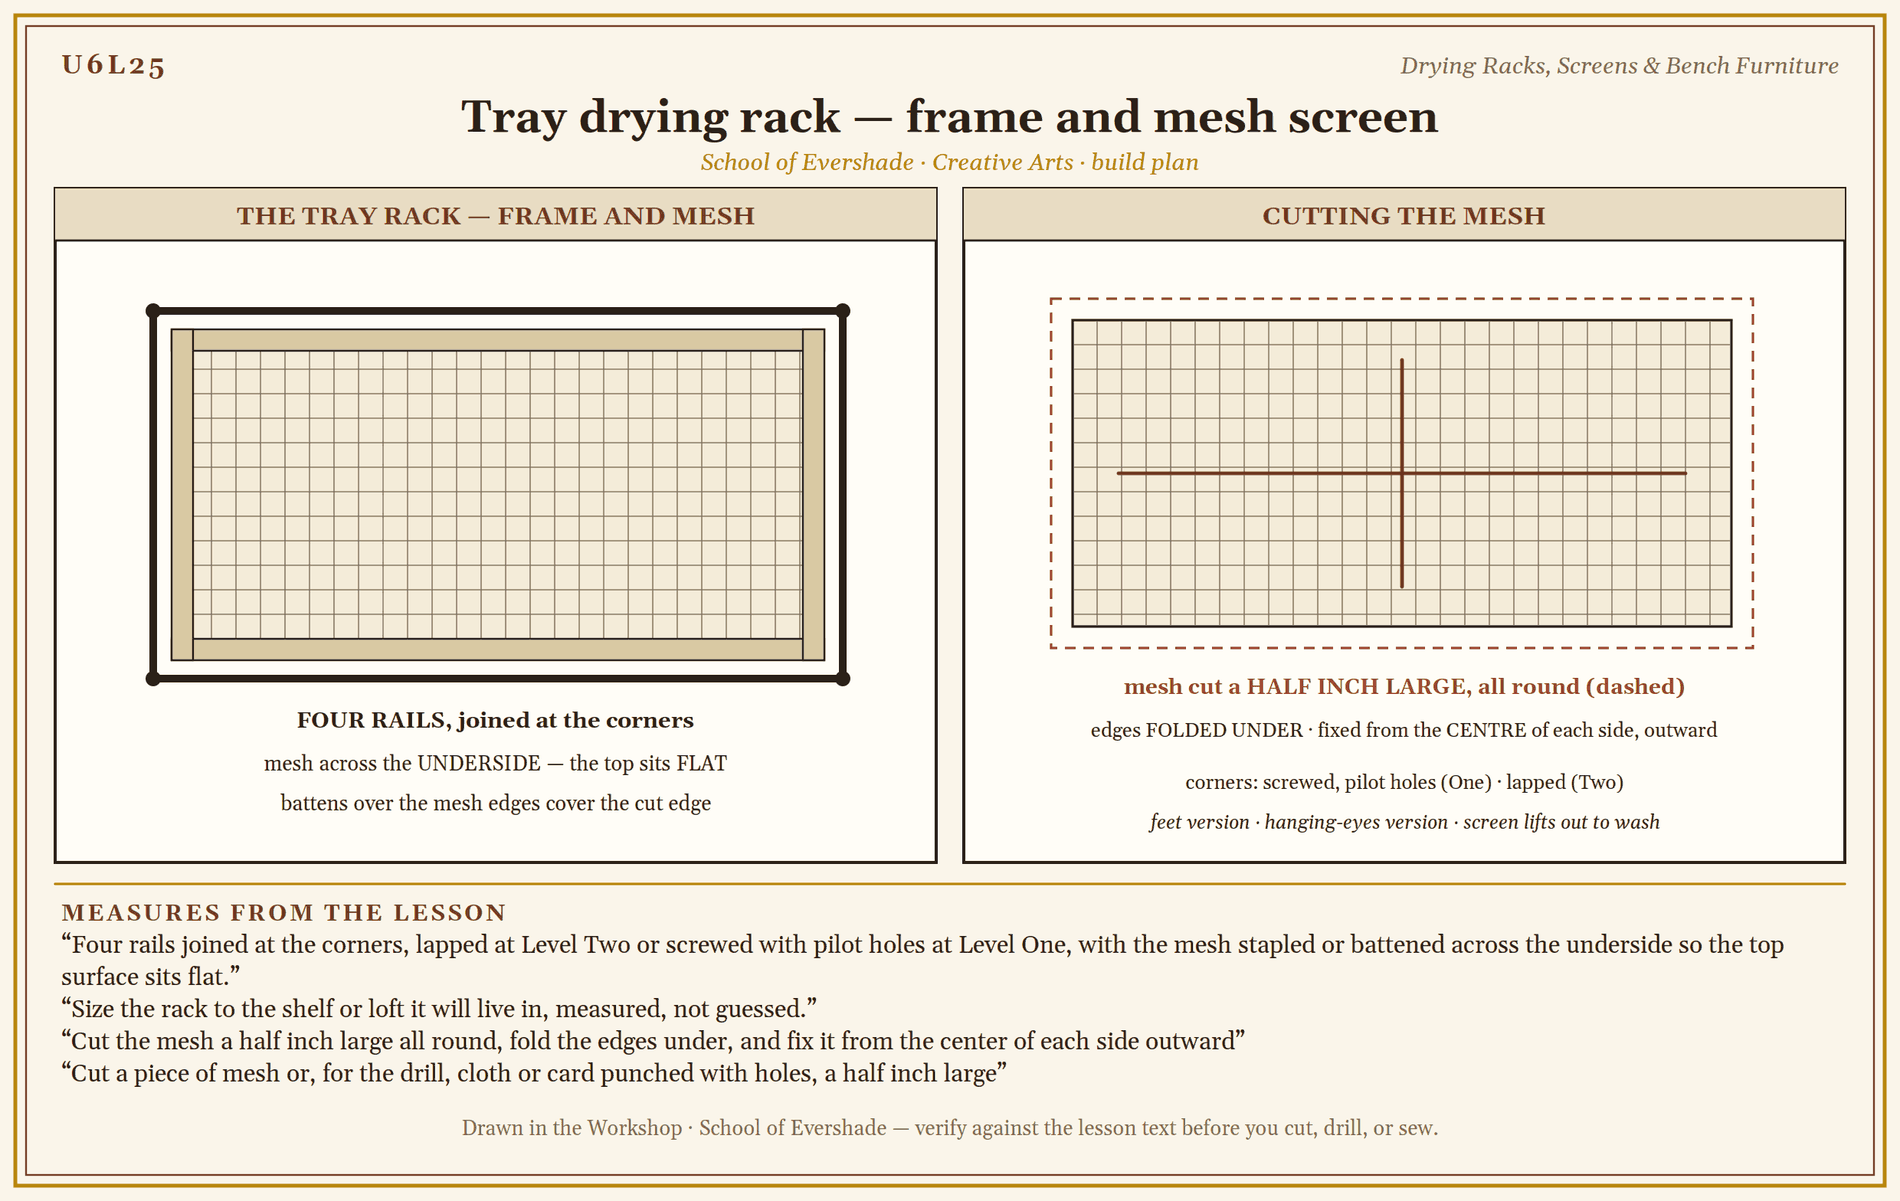
Tray drying rack — frame and mesh screen
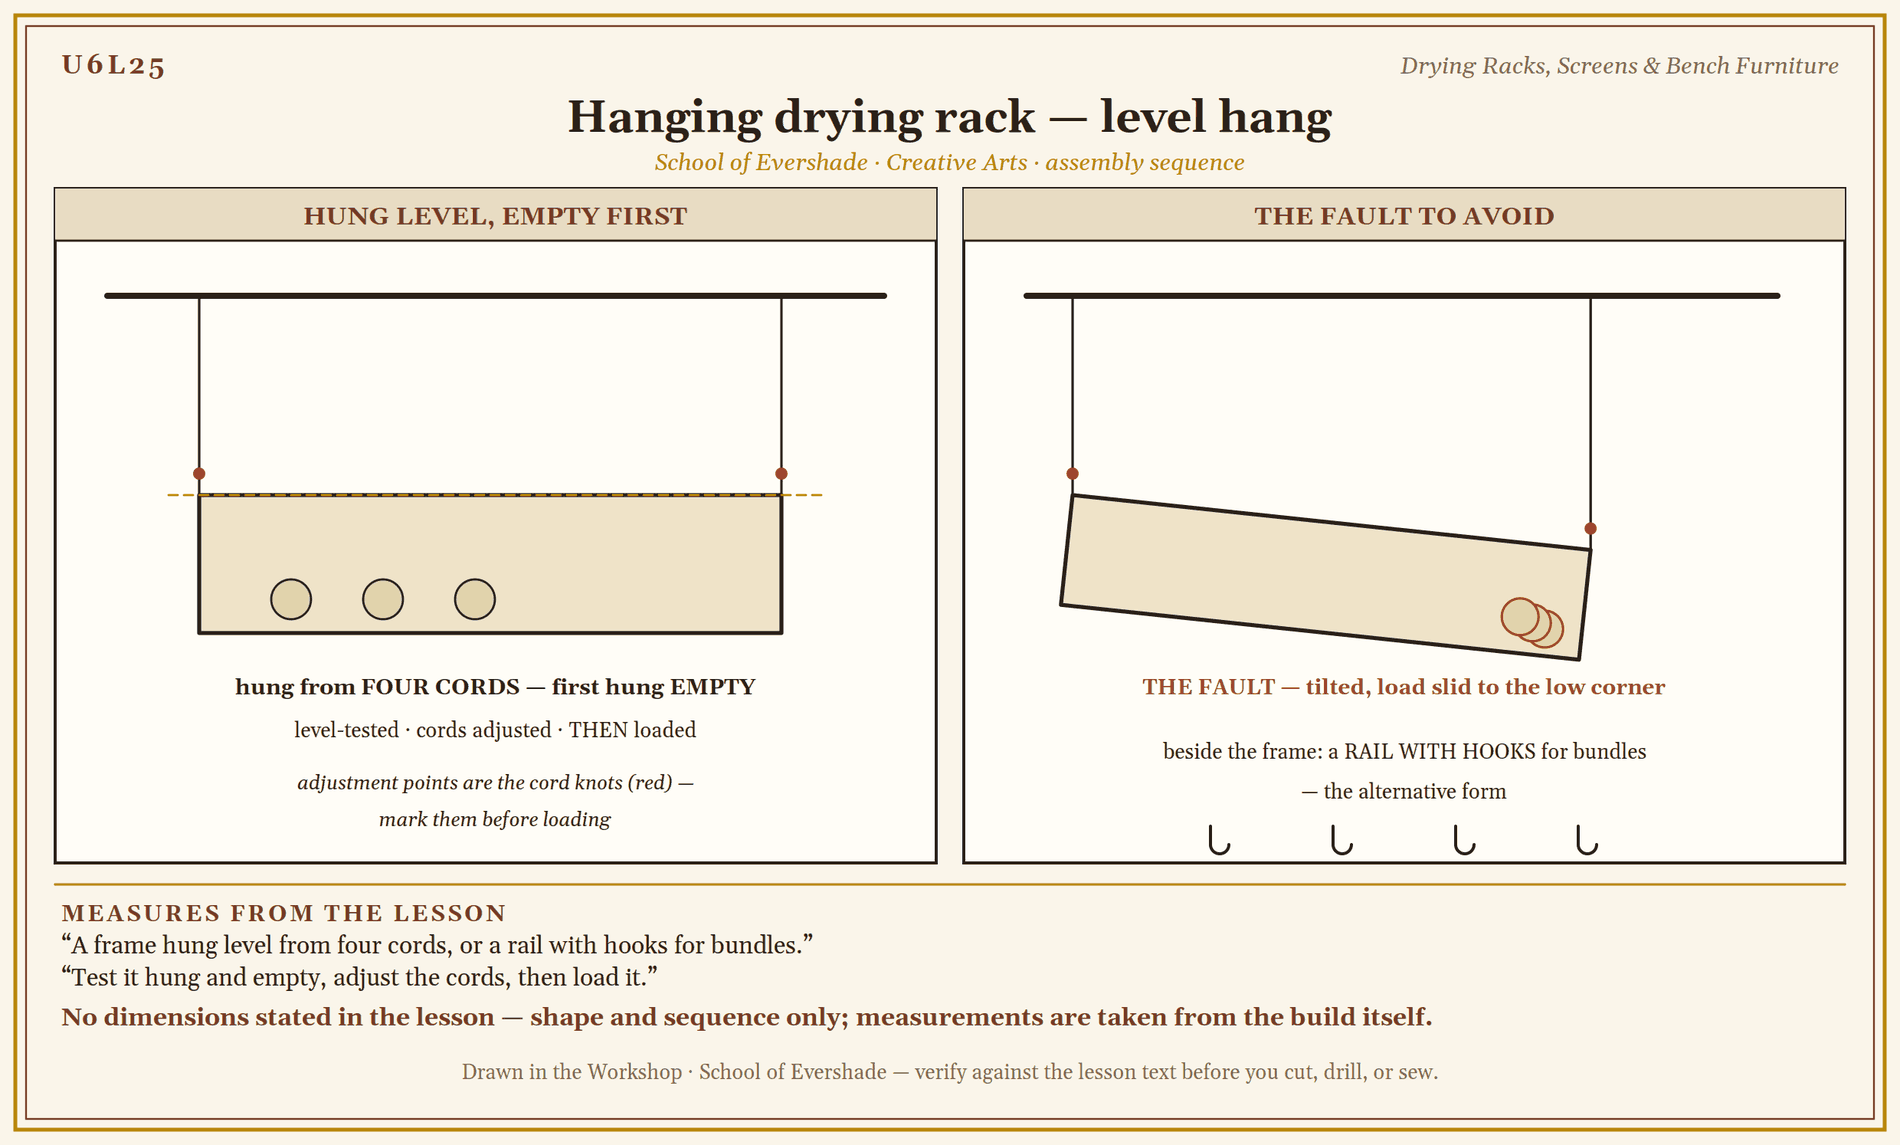
Hanging drying rack — level hang
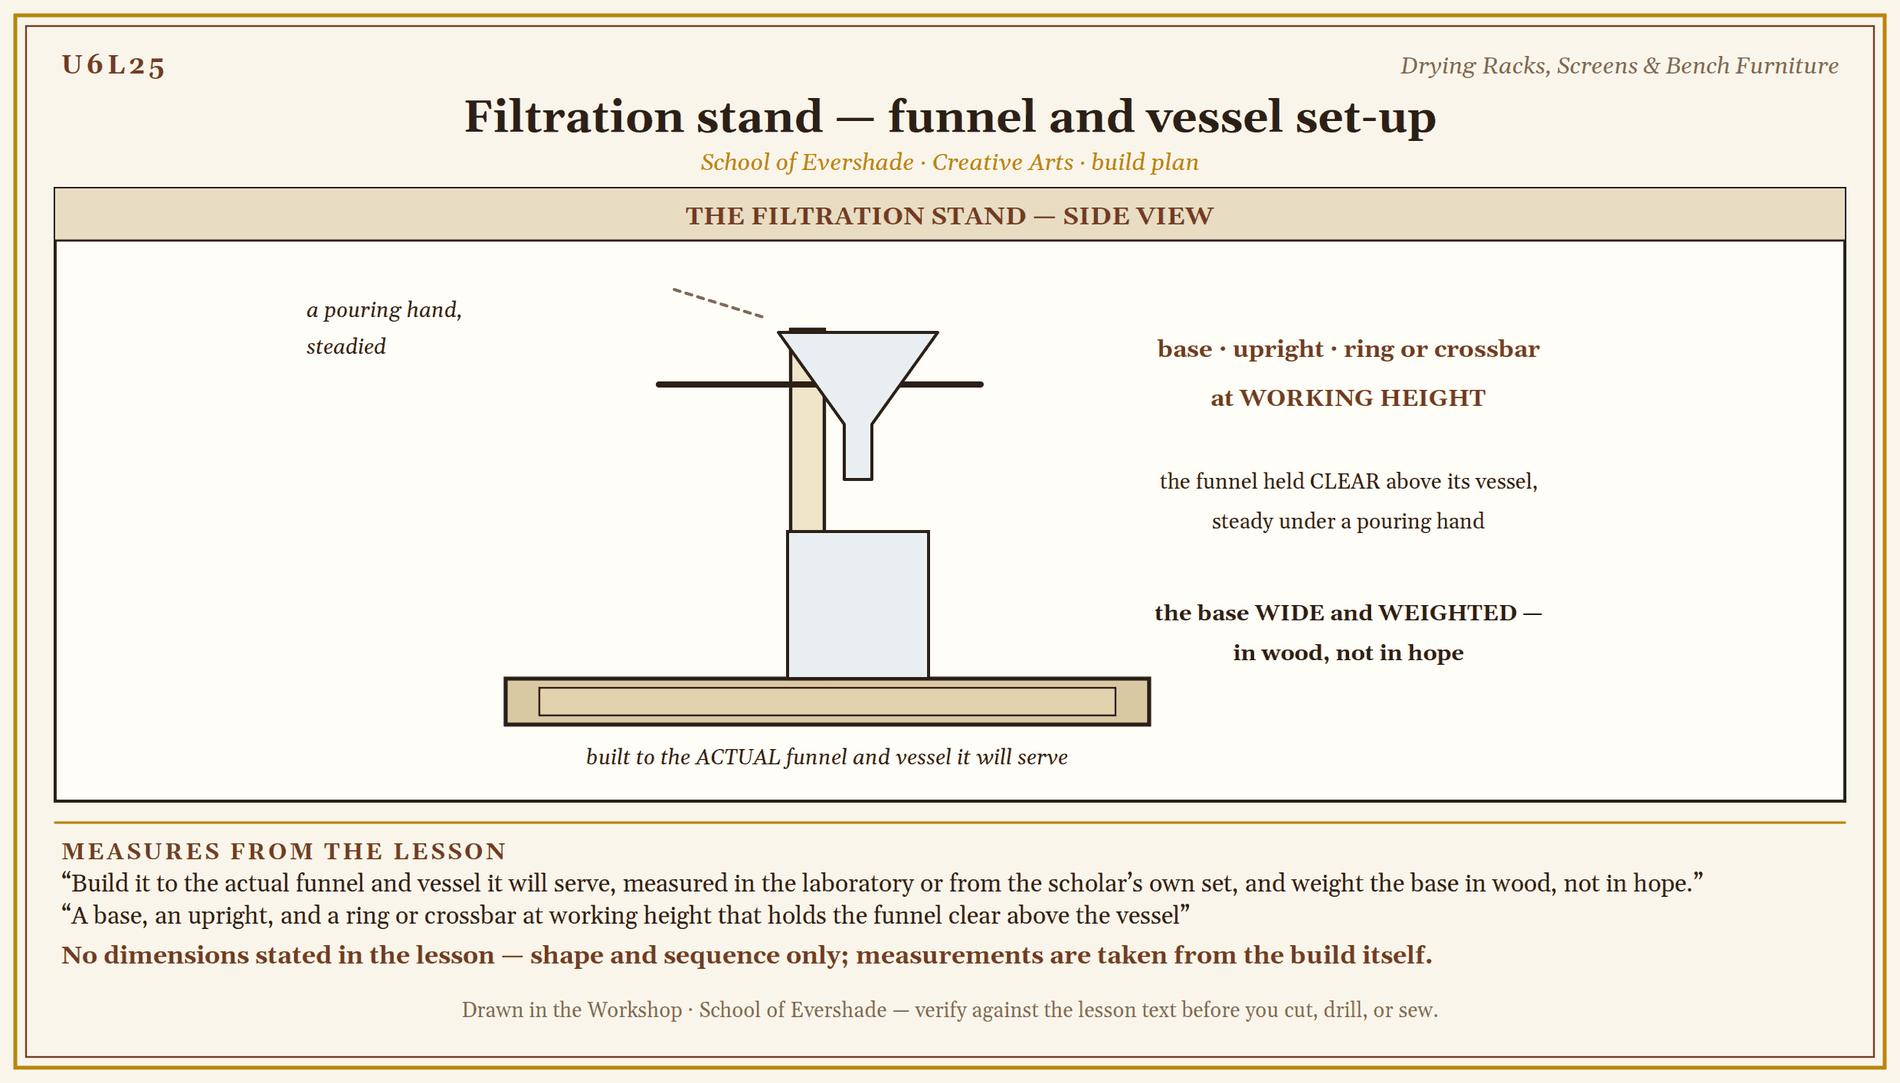
Filtration stand — funnel and vessel set-up
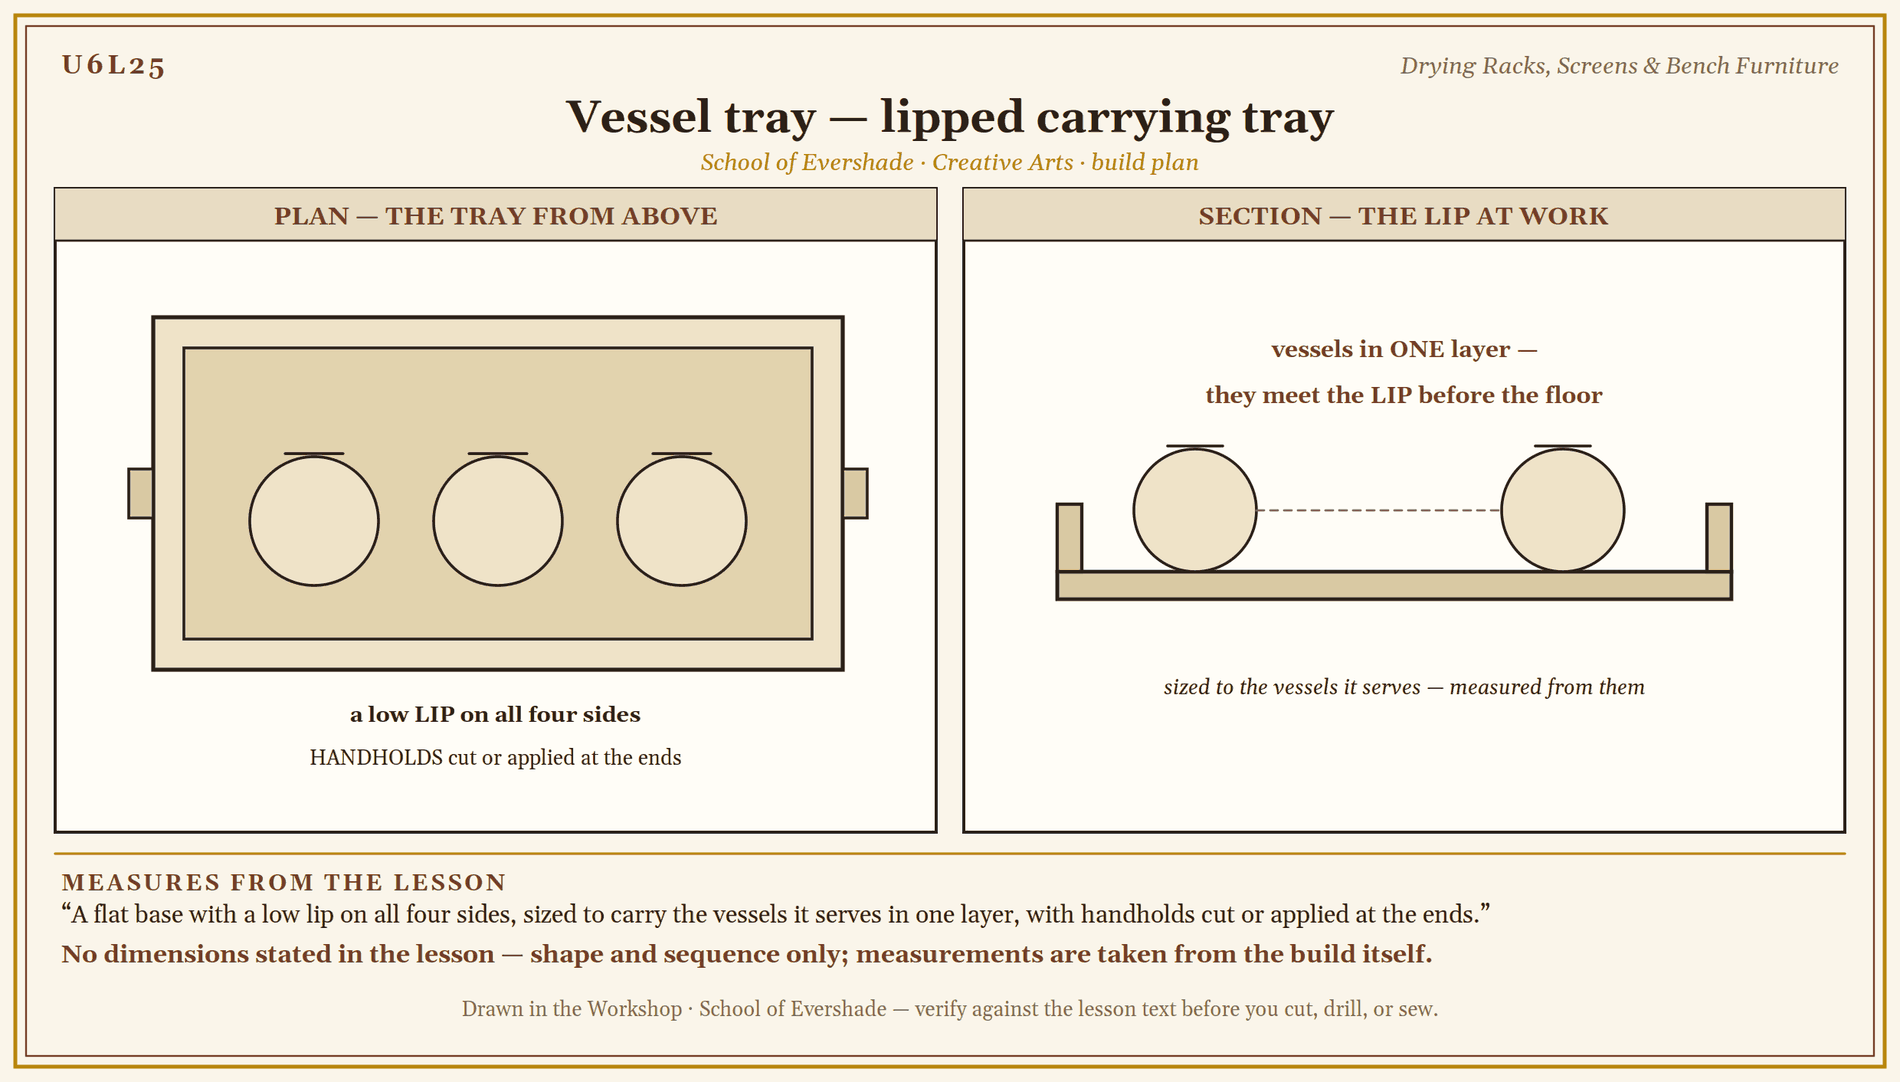
Vessel tray — lipped carrying tray
Assignment Manual
Assignment key: ✎ written work · ⚒ hands-on practical · ◐ both
Assignment I ⚒ — The Practice Practical
Complete the drill in this lesson: a practice tray frame measured, joined, squared by its diagonals, screened, and load-tested, all in scrap. Your labeled tray with its diagonal measurements recorded is the record of the drill.
Assignment II ✎ — The Room That Kept the House
Using the lesson and the sources below, write a short account of the still room in the great house. Include: three different kinds of work done in it, who was in charge of it, and how its drying shelves used moving air. End with one sentence on what the still room became in modern houses.
Assignment III ◐ — Build for the Bench
Build one piece from this lesson for real service: a drying rack or screen for the Greenhouse pattern, or a filtration stand and vessel tray for the laboratory bench. Work from the practice tray's lessons, size it to its real station and vessels, and write a short maker's note: what it serves, what you measured, and where you expect it to wear first. Photograph or sketch the finished piece in place.
Materials
Level One (household)
- Frame stock: lath, batten, or offcut boards for rails; screws, brads, and brackets under Lesson 4's fastening, with pilot holes
- Food-safe mesh: stainless or food-safe plastic screen material, snips for cutting it, and battens to cover its edges
- Cord or chain and eye screws for the hanging rack
- A funnel and vessel from your own set, to size the filtration stand honestly
- Wax and oil finish from Lesson 23, cloth, sandpaper in sequence
- Square, tape, pencil; safety glasses; work gloves for handling cut mesh
Level Two (historical)
Everything in Level One, plus:
- Stock for lapped and pegged frame corners, joined without hardware
- Woven or pierced screen material in the older manner, or a coarser traditional mesh, for one comparison screen
- A holdfast, where one can be borrowed, or a bench with dog holes and dogs for the holding trials
- Hardwood for the filtration stand, weighted in its base
Both levels teach the same craft. Level One fastens with screws and brackets; Level Two fits the joints so the frame holds itself. Either scholar's rack, stand, and tray, squared and in service, are the deliverable of the lesson.
Reflection Questions
Answer the following questions in your workbook.
- Why does air beneath the harvest matter as much as air above it? What happens in the middle of a piled layer?
- Your diagonals disagreed the first time. What had actually gone wrong, and why did measuring find it when looking did not?
- The holdfast has been in use for at least nineteen centuries with no redesign worth mentioning. What makes a tool finished, in that sense?
- A screen that cannot be removed for washing will be dirty by its second season. What other workshop builds carry the same lesson about cleaning and repair?
- Building furniture for another professor's classroom changed what about how you worked? Be specific about one decision it changed.
Professor's Review
Somewhere in this castle there is now a rack that will dry a harvest without molding it, and a stand that will hold a funnel steady while both of a scholar's hands are busy. That is workshop work at its most honorable: unglamorous, load-bearing, and built for someone else's hands.
You have the frame builder's core skill now, the squared corner, and you know why it is a skill of measurement and not of eyesight. You know the still room's air as well as its shelves, and the bench's grip as well as its top. One lesson remains in this unit, and it is the one the whole castle has been waiting for, because everything this school makes and gathers has to be kept somewhere.
Next lesson: shelves, boxes, and storage that lasts, from Egyptian boxes to the seed vaults of the modern world.
PROFESSOR COGBRANCH TIMBERCLANK
Creative Arts Workshop
Master Artisan, Head of House Occidens
Cross-Class Connections

Herbology · Unit IV, Lesson 28 — Drying Herbs the Traditional Way
In my Greenhouse, scholars, a harvest dries well or it molds, and the difference is rarely the plant — it is the air. My lesson teaches the harvest side of drying: what to cut, when to cut it, and how the plant material is prepared and tested for dryness. The racks and screens it dries on are built here, at this bench — frames true and square, mesh fitted so it can come out and be washed, air reaching every leaf from below as well as above. Build the equipment in this workshop, then bring your harvest to my lesson and we will lay it out together.
PROFESSOR BERYL FERNFOOT
Herbology Greenhouse
Further Reading & Sources
Wikipedia. "Still room." The great house's compound room across the medieval, Renaissance, and later periods, including the adjoining stove room with slatted shelves for drying and the receipt books its work was recorded in.
Wikipedia. "Holdfast (tool)." The holdfast's setting and release, its depiction in the Herculaneum fresco, and its descriptions in Moxon and Roubo.
Wikipedia. "Shaving horse." The foot-clamped bench of the chairmakers and bodgers: construction, operation, and its place in green woodworking.
Wikipedia. "Workbench (woodworking)." Bench styles from Roman practice to Roubo and Nicholson, and the holding devices, vises, dogs, and holdfasts, that define them.
Student-friendly starting points for exploring this lesson's world. All links verified October 2026.
- NC State Extension / Let's Preserve. "Drying Herbs" (fact sheet, PDF). The drying science the racks serve: air movement, low humidity, screens and one-layer spreading, and the tests for dryness.
- Smithsonian Magazine. "How to Harvest and Dry Herbs." A practical walk through bundle drying and the suspended window screen method, air beneath the harvest, with storage rules at the end.
Submit your work for this lesson using the form below.
CONTINUE IN THE CREATIVE ARTS WORKSHOP
← Previous · Lesson 24: Counting Boards & Thinking Tools Next · Lesson 26: Shelves, Boxes & Storage That Lasts →
Unit VI · Wood & Furniture Creative Arts Workshop · All 39 Lessons
Bookstore Shelf The Library · Creative Arts Shelf Course Supplies
The rest of Unit VI: Lesson 23 · Wood, Grain & Safe Hand Tools · Lesson 24 · Counting Boards & Thinking Tools · Lesson 26 · Shelves, Boxes & Storage That Lasts