

Creative Arts
Unit VI, Lesson 23Wood, Grain & Safe Hand Tools
Professor Cogbranch Timberclank
Master Artisan, Head of House Occidens
The Creative Arts Workshop • School of Evershade
Professor's Introduction

Set up your bench, scholars. This is the wood ticket, the lesson every wooden build after it depends on, and we will take it at the speed wood deserves.
Wood is not a uniform material, and treating it as one is the beginner's first error. A board is a bundle of fibers that grew in one direction, fed by one tree, in one place, and it remembers all of that. It cuts easily one way and tears the other. It planes smooth with the grain and rough against it. It splits along the grain whether you planned the split or not. The maker's first skill is not cutting. It is reading: looking at a board and knowing, before a tool touches it, what the wood will do. One part of that reading is seasoning: cut wood dries until its moisture settles to match the air around it, and work built from seasoned wood stays close to where the maker put it, while green wood moves as it dries — it shrinks, cups, and checks.
This lesson teaches the reading and the cutting together. You will meet the saw, the plane, the rasp and file, the abrasives, and the simple finishes, and you will meet them standing where their makers stood: at benches in Egypt five thousand years ago, where there were no planes at all and the work was finer than most of ours; in Rome, where the plane appears; and in workshops that smoothed wood with sand and shark skin long before sandpaper had a name. You will also take up the joint layout that Lesson 4 began, and lay out a mortise, a tenon, and a dovetail on practice stock, so the pieces fit together without hardware.
Level One scholars will work with a modern hand saw, a block plane, and sandpaper in graded sheets. Level Two scholars will try the older abrasives and finishes beside them. Both levels learn the same grain, the same tools' logic, and the same standard. The standard is built true.
PROFESSOR COGBRANCH TIMBERCLANK
Creative Arts Workshop
Master Artisan, Head of House Occidens
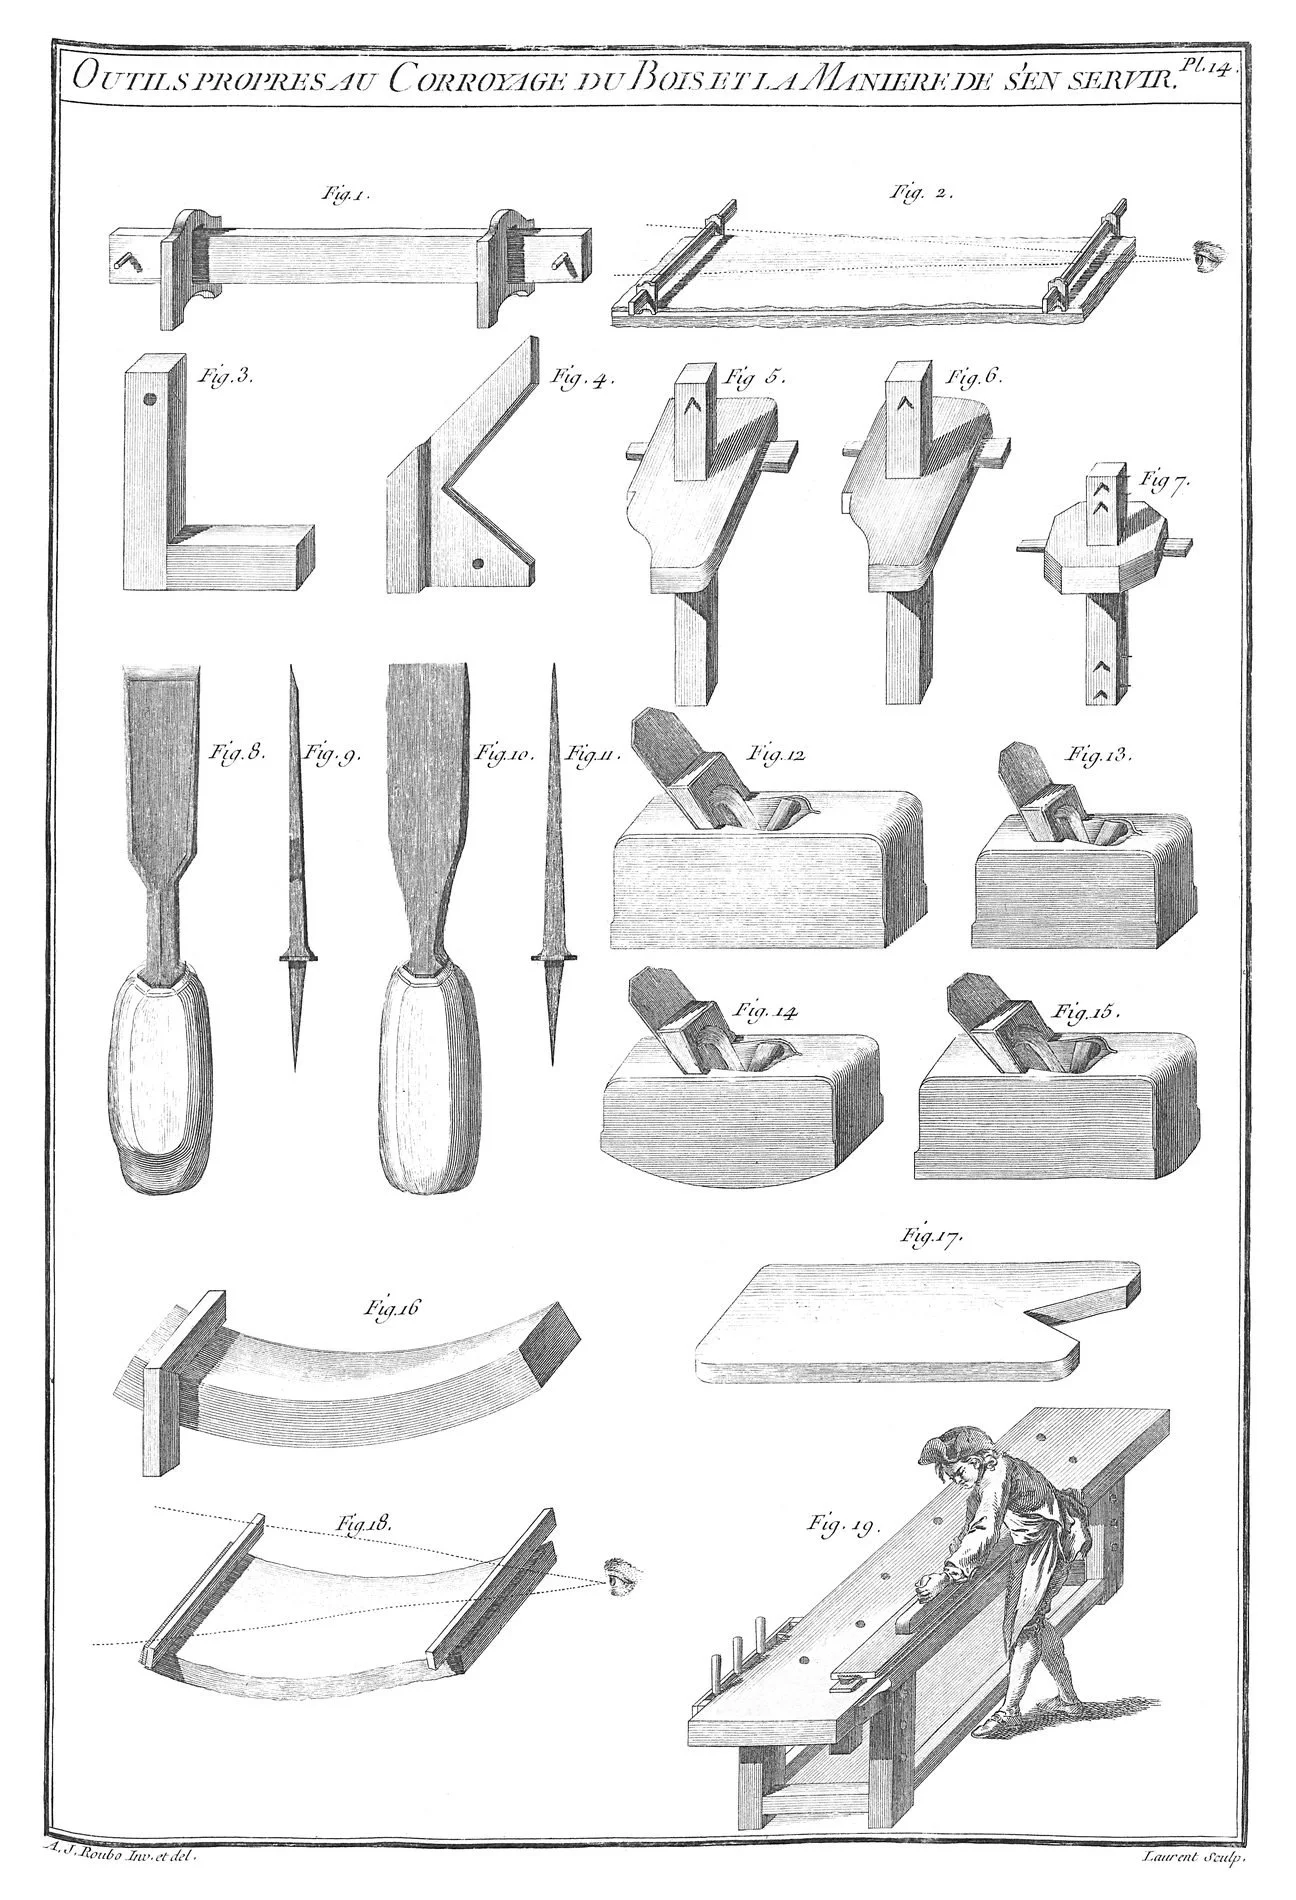
Plate 14 of Roubo's *L'Art du Menuisier* (1769), "Outils propres au Corroyage du Bois" — the tools for dressing wood, drawn in use: planes, saws, and benches at work.
André Jacob Roubo, L’Art du Menuisier (1769). Public domain, via Wikimedia Commons.
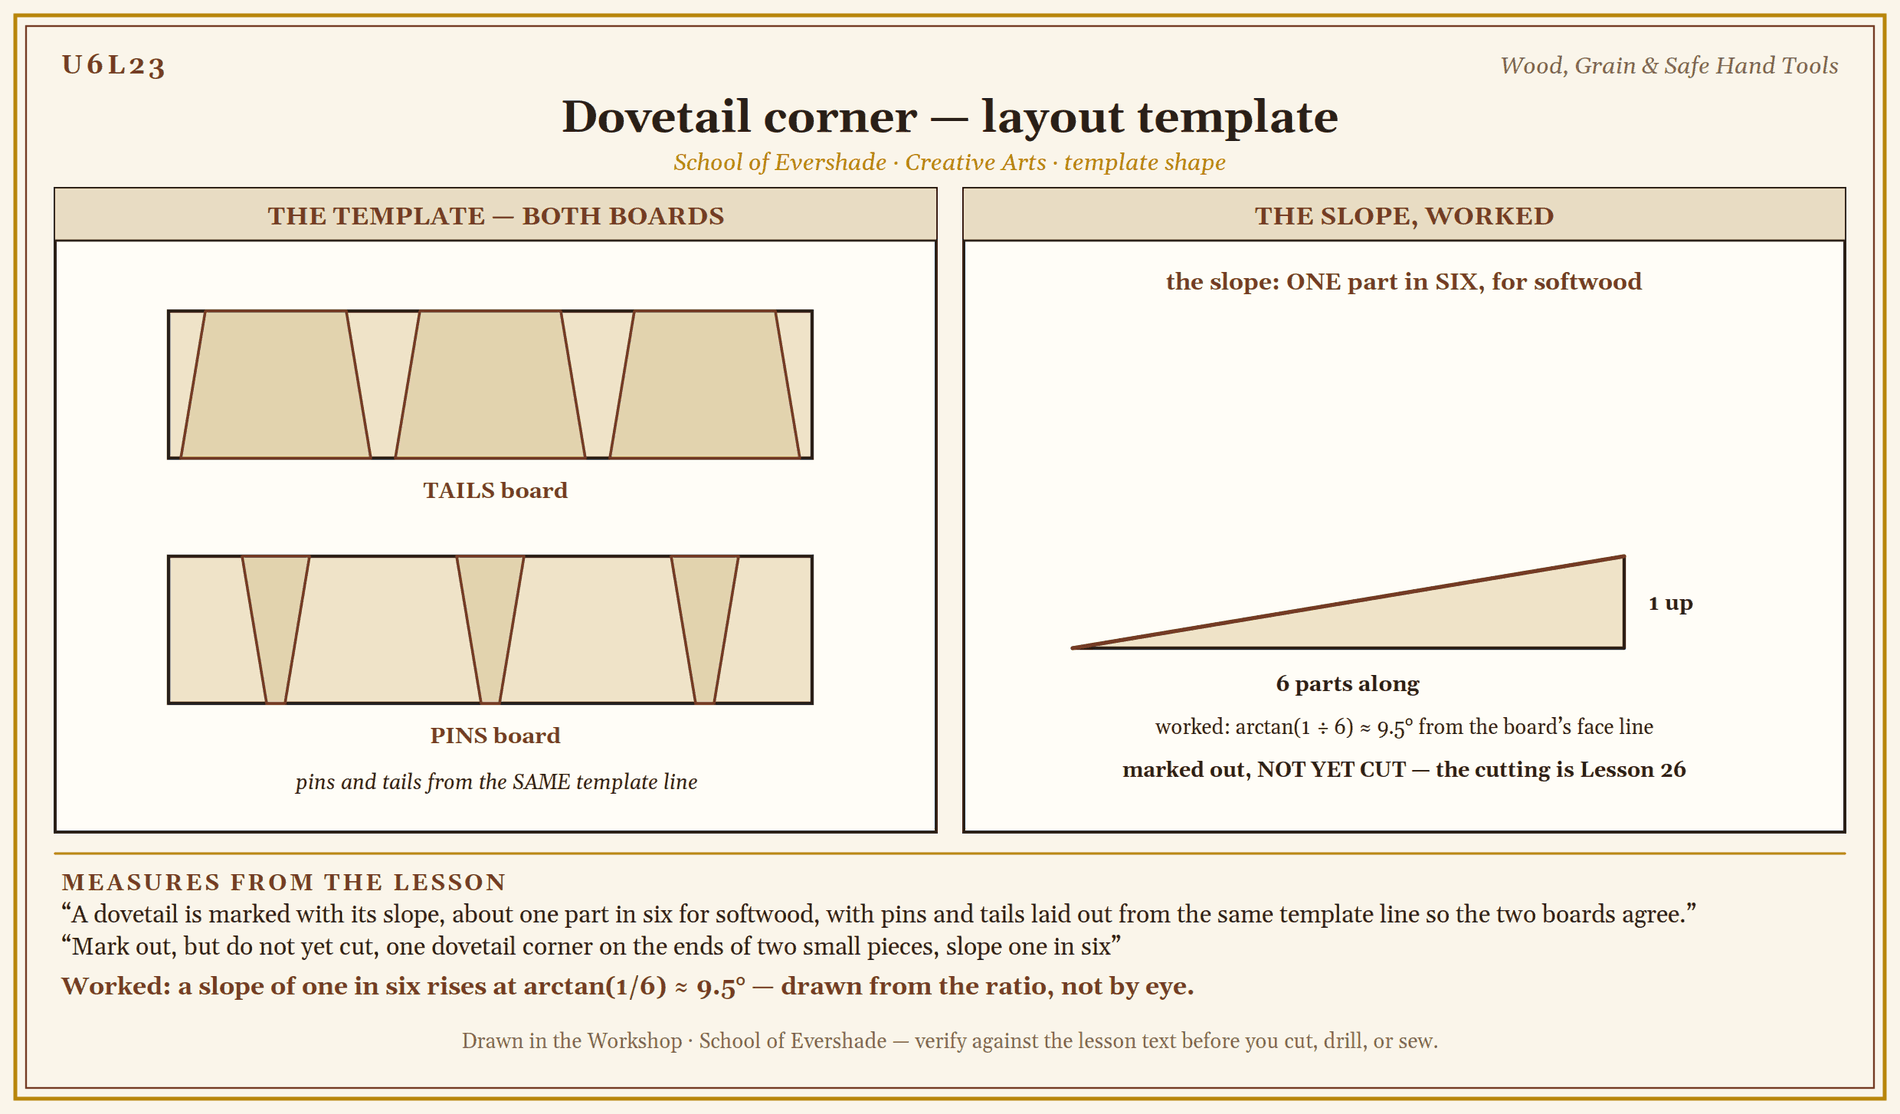
Dovetail corner — layout template
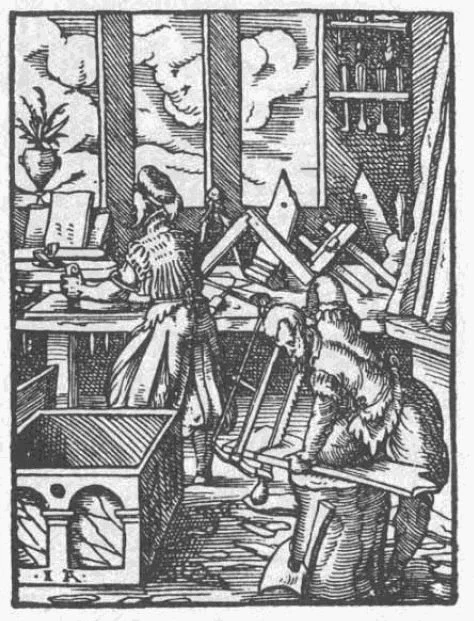
A joiner at his bench with planes and work in progress, 1568 woodcut.
Woodcut from the Ständebuch (Book of Trades), Frankfurt, 1568. Public domain, via Wikimedia Commons.
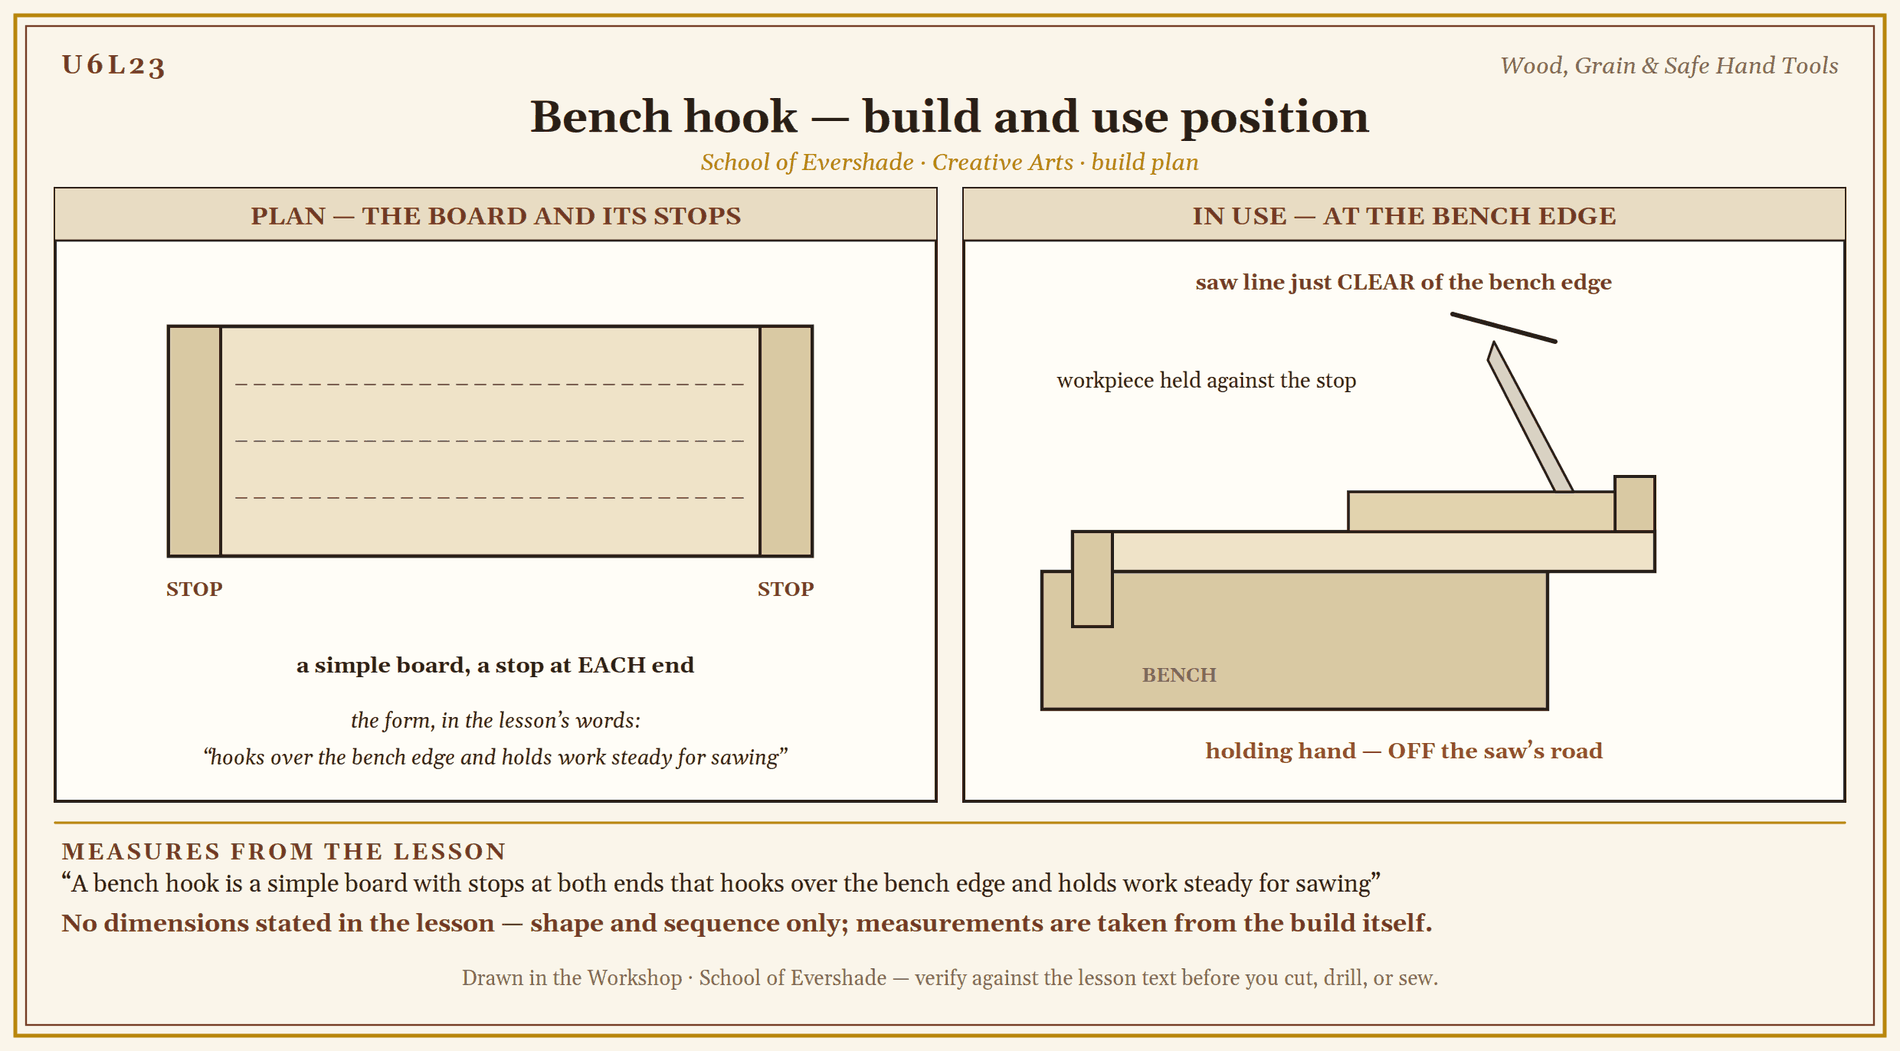
Bench hook — build and use position
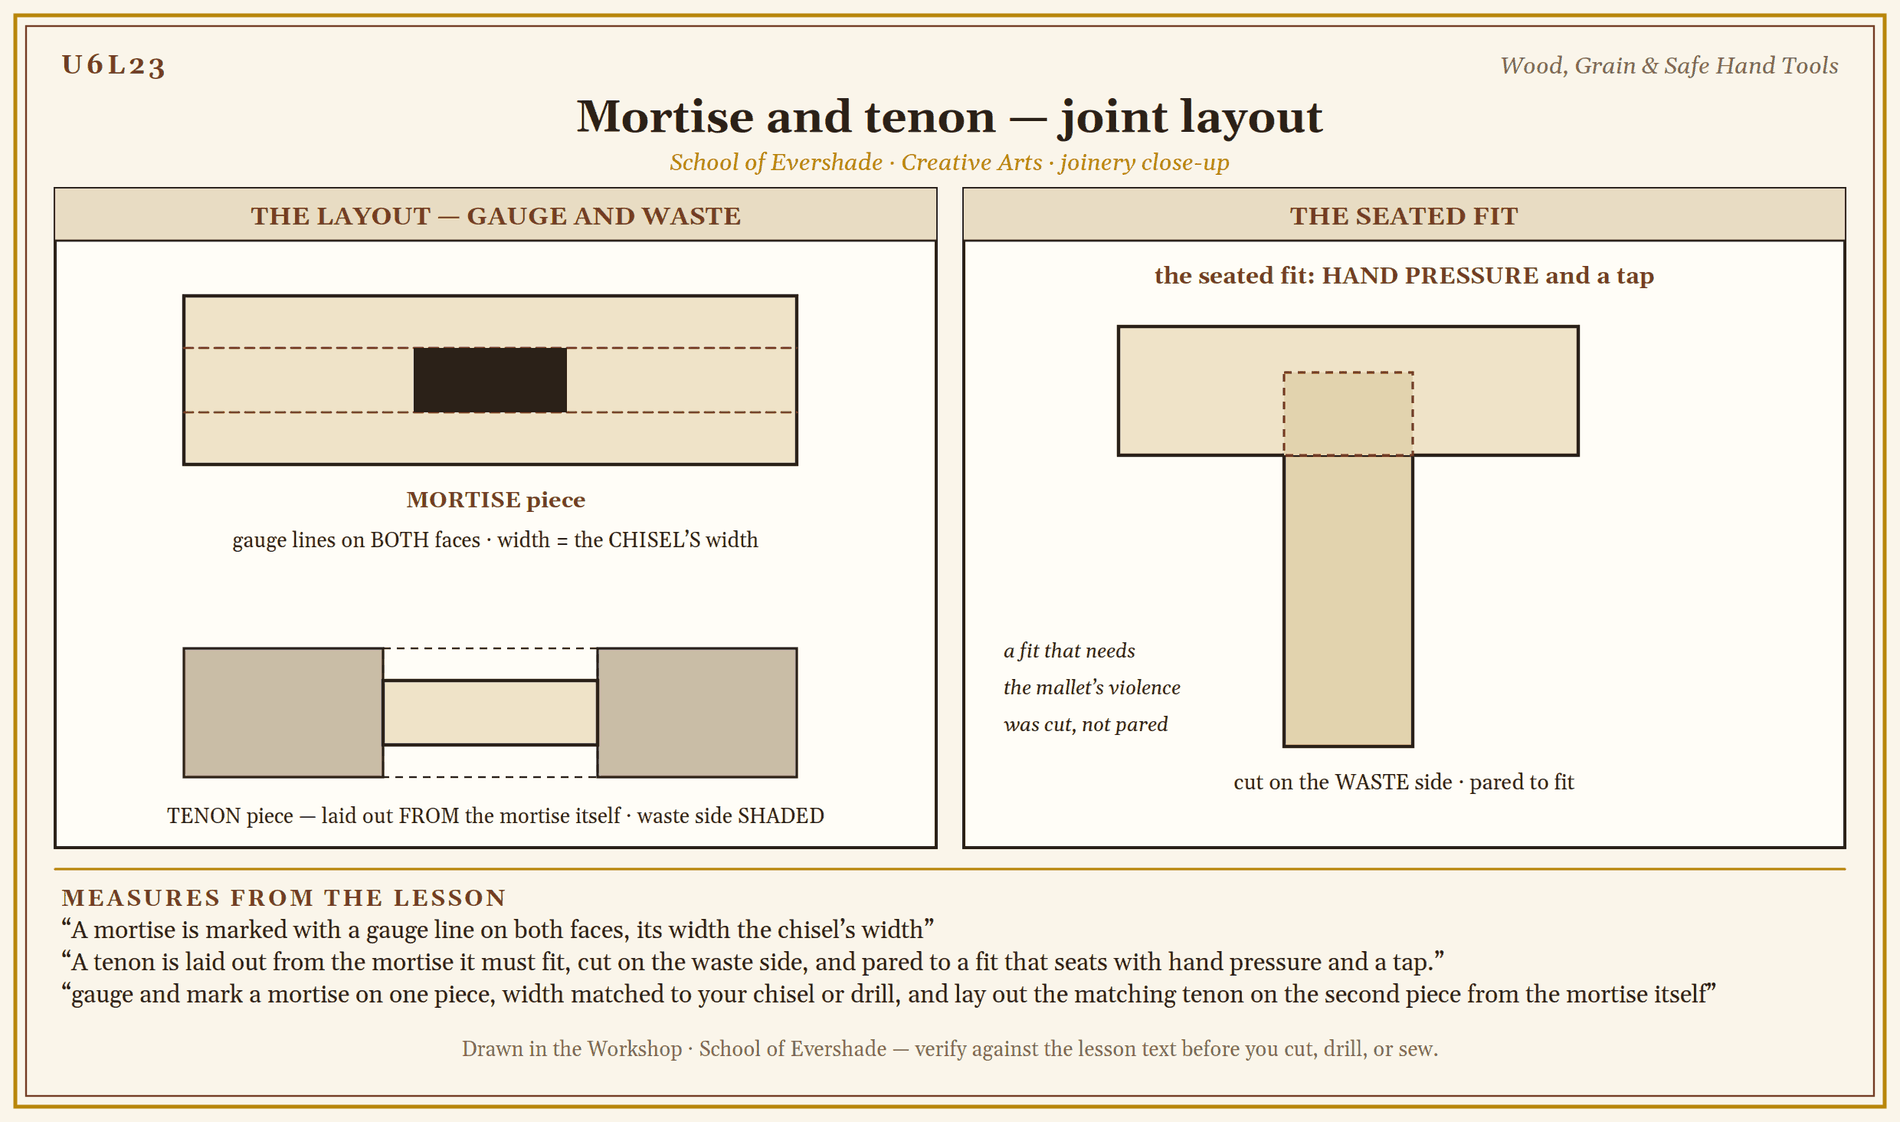
Mortise and tenon — joint layout

Where and when: Pompeii — 79 CE, the earliest known planes.
Lesson Objectives
By the end of this lesson, students should be able to:
- Read the grain of a board and predict how it will saw, plane, and split.
- Saw to a marked line in scrap, keeping the cut on the waste side and the blade on its road.
- Plane a full, even shaving and explain what the plane's iron is doing to the fibers.
- Sand through a sequence of grits in order and explain why the order matters.
- Apply a simple finish, wax or oil, and describe the traditional finishes and where each came from.
- Lay out a mortise and tenon, and mark out a dovetail, on practice stock so the pieces fit without hardware.
Your Assignment Packet
This lesson's assignments live in its packet: the Lexicon Handout (every term, course terms marked ◆), the Assignment Manual, and the Reflection Questions. Download the packet before you begin and keep it beside you as you read — work from it as each subject is taught, or take the assignments as homework afterward.
The Egyptian Bench
The oldest complete woodworking tradition we can study in detail is Egypt's, and it humbles modern benches. Egyptian carpenters five thousand years ago worked with saws, adzes, chisels, awls, and bow drills, and joined their work with mortise and tenon, with dovetails in fine boxes, with dowels and pegs, exactly the fastening Lesson 4 taught. Their furniture survives in museums with its joints still tight.
Two absences instruct us. The Egyptians had no plane. Smoothing was done with the adze, a blade set crosswise on a handle and swung in short, controlled strokes that shave a surface the way a plane does, one scoop at a time, and finished with abrasives: sand rubbed on the surface, in a land that had sand in professional quantities. And their saws cut on the pull or the push by turns of design, worked by a craftsman seated at a low bench, holding the work with his foot or a forked post. Nothing in the toolkit is powerful. Everything in the results is precise. The lesson the Egyptian bench teaches this workshop is permanent: precision is a property of the maker, not the tool.
Rome and the Plane
The plane, a blade held in a block so only a shaving's thickness protrudes, is the Roman contribution this workshop uses daily. The earliest known planes come from Pompeii, preserved by the eruption of 79 CE, and a fine Roman plane from Silchester in Britain shows the tool fully formed: a wooden body sheathed in iron, its blade held between rivets. In Roger Ulrich's study of Roman woodworking, the plane takes its place in a mature toolkit beside the frame saw, whose blade is held taut in a wooden frame, and the bow saw, whose thin blade is tensioned by a twisted cord. The frame saw's family is long: versions of it stayed in European workshops into the age of the bandsaw, because a blade under tension cuts straight and thin, and thin cuts waste little wood.
Rome also gives us the bench itself, a heavy table with stops and holdfasts to grip the work, which Lesson 25 takes up in full. The pattern to notice is that Rome did not invent woodworking. Rome organized it: standardized tools, a proper bench, work held fast so both hands could attend to the tool. A scholar's bench should be organized the same way, at whatever scale the scholar's bench happens to be.
Smoothing Before Sandpaper
Sandpaper feels inevitable, and it is recent. Before coated abrasives, makers smoothed with what the world provided. Sand itself, loose on a block or rubbed with a handful, did the Egyptian work. Shark skin, rough with tiny tooth-like scales, served as a natural abrasive in more than one seafaring culture. The scouring rush, horsetail, a plant whose stems carry silica in their walls, was gathered, dried, and used by European woodworkers and metalworkers for fine smoothing well into the nineteenth century; old workshops called it by the work it did, and bundles of it hung by the bench.
Coated abrasives have an old idea and a young industry. Crushed shell or sand glued to parchment is credited to Chinese workshops many centuries ago, and sharkskin-like materials were used in Japan, but the modern sheet begins with patents in the 1830s and becomes a workshop staple only when factories could grade the grit evenly. Grit is the grading of an abrasive by particle size: low numbers are coarse and remove material quickly, and high numbers are fine and remove scratches. The 3M company's wet-or-dry paper of 1921, which can be used with water to keep it from clogging, is within living memory of the trade's elders. When you sand through the grits in this lesson, coarse to fine, each grade erasing the last one's scratches, you are doing with a factory sheet what the Egyptian did with loose sand and patience. The patience is the part that cannot be manufactured.
Finishes from Hive, Seed, and Insect
Three traditional finishes cover most of what this workshop needs, and each is a small history.
Beeswax is the oldest: softened, sometimes warmed with a little oil, rubbed into the wood and buffed. It gives little protection against water and must be renewed, and it has been renewed, on furniture, for millennia, because it feeds dry wood, smells honest, and can be repaired by any hand with a cloth.
Linseed oil, pressed from flax seed, soaks into the fibers and hardens there over days as it takes up oxygen. It darkens wood slightly and deepens its figure. Northern Europe, where flax grew everywhere and its fiber became linen, finished its woodwork in its own crop. Boiled linseed oil — nowadays usually raw oil with driers added to make it dry faster — is the modern bench version; the older way was raw oil, sun, and time.
Shellac is the strangest and the finest. It is a resin secreted by the lac insect on trees in India and Thailand, gathered, cleaned, and dissolved in alcohol to make a finish that brushes or pads on in thin coats and dries in minutes. In nineteenth-century Europe and America it was the dominant fine finish, built up by the French polish method into a surface like still water, until nitrocellulose lacquers displaced it in the 1920s and 1930s. It is still the finish that repairs most gracefully, because a new coat dissolves into the old.
A Sealed Note from Professor Timberclank
The saw's road is the line it is already traveling. Watch it the way you watched the blade's road in Lesson 3, because the rule is the same and the saw is less forgiving.
Clamp the work or hook it on the bench hook. A board held by hope moves, and a moving board takes the blade with it. Keep both hands behind the cut line, always, and keep your holding hand off the road entirely. Let the saw do the cutting: your arm gives it travel, not pressure. A saw forced is a saw wandering, and a saw wandering near a hand is how this lesson's one real accident happens.
So we do not force it. If the cut binds, we stop. If the blade jumps the line, we stop. We stop, we make it safe, then we begin again. This lesson is the full teaching on the hand saw, and the sealed notes elsewhere in the school that point to a first saw cut point back here.
A cloth that has wiped linseed oil is never wadded up and never tossed in a bin or left in a heap. Oil drying in a crumpled rag makes heat of its own, and a rag left heaped can smolder and catch with no flame anywhere near it. Spread the cloth flat to dry where air moves freely and nothing can catch, or lay it in a lidded tin of water until it can be dealt with for good. If an oily cloth is found already wadded and warm, leave it where it lies and fetch an adult. We stop. We make it safe. Then we begin again.
PROFESSOR COGBRANCH TIMBERCLANK
Creative Arts Workshop
Master Artisan, Head of House Occidens
Technique: Saw, Plane, Abrasive, Finish
Sawing to a line. Lay out the line with Lesson 2's marks, on the face and edge. Hook the work on the bench hook or clamp it with the line just clear of the bench edge. A bench hook is a simple board with stops at both ends that hooks over the bench edge and holds work steady for sawing — among the oldest and most useful devices in the workshop, and the first thing a new scholar should make for the saw. Start the cut with two or three short pull strokes to open a notch on the line, thumb of the holding hand braced against the blade's flat side, well above the teeth, as a guide for the first strokes only. Then settle into long, level strokes, watching the line on both faces, letting the teeth cut on the stroke the saw was made for. Keep the kerf on the waste side of the line. The kerf is the slot the saw cuts, the width of wood the blade itself removes; a line laid out without it leaves the finished piece a blade's width small. Ease off at the end so the last fibers do not tear away with the offcut; support the offcut with your holding hand once the teeth are past it, never before.
Planing a shaving. Set the work flat and held. A shaving should come off in one connected ribbon, thin enough to read large print through. Skate the plane onto the surface, weight at the front as the cut begins, at the back as it ends, and plane with the grain: the surface tells you the direction, smooth under a palm one way, catching the other. If the plane chatters or tears, the iron is too deep or the grain runs against you. Adjust by small turns. A plane is tuned, not forced.
Rasp and file. Shape with the rasp first where material must come off quickly: edges, curves, the fit of a joint. Work on the push, lift on the return, and check against your layout lines often, because a rasp removes evidence as fast as wood. Follow with the file to refine, and never use either on a surface meant to stay crisp until the layout says the shape is right.
Sanding through the grits. Begin with the coarsest grit the surface needs, no coarser. Sand with the grain, the paper on a flat block for flat work, until the surface is evenly marked by that grit, then move to the next finer and sand until the previous marks are gone. Skipping a grade leaves the coarse scratches under a polished surface, where they show forever. Wipe the dust away between grades. Stop when the finest grit leaves the surface even; the finish will do the rest.
Applying a finish. Work on the practice piece first, always. Wax: rub a thin coat in with a cloth pad, let it stand, buff it off. Oil: wipe on, let it soak, wipe off every trace of excess, because oil left standing on the surface turns gummy. Shellac is demonstrated and read about at Level One and tried at Level Two with an adult present, since its solvent is alcohol and its coats dry fast enough to punish hesitation. Whatever the finish, the rule holds: thin coats, fully dry, judged in daylight.
Joint layout, returned. Lesson 4 fitted the notch, the lap, and the peg. This lesson adds the layout the next units spend. A mortise is marked with a gauge line on both faces, its width the chisel's width, and cut with the waste removed in stages, never levering against the finished walls. A tenon is laid out from the mortise it must fit, cut on the waste side, and pared to a fit that seats with hand pressure and a tap. A dovetail is marked with its slope, about one part in six for softwood, with pins and tails laid out from the same template line so the two boards agree. The cutting of joints to a finished fit is practiced in this lesson's drill and spent in Lessons 25, 26, and 28.
Practice Practical: Bench Drills
This drill is checked for control, not speed. All work is in scrap.
A cloth that has wiped linseed oil is never wadded up and never tossed in a bin or left in a heap. Oil drying in a crumpled rag makes heat of its own, and a rag left heaped can smolder and catch with no flame anywhere near it. Spread the cloth flat to dry where air moves freely and nothing can catch, or lay it in a lidded tin of water until it can be dealt with for good. If an oily cloth is found already wadded and warm, leave it where it lies and fetch an adult. We stop. We make it safe. Then we begin again.
- Saw to a line. Bench drill first. Mark a straight line across a piece of scrap, face and edge. Hook the piece on the bench hook, open the notch with short pull strokes, and saw the line through, kerf on the waste side, easing off at the end. Check the cut against the square. Repeat until two cuts in a row come out true.
- Plane a shaving. Set an offcut flat and held. Adjust the plane until it takes a connected ribbon of a shaving. Plane one full face with the grain, checking direction by palm before each pass. Keep the shaving; a whole, even shaving is the record of the setting.
- Sand through the grits. Take the sawn face of a fresh offcut and sand it through your full sequence, block-backed, with the grain, wiping between grades. Hold it to the light at a low angle after each grade and watch the previous scratches disappear. Label the piece with the grit sequence used.
- Lay out one mortise and tenon. In practice stock, gauge and mark a mortise on one piece, width matched to your chisel or drill, and lay out the matching tenon on the second piece from the mortise itself. Cut the tenon on the waste side and pare until it seats in the mortise with hand pressure and a tap. Mark out, but do not yet cut, one dovetail corner on the ends of two small pieces, slope one in six, so the layout is ready for Lesson 26.
- Finish trial. On the sanded piece, apply your finish in a thin coat by the rules above. Let it dry fully and judge it in daylight. A second thin coat if the first drank in unevenly.
- Record and put away. Keep the fitted mortise and tenon and the finished sanding piece, labeled with the date. Note in your workbook which drill took the most attempts and why. Tools away, blades covered, bench swept.
When the saw follows your line without being steered, your hands have learned what this lesson is for.
Assignment Manual
Assignment key: ✎ written work · ⚒ hands-on practical · ◐ both
Assignment I ⚒ — The Practice Practical
Complete the drill in this lesson: two true saw cuts, a full plane shaving, a piece sanded through the grits and finished, and one mortise and tenon laid out and fitted, all in scrap. Your labeled pieces are the record of the drill.
Assignment II ✎ — The Plane Egypt Never Had
Using the lesson and the sources below, write a short account of how Egyptian carpenters smoothed and joined wood without the plane, and what changed when Rome put the plane in the toolkit. Include: what the adze did, what abrasives Egypt used, and one reason the plane spread once it existed.
Assignment III ◐ — A Finish, Tested
Choose one traditional finish from the lesson. Apply it to one half of a practice offcut, leaving the other half bare. Subject both halves to the same honest tests: a few drops of water, a day's dust, a thumb's handling. Photograph or sketch the result and write a short piece on what the finish did, what it did not do, and when you would choose it again.
Materials
Level One (household)
- A small hand saw (a pull saw or a junior hacksaw for fine work, with adult supervision), and a bench hook or a clamp and a sturdy table edge
- A block plane, borrowed or household, with an adult's help in adjusting it
- A rasp and a file suitable for wood, or one combination tool
- Sandpaper in a sequence of grits, for example 80, 120, and 220, and a flat block to back it
- Scrap wood for all drills: offcuts, crate or pallet board (checked for nails and staples), craft sticks for small trials
- Beeswax finish or boiled linseed oil, a soft cloth, and a practice offcut for the finish trial
- Pencil, square, and marking gauge or ruler for layout; safety glasses
Level Two (historical)
Everything in Level One, plus:
- Loose sand and a leather pad or block, horsetail rush if it can be gathered and dried, or a sheet of sharkskin-pattern abrasive for comparison trials
- Raw linseed oil and shellac flakes with their solvent, used with an adult present
- A frame saw or bow saw for demonstration or trial, where one can be borrowed
- Hardwood practice stock of decent quality for the mortise and tenon layout
Both levels teach the same craft. Level One works with the modern graded sheet and the block plane; Level Two tries the abrasives and finishes the old benches used, beside them. Either scholar's drilled and laid-out practice pieces are the deliverable of the lesson.
Reflection Questions
Answer the following questions in your workbook.
- Where did your first saw cut wander: the start, the middle, or the end? What does the place it wandered tell you about your strokes?
- Explain, in your own words, why sanding grades must be used in order and cannot be skipped.
- Egyptian work without planes or sandpaper survives with tight joints after five thousand years. What does that prove about tools, and what does it not prove?
- Wax, oil, and shellac each ask something different of the maker afterward. Which bargain suits a shelf that will be handled daily, and why?
- Which tool in this lesson felt most like an extension of your hand by the end, and which still feels like a stranger?
Professor's Review
Your practice pieces are scarred, and they should be. Every wander in those saw cuts is a sentence in a language your hands are learning to read.
You can read a board now, and say what it will do before you ask it. You have sawn to a line, planed a ribbon, sanded in order, and fed a surface with wax or oil. You know the Egyptian bench had no plane and needed none, and that the joint you laid out today held a Bronze Age ship together. Lessons 24 through 26 will spend this ticket: on a counting board, on racks and bench furniture, and on shelves and boxes. Spend it the way it was earned, a shaving at a time.
Next lesson turns from shaping wood to thinking with it: the counting board, the tally stick, and the long history of doing arithmetic with pebbles on lines.
PROFESSOR COGBRANCH TIMBERCLANK
Creative Arts Workshop
Master Artisan, Head of House Occidens
Cross-Class Connections

Herbology · Unit II, Lesson 11 — The Compost Crucible
My composter is built and run inside my own lesson, scholars, at household scale, and that is the right place to start one. For those of you who want the durable wooden composter — the one built to last rather than assembled for a season — the build path runs through this workshop together: the structures and scale discipline of Lesson 22, and the wood and joinery ticket you earn in this lesson. Herbology teaches what the composter does; this bench teaches how its wooden frame is cut, joined, and finished to survive the weather it works in.
PROFESSOR BERYL FERNFOOT
Herbology Greenhouse
Further Reading & Sources
Fitzwilliam Museum, University of Cambridge. "The Ancient Egyptians: Materials and Technology" (schools fact sheet, PDF). The carpentry section covers Egyptian tools and joints: saws, adzes, bow drills, pegs, dowels, mortise and tenon, and dovetails.
Ulrich, Roger B. Roman Woodworking (Yale University Press, 2007), full text at the Internet Archive. The scholarly survey of the Roman toolkit, joinery, and furniture, including the tools of the trade.
Stanley Tools / Handplane Central. "A Brief History of the Woodworker's Plane." From the Pompeii and Silchester planes to the modern bench plane, with Egypt's adze-and-sand smoothing for contrast.
Wikipedia. "Shellac." The lac insect's resin, its history as the dominant fine finish of the nineteenth century, and the French polish method.
Print source, unlinked: a standard workshop manual's chapters on abrasives and finishes will serve for the sanding sequence and oil application; ask at the bench for the workshop copy.
Student-friendly starting points for exploring this lesson's world. All links verified October 2026.
- University College London, Digital Egypt. "Furniture in Ancient Egypt." Surviving Egyptian furniture and boxes, and what the pieces and tomb paintings show about how they were made and stored in.
- Woodshop News. "What does the future hold for sandpaper?" A trade history of coated abrasives, from early glued grit and sharkskin to the 1834 patent and modern wet-or-dry paper.
- Fitzwilliam Museum, schools resources on ancient Egyptian technology. The same fact sheet as above, worth a second visit for its sections on materials beyond wood.
Submit your work for this lesson using the form below.
CONTINUE IN THE CREATIVE ARTS WORKSHOP
← Previous · Lesson 22: Garden Structures: Supports, Cold Frames & Garden Models Next · Lesson 24: Counting Boards & Thinking Tools →
Unit VI · Wood & Furniture Creative Arts Workshop · All 39 Lessons
Bookstore Shelf The Library · Creative Arts Shelf Course Supplies
The rest of Unit VI: Lesson 24 · Counting Boards & Thinking Tools · Lesson 25 · Drying Racks, Screens & Bench Furniture · Lesson 26 · Shelves, Boxes & Storage That Lasts