
Creative Arts
Unit VII, Lesson 28Runestones, Ogham Sticks & Inscription Plaques
Professor Cogbranch Timberclank
Master Artisan, Head of House Occidens
The Creative Arts Workshop • School of Evershade
Professor's Introduction

Set up your bench, scholars. Last lesson you learned to cut. This lesson you learn to write with the chisel, which is a slower and more permanent kind of writing.
An inscription is a message meant to outlast its maker. Paper rots, ink fades, and memory is the frailest archive of all, so when people of the early medieval world had something that had to survive, a death, a boundary, a claim, a name, they cut it into stone or wood and raised it where it would be seen. Some of those stones still stand in their fields after a thousand years of weather, and scholars still walk out to read them. That is the company this lesson's work keeps.
Let me be clear about the division of labor, because this workshop respects it. The scripts themselves, what the runes mean, how ogham reads, which letter stands for which sound, belong to Professor Webblethorn and the Runes classroom, and you will learn them there or not at all. Ogham is an early medieval alphabet of twenty letters, written as strokes and notches along a central line or edge; on pillar stones, the edge of the stone itself is the line, and the inscription reads up one edge and sometimes down the next. What this lesson teaches is the carving: how a letterform is laid out on a stick or a stone, how the cut is made cleanly at this size, how the finished letters were painted in their own time, and how a plaque is built to carry an inscription indoors. Her alphabets, my chisel. It has always taken two crafts to raise a runestone, and the stones are better for it. A runestone is a raised stone carved with a runic inscription, most often a memorial; the great age of runestones ran roughly from the tenth into the early twelfth century, and Sweden alone holds some two thousand of them — more than any other country.
You will make a practice piece first: letterforms laid out and carved in scrap wood or soft stone. Only when the practice piece reads true will the real stone or stick be chosen.
PROFESSOR COGBRANCH TIMBERCLANK
Creative Arts Workshop
Master Artisan, Head of House Occidens
Lesson Objectives
By the end of this lesson, students should be able to:
- Describe the runestone tradition at survey level, including the Jelling stones and the Rök stone's great inscription.
- Describe the ogham pillar stones of Ireland and Wales, including the edge alphabet and bilingual stones.
- State the evidence that carved runes were painted, and finish carved letters with paint in the historical manner using Lesson 15's pigments.
- Lay out letterforms on wood and on soft stone, spaced and sized for carving.
- Carve a practice inscription in scrap wood or soft stone, and mount a finished inscription plaque.
- Explain which parts of inscription work belong to this workshop and which belong to the Runes classroom.
Your Assignment Packet
This lesson's assignments live in its packet: the Lexicon Handout (every term, course terms marked ◆), the Assignment Manual, and the Reflection Questions. Download the packet before you begin and keep it beside you as you read — work from it as each subject is taught, or take the assignments as homework afterward.
The Great Stones
Denmark holds the most famous pair. At Jelling stand two runestones raised by a royal family in the tenth century. The smaller was set up by King Gorm for his wife Thyra, whom its inscription calls Denmark's ornament. The larger was raised by their son, Harald, the king remembered as Bluetooth, and it declares that he won Denmark and Norway and made the Danes Christians; it also carries one of the earliest depictions of Christ in Scandinavia, carved into the same stone as the runes. UNESCO keeps Jelling on its World Heritage list, mounds, stones, and church together, as a monument of a kingdom changing its world and writing the change down in stone.
Sweden's Rök stone is the great inscription of them all: the longest known runic inscription in stone, roughly 760 characters, carved in the early ninth century by a runemaster named Varinn for his dead son. It covers five sides of the stone, mixes alphabets, turns to riddles and old stories, and is counted the beginning of Swedish written literature. And its opening lines hold the detail this lesson cares most about. In the usual translation, Varinn does not say he carved the runes. He says he coloured them — the verb fá covers both painting and writing runes. The cutting and the painting were one act of making, and the stone's first reader expected color.
That expectation was general. Runestones were usually brightly coloured when they were erected, red above all, and the evidence survives in several kinds: traces of pigment found in the cuts, inscriptions that boast of being reddened with runes, and the Old Norse word at the root of the matter, which meant both to write in runes and to paint. Pigment in the cut is paint worked into carved letterforms to make them legible and to honor the inscription; historical runestones were commonly painted, most often in red, and surviving inscriptions sometimes say so in their own words. One stone preserved indoors in a church on Öland kept its paint all over, its words picked out in alternating black and red. The grey, bare stones in modern churchyards are weathered survivors, not portraits of the originals. A runestone as its maker finished it was a painted object, meant to be read at a distance, in color.
Most runestones are humbler than Jelling and Rök, and more moving for it: a bridge built for a father's soul, a mother's memorial to a son lost at sea, names, families, and journeys, cut by working carvers whose letterforms a modern scholar can still use to tell one master's hand from another's.
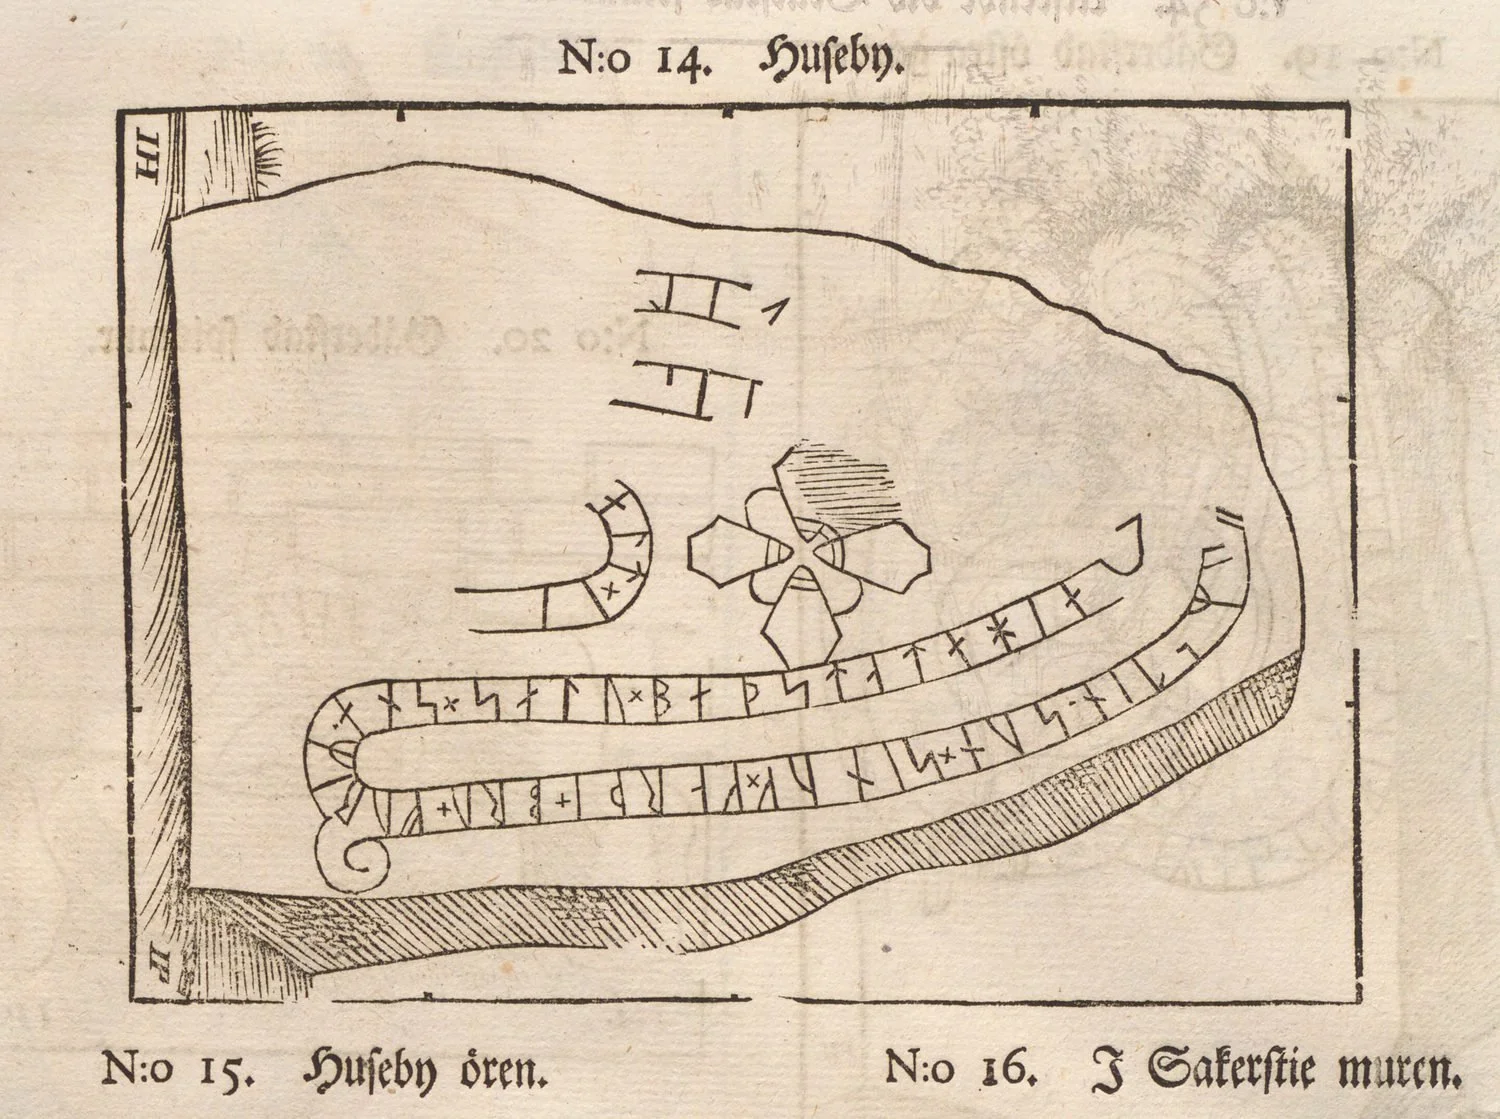
An 18th-century engraving of runestone U 327 (from Bautil, Johan Göransson, 1750) — the carved stone with its full runic band recorded line by line.
Engraving from Bautil (Johan Göransson, 1750). CC0, via Wikimedia Commons.
Rune inscription — measured letter layout on practice stock
Ogham: The Alphabet on the Edge
Ogham solves a carver's problem beautifully: how do you write on a tall, narrow stone? Its answer is to make the stone's own edge the writing line. The alphabet has twenty letters in four groups of five: strokes in counts of one to five — on one side of the edge for the first group, on the other side for the second, slanting across it for the third — and notches cut into the edge itself for the vowels. The inscription climbs the edge of the pillar, and the reader walks up it with their eyes.
Some hundreds of ogham stones survive, most in Ireland, with others in Wales, Scotland, and the Isle of Man, and the digital corpus maintained by the Dublin Institute for Advanced Studies now gathers the inscriptions of Ireland, Britain, and the Isle of Man with photographs and three-dimensional models. The stones are usually memorials: a name, a father's name, a tribe. In Wales, many are bilingual, the ogham climbing the edge while a Latin version in Roman capitals runs on the face, the two texts complementing each other for every scholar since. A bilingual stone is an inscription stone carrying the same or related text in two scripts or languages, as these Welsh stones pair their ogham with Latin in Roman letters. The same alphabet lives smaller in the manuscripts and, in this workshop, on sticks: an ogham stick, a squared length of wood with the inscription cut across its corner edge, is the portable form of the pillar stone, and the form scholars here will carve.
For the letters themselves, their names, their order, and their reading, go to Professor Webblethorn's Runes lessons, where ogham is taught as a script. Here we teach it as a cut: how deep a notch, how clean a stroke, how the arris is kept true.
A Sealed Note from Professor Timberclank
Stone work makes dust, and dust is this lesson's quiet hazard. Soft stone and soapstone are worked wet in this workshop, always: a wet surface makes no dust to breathe, and the work goes better besides. If a stone cannot be worked wet, it is not worked here.
Eye protection is not optional at the stone bench. A chip leaves a chisel at speed and does not apologize. Glasses on before the first cut, and they stay on while anyone at the bench is cutting, not only while your own chisel is moving.
The carving rules of Lesson 27 hold in full: work secured, hands behind the edge, brush before chisel. Add this one for inscription work. Never test a cut's depth with a fingertip. Read the depth with your eyes and the brush. A carved letter is a small cliff, and your finger learns nothing from it that your eyes did not already know. We stop. We make it safe. Then we begin again.
PROFESSOR COGBRANCH TIMBERCLANK
Creative Arts Workshop
Master Artisan, Head of House Occidens
Technique: Laying Out and Carving Letters
Choose the practice stock. Scrap softwood, a basswood offcut from Lesson 27, or a piece of soapstone worked wet. The practice piece takes your chosen inscription at full size: your name, a house word, or a short line from your Runes studies, in runes or ogham as your work requires.
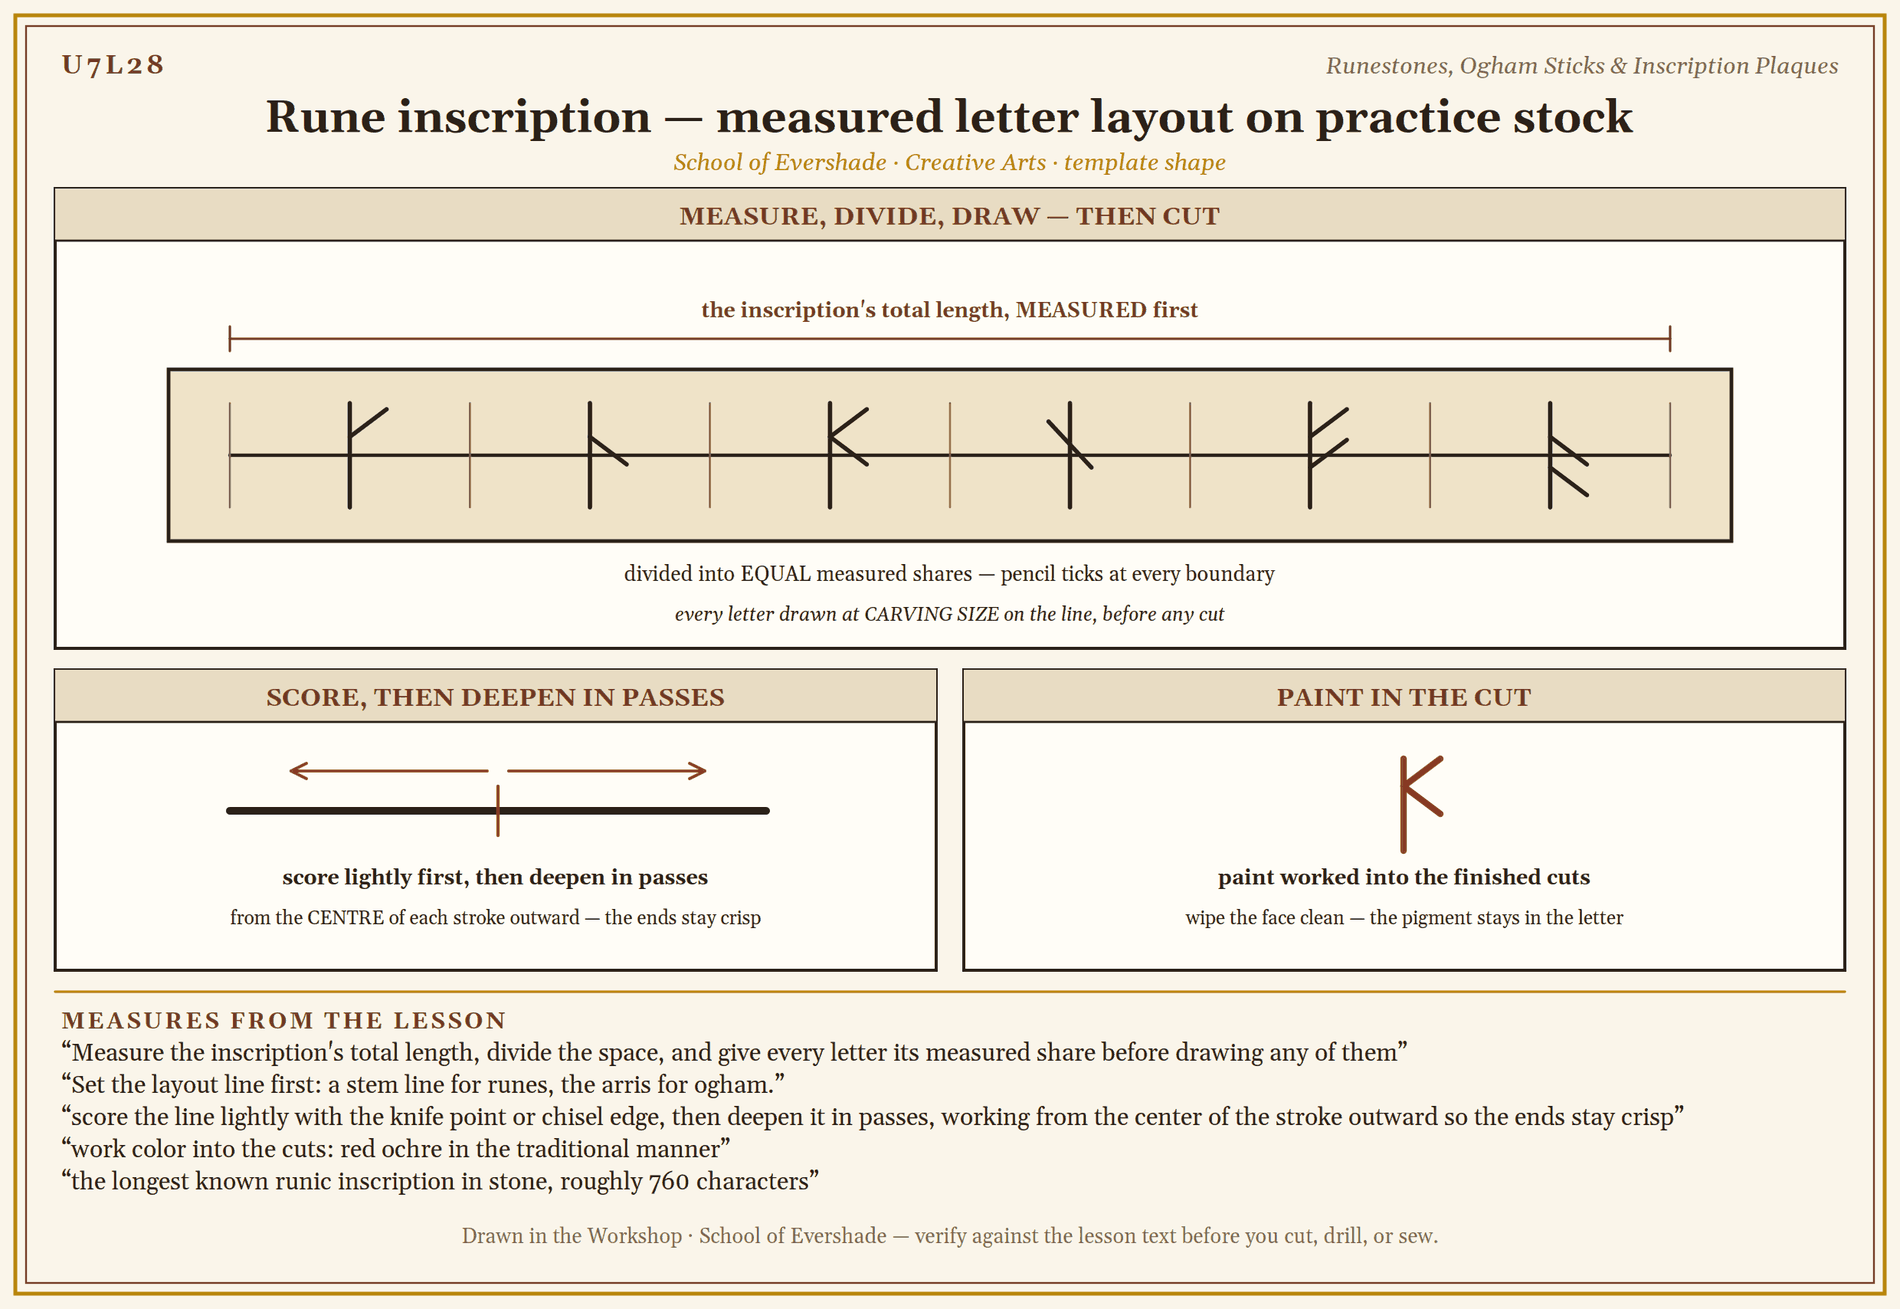
Lay out to measure. Set the layout line first: a stem line for runes, the arris for ogham. The arris is the sharp edge of a squared stone or stick, and ogham's letters are cut across it, strokes on one face, notches on the edge itself, and vowels as notches or short marks on the line; letterforms in inscription work are laid out to that line to measure before a single cut, because stone does not forgive a spacing error. Measure the inscription's total length, divide the space, and give every letter its measured share before drawing any of them; crowding at the end of a line is a layout failure, not a carving failure, and it is the oldest mistake in the craft. Draw the letterforms at carving size, with the strokes wide enough for the tool you actually own.
Cut the strokes. Runes are cut as straight incised strokes: score the line lightly with the knife point or chisel edge, then deepen it in passes, working from the center of the stroke outward so the ends stay crisp. Ogham strokes are cut across the arris in the same scored passes; vowels are notched into the edge itself with the corner of the tool. Keep Lesson 27's rhythm: thin cuts, brush the line clear, look, cut again.
Paint the letters. With Lesson 15's pigments, work color into the cuts: red ochre in the traditional manner, or your charted colors where the design asks for them. Paint goes in the cut, not smeared across the face; wipe the face clean while the pigment in the letter stays. This is not decoration added to carving. On the evidence, it is the carving's finished state.
The plaque. For indoor work, mount the carved piece or carve directly into a prepared board: a squared plaque of wood, its edges eased, its face sanded through Lesson 23's grits, the inscription carved and painted, and a hanging slot or cord fitted to the back with Lesson 4's fastening. A bilingual plaque, your inscription with its translation carved or painted beneath in Roman letters, follows the Welsh stones' own example.
Practice Practical: The Practice Inscription
This drill is checked for layout and clean cutting, not for the beauty of the letters. The real stone or stick is not touched until this piece reads true.
- Choose the text. Pick a short inscription: a name, a house word, or a brief line, in runes or ogham, from your Runes studies. Write it out on paper at the size you will carve it.
- Measure the stock. On your scrap wood or soft stone, mark the layout line. Measure the inscription's length, divide the space evenly, and allot each letter its share in pencil ticks before drawing a single letterform.
- Draw the letters. Draw every letterform at full size on the line. Check the drawing against your paper copy letter by letter. A mistake in pencil costs an eraser; the same mistake in stone costs the piece.
- Carve. Secure the work. Score each stroke lightly, then deepen in passes, brushing the line clear between passes and reading the depth with your eyes. Keep every rule of Lesson 27 and of this lesson's sealed note: stone worked wet, glasses on, no fingertip depth tests.
- Paint. Work pigment into the cuts, wipe the face clean, and let the piece dry. Read it at arm's length, then from across the room. An inscription that cannot be read at a distance has not finished its job.
- Judge and record. Compare the piece against the paper layout. Mark in your workbook every letter that wandered, crowded, or cut shallow. Only a practice piece that reads true earns the real stone or stick.
When your practice letters stand in their measured places and read clearly in their paint, your hands have learned what this lesson is for.
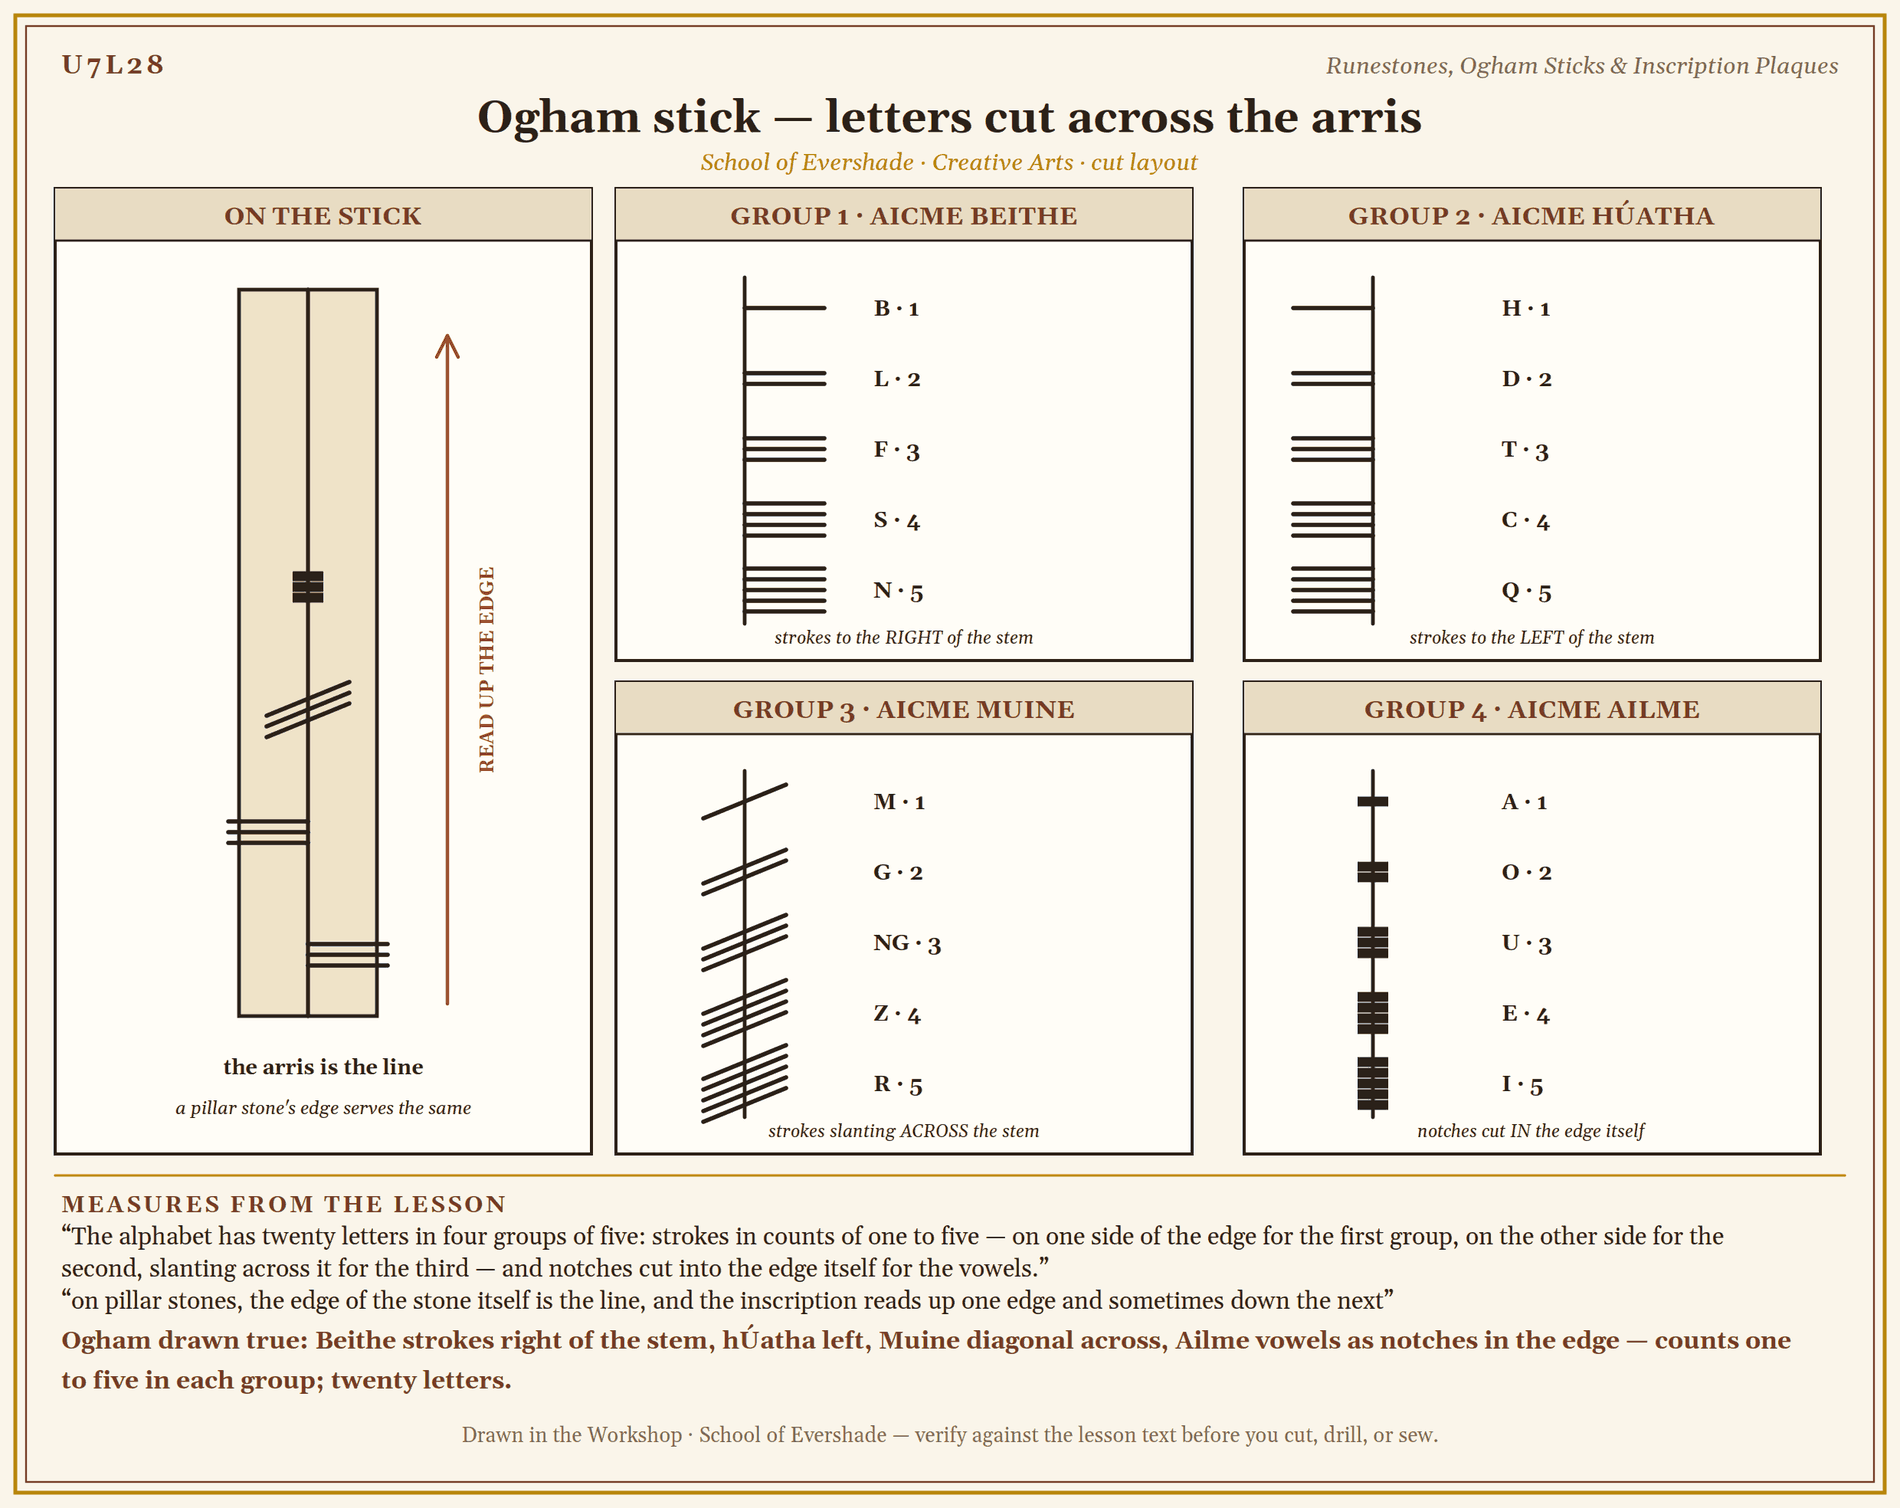
Ogham stick — letters cut across the arris
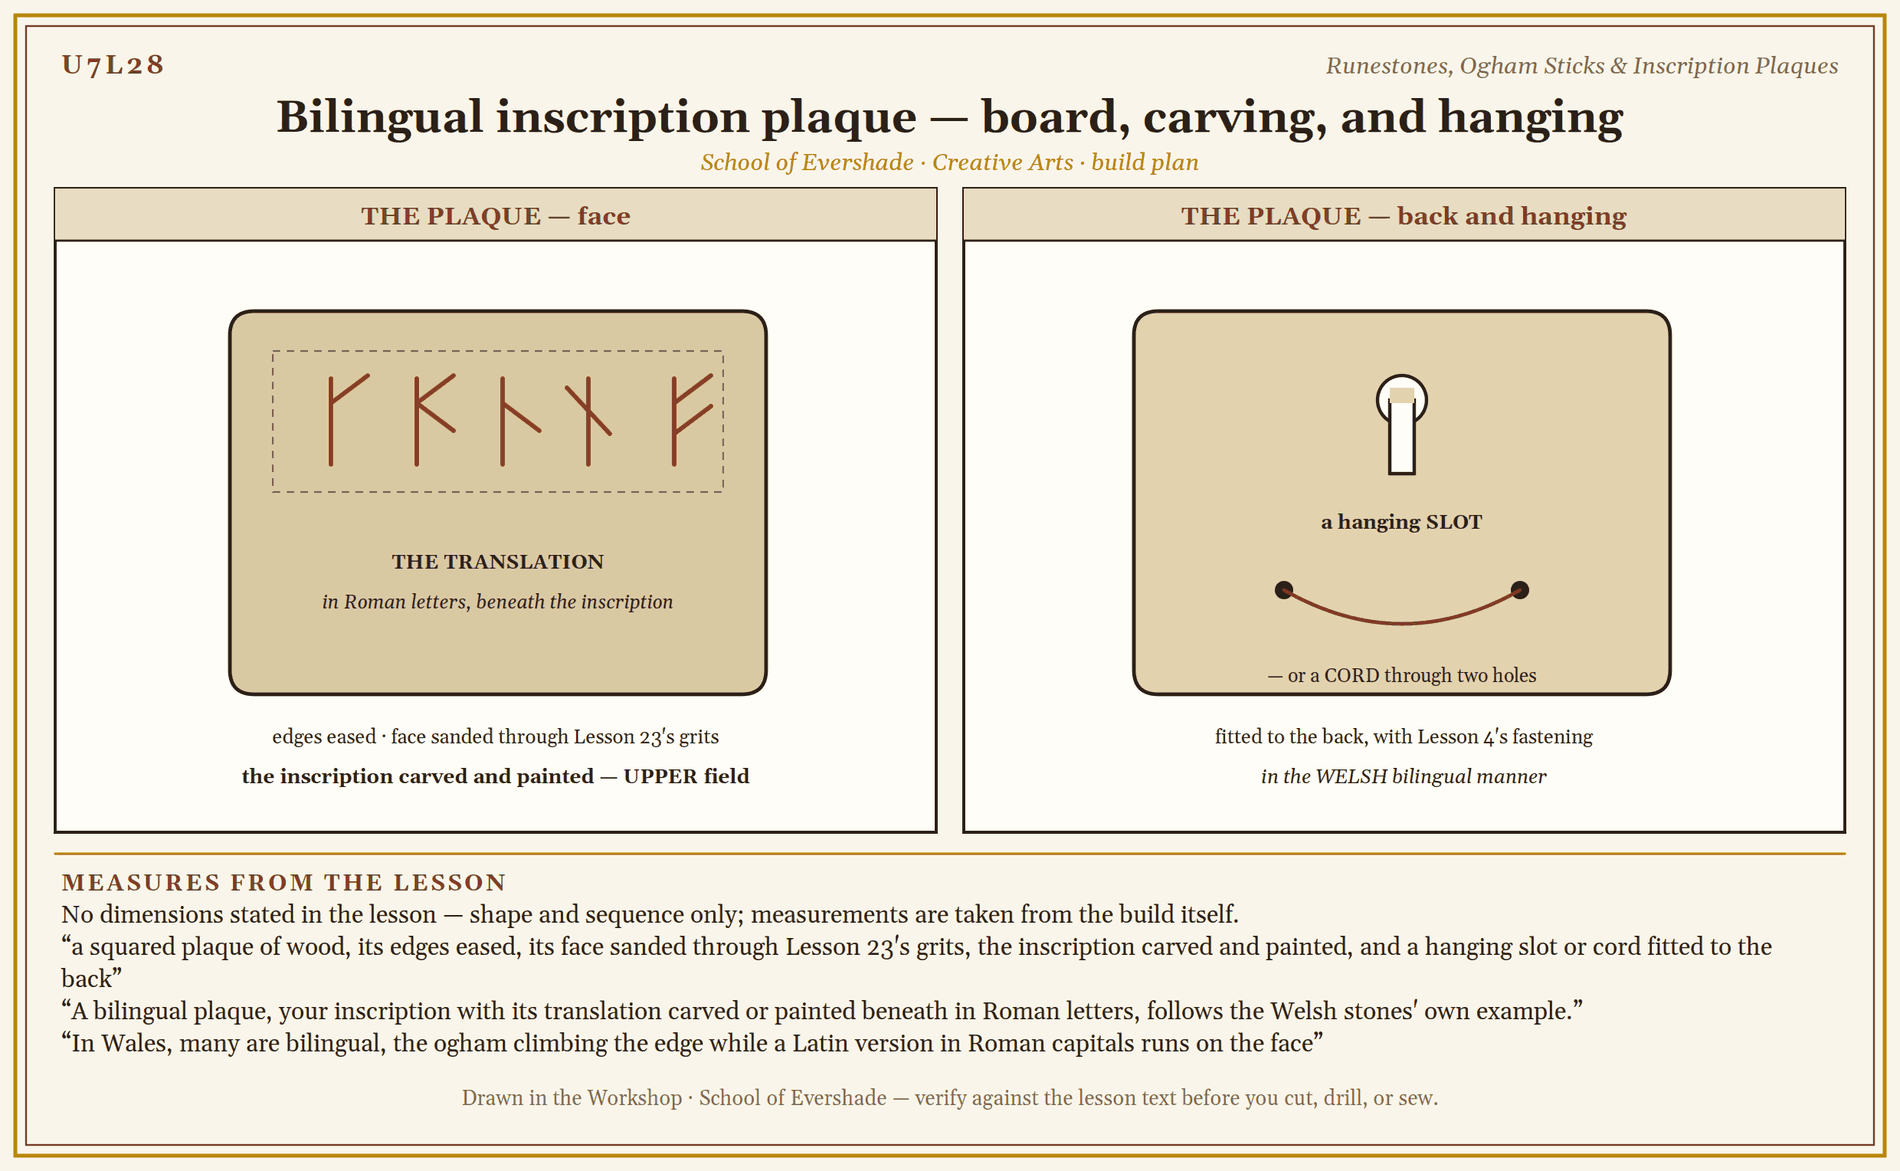
Bilingual inscription plaque — board, carving, and hanging
Assignment Manual
Assignment key: ✎ written work · ⚒ hands-on practical · ◐ both
Assignment I ⚒ — The Practice Practical
Complete the drill in this lesson: a measured, carved, and painted practice inscription in scrap wood or soft stone. Your practice piece, with its paper layout kept beside it, is the record of the drill.
Assignment II ✎ — Two Stones
Using the lesson and the sources below, write a short account of the two great stones of this lesson: Jelling and Rök. Cover who raised each, what each inscription says it is doing, and what the Rök stone's opening tells us about how runestones were finished.
Assignment III ◐ — The Bilingual Plaque
Design and make a small bilingual plaque: a short inscription in runes or ogham, carved or painted into a prepared board, with its translation in Roman letters beneath it, in the manner of the Welsh bilingual stones. With it, write a paragraph explaining what the two texts on a bilingual stone do for the scholars who read them a thousand years later.
Materials
Level One (household)
- Scrap softwood or a basswood offcut, a pencil and ruler for measured layout, and the carving tools of Lesson 27, with adult supervision
- A piece of soapstone or soft carving stone, a small bowl of water for wet working, and safety glasses
- Red ochre or earth pigment from Lesson 15's stores, a small brush, and a cloth for wiping the face
- For the plaque: a squared board, sandpaper in grits, and cord or a picture fitting for hanging
Level Two (historical)
Everything in Level One, plus:
- A squared hardwood stick, hazel or ash in the traditional manner, for a true ogham stick
- A flatter, dressed piece of stone for a small standing inscription stone, worked wet
- Genuine ochre and charcoal black pigments, alternating in the Öland manner, for a two-color inscription
- A mallet and lettering chisels for stone work at full craft
Both levels teach the same craft: measured layout, scored and deepened cuts, and paint in the letters. Level One's pine scrap and Level Two's hazel stick carry the same alphabet and the same standard.
Reflection Questions
Answer the following questions in your workbook.
- Where did your layout fail first, if it did: measuring, dividing the space, or drawing the letterforms? How will the real stone benefit?
- Why do you think Varinn's inscription says he coloured the runes rather than carved them? What did the finished stone look like to its first readers?
- The ogham alphabet uses the stone's own edge as its line. What does that choice tell you about the carvers who designed it?
- What do the two texts on a bilingual stone do for each other, and what does that suggest about the people who raised such stones?
- This lesson carves Professor Webblethorn's scripts with this workshop's tools. Where exactly does her teaching end and this lesson's begin, and why does the boundary matter?
Professor's Review
Your practice piece reads, or it honestly does not yet, and either way your workbook knows the difference, which is the beginning of inscription craft.
You have measured a line and divided it fairly among its letters, cut strokes in passes, and painted them the way the stones' own words say they were painted. You have stood before Jelling and Rök at survey distance and seen what the craft was for: names and deeds set where weather could not argue with them. When the real stone or stick is chosen, it will be chosen by a carver whose practice piece already reads true.
Next lesson is the last of the course's tickets, and the brightest: foil, wire, and simple metalwork, ending with the seal matrix of Lesson 17 remade at full craft in metal. After it, only the capstone build stands between you and the end of the course.
PROFESSOR COGBRANCH TIMBERCLANK
Creative Arts Workshop
Master Artisan, Head of House Occidens
Further Reading & Sources
UNESCO World Heritage Centre, "Jelling Mounds, Runic Stones and Church." The two Jelling stones: Gorm's stone for Thyra and Harald's great stone, with the church and mounds, on the World Heritage list.
Wikipedia, "Rök Runestone." The longest runic inscription in stone, its runemaster Varinn, and the standard translation, which begins by saying that Varinn coloured the runes.
Wikipedia, "Runestone." The tradition as a whole, including its Colour section: runestones were usually brightly coloured when erected, and the evidence for their paint.
The OG(H)AM Project, Dublin Institute for Advanced Studies, "Ogham in 3D" corpus. The digital corpus of ogham inscriptions from Ireland, Britain, and the Isle of Man, with photographs and three-dimensional models of the stones.
Student-friendly starting points for exploring this lesson's world. All links verified October 2026.
- UNESCO's Jelling page, read with the Rök article beside it. Two stones, two kingdoms, two purposes: the memorial and the proclamation.
- The ogham corpus, browsed by county or by stone. Find a bilingual Welsh stone and read its two texts against each other, as this lesson's Assignment III asks.
- Print only: local and regional runestone guides, published in Scandinavia and widely held in libraries, catalog the humbler stones: the bridges, the sea losses, and the family memorials that make up most of the tradition.
Submit your work for this lesson using the form below.
CONTINUE IN THE CREATIVE ARTS WORKSHOP
← Previous · Lesson 27: First Cuts: Carving Safely Next · Lesson 29: Foil, Wire & Simple Metalwork →
Unit VII · Carving & Metal Creative Arts Workshop · All 39 Lessons
Bookstore Shelf The Library · Creative Arts Shelf Course Supplies
The rest of Unit VII: Lesson 27 · First Cuts: Carving Safely · Lesson 29 · Foil, Wire & Simple Metalwork