

Creative Arts
Unit VII, Lesson 27First Cuts: Carving Safely
Professor Cogbranch Timberclank
Master Artisan, Head of House Occidens
The Creative Arts Workshop • School of Evershade
Professor's Introduction

Set up your bench, scholars. This is the carving ticket — carving is shaping a material by cutting material away, and, unlike modeling in clay, which adds, it only subtracts, so the design must be settled before the cutting starts — and we earn it slowly, in soft material, the way carving has been taught for as long as anyone has taught it.
Every craft in this course so far has let you change your mind. Clay can be wedged back into a lump. A seam can be unpicked. Even a saw cut leaves the waste piece whole. Carving is different. Carving is subtraction: every cut removes material that does not come back, and the finished object is whatever is left when you stop. That is not a reason to fear it. It is a reason to plan it, and planning, as this workshop has said since Lesson 2, is most of the craft.
Humans have carved for longer than they have farmed, longer than they have built houses, longer than they have written a single word. The first carvers worked bone, antler, ivory, and stone with tools of flaked flint, and some of what they made still stops a room of archaeologists mid-sentence. You will meet their work in this lesson, and the stone carvers of Egypt, and the masons of the medieval world, briefly and with respect. Then you will pick up the modern teaching materials, a bar of soap and a piece of basswood, and learn what they learned: layout first, small cuts, and one rule that guards your fingers and your work at once. Layout is the design drawn or scribed on the material before cutting: center lines, borders, and the shapes themselves; in carving, layout is not preparation for the work, it is the work, done in advance, in pencil, where mistakes are free.
Brush before chisel. Every time. By the end of this lesson, that rule will be in your hands, not just in your head.
PROFESSOR COGBRANCH TIMBERCLANK
Creative Arts Workshop
Master Artisan, Head of House Occidens

Lesson Objectives
By the end of this lesson, students should be able to:
- Explain why carving is a subtractive craft and what that demands of the maker before the first cut.
- Lay out a design on soap and on basswood, and carve to a marked line in both materials.
- State and demonstrate the brush-before-chisel rule, and explain why chips are never cleared by hand.
- Describe carved work from deep prehistory, including mammoth-ivory figurines and the engraved ochre of Blombos Cave.
- Describe Egyptian stone carving at survey level: its tools, its abrasives, and its guiding gridlines.
- Set up a carving bench safely: work secured, tools sharp, cutting direction away from the body.
Your Assignment Packet
This lesson's assignments live in its packet: the Lexicon Handout (every term, course terms marked ◆), the Assignment Manual, and the Reflection Questions. Download the packet before you begin and keep it beside you as you read — work from it as each subject is taught, or take the assignments as homework afterward.
Carving Before History
The oldest carved objects we know are astonishingly old. In a cave called Hohle Fels in southwestern Germany, archaeologists found a small female figure carved from mammoth ivory, made at least 37,000 years ago and counted among the oldest figurative art in the world. She is small enough to hold in one hand, and she was carved with stone tools, by someone whose name, language, and reasons are gone entirely. What survives is the skill. The carving is confident, the proportions deliberate, and a polished ring where a head would be suggests she was worn as a pendant: a made thing, carried on a person, thirty-seven thousand years ago.
Older still are marks rather than figures. At Blombos Cave on the South African coast, pieces of ochre were engraved with crosshatched patterns as much as 100,000 years ago, and a drawing in red ochre crayon on a stone flake there has been dated to about 73,000 years ago. Whether these patterns were symbols, decorations, or ownership marks, no one can now say. What they prove is simpler and, for this lesson, more useful: the wish to cut a deliberate mark into a hard surface is one of the oldest human wishes we can document.
Bone, antler, and ivory carving runs through the whole of prehistory: harpoon points, needle cases, beads, and figures, worked with flaked stone burins and finished by rubbing with abrasives. An abrasive is a hard gritty material used to wear a surface smooth; quartz sand was the Egyptian stone worker's abrasive, worked with saws and drills of softer metal to cut the hardest stone. Nothing about the method is mysterious. It is layout, patience, and small removals, the same method this lesson teaches, with harder-won tools.
Stone Carving: Egypt and After
Egypt raised stone carving to an industrial art. From before 3000 BCE, Egyptian stone workers were producing vessels of alabaster, limestone, and even granite and basalt, some with walls only a few millimetres thick — in alabaster, thin enough to pass light. Their cutting tools were copper and stone picks; their drills were weighted and fitted with bits of the hardest stone; and their great secret was abrasion. A copper saw or a tubular drill, soft in itself, will cut granite if it is worked with quartz sand: the sand does the cutting, and the tool only guides it. Egyptian carvers produced the obelisks, colossal statues, stelae, and relief-covered walls that still define the civilization, and they laid the work out before they cut it. Reliefs survive with the sculptors' guiding gridlines still visible on the stone, the layout of a workshop that measured twice as a matter of doctrine.
The medieval world carved stone at the scale of cathedrals. Masons worked with mallet and chisel families much like the ones on a modern bench, templates for repeated shapes, and lodge traditions that guarded both technique and standards. Their carving is the roof bosses, capitals, and gargoyles of the great churches, and it rests on the same sequence this lesson teaches: the design set out first, the mass removed in stages, the detail last, and never a hand where the chips fall.
Soap and basswood are the modern answer to an old teaching problem: how does a beginner learn subtraction without ruining expensive material or soft fingers? Soap carves with a table knife, forgives nearly everything, and costs almost nothing; it has taught first carving in schools and scout troops for generations. Basswood, pale, soft, and fine-grained, with grain so even it is easy to read, is the standard first wood of carving teachers for the same reason: it cuts more evenly in every direction than almost any other wood, so the student's attention stays on the line and the tool, where it belongs. Soft stone, such as steatite, which is soapstone by another name, waits one step beyond, in the next lesson's inscription work.
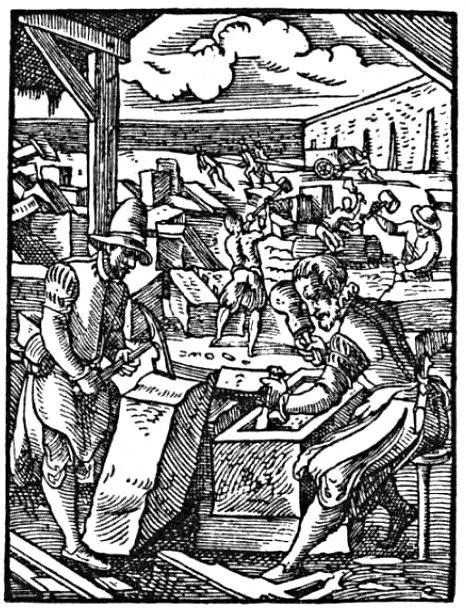
A stonemason dressing stone with mallet and chisel, 1568 woodcut.
Woodcut from the Ständebuch (Book of Trades), Frankfurt, 1568. Public domain, via Wikimedia Commons.
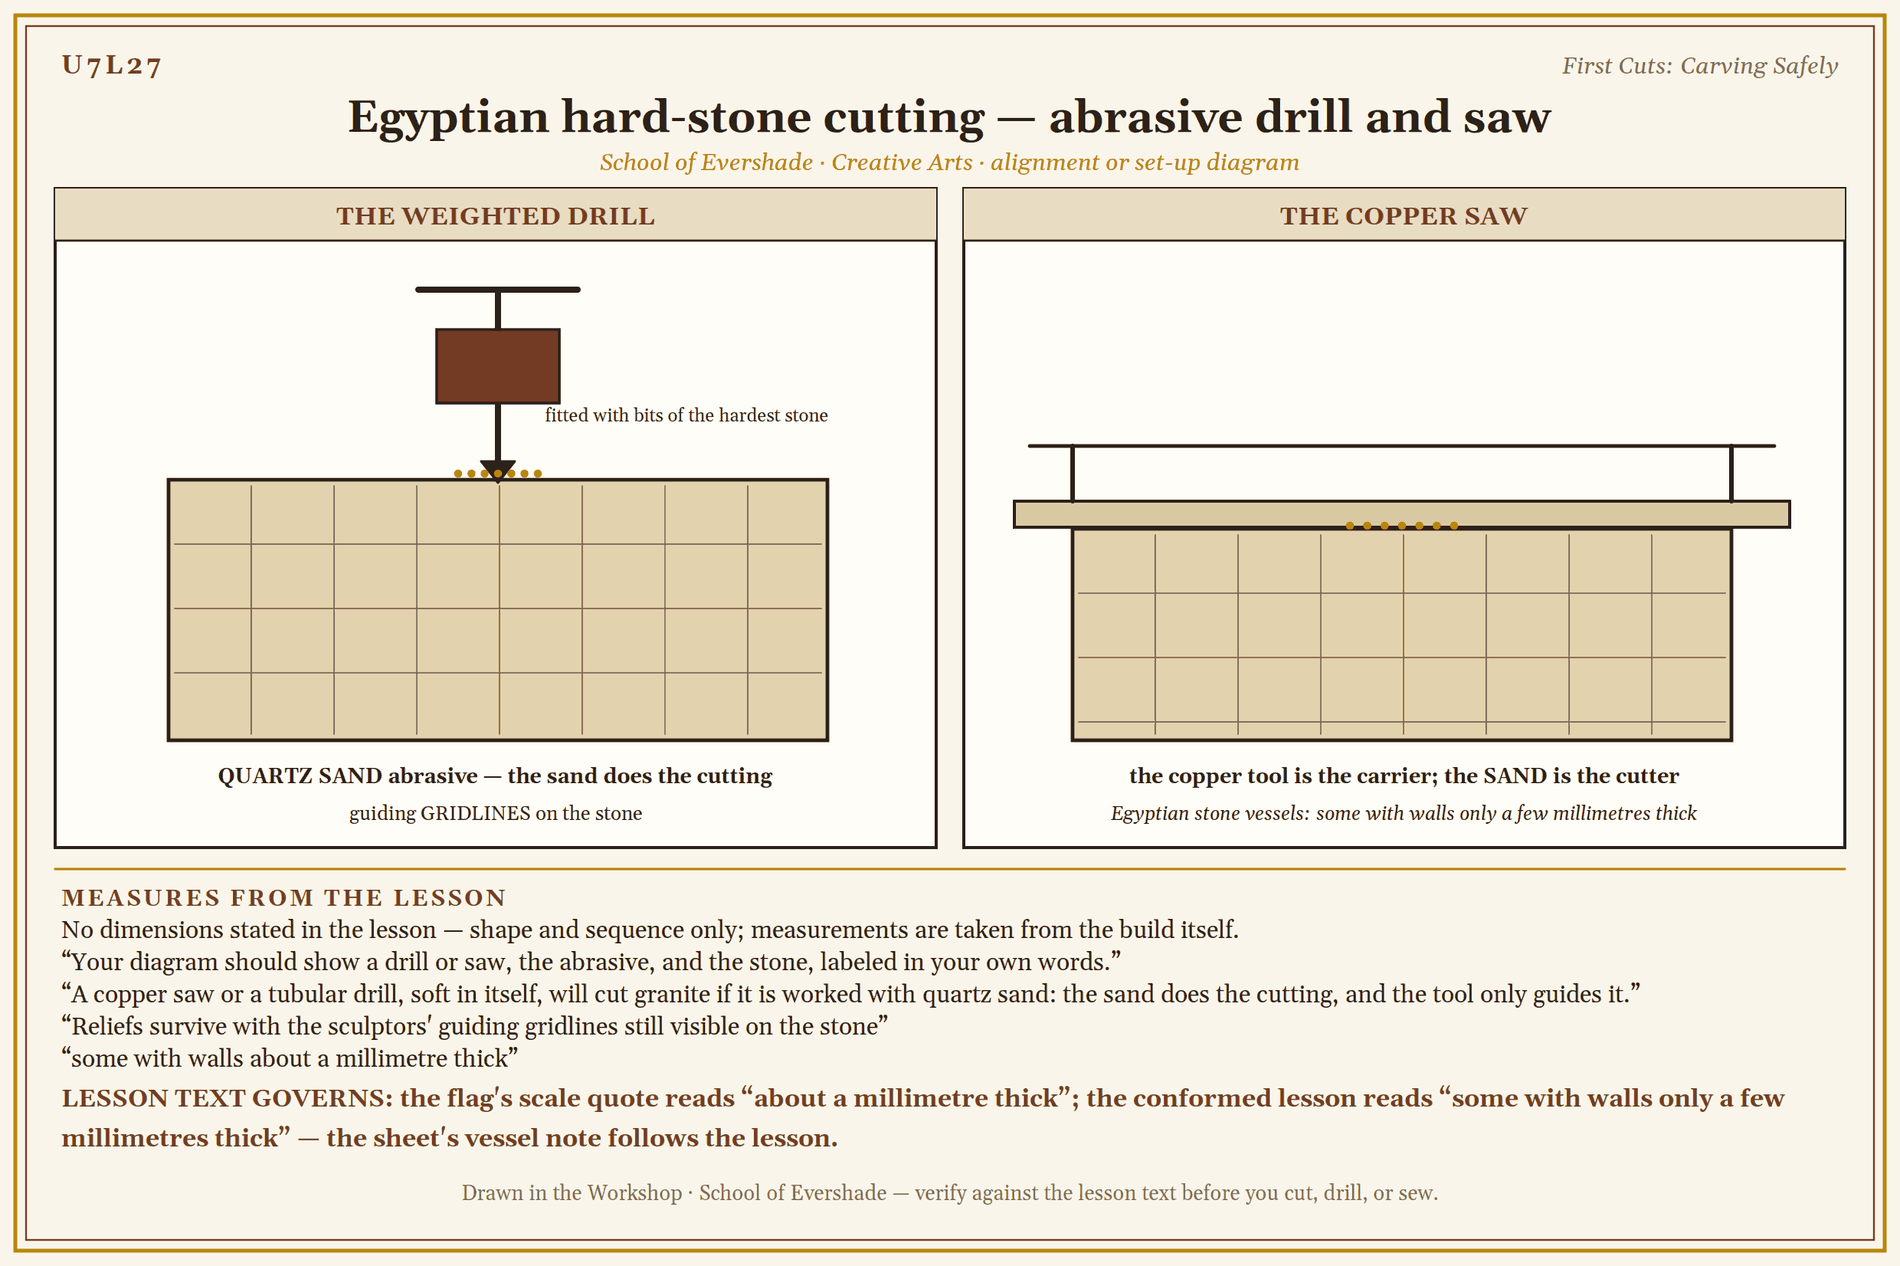
Egyptian hard-stone cutting — abrasive drill and saw
A Sealed Note from Professor Timberclank
Carving tools are honest tools. A sharp chisel does exactly what the hand tells it, including the thing the hand did not mean.
So we keep the rules plain. The work is clamped or stopped on the bench, never held in the hand against the blade. Both hands stay behind the cutting edge, or one hand holds the tool and the other holds the mallet, and no hand is ever in the road the edge is traveling. We cut away from the body. We walk with tools down at our sides, edges turned in.
And the rule I will ask you about when you leave this lesson: brush before chisel. When chips and dust crowd the line, we stop, we set the chisel down or hold it still, and we clear the work with the brush. Never with a sweep of the fingers. The line you cannot see is the line you will miss, and the hand that goes hunting for it among fresh chips is the hand that finds the edge. We stop. We make it safe. Then we begin again.
PROFESSOR COGBRANCH TIMBERCLANK
Creative Arts Workshop
Master Artisan, Head of House Occidens
Technique: The First Cuts
Setup. Work at a bench or sturdy table, seated or standing so the work is below elbow height. Secure the piece: a bench hook, a nonslip mat, or a clamp with a pad to protect the surface. A bench hook and stop are simple bench fittings that hold the work still against the pressure of the cut; carving is always done on secured work, and a piece held in the hand against a blade is an accident arranging itself. Lay out the tools to the side of your dominant hand, edges facing away. Good light is a safety tool here; you must see the line.
Layout. Draw the design on the material: for the drill, a straight border line and a simple leaf or diamond shape, drawn boldly. In soap, the drawing can be scratched with a skewer or toothpick. In basswood, pencil, then darken the lines you must keep. Carve to the line means the line stays visible until the final pass; cut up to it, not through it.
The grip and the cut. For knife work in soap and basswood, the thumb of the knife hand may brace on the work to control a paring cut, always with the edge moving away from the bracing thumb. For gouge and chisel work, two hands: one drives, one guides near the blade, both behind the edge, and the mallet hand, when a mallet is used, never trades places with the guide hand. A gouge is a chisel with a curved blade, used to scoop and hollow, described by the curve of its edge, from nearly flat to a deep U. Take thin cuts. A carving that goes wrong almost always went wrong in one thick, ambitious slice.
Brush before chisel. After every few cuts, stop and brush the chips away from the line with a soft brush. Check the line against the layout. Check the depth against the design. Then cut again. This rhythm, cut, brush, look, is not slowness. It is the craft itself.
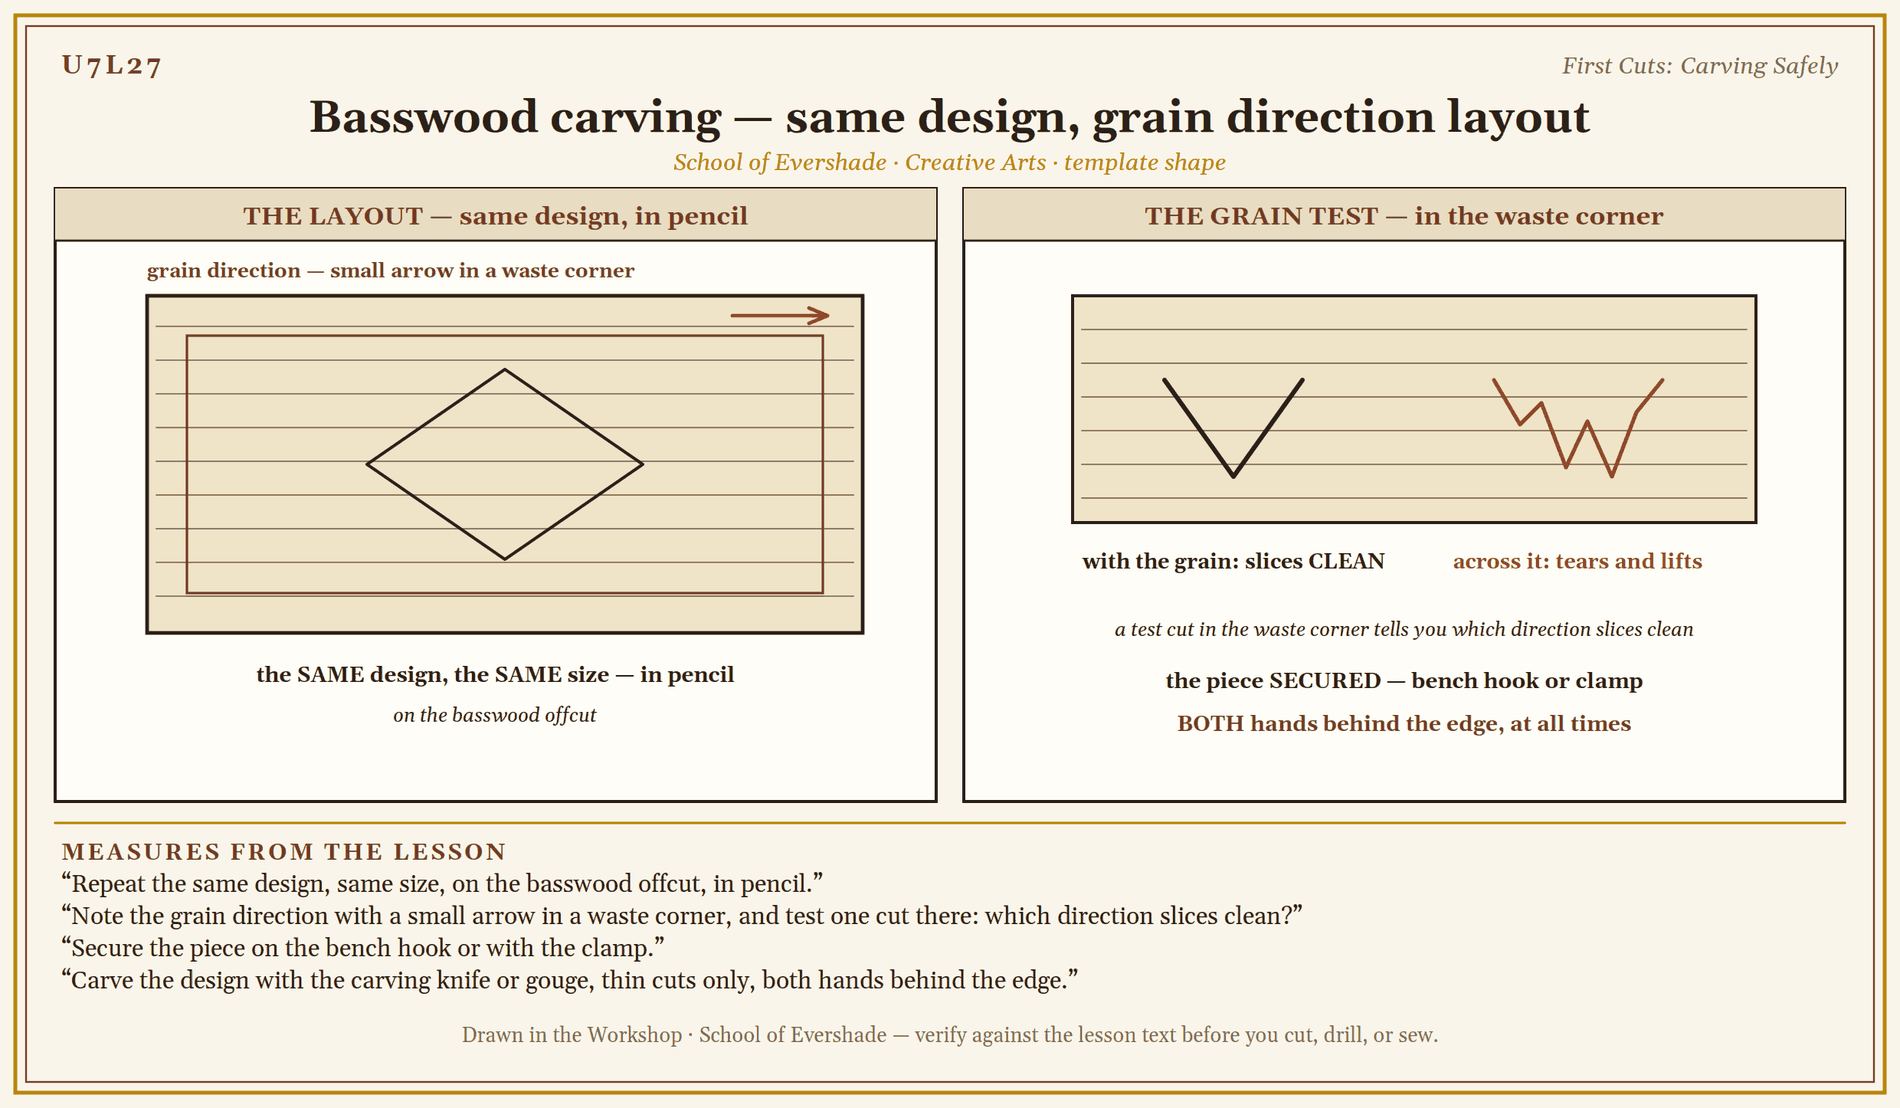
Stopping and finishing. A cut that starts to tear rather than slice means a dull tool or the wrong direction; stop and correct it rather than forcing on. In basswood, test the grain direction on a waste corner first: carve the side that slices clean, and plan the work to favor it. Finish the drills by brushing the piece clean and comparing it honestly with the layout. What matches? What wandered? The answers go in the workbook.
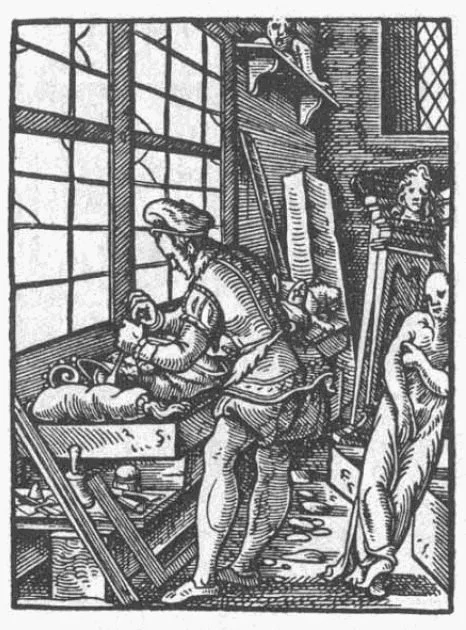
A sculptor carving a figure at his bench, mallet and chisel in hand, 1568 woodcut.
Woodcut from the Ständebuch (Book of Trades), Frankfurt, 1568. Public domain, via Wikimedia Commons.
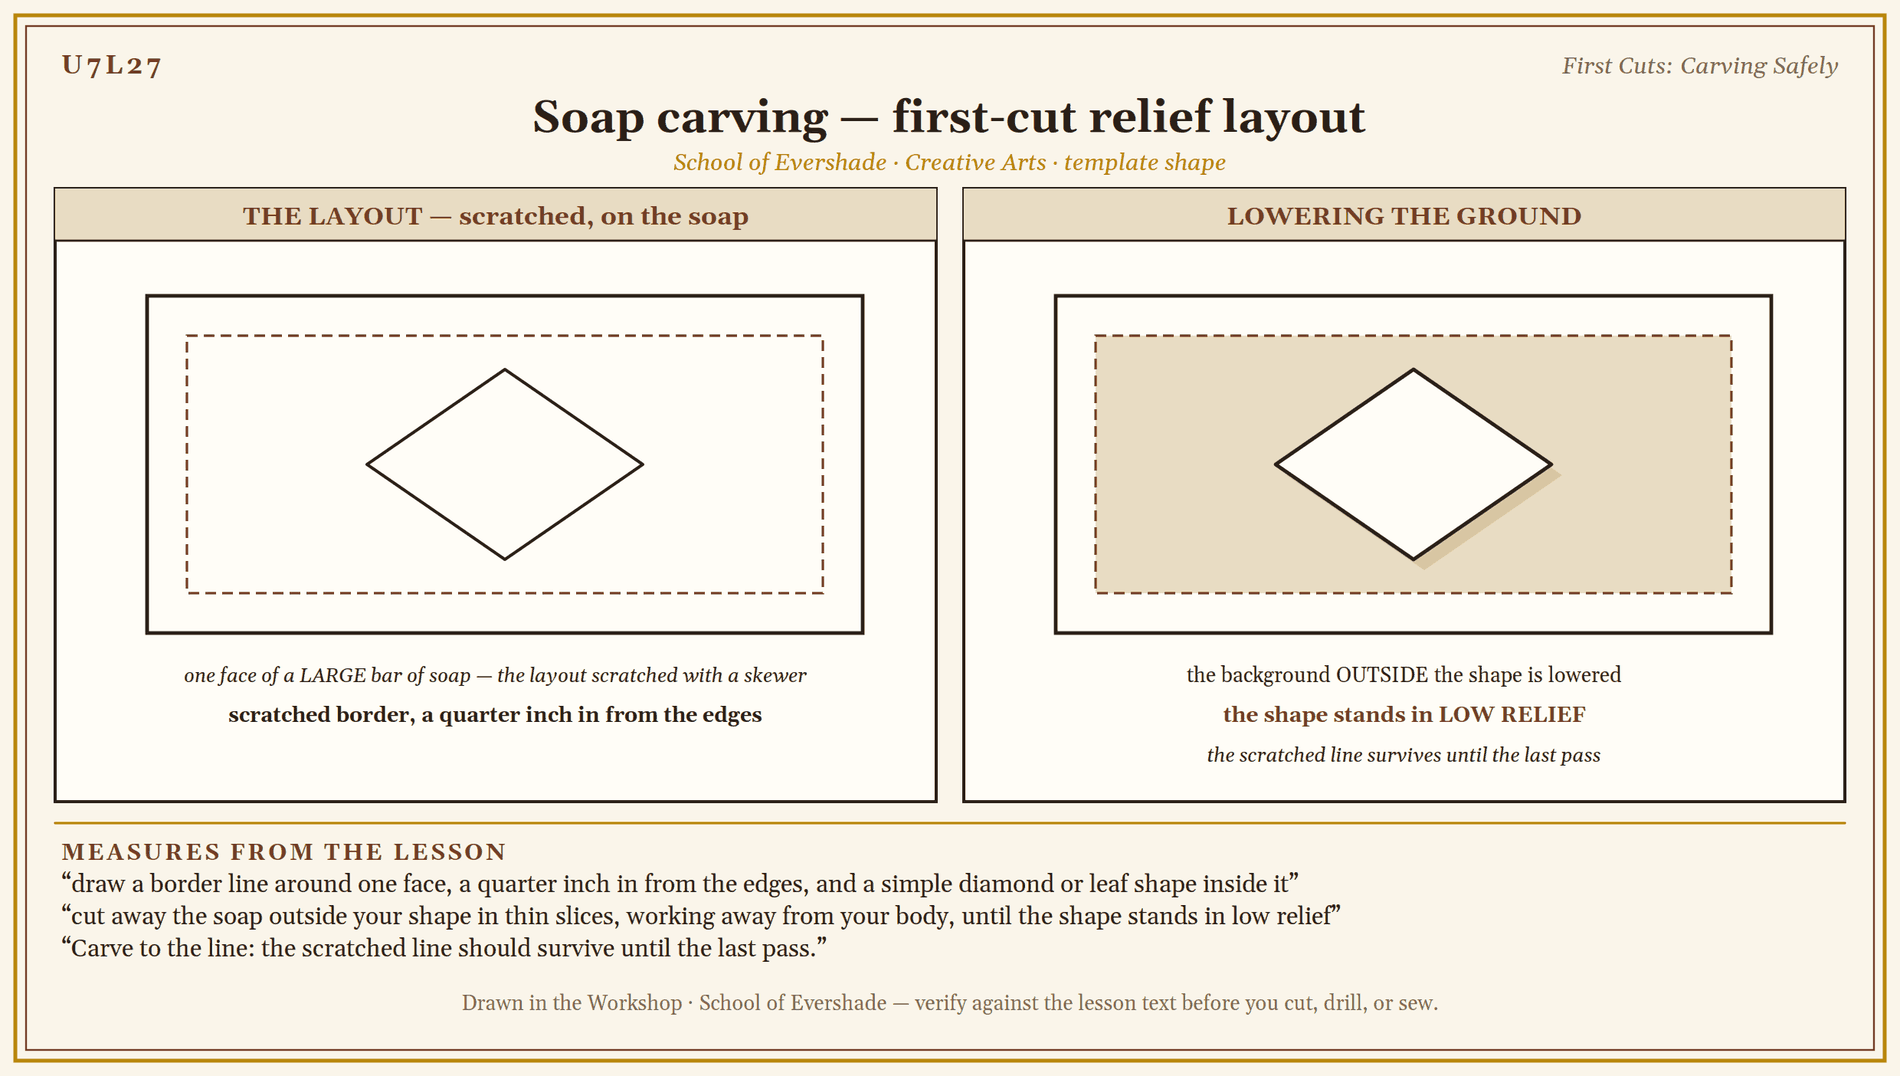
Soap carving — first-cut relief layout
Basswood carving — same design, grain direction layout
Practice Practical: First-Cut Drills
This drill is checked for control and for the brush habit, not for beauty. All cuts are practice cuts.
- Layout in soap. Choose a large bar of soap. With a skewer, draw a border line around one face, a quarter inch in from the edges, and a simple diamond or leaf shape inside it. Darken the lines until they read clearly.
- Carve the soap. Secure the bar on a nonslip mat. With the table knife, cut away the soap outside your shape in thin slices, working away from your body, until the shape stands in low relief. Relief is carving in which the design stands out from a lowered background, as on a carved panel or a stone inscription; most inscription carving, including next lesson's, is shallow relief. After every few cuts, stop and brush the line clear. Carve to the line: the scratched line should survive until the last pass.
- Layout in basswood. Repeat the same design, same size, on the basswood offcut, in pencil. Note the grain direction with a small arrow in a waste corner, and test one cut there: which direction slices clean?
- Carve the basswood. Secure the piece on the bench hook or with the clamp. Carve the design with the carving knife or gouge, thin cuts only, both hands behind the edge. Brush before chisel, every time the line fills with chips. Stop at the first tear and correct direction rather than forcing the cut.
- Compare. Set the soap and basswood carvings side by side. Where did the line wander in each? Which material forgave, and which charged you? Write the answers in your workbook.
- Put away. Brush the bench down into the bin, never across the floor where feet will find the chips. Tools wiped, edges sheathed or racked, work labeled with the date.
When your basswood line is the line you drew, and your brush moved before your chisel every time the chips gathered, your hands have learned what this lesson is for.
Assignment Manual
Assignment key: ✎ written work · ⚒ hands-on practical · ◐ both
Assignment I ⚒ — The Practice Practical
Complete the drill in this lesson: the same design carved in soap and in basswood, with the brush-before-chisel habit observed throughout. Your two drill pieces, kept side by side, are the record of the drill.
Assignment II ✎ — The Oldest Carvers
Using the lesson and the sources below, write a short account of carving before history. Cover: the Hohle Fels figure and what its age and material tell us, the engraved ochre of Blombos Cave and what it proves even though its meaning is unknown, and one way in which those first carvers' method is the same method you used on soap.
Assignment III ◐ — The Egyptian Method
Explain, in a page of writing with one labeled diagram, how Egyptian stone workers cut hard stone with softer tools: the role of quartz sand abrasives, the weighted drill, and the guiding gridlines. Your diagram should show a drill or saw, the abrasive, and the stone, labeled in your own words.
Materials
Level One (household)
- A large bar of plain soap (soft white soap carves easiest), a table knife or butter knife, a skewer or toothpick for layout, and a soft brush
- A basswood offcut or carving blank, a pencil, and a beginner's carving knife or a small gouge, used with an adult's permission and supervision
- A bench hook, clamp, or nonslip mat to secure the work
- A cut-resistant glove for the holding hand, if available, and safety glasses for stone-adjacent work
Level Two (historical materials, modern safety)
Everything in Level One, plus:
- A small set of proper carving gouges and a mallet of wood or rawhide
- A piece of steatite (soapstone) and a riffler or small rasp, for a first taste of stone, worked wet to keep dust down and only with an adult present
- Ochre pigment and a flat stone, to try marking layout the Blombos way before cutting
- A proper bench stop and a strop for keeping edges keen
Both levels teach the same craft: layout first, thin cuts, brush before chisel. Level One's soap and basswood are not lesser materials; they are the teaching materials carving masters still start their own apprentices on.
Reflection Questions
Answer the following questions in your workbook.
- Where did your line wander first, in soap or in basswood, and what caused it: layout, grip, or impatience?
- Why does a subtractive craft demand more planning than a craft that adds material?
- The brush-before-chisel rule costs a few seconds each time it is followed. What does it buy?
- Egyptian carvers laid gridlines on stone they were about to carve for months. What does that tell you about how they valued layout?
- Which felt more honest in your hands, the forgiving soap or the basswood that charged for mistakes, and what will you do differently on stone because of it?
Professor's Review
Two small pieces sit on your bench now, and between them they hold the whole lesson: a design you settled before you cut, thin slices instead of one ambitious bite, and a brush that moved before the chisel every time the line began to disappear.
You have also stood, briefly, in very old company. The hands that carved ivory in a German cave and scored ochre in a South African one were doing what your hands did today, with worse tools and the same patience. Egypt's gridlines and the medieval lodges are the same lesson written larger: the cutting is the last part of carving, and the smallest.
Next lesson spends this ticket. We take the chisel to words themselves: runestones, ogham sticks, and inscription plaques, carved the way their first makers carved them and painted, as the evidence says they were painted, with Professor Webblethorn's scripts and this workshop's hands.
PROFESSOR COGBRANCH TIMBERCLANK
Creative Arts Workshop
Master Artisan, Head of House Occidens
Cross-Class Connections

Runes · Unit I, Lesson 3 — The Engineered Illusion
In my classroom, scholars, an inscription begins with a hard point against a hard surface: my third lesson reads the Old Persian script, whose signs were pressed into clay and cut into rock by scribes whose whole language fits in thirty-six signs, and whose own connections send their readers to this bench. The reading of the signs is mine to teach. The cutting of them is taught here: layout settled before the blade, first cuts taken safely in soap and basswood before soft stone, the brush moving before the chisel. Learn the script with me, then come and learn its edge, and the two halves of the inscription craft are yours.
PROFESSOR THISTLELOOM WEBBLETHORN
Runes & Ancient Writing
Further Reading & Sources
Archaeology Magazine, "Artifact: Female 'Venus' Figurine." The mammoth-ivory figure from Hohle Fels, at least 37,000 years old and among the oldest figurative art known.
Smithsonian Magazine, "Stone Age Markings May Be the Oldest Drawing Ever Discovered." The Blombos Cave ochre drawing of about 73,000 years ago, the cave's earlier engraved ochre pieces of up to 100,000 years ago, and what such marks can and cannot tell us.
The Fitzwilliam Museum, "The Ancient Egyptians: Materials and Technology" fact sheet (PDF). Egyptian stone carving, copper and stone tools, weighted drills, quartz sand abrasives, and reliefs with their gridlines still visible.
Student-friendly starting points for exploring this lesson's world. All links verified October 2026.
- Archaeology Magazine archive, artifact features. The Hohle Fels figurine presented as a single-object study: a good model for looking hard at one carved thing.
- Smithsonian Magazine, science coverage of Blombos Cave. The research debate over the oldest marks, told with the researchers' own caution about meanings we cannot recover.
- Print only: standard references on Paleolithic art and on soap and basswood carving instruction are held in most public libraries; ask for the carving section, where beginner texts begin, as this lesson does, with soap, basswood, and a marked line.
Submit your work for this lesson using the form below.
CONTINUE IN THE CREATIVE ARTS WORKSHOP
← Previous · Lesson 26: Shelves, Boxes & Storage That Lasts Next · Lesson 28: Runestones, Ogham Sticks & Inscription Plaques →
Unit VII · Carving & Metal Creative Arts Workshop · All 39 Lessons
Bookstore Shelf The Library · Creative Arts Shelf Course Supplies
The rest of Unit VII: Lesson 28 · Runestones, Ogham Sticks & Inscription Plaques · Lesson 29 · Foil, Wire & Simple Metalwork