

CELESTIAL STUDIES
Unit VI · Lesson 30The Planisphere & Star Charts
Professor Vesper Glimmerwick
Astronomer & Celestial Historian
The Celestial Tower • School of Evershade
Professor's Introduction

The wheel is turning, scholars,
If you have ever wandered into my corner of the Celestial Tower after dark, you will have seen the shelves. They sag. They sag under the weight of star charts: engraved plates from old atlases, paper wheels yellowed at the edges, a brass astrolabe I am still restoring, and one very precious circular map copied from a temple ceiling in Egypt, which I keep flat under glass because it is older than any of us can quite believe.
I collect these things because each one is a different answer to the same question. The question is: how do you hold the sky still long enough to learn it? The sky never stops turning. The stars rise four minutes earlier every night, the seasons wheel the constellations around like slow dancers, and no chart drawn for one evening will serve for the next. So for thousands of years, skywatchers have been inventing ways to make the turning sky sit still on a flat page.
The most useful answer anyone ever found fits in your pocket. It is called a planisphere, which is a grand word for a humble thing: two disks of card that turn on a single pin. Set the date against the hour, and the little window shows you exactly which stars are above your horizon at that moment. Sailors carried them. Teachers carried them. I carry one on every flight, tucked where the wind cannot take it, and I have never once been sorry.
In this lesson you will learn how the wheel works, how to read one, and the long history of the charts that led to it, from stone ceilings to copper engravings to the paper wheel itself. And then you will build one for your own latitude, with your own hands, because this is the instrument you will carry into your capstone. Chart Your Sky asks you to know your sky the way a musician knows an instrument, and every musician needs an instrument of their own.
One small warning, given with love: the build asks for patience, not talent. Measure twice, cut once, and do not hurry the pin. The sky has waited this long for you. It can wait an afternoon.
PROFESSOR VESPER GLIMMERWICK
Celestial Studies
Astronomer & Celestial Historian
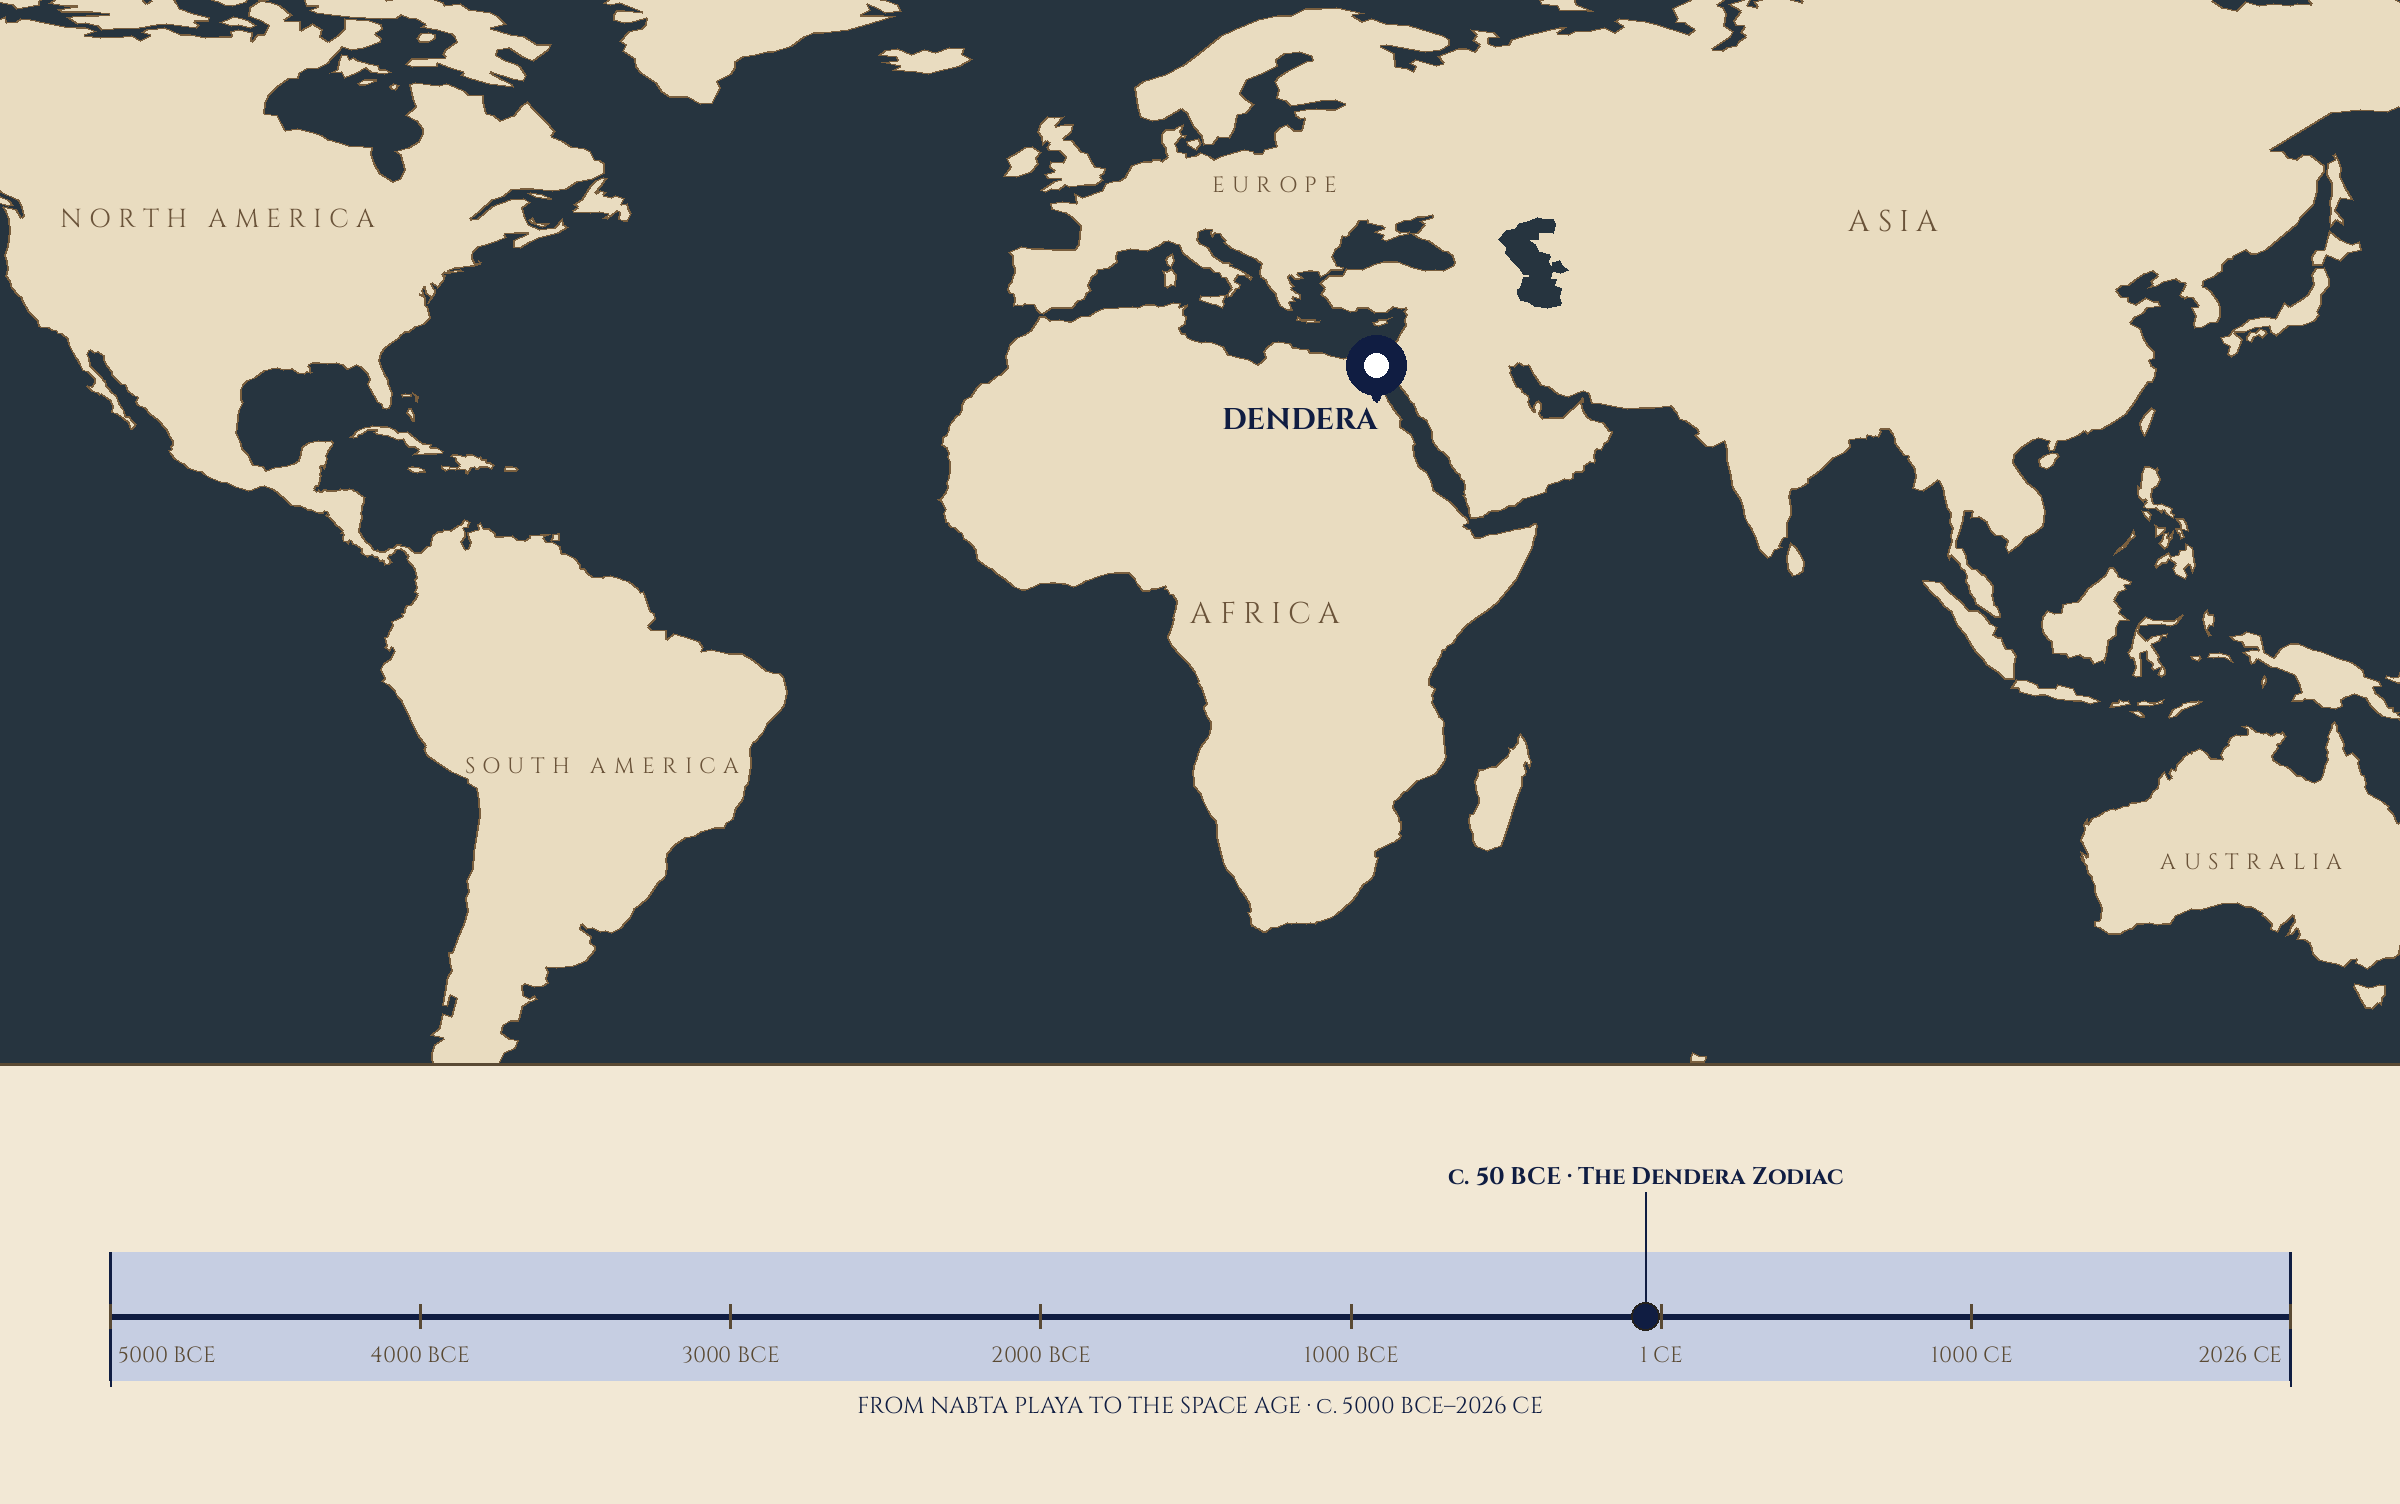
Where and when: DENDERA, c. 50 BCE · The Dendera Zodiac (year −50) — The Planisphere & Star Charts. The pin is this lesson. The line beneath the map is our road: every stop a moment when watching the sky changed, every lesson a pin upon it.
Lesson Objectives
By the end of this lesson, you will be able to:
- Explain, in their own words, how a planisphere works: what the rotating star disk represents, what the horizon mask represents, and why the two turn against each other.
- Read a planisphere step by step: set a date and time, orient the instrument, and match its window to the real sky.
- Explain why every planisphere is built for one latitude, and what goes wrong when you use the wrong one.
- Summarize the history of printed sky charts: from ancient circular sky maps, through the mathematics of flattening the sphere, to Bayer's Uranometria of 1603 and the modern star wheel.
- Build a working planisphere for their own latitude, with a pivoting star disk and a latitude-matched horizon window, and verify it with calibration checks.
- Describe how the southern-hemisphere planisphere differs, and why.
Reading this lesson: ★ marks the passages to remember. They return on the unit quiz and the class test. Check in questions ask the material back as you go; answer them in your workbook when you meet them.
Working this lesson: Your assignment packet is the first download on this page. Work in it as the lesson moves along, answering each exercise as its subject is taught — or read the lesson through for your notes and take the exercises as homework afterward. Both are proper ways to sit this class. Signposts in the reading tell you where each exercise belongs. Written answers are short answers in your own words; a few honest lines are worth more than a filled page.
Your Assignment Packet
This lesson's exercises live in its packet: the Lexicon Handout (every term of the lesson), Materials, Guided Practice, the Assignment Manual with its answer key for self-checking, the Reflection Questions, and the Workbook Checklist. Download the packet before you begin and keep it beside you as you read. The packet's exercises are Glimmerwick's own word for the work: Exercise I: Build and Calibrate Your Planisphere ⚒, Exercise II: Reading the Wheel ◐, and Exercise III: Star Charts Through Time ✎. The manual's own Lesson Quiz items are not printed in the packet — its key stands in the packet's Answers & Self-Check for self-marking, and the items themselves pool to the Unit VI Quiz, where they will meet you again.
Safety Briefing
Night observing comes first, as always. All observing for this lesson is done with an adult present, in a familiar and safe location. Tell someone where you are going and when you expect to return. Dress warmly, bring a red-filtered flashlight to protect your night vision, and watch your footing in the dark.
Sharp tools need respect. The build calls for scissors and a craft knife or compass point for cutting the window and the pivot hole. An adult should handle the craft knife, or supervise closely. Cut away from your fingers, on a protected surface, never toward your hand.
The brass fastener is sharp on both ends. The split pin that forms the pivot has pointed legs. Push it through with the points away from your fingers, spread the legs flat on the back of the wheel, and cover the back with a small circle of tape so nothing snags or scratches.
This is a night instrument. A planisphere maps the stars. It is never used for the sun, and nothing in this lesson involves looking at or near the sun.
The Wonder
Go outside tonight, if the sky is clear, and look up for one full minute without trying to name a single thing. Just look.
Now imagine holding all of that in one hand. Every star you can see, and every star you cannot see because it has not risen yet or has already set, all of it arranged on a paper disk no wider than a dinner plate. Turn the disk a little, and an hour passes: the stars wheel westward. Turn it a little more, and a month passes: new constellations climb into the window while old ones sink away. You are holding time itself, or at least the sky's version of it, turning under your thumb.
That is what a planisphere is. It is not a picture of the sky. It is a small working model of the sky, an analog computer made of card and a brass pin, and it answers the only question a skywatcher ever really asks: what is up there right now?
The wonder of it is not the card. The wonder is that it works at all, that the enormous turning sphere of the heavens can be flattened onto a disk, fitted with a window shaped for exactly your latitude, and trusted to tell the truth. People spent two thousand years getting the mathematics right. You are about to spend one afternoon getting the scissors right. Both are worth doing.
❦ In your workbook: record the wonder in your own way — the whole turning sky held in one hand, an hour or a month passing under your thumb, and the question the wheel answers: what is up there right now? — copy, sketch, or note what matters.
The Story
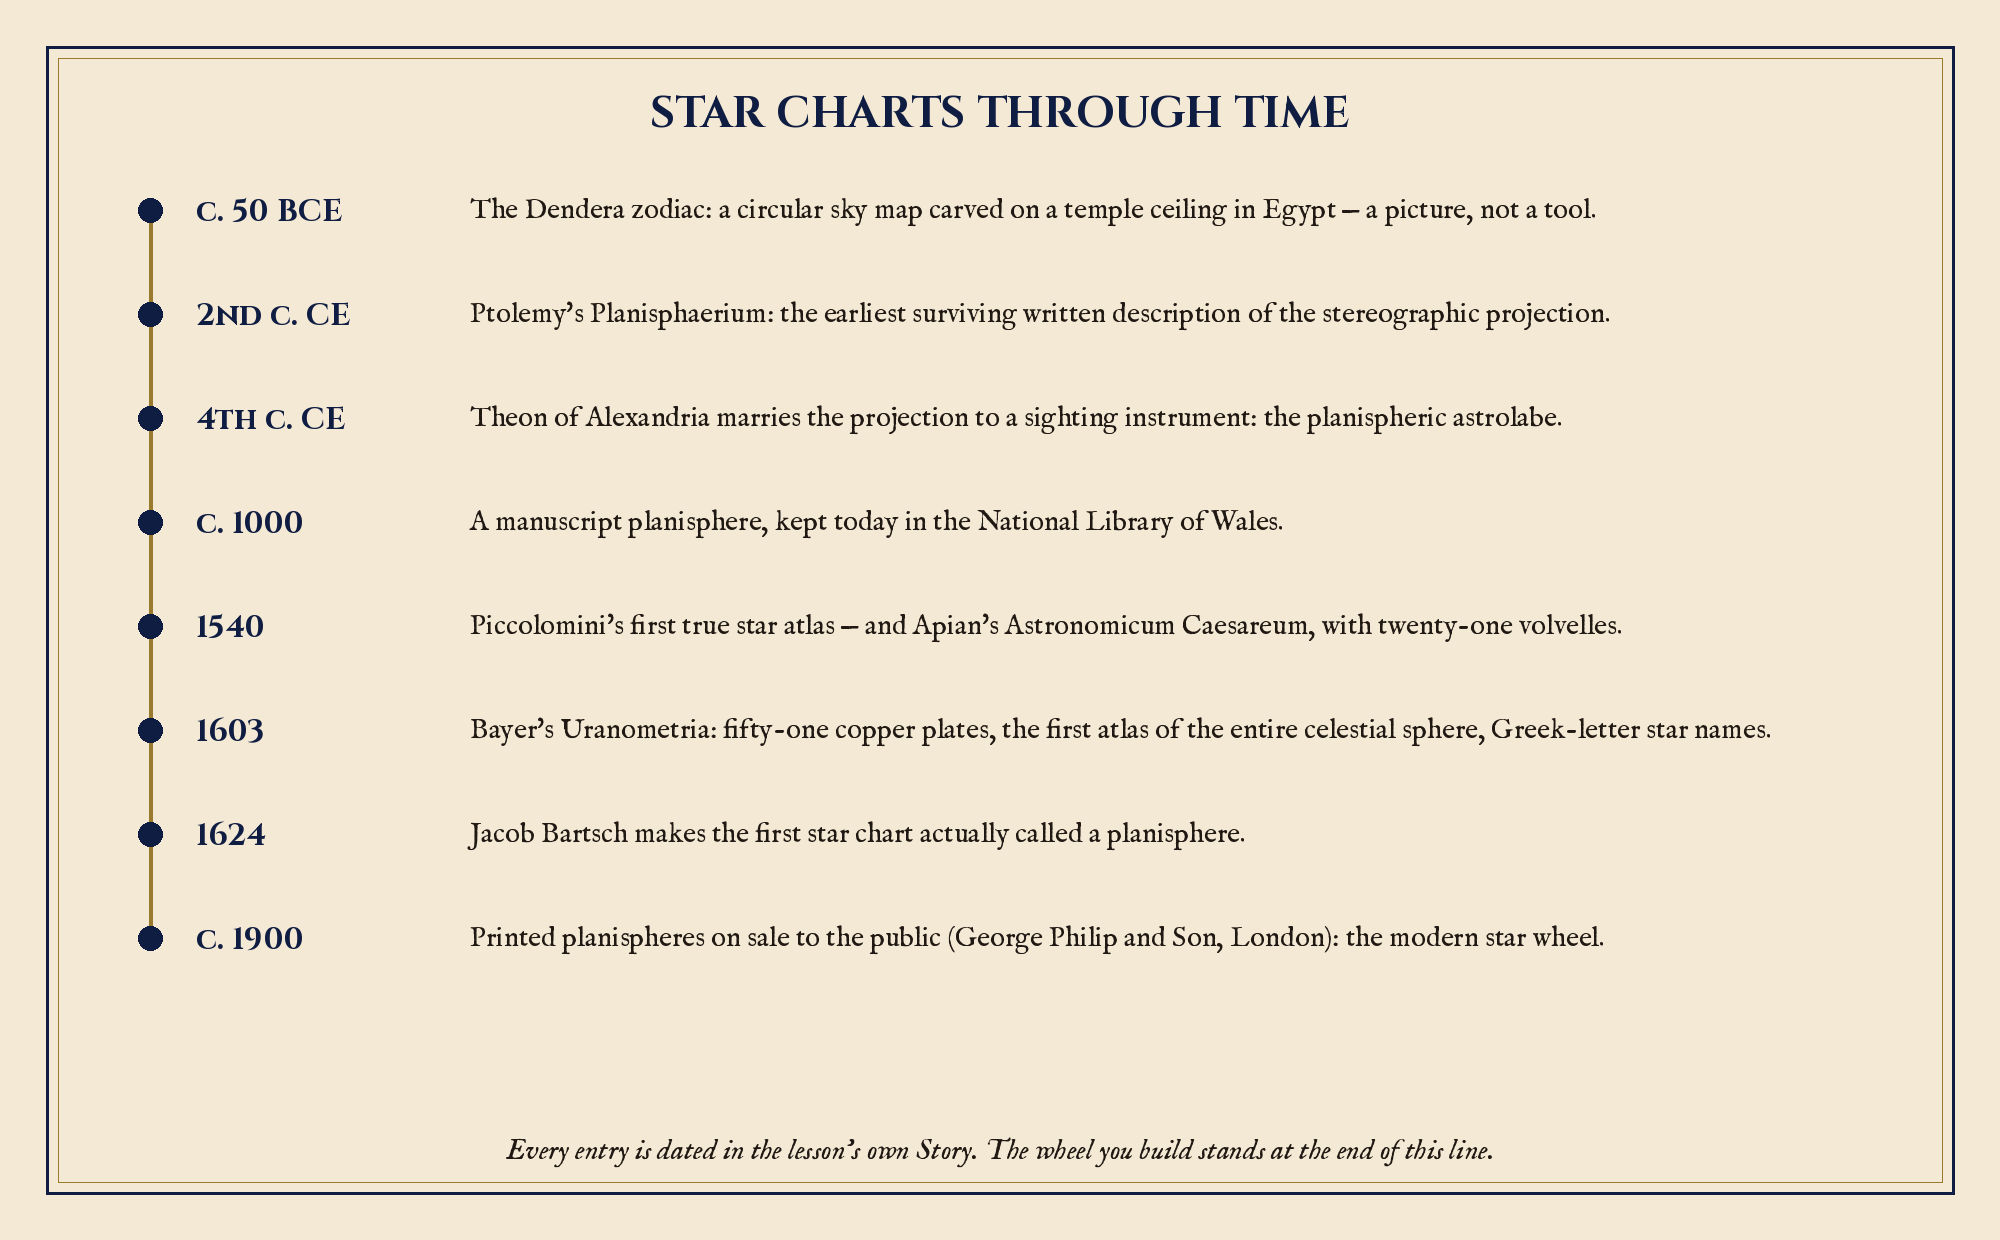
Star charts through time: every date on this plate is a turning point named in the lesson, from a stone ceiling in Egypt to the paper wheel in your pocket.
Built digitally for this overhaul (Python/PIL, typeset labels), from the dates taught in the lesson text.
Pictures of the sky before there were instruments
Long before anyone built a wheel, people drew the sky. One of the most remarkable survivals is the Dendera zodiac, a circular sky map carved as a bas-relief on the ceiling of a chapel in the temple of Hathor at Dendera in Egypt. Scholars have dated it to about 50 BCE, in the reign of Cleopatra VII, the late Ptolemaic period. It mixes Egyptian constellations with Babylonian and Greek zodiac figures, all arranged in a great stone circle, and it now rests in the Louvre in Paris. It is a picture, not a tool: it does not turn, and it tells no time. But it shows the deep human urge this lesson is about, the wish to lay the whole sky out flat where it can be studied.
❦ In your workbook: record the stone sky in your own way — a circular map carved on a temple ceiling at Dendera, dated to about 50 BCE, Egyptian figures mixed with Babylonian and Greek — a picture, not a tool — copy, sketch, or note what matters.
The mathematics of flattening the sky
A sphere cannot be flattened without distortion. Anyone who has tried to gift-wrap a ball knows this in their fingers. Mapmakers call the recipes for flattening spheres projections, and the projection behind most star wheels is an old and beautiful one: the stereographic projection.
Picture the celestial sphere with a tiny light at one celestial pole. The light shines through each star and casts its shadow onto a flat sheet laid across the equator. Near the pole opposite the light, the shadows fall close together and true to shape. Farther out, toward the light's own pole, the shadows stretch and swell, growing enormous near the edges. That stretching is the price of flatness, and every planisphere pays it: constellations near the rim of the wheel look larger than they should, the way Greenland swells on certain world maps.
★ The idea is ancient. Its earliest surviving written description appears in the Planisphaerium, written by Claudius Ptolemy in the second century CE, where it is called the planisphere projection. A later writer credited it to Hipparchus, two centuries before Ptolemy, though modern scholars treat that attribution with caution: the honest statement is that Greek astronomers knew it early, and Ptolemy is the first we can prove wrote it down. By the fourth century, Theon of Alexandria had married the projection to a sighting instrument to make the planispheric astrolabe, the famous brass "star taker." Islamic astronomers of the medieval period developed the astrolabe into a superb instrument, and it reached Western Europe in the eleventh and twelfth centuries, carried in translated Arabic texts. The word itself, Latin planisphaerium, was Ptolemy's: his name for drawing a sphere flat on a plane.
Check in: What is the stereographic projection, where does its earliest surviving written description appear — and why do the constellations near a planisphere's rim look larger than they should?
❦ In your workbook: record the flattening in your own way — a light at one pole, shadows on a sheet across the equator, shapes true near the center and stretched at the rim, and Ptolemy's Planisphaerium as the first description we can prove — copy, sketch, or note what matters.
Paper wheels
There is a second ancestor, humbler and closer to our build. Medieval books of astronomy often contained volvelles: disks of parchment or paper, pinned at the center so they could turn, printed with scales and pointers for working out astronomical problems. The word comes from the medieval Latin volvere, to turn. Some volvelles calculated the moon's phases. Some found the sun's place in the zodiac. Ramon Llull used rotating disks in the late thirteenth century, and Peter Apian's Astronomicum Caesareum of 1540 contained twenty-one of them, some with as many as six moving dials, silk threads for sight lines, and tiny pearl markers. A volvelle is a computer made of paper, three centuries before anyone used the word computer for a machine. Your planisphere belongs to this family. When you turn its disk, you are doing what a medieval scholar did with a volvella, only your question is simpler: what stars are up?
The first star chart actually called a planisphere was made in 1624 by Jacob Bartsch, who was Johannes Kepler's son-in-law. And there is a lovely manuscript survivor even older than the name: a planisphere drawn around the year 1000, kept today in the National Library of Wales. Paper wheels for the sky are a thousand years old. Yours will be in good company.
Check in: What is a volvelle, what could the medieval ones calculate — and who made the first star chart actually called a planisphere, and when?
❦ In your workbook: record the paper wheels in your own way — parchment disks pinned at the center, Llull's turning circles, Apian's twenty-one volvelles of 1540, and Bartsch's named planisphere of 1624 — copy, sketch, or note what matters.
Bayer's Uranometria: the atlas that mapped everything
Printed star charts grew up alongside printed books. The first true star atlas, a book of individual constellation charts drawn as seen from Earth rather than as figures on a globe, was published in 1540 by the Italian astronomer Alessandro Piccolomini. But the first great star atlas, and the first to chart the entire celestial sphere, came sixty-three years later from an unexpected author: Johann Bayer, a lawyer in Augsburg, Germany, whose passion was astronomy.
★ Bayer's Uranometria appeared in 1603: fifty-one star charts engraved on copper plates by the artist Alexander Mair. Forty-eight plates show the forty-eight constellations of Ptolemy. One plate gathers twelve new southern constellations, unknown to the ancient world, based on observations by the Dutch navigator Pieter Dirkszoon Keyser. Two final plates give overviews of the northern and southern celestial hemispheres. The star positions came largely from the great Danish observer Tycho Brahe's catalog, far more accurate than Ptolemy's, and more than twelve hundred stars are plotted.
Uranometria gave astronomy two lasting gifts. The first was beauty with accuracy: Mair's engravings are works of art, and the atlas was reprinted through the whole seventeenth century. The second was a naming system we still use. Bayer labeled the brighter stars of each constellation with Greek letters, roughly in order of brightness: Alpha, Beta, Gamma, and so on. That is why Betelgeuse is also Alpha Orionis and Rigel is Beta Orionis, names you met in Lesson 20. Astronomers still call these Bayer designations, four centuries later.
One caution from the history, which your professor insists on: Bayer drew his constellations as seen from Earth looking up, which mirrors the old globe convention of drawing figures as seen from outside the celestial sphere. It is the same mirror puzzle you will meet when you lift your planisphere overhead. The sky looks different from inside than from outside, and every chartmaker must choose a side.
Check in: What two lasting gifts did Uranometria give astronomy — and what mirror caution does your professor insist on about how Bayer drew his figures?
❦ In your workbook: record the great atlas in your own way — fifty-one copper plates, Tycho's positions, more than twelve hundred stars, and Greek letters for the bright ones, Alpha and Beta and on — copy, sketch, or note what matters.
In your packet: Exercise III: Star Charts Through Time ✎ begins here — its first two parts study one of Bayer's plates against your own star disk. Work it now, or mark the place and take it as homework — your choice.
The modern star wheel
The paper star wheel became a staple of amateur astronomy by about 1900: publishers such as George Philip and Son in London were selling printed planispheres to the public. The design has barely changed since, because it can barely be improved. A star disk, a horizon mask, a pivot, a date scale, an hour scale: that is the whole machine.
You can buy handsome planispheres today, and the lesson's Further Reading points to a fine printable one from Sky & Telescope. But a bought wheel teaches your hands nothing. For the capstone you need an instrument you understand bolt by bolt, or rather pin by pin. So now we learn the mechanism, and then we build.
❦ In your workbook: record the modern wheel in your own way — a star disk, a horizon mask, a pivot, a date scale, an hour scale: the whole machine, barely changed since about 1900 — copy, sketch, or note what matters.
The Mechanism
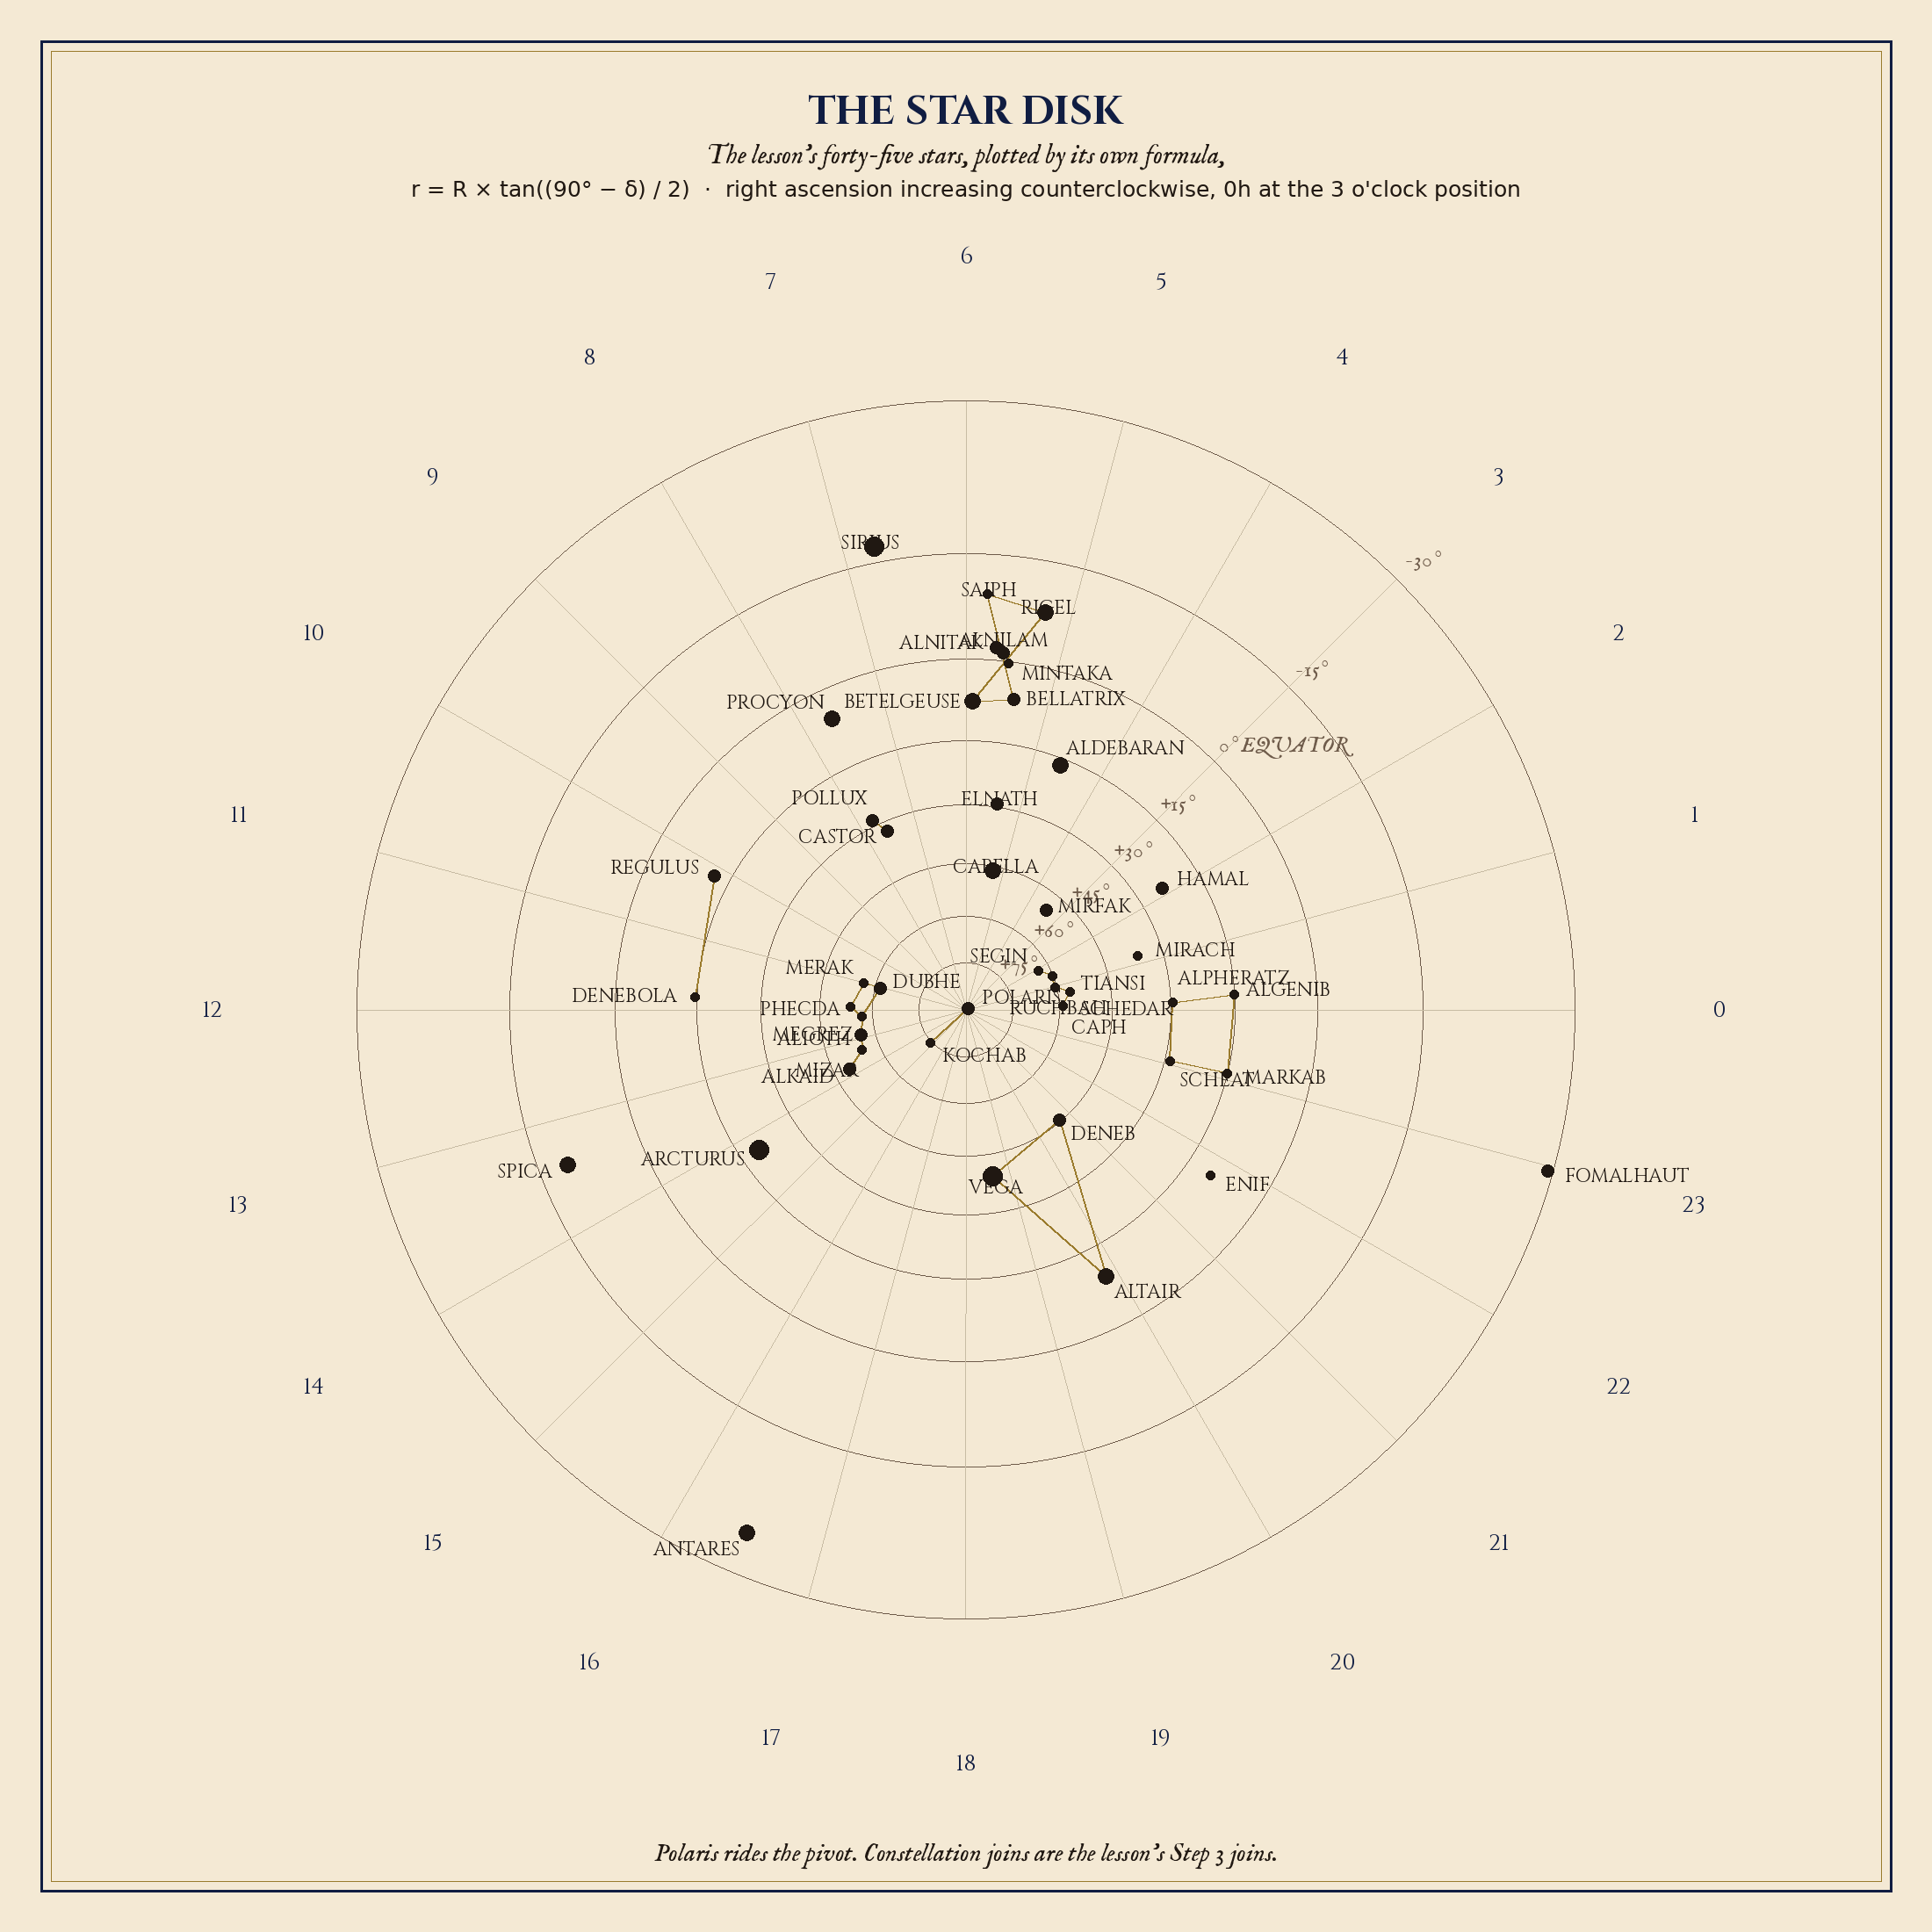
The star disk, plotted from this lesson's own table: forty-five stars by right ascension and declination, r = R × tan((90° − δ) / 2). Compare it with the disk you draw in Step 2 — same stars, same rings, same joins.
Built digitally for this overhaul (Python/PIL) from the lesson's star table (J2000 coordinates verified against the Hipparcos catalog in the lesson's fact-check notes).
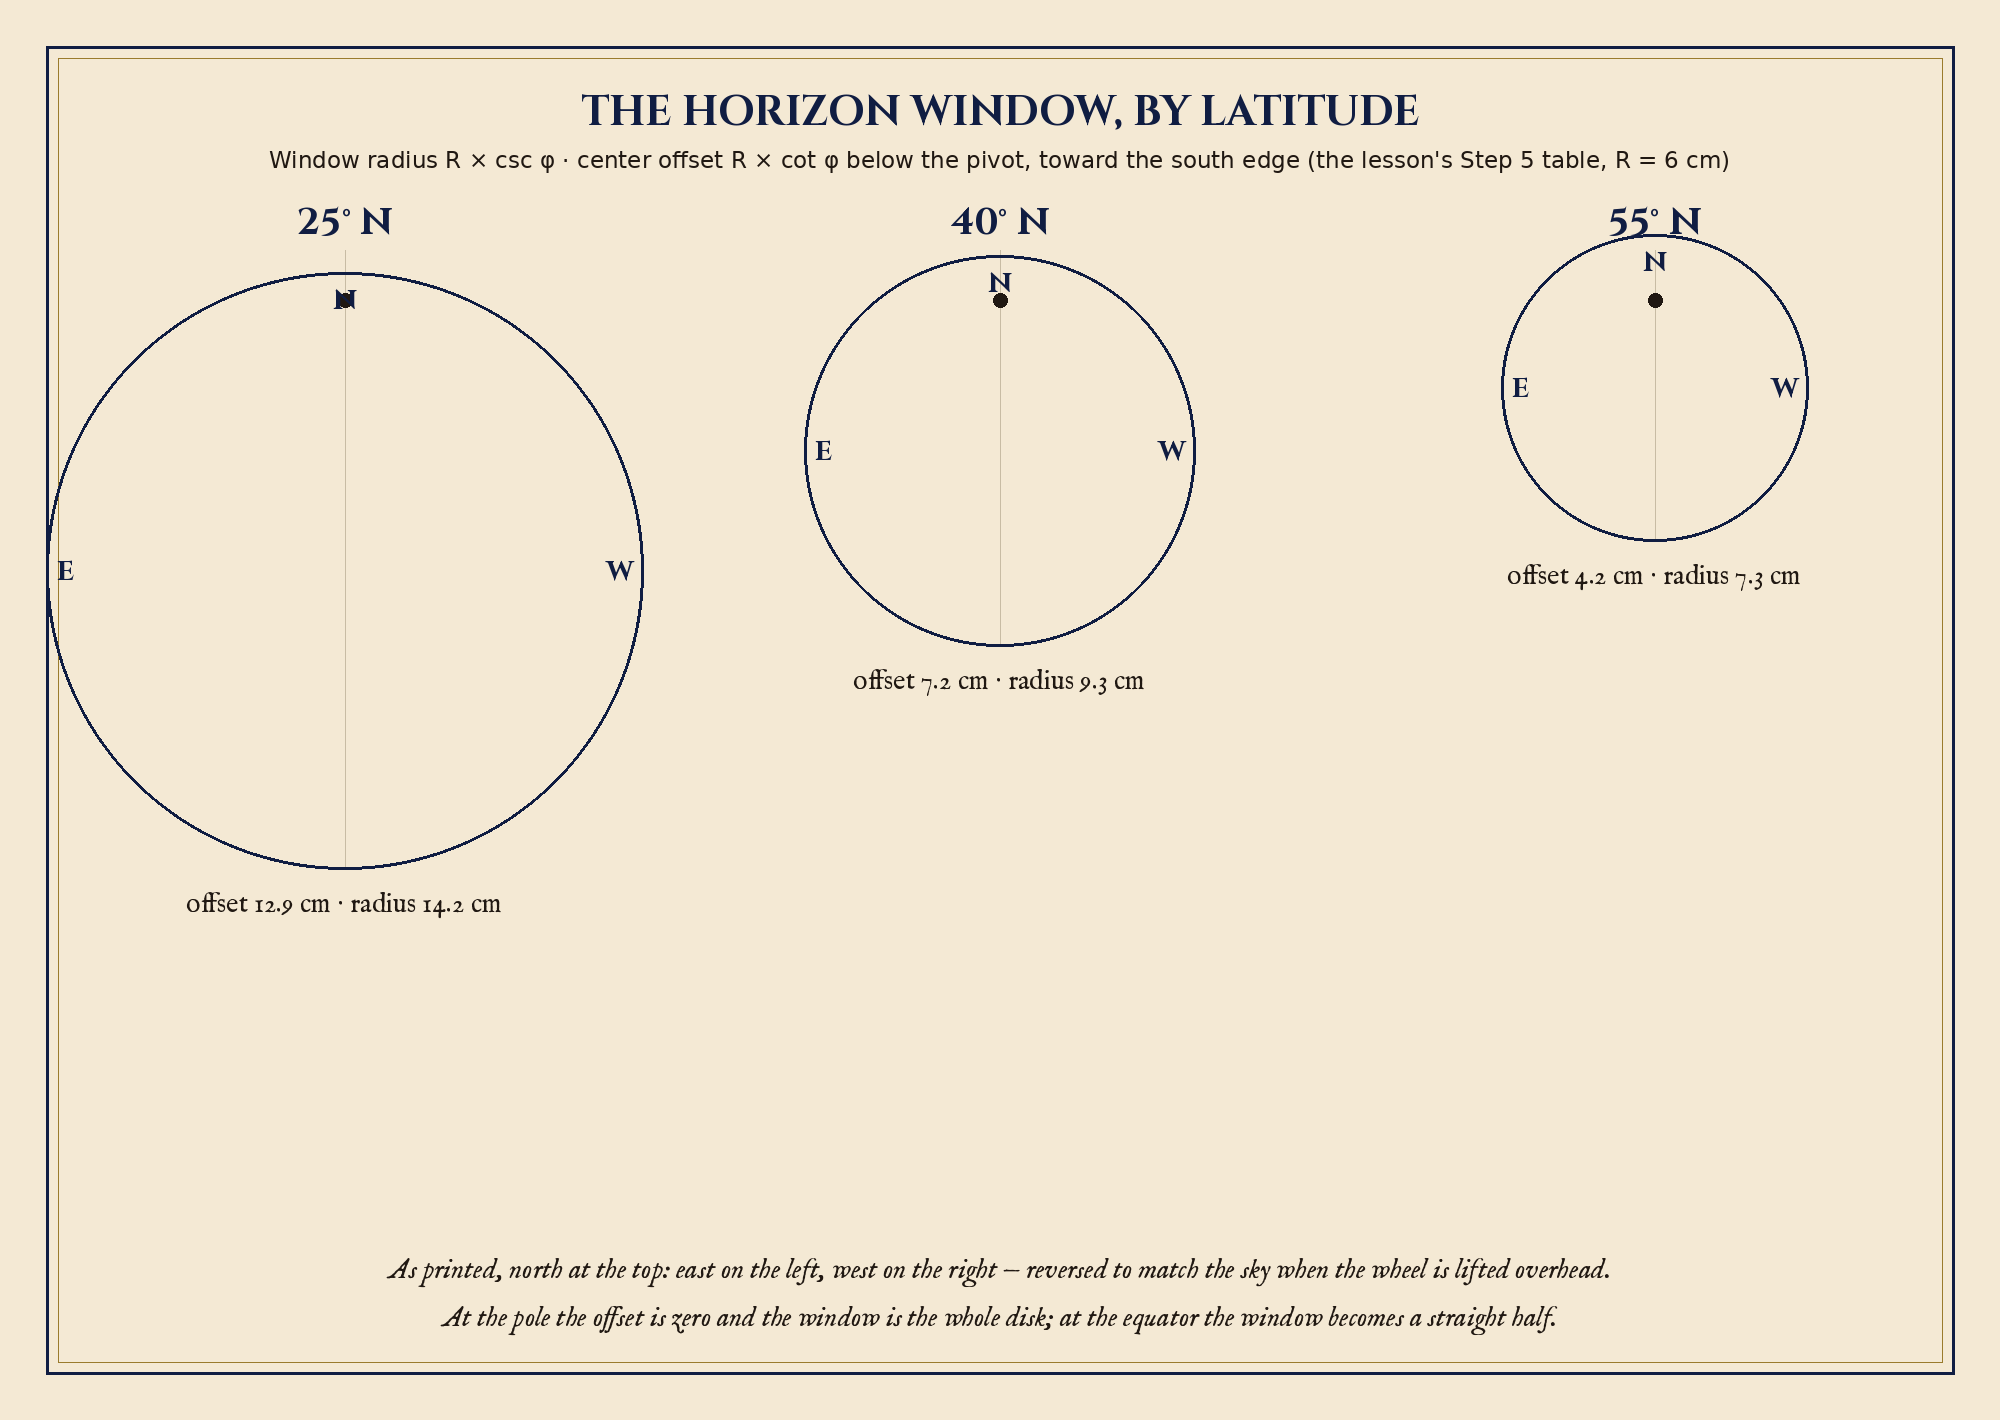
One sky, three windows: the horizon circle your latitude cuts. The farther from the equator you stand, the smaller the offset and the rounder the window — which is why a wheel cut for one latitude lies at another.
Built digitally for this overhaul (Python/PIL), from the lesson's Step 5 table.
Two disks, one sky
A planisphere has exactly two moving ideas, and it helps to name them before you touch scissors.
★ The star disk is the celestial sphere, flattened. Every star on it sits at the position the stereographic projection gives it: the north celestial pole — the point where Earth's axis, extended northward, meets the celestial sphere — at the center, the celestial equator as a circle halfway out, the stars of each declination ring placed around their ring according to their right ascension. The disk is the whole sky at once, or at least the whole sky your hemisphere can ever show you.
The horizon mask is your personal sky, right now. It is an opaque card with a window cut in it, and the window is the exact shape of the sky above your horizon. Turn the disk behind the mask, and the window shows you which stars have risen and which have set. The mask does not move. The sky moves behind it, one full turn per sidereal day, exactly the way the real sky turns over your head.
★ Setting the instrument is setting the time. The rim of the disk carries the 365 days of the year. The rim of the mask carries the 24 hours of the day. Line up today's date with the current hour, and the window shows the sky at this moment. That is the entire operation. Everything else is understanding why it works.
Check in: What does the star disk represent, what does the horizon mask represent — and what single operation sets the instrument?
❦ In your workbook: record the two disks in your own way — the flattened sphere turning behind your personal window, one full turn per sidereal day, date against hour — copy, sketch, or note what matters.
Why the window is latitude-shaped
Here is the heart of the instrument, and the reason your planisphere must be built for your own latitude.
★ Your horizon is a circle on the celestial sphere: the ring of points exactly ninety degrees from your zenith. On a stereographic projection, circles on the sphere become circles on the flat page. So your horizon draws as a perfect circle on the mask, and everything inside that circle is your visible sky.
But where the circle sits depends on where you stand. The north celestial pole stands above your northern horizon at an altitude equal to your latitude: at 40 degrees north, Polaris stands about 40 degrees above the northern horizon. On the flat disk, that means the horizon circle is not centered on the pole. Its center is pushed south of the pivot, and the farther south your latitude, the farther the push.
The numbers are clean. If the celestial equator is drawn as a circle of radius R, then for latitude φ the horizon circle has radius R divided by sin φ, and its center sits R times cot φ below the pivot, toward the south edge of the mask. At the north pole the offset is zero and the window is the whole disk: every northern star is circumpolar. At the equator the circle grows infinitely large and the window becomes a straight half: the whole sky takes turns overhead, and nothing is circumpolar. Your latitude, written in cardboard, is the shape of your sky. A mask cut for 40 degrees north will lie to you at 20 degrees north, showing stars below your horizon and hiding stars above it. Makers sell wheels in latitude bands, and a wheel is honestly usable within about five degrees of its design latitude. Yours will be exact, because you will cut it for home.
Check in: Why is the horizon circle's center pushed away from the pivot — and what happens to a mask cut for 40 degrees north when it is used at 20 degrees north?
❦ In your workbook: record the latitude-shaped window in your own way — the pole standing as high above your horizon as your latitude, the circle of radius R ÷ sin φ offset R × cot φ, and a wheel honest within about five degrees of home — copy, sketch, or note what matters.
Why there is a date scale at all
The hour scale is obvious: the sky turns once a day, so an hour dial tracks it. The date scale is the clever part, and it exists because of a fact you already know from Unit I: the stars rise about four minutes earlier every night.
★ That drift is Earth's orbital motion. As Earth travels around the sun, the direction of "midnight," the direction pointing away from the sun, sweeps once around the sky each year. So at the same clock hour on successive nights, the sky has advanced by one three-hundred-sixty-fifth of a turn: about one degree per day, four minutes of time per night. The date scale is the correction for that drift. Setting October against 9 PM turns the disk back by the accumulated drift since January, putting the stars where they truly are tonight rather than where they were on New Year's night.
This is also why the disk turns against the mask the way it does. Advance the hour, and the disk rotates in the direction the stars travel across your sky. Advance the date, and it rotates a touch farther in that same direction. The two scales together are a little analog calculation: sky equals date plus time, worked in cardboard.
Check in: Why does a planisphere need a date scale at all — what drift does it correct, and how large is that drift each night?
❦ In your workbook: record the date scale in your own way — midnight sweeping once around the sky each year, about one degree a day, four minutes a night, corrected on a cardboard rim — copy, sketch, or note what matters.
Reading the wheel: two honest methods
There are two standard ways to read a planisphere, and both are correct. Use whichever suits the moment.
The overhead method. Go outside, set the date and hour, and hold the planisphere above your head with the printed side facing down toward you and the north edge of the mask pointing north. The window now matches the sky: the edge of the window is your horizon all around, the middle of the window is near your zenith, and the stars in the window are the stars above you. To study one direction, turn your body, not the wheel, keeping north pointing north.
The facing method. Hold the wheel out in front of you. Find the compass label on the mask for the direction you are facing, and turn the whole instrument so that label is at the bottom, right side up. Now the lower part of the window matches the sky in front of you: stars near the bottom edge are near the horizon ahead, stars higher in the window are higher in your sky. Turn to a new direction, rotate the instrument to match, and read again.
Two details that surprise every beginner. First, the constellations will look bigger in the sky than on the card. Paper shrinks the heavens; your eyes do not. Learn the shapes small, then let the sky astonish you with the large. Second, the middle of the window is the zenith, the point straight overhead, which you found in Lesson 2. Stars plotted halfway from the edge to the middle stand about halfway up your sky.
Check in: In the overhead method, what is the middle of the window, and what do you turn when you want to study a new direction — yourself, or the wheel?
❦ In your workbook: record the two readings in your own way — the wheel lifted overhead with north pointing north, and the wheel held facing you with your direction's label at the bottom — copy, sketch, or note what matters.
In your packet: Exercise II: Reading the Wheel ◐ begins here — its settings and identifications use exactly these two methods. Work it now, or mark the place and take it as homework — your choice.
A note on the printed directions
★ On the printed mask, with the north edge at the top of the page, east is printed on the left and west on the right. This looks wrong, and it is wrong, until you lift the wheel overhead. Held above your head with north pointing north, the whole instrument is seen from the other side, and the mirror reverses: east falls on your right, where the real east is, and the chart matches the sky. Chartmakers call this the difference between the globe view and the sky view. Globes show the heavens as seen from outside; you live inside. Your wheel is printed for the lift, not for the table. Trust the overhead check, not your first glance at the page.
❦ In your workbook: record the printed directions in your own way — east on the left and west on the right on the page, reversed to match the sky when the wheel is lifted overhead: the globe view against the sky view — copy, sketch, or note what matters.
The southern wheel
Scholars in the southern hemisphere build the same instrument, mirrored. The star disk is centered on the south celestial pole — the point where Earth's axis, extended southward, meets the celestial sphere — instead of the north. Everything on it is the mirror image of the northern wheel: right ascension and the dates run clockwise as seen on the printed side, the hours run counterclockwise, and the horizon circle's center is pushed north of the pivot instead of south. The geometry is identical; only the side of the sky changes.
Two southern particulars. First, the south celestial pole has no bright pole star. Sigma Octantis, the southern pole star, is barely fifth magnitude, a faint speck you will likely need dark skies and patience to find. Southern navigators instead find the pole from the Southern Cross and the Pointers: the long axis of the Cross points toward the pole, and the line is confirmed where it meets the perpendicular bisector of the line joining Alpha and Beta Centauri. Your wheel will show you exactly this. Second, the southern constellations on your disk will look flipped compared to pictures in northern books. They are not wrong. You are looking at the other side of the sphere.
Scholars near the equator, within about ten degrees of it, should know that neither wheel serves very well: from the equator nearly the whole celestial sphere takes turns overhead across the year, and the horizon window is nearly a straight half-disk. Build the wheel for your hemisphere anyway, and use it to learn the bright stars; for precision work at the equator, a monthly all-sky chart serves better.
Check in: What is mirrored on a southern wheel, why has its pole no bright star to ride the pivot — and how do southern navigators find that pole instead?
❦ In your workbook: record the southern wheel in your own way — the disk centered on the south celestial pole, faint Sigma Octantis at the hub, and the Southern Cross with the Pointers as the way to find it — copy, sketch, or note what matters.
A Sealed Note on the Wheel
Scholars, a confession.
I have owned planispheres printed by professionals on heavy stock with gilt edges, and I have owned one made from a cereal box by a student who misspelled "Cassiopeia" on the rim and never bothered to fix it. Guess which one I carried for ten years.
The cereal-box wheel worked. It worked because its maker had measured her latitude honestly, plotted her stars carefully, and checked it against the real sky on a cold night in November until the wheel and the heavens agreed. Precision of the hands matters more than expense of the materials. The sky does not grade your cardstock.
Build it plain or build it beautiful, as you like. Professor Timberclank will tell you, when you visit the Creative Arts Workshop, that there is no contradiction between sturdy and lovely. But build it true. A wheel that lies is worse than no wheel at all, and a wheel that tells the truth becomes something rare: an instrument you can trust in the dark.
Turn it slowly. Listen for the little click of the pin. That sound is two thousand years of mathematics, turning under your thumb.
❦ In your workbook: record the sealed note in your own way — the cereal-box wheel carried for ten years, a latitude measured honestly, and a wheel checked against the real sky until the two agreed — copy, sketch, or note what matters.
PROFESSOR VESPER GLIMMERWICK
Celestial Studies
Astronomer & Celestial Historian
Guided Observation
Try It Tonight
Part One: First Light with a Star Wheel
If you own or can print any planisphere, even a simple one, take it outside tonight and practice the reading before you build. Sky & Telescope offers a free printable star wheel in this lesson's Further Reading, usable for northern latitudes between 30 and 50 degrees, and any commercial wheel will do.
- Set the wheel: turn the star disk until today's date on its rim lines up with the current time on the mask's rim. If your clocks are on daylight saving time and your wheel marks it, use the daylight-correct hour: for 9 PM daylight time, set the wheel to 8 PM.
- Hold the wheel overhead with the printed side facing down and the north edge pointing north. Let your eyes adjust to the dark for a few minutes first.
- Find the brightest thing in the window and match it to the brightest thing in your sky. The moon and planets are not printed on most wheels, so if the brightest light is missing from the card, you may be looking at a planet, which travels near the ecliptic line if your wheel draws one.
- Pick one constellation in the window and find it overhead. Then turn your body east, keeping north pointing north on the wheel, and find what the window shows rising.
- Note what surprises you: a star the wheel shows that you cannot see (light pollution hides the faint ones), or a bright star in your sky that the wheel does not plot (a planet, or a star too far south for your wheel's disk).
❦ In your workbook: record First Light in your own way — tonight's date against tonight's hour, the brightest thing in the window matched to the brightest thing in your sky, and what surprised you — copy, sketch, or note what matters.
Part Two: The Birthday Sky
Without going outside, set any planisphere, yours when it is built or a printed one, to 9 PM on your birthday.
- Write down the three brightest constellations the window shows. These are the constellations that stood over your birth-hour sky.
- Find one of them that you have never identified before, and learn its shape from the wheel.
- Now set the wheel to 9 PM on tonight's date. Which of your birthday constellations is still up, and which has wheeled away with the seasons? Write one sentence explaining, in terms of the date scale, why the sky changed.
❦ In your workbook: record the Birthday Sky in your own way — the three brightest constellations over your birth-hour sky, the one you learned new, and your one sentence on why the sky changed — copy, sketch, or note what matters.
Part Three: Build Your Own Planisphere
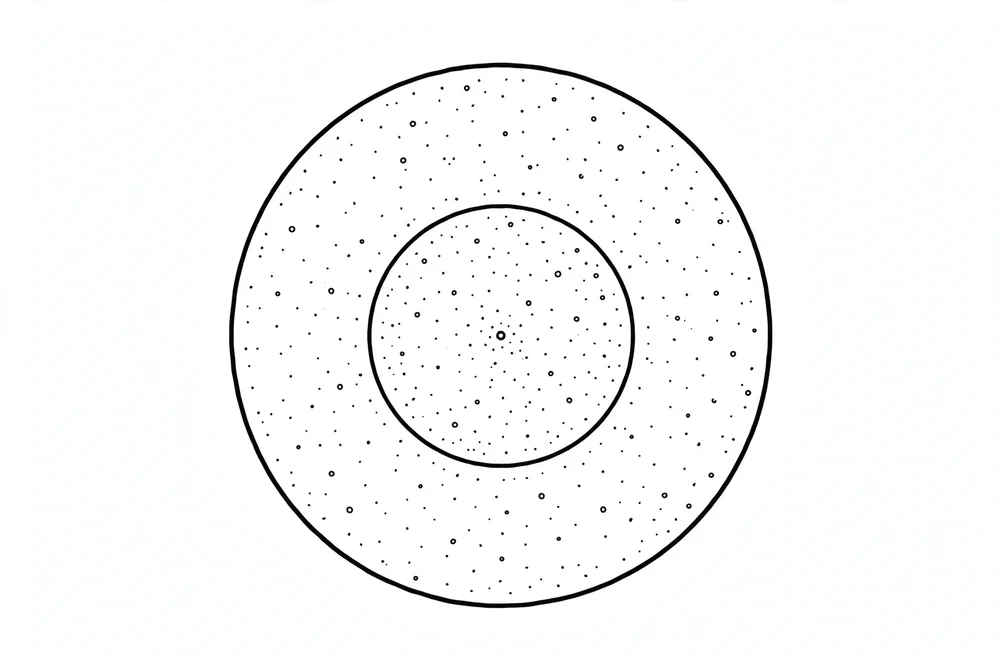
In your packet: Exercise I: Build and Calibrate Your Planisphere ⚒ begins here — Part Three below is its build, step by step, and the four calibration checks are its proof. Work it now, or mark the place and take it as homework — your choice.
This is the practical heart of the lesson, and the instrument you will carry into your capstone. Work carefully. The steps are long because the instrument is real.
What you are making. A star disk: a circle of card carrying the bright stars around your celestial pole, plotted by right ascension and declination, with the 365 days of the year around its rim. A horizon mask: a larger card with a window cut in the exact shape of your sky, carrying the 24 hours around its rim. A brass paper fastener through both centers as the pivot. When the date meets the hour, the window shows your sky.
Materials, Level One (household): two large sheets of white card or thin cardboard (cereal-box card works beautifully), a printer or a steady hand for the scales, a ruler, a drawing compass, a pencil, scissors, a craft knife (adult handles this), a brass paper fastener (split pin), clear tape, and your red flashlight for testing.
Materials, Level Two (closer to the historical craft): heavy watercolor paper or Bristol board for both parts, a self-healing cutting mat, a metal-edged ruler, a fine technical pen for the stars, a metal brad instead of brass, and clear adhesive film or a laminating pouch to weatherproof the finished wheel.
Step 1: Draw the star disk grid. With your compass, draw the celestial equator as a circle of radius 6 cm. This is your measuring circle: call its radius R. Around the same center, draw the declination rings using r = R × tan((90° − δ)/2):
| Declination | Ring radius (R = 6 cm) |
|---|---|
| +75° | 0.8 cm |
| +60° | 1.6 cm |
| +45° | 2.5 cm |
| +30° | 3.5 cm |
| +15° | 4.6 cm |
| 0° (equator) | 6.0 cm |
| −15° | 7.8 cm |
| −30° | 10.4 cm |
Draw the disk's outer edge at 10.5 cm: your wheel will carry stars down to 30 degrees south declination, plenty for a northern observer. Through the center, draw 24 spokes, one every 15 degrees. These are your hour lines of right ascension. Label them 0 through 23 around the circle, increasing counterclockwise as you look at the printed side. Right ascension 0 sits at the 3 o'clock position; right ascension 6 at 12 o'clock; right ascension 12 at 9 o'clock; right ascension 18 at 6 o'clock.
Step 2: Plot the stars. For each star in the table below, convert its right ascension to an angle (multiply the hours by 15) and its declination to a radius with the formula above, then mark the point. Make the dot bigger for brighter stars: magnitude 0 and below get the largest dots, magnitude 1 the next, magnitude 2 the next, magnitude 3 and fainter the smallest. The coordinates are J2000, the standard epoch of star atlases, verified against the Hipparcos catalog. A degree or two of hand-plotting wobble is fine: this wheel finds constellations, not asteroids.
| Star | RA (J2000) | Dec (J2000) | Mag |
|---|---|---|---|
| Polaris | 2h 32m | +89° 16′ | 2.0 |
| Caph | 0h 09m | +59° 09′ | 2.3 |
| Schedar | 0h 40m | +56° 32′ | 2.2 |
| Tiansi | 0h 57m | +60° 43′ | 2.5 var |
| Ruchbah | 1h 26m | +60° 14′ | 2.7 |
| Segin | 1h 54m | +63° 40′ | 3.4 |
| Alpheratz | 0h 08m | +29° 05′ | 2.1 |
| Mirach | 1h 10m | +35° 37′ | 2.1 |
| Hamal | 2h 07m | +23° 28′ | 2.0 |
| Mirfak | 3h 24m | +49° 52′ | 1.8 |
| Aldebaran | 4h 36m | +16° 30′ | 0.9 |
| Elnath | 5h 26m | +28° 37′ | 1.7 |
| Capella | 5h 17m | +46° 00′ | 0.1 |
| Bellatrix | 5h 25m | +06° 21′ | 1.6 |
| Rigel | 5h 15m | −08° 12′ | 0.1 |
| Betelgeuse | 5h 55m | +07° 24′ | 0.5 var |
| Alnitak | 5h 41m | −01° 57′ | 1.8 |
| Alnilam | 5h 36m | −01° 12′ | 1.7 |
| Mintaka | 5h 32m | −00° 18′ | 2.2 |
| Saiph | 5h 48m | −09° 40′ | 2.1 |
| Sirius | 6h 45m | −16° 43′ | −1.5 |
| Procyon | 7h 39m | +05° 14′ | 0.3 |
| Castor | 7h 35m | +31° 53′ | 1.6 |
| Pollux | 7h 45m | +28° 02′ | 1.1 |
| Regulus | 10h 08m | +11° 58′ | 1.4 |
| Denebola | 11h 49m | +14° 34′ | 2.1 |
| Dubhe | 11h 04m | +61° 45′ | 1.8 |
| Merak | 11h 02m | +56° 23′ | 2.4 |
| Phecda | 11h 54m | +53° 42′ | 2.5 |
| Megrez | 12h 15m | +57° 02′ | 3.3 |
| Alioth | 12h 54m | +55° 58′ | 1.8 |
| Mizar | 13h 24m | +54° 55′ | 2.3 |
| Alkaid | 13h 48m | +49° 19′ | 1.9 |
| Spica | 13h 25m | −11° 10′ | 1.0 |
| Arcturus | 14h 16m | +19° 11′ | −0.1 |
| Kochab | 14h 51m | +74° 09′ | 2.1 |
| Antares | 16h 29m | −26° 26′ | 1.0 var |
| Vega | 18h 37m | +38° 48′ | 0.0 |
| Altair | 19h 51m | +08° 52′ | 0.8 |
| Deneb | 20h 41m | +45° 17′ | 1.3 |
| Enif | 21h 44m | +09° 53′ | 2.4 |
| Fomalhaut | 22h 58m | −29° 37′ | 1.2 |
| Markab | 23h 05m | +15° 12′ | 2.5 |
| Scheat | 23h 04m | +28° 05′ | 2.4 |
| Algenib | 0h 13m | +15° 11′ | 2.8 |
Step 3: Connect the constellations. Lightly join these stars with pencil lines, and label each pattern:
- Big Dipper: Dubhe to Merak to Phecda to Megrez to Alioth to Mizar to Alkaid, and close the bowl from Megrez back to Dubhe.
- Cassiopeia's W: Caph to Schedar to Tiansi to Ruchbah to Segin.
- Orion: Betelgeuse to Bellatrix across the shoulders, Bellatrix down to Saiph, Saiph across to Rigel, Rigel up to Betelgeuse; the belt, Alnitak to Alnilam to Mintaka, across the middle.
- Gemini: Castor to Pollux.
- Leo: Regulus to Denebola (the lion's fore and hind).
- Summer Triangle: Vega to Deneb to Altair, the great triangle itself.
- Scorpius: Antares to Shaula, the scorpion's heart to its sting (Shaula plots just off your disk's southern edge at −37°; mark its direction with an arrow and label it).
- Great Square of Pegasus: Markab to Scheat to Alpheratz to Algenib and back to Markab.
- Little Dipper: Polaris to Kochab (the two ends of the little dipper's handle and bowl edge; the bowl's faint stars are left for dark skies).
Step 4: Draw the date scale. Around the disk's rim, outside the stars, mark the 365 days. Put January 1 at the top and run the dates counterclockwise as seen on the printed side, one day every 0.986 degrees. Mark the first of each month with a labeled tick using this table, then fill the days between by spacing evenly:
| Month | 1st falls (day of year) | Degrees CCW from Jan 1 |
|---|---|---|
| Jan | 1 | 0.0° |
| Feb | 32 | 30.6° |
| Mar | 60 | 58.2° |
| Apr | 91 | 88.7° |
| May | 121 | 118.3° |
| Jun | 152 | 148.8° |
| Jul | 182 | 178.4° |
| Aug | 213 | 209.0° |
| Sep | 244 | 239.5° |
| Oct | 274 | 269.1° |
| Nov | 305 | 299.6° |
| Dec | 335 | 329.2° |
Step 5: Draw the horizon mask. Take your larger card. Find your latitude φ. With your compass, draw the horizon circle: its center sits R × cot φ below the disk's pivot point, toward the south edge, and its radius is R × csc φ, using the same R = 6 cm as your disk. Read your numbers from this table:
| Your latitude | Center offset below pivot | Window radius |
|---|---|---|
| 25° N | 12.9 cm | 14.2 cm |
| 30° N | 10.4 cm | 12.0 cm |
| 35° N | 8.6 cm | 10.5 cm |
| 40° N | 7.2 cm | 9.3 cm |
| 45° N | 6.0 cm | 8.5 cm |
| 50° N | 5.0 cm | 7.8 cm |
| 55° N | 4.2 cm | 7.3 cm |
| 60° N | 3.5 cm | 6.9 cm |
Between these latitudes, interpolate, or use the formulas directly: offset = 6 × cot φ, radius = 6 / sin φ. The mask is honestly usable within about five degrees of the latitude you cut it for. Mark the pivot point on the mask exactly where the disk's pivot will sit: on the meridian line, one offset-distance above the window circle's center. Draw the meridian line through the pivot, running north to south across the mask. Label the window's edges with compass points: north at the top, and, as seen on the printed side, east on the left and west on the right. Cut out the window with the craft knife (adult's job), staying exactly on the circle.
Step 6: Draw the hour scale. Around the mask's rim, mark the 24 hours, increasing clockwise as seen on the printed side, one hour every 15 degrees. Put midnight at the top. Label every hour, or every two hours if the rim is crowded. If your region observes daylight saving time, you may add a second inner ring of daylight hours, one hour ahead, exactly as commercial wheels do.
Step 7: Assemble. Cut out the star disk. Pierce both centers precisely: the disk's pole and the mask's pivot mark must coincide, or every reading will be wrong. Push the brass fastener through from the printed side of the disk, spread its legs flat on the back, and tape over them. The disk should turn smoothly with gentle finger pressure, with no wobble and no sticking.
Step 8: Calibrate, and trust nothing until you do. Four checks, in order:
- The pivot check. Polaris is plotted almost exactly at the pivot. Set any date and time: the pivot should sit inside the window at the correct height above the northern horizon for your latitude, and Polaris should ride with it, never leaving the window as you turn the disk through a full day. If Polaris dips below the window's edge, your mask's latitude is wrong.
- The circumpolar check. Kochab (declination +74°) is about 16 degrees from the pole, well within the circumpolar zone for mid-northern latitudes. Turn the disk through a full rotation: Kochab must never leave the window. Any star within φ degrees of the pole must be circumpolar on your wheel, exactly as in the sky.
- The tonight check. Set tonight's date and time and go outside with a red flashlight. Find three constellations in the window and match them to the sky. If a constellation the wheel shows high is actually near the horizon, your date and hour scales run the wrong way around: check that dates increase counterclockwise and hours increase clockwise on the printed side.
- The birthday check. Set the wheel to midnight on October 12. The meridian should carry right ascension near 1.5 hours: the stars of Andromeda and Pegasus, Mirach and Alpheratz, should stand near the meridian line. This is the date scale proving itself against the real turning year.
When all four checks pass, sign and date the back of your wheel. This is your capstone instrument. Treat it accordingly.
❦ In your workbook: record the build in your own way — your latitude, your offset and radius, the stars you plotted, and the four calibration checks with their results — copy, sketch, or note what matters.
A Note for Southern Scholars
Build the same instrument, mirrored. Center your star disk on the south celestial pole. Plot southern stars with the same radius formula, using south polar distance in place of declination: r = R × tan((90° − |δ|)/2). Run right ascension and the dates clockwise as seen on the printed side, and the hours counterclockwise. Cut the horizon circle with its center offset R × cot φ toward the north side of the mask, radius R × csc φ, using your southern latitude's absolute value. Label the window with south at the top, east on the right, west on the left as seen printed-side up.
Plot these southern stars (J2000, Hipparcos-verified):
| Star | RA (J2000) | Dec (J2000) | Mag |
|---|---|---|---|
| Sigma Octantis | 21h 08m | −88° 57′ | 5.4 |
| Atria | 16h 49m | −69° 01′ | 1.9 |
| Acrux | 12h 27m | −63° 06′ | 0.8 |
| Hadar | 14h 04m | −60° 22′ | 0.6 |
| Rigil Kent | 14h 40m | −60° 50′ | −0.3 combined |
| Mimosa | 12h 48m | −59° 41′ | 1.3 |
| Gacrux | 12h 31m | −57° 07′ | 1.6 |
| Delta Crucis | 12h 15m | −58° 45′ | 2.8 |
| Achernar | 1h 38m | −57° 14′ | 0.5 |
| Peacock | 20h 26m | −56° 44′ | 1.9 |
| Canopus | 6h 24m | −52° 41′ | −0.7 |
| Alnair | 22h 08m | −46° 58′ | 1.7 |
| Ankaa | 0h 26m | −42° 18′ | 2.4 |
| Shaula | 17h 34m | −37° 06′ | 1.6 |
| Kaus Australis | 18h 24m | −34° 23′ | 1.9 |
| Diphda | 0h 44m | −18° 00′ | 2.0 |
Connect the Southern Cross (Acrux to Gacrux along the long axis, Mimosa to Delta Crucis across), the Pointers (Rigil Kent to Hadar), and the tail of Scorpius (Shaula toward Antares' direction). Calibrate with the same four checks, mirrored: the south celestial pole region rides the pivot, the Cross never sets for most southern latitudes, and tonight's sky must match the window.
Sky Log Entry
Date and time of observation: _______________
Planisphere setting used (date and hour on the rims): _______________
Reading method (overhead / facing): _______________
Constellation 1 in the window, and where you found it in the sky: _______________
Constellation 2 in the window, and where you found it in the sky: _______________
Constellation 3 in the window, and where you found it in the sky: _______________
Build notes: what worked, what needed redoing: _______________
Calibration checks (pivot / circumpolar / tonight / birthday): pass or note the fault: _______________
❦ In your workbook: this Sky Log entry is the workbook record — the setting used, the reading method, the three constellations matched between window and sky, and the calibration verdicts, all kept beside the wheel they describe.
Materials
Required (Level One — household items)
- Two large sheets of white card or thin cardboard (cereal-box card works beautifully) for the star disk and the horizon mask.
- A ruler, a drawing compass, and a pencil for the declination rings, the horizon circle, and the date and hour scales.
- Scissors for the disks; a craft knife (adult's job) for cutting the window and the pivot hole, on a protected surface.
- A brass paper fastener (split pin) for the pivot, plus a small circle of clear tape to cover the fastener's legs on the back.
- Your workbook and a red-filtered flashlight for the reading exercises, the Sky Log, and the calibration checks.
Suggested (Level Two — historically closer)
- Heavy watercolor paper or Bristol board for both parts, so the wheel survives years of night use.
- A self-healing cutting mat and a metal-edged ruler for clean window cuts.
- A fine technical pen for inking the stars and constellation figures; silver ink for the figures is traditional.
- A metal brad in place of the brass paper fastener, and clear adhesive film or a laminating pouch to weatherproof the finished wheel.
- A printed star atlas for adding fainter stars to the disk beyond the lesson's table.
Reflection Questions
Answer in your workbook, in complete sentences.
- A planisphere is sometimes called an analog computer. What is it computing, what are its inputs, and where is the calculation actually performed?
- The stereographic projection stretches the constellations near the rim of the wheel. Why do chartmakers accept this distortion, and what would be lost if they used a projection that kept areas true instead?
- Bayer drew his constellation figures as seen from Earth looking up, reversing the old globe convention. Why does the choice of viewpoint matter for someone learning the sky, and where did you meet the same mirror puzzle in your own build?
- Your wheel is honest only within about five degrees of its design latitude. What does that limitation reveal about the relationship between the observer and the sky: is the sky the same for everyone?
- You built an instrument with paper, a pin, and mathematics two thousand years old. What does it mean that the same geometry Ptolemy described still tells the truth on a cold night tonight?
Workbook Checklist — Lesson 30
In my workbook I have:
- ☐ taken a printed wheel outside for First Light: set tonight's date against tonight's hour, matched the window's brightest thing to the sky's, and noted what surprised me
- ☐ set the Birthday Sky at 9 PM on my birthday, written its three brightest constellations, learned one new shape, and written my one sentence on why tonight's sky differs
- ☐ built my planisphere for my own latitude (southern scholars: the mirrored wheel): star disk plotted from the lesson's table, date scale and hour scale drawn, horizon window cut to my latitude's offset and radius
- ☐ run all four calibration checks — pivot, circumpolar, tonight, birthday — and recorded each result, with any fault and its correction
- ☐ completed Exercise I: latitude, offset, radius, and southernmost declination recorded; the four checks described; the offset-center explanation written; my finished wheel photographed or sketched beside the notes
- ☐ completed Exercise II: birthday and tonight settings compared, one circumpolar constellation and one eastern riser identified with date and hour, and the ecliptic reasoning written
- ☐ completed Exercise III: one Bayer plate described from looking, the two-and-two atlas-versus-wheel comparison listed, and my half-page history written with at least two dated facts
- ☐ dated my Sky Log entry with the planisphere setting used, the reading method, three constellations matched between window and sky, and my calibration verdicts
☐ Lesson completed Date: ___ Signature: ___
Cross-Class Connections

Creative Arts · Studio Extension E1 — Precision Paper Instruments, Built to Last
Set up your bench, scholars, and bring the planisphere from Professor Glimmerwick's tower with you — it is named in my introduction, first among the paper instruments this extension rebuilds to last. You already know its weakness, because you have used it: a paper instrument fails at its center, the pivot hole stretches with every turning, and one damp week in a schoolbag finishes what the wobble began. In this extension we rebuild it in board, in thin wood, in brass where brass earns its place, with a pivot fitted the way a hinge is fitted, and a case to keep it in. Nothing here is decoration added to the original. It is the original, given a body that lasts — the same scales, the same geometry, ready for ten thousand turnings and a decade of Sky Logs.
PROFESSOR COGBRANCH TIMBERCLANK
Creative Arts Workshop

Scrollwork · Unit VI, Lesson 23 — Archive Labels & Library Systems
Mind your lists, Tower scholars. Professor Glimmerwick has shown you the star catalog become a book — Bayer's fifty-one copper plates, each chart a publishing project with artists, printers, and deadlines. My twenty-third lesson teaches the other half of that craft: how anything written down gets kept so it can be found again — the label on the binding, the shelfmark, the catalog with rules. A star atlas that cannot be found is a sky that does not exist, and the scribes who listed the great libraries knew it. The Tower draws the charts. Here, we keep them.
PROFESSOR QUILLBERRY NOCTURNE
Scrollwork Library

Runes · Unit I, Lesson 1 — The Structural Wedge
Come closer to the web, scholars. The oldest sky records your professor reads tonight were pressed into wet clay by Babylonian astronomers, wedge by wedge — eclipses and planetary positions logged in the script this lesson teaches from its first page: the tokens, the clay, the five basic forms, and why so many tablets survived to be read at all. Glimmerwick reads what the writing was for — the sky, written down before it turned away. Here, we press the marks it was written with.
— Professor Thistleloom Webblethorn, Runes & Ancient Writing
History of Magic (a future class) — named only. The zodiac wheels of history mapped what people believed the stars meant; your planisphere maps where the stars are — exactly the distinction the bullet above draws. That second kind belongs to Unit V, taught as history, and to the future class that will study magical traditions on their own terms. No invitation is written: the class is not yet built.
The Professor's Closing Note
And so the wheel turns, scholars, and the sky with it.
You now own something that no app can give you: an understanding that lives in your hands. You know that the star disk is the celestial sphere drawn flat, that the window is your horizon drawn as a circle, that your latitude bent that circle into its shape, and that the date scale is Earth's year written around a rim. When you set October against nine in the evening and the Summer Triangle leans into the west exactly as the card promised, that is not luck. That is geometry, keeping its promises.
Keep your wheel somewhere you will actually use it: by the door you take on night walks, or in the bag you carry to dark places. Oil the pin with use. Let the rim soften. An instrument that lives in a drawer is a decoration. An instrument that lives in your pocket is an education.
Bring it to your capstone, calibrated and honest. The Moon Journal taught you patience. The constellations taught you stories. The wheel will teach you the sky entire, one window at a time, for the rest of your life.
Clear skies, my dears. I shall see you among the stars.
PROFESSOR VESPER GLIMMERWICK
Celestial Studies
Astronomer & Celestial Historian
Further Reading & Sources
These are real destinations for further study, verified live at the time of writing. Start with Sky & Telescope's printable wheel and Ian Ridpath's history; they are the friendliest doors into this lesson's two halves.
- Sky & Telescope: How to Make a Star Wheel and Observe the Night Sky (free printable planisphere for 30-50N, with full using instructions). https://Skyandtelescope.org/observing/make-a-star-wheel/
- Sky & Telescope: Using a Naked-Eye Star Map (how to read any star chart at the telescope, or with no telescope at all). https://skyandtelescope.org/astronomy-resources/using-a-naked-eye-star-map/
- Ian Ridpath's Star Tales: Star Maps, from hemispheres to atlases (Piccolomini 1540, Bayer 1603, Hevelius, with the Keyser southern constellations). http://www.ianridpath.com/startales/startales2b.html
- Wikipedia: Planisphere (how the instrument works, the two projection methods, latitude bands, history from Ptolemy to Bartsch 1624). https://en.wikipedia.org/wiki/Planisphere
- Wikipedia: Uranometria (Bayer's 1603 atlas: the 51 plates, Tycho Brahe's positions, the 12 new southern constellations, Bayer designations). https://en.wikipedia.org/wiki/Uranometria
- Wikipedia: Volvelle (paper wheel charts from medieval astronomy books to the twentieth century). https://en.wikipedia.org/wiki/Volvelle
- Wikipedia: Stereographic Projection (the mathematics behind the star disk, with the history from Ptolemy's Planisphaerium). https://en.wikipedia.org/wiki/Stereographic_projection
Browse the Celestial Studies shelf in the school Library for readable editions of these works.
Sealed in the Celestial Tower, in deep midnight blue, by Professor Vesper Glimmerwick.
This lesson's own instrument, alive — a planisphere that turns itself, set for your sky and your hour. Bring everything Lesson 30 taught, and put it to work.
Open the WheelPROFESSOR VESPER GLIMMERWICK · CELESTIAL TOWER
Submit your work for this lesson using the form below.
CONTINUE IN THE CELESTIAL TOWER
← Previous · Lesson 29: Sundials: Catching Shadows Next · Lesson 31: The Astrolabe →
Unit VI — Instruments of the Sky Celestial Tower — All 33 Lessons
The rest of Unit VI: Lesson 29 · Sundials · Lesson 31 · The Astrolabe · Lesson 32 · Telescopes · Lesson 33 · Dark Skies