SCROLLWORK
Unit I · Lesson 4INKWELLS, SAND, & SCRIBAL TOOLS
Professor Quillberry Nocturne
Master Scribe & Illuminator
The Scrollwork Library • School of Evershade
Professor's Introduction

Attention, scholars, and welcome to the last lesson of our first unit.
In our first lesson, you surveyed the scribe's workspace. In our second, you asked why the scribe chose this pen. In our third, you asked why the scribe chose this surface. Tonight, we put the pieces together and ask the question that closes the unit: why arrange the desk this way?
A pen and a page do not make a manuscript. Between them stands a whole system of small, deliberate choices: where the ink waits, how the page is protected, what steadies the hand, what dries the line. Every object on the scribe's desk answers a vulnerability of the work, and tonight you will learn to read the desk the way you have learned to read the pen and the page.
Arrange your own desk as we go. By the end of this lesson, you will understand the workstation as one working system, and you will see exactly what is still missing.
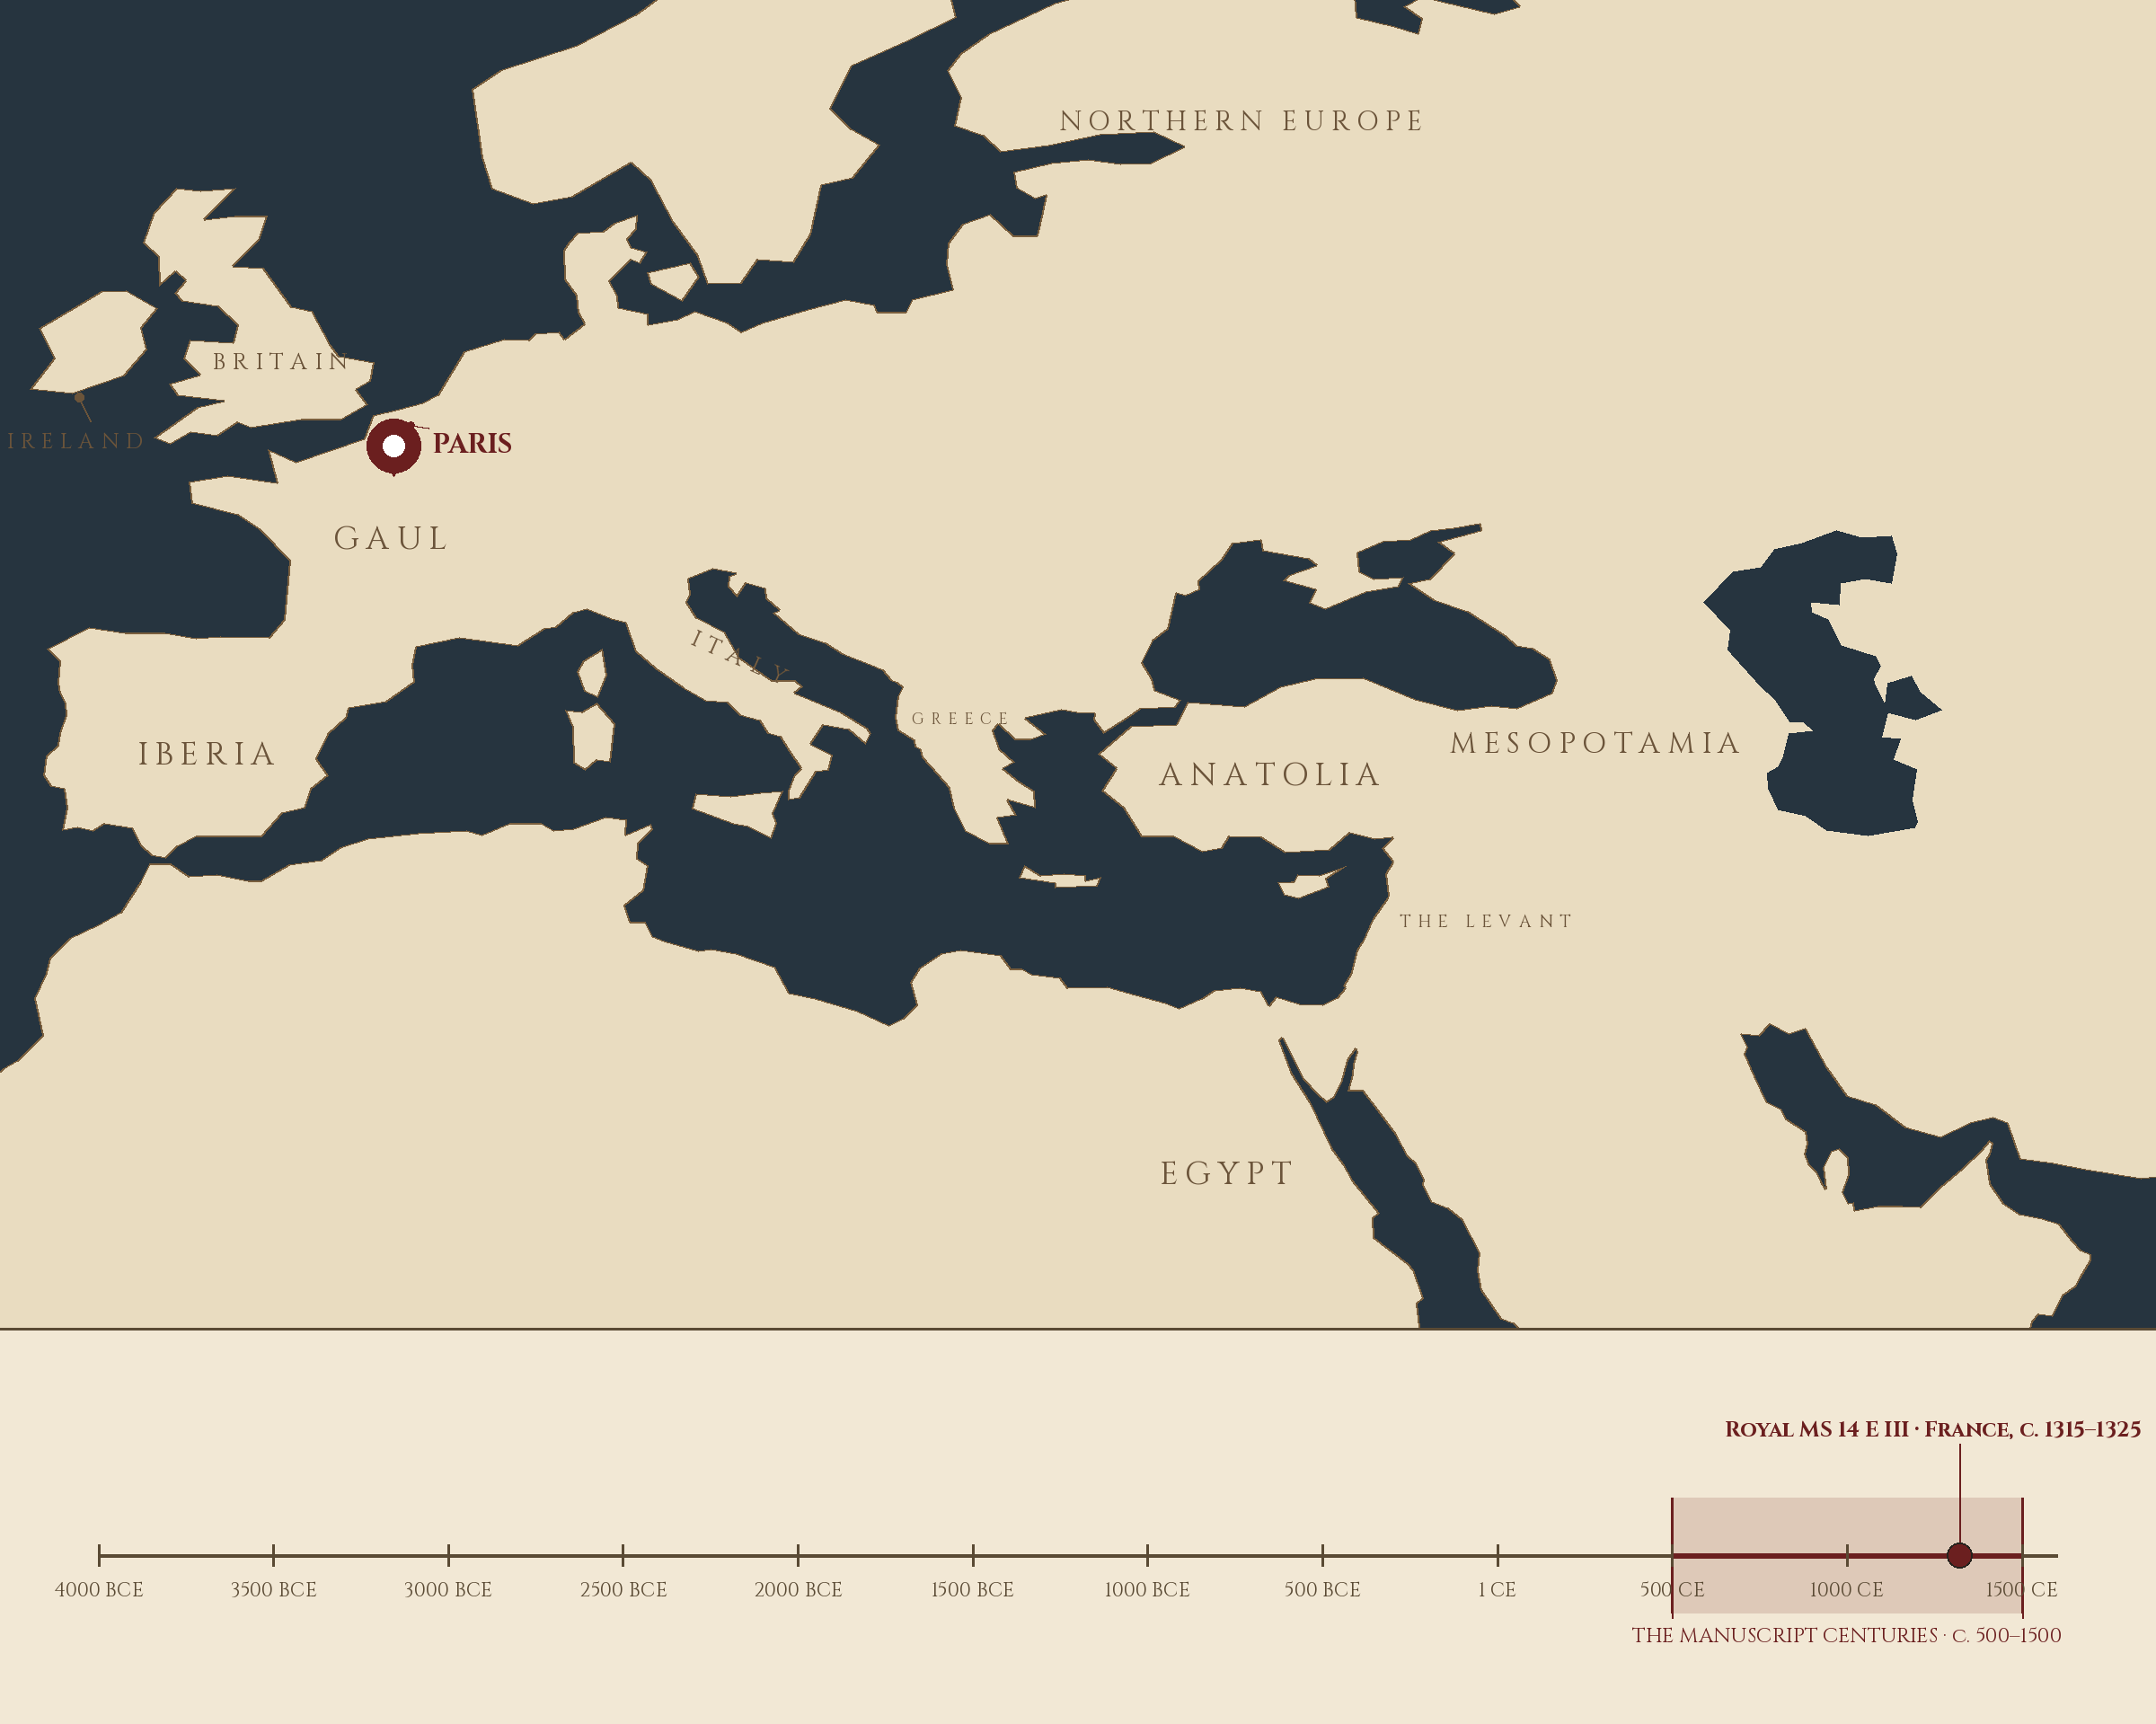
Where and when: Paris, France, c. 1320 CE — Royal MS 14 E III · France, c. 1315–1325. The pin is this lesson. The line beneath the map is our road: every stop a place where writing changed, every lesson a pin.
Lesson Objectives
By the end of this lesson you will be able to:
- define pounce, the fine powder — of pumice, cuttlefish bone, resin, or the like — and say plainly what powdered materials did at the writing desk: prepared surfaces before writing, and dried fresh writing after it;
- distinguish the sander (the container) from pounce (the powder);
- define the inkwell and the inkhorn and describe the materials historical inkwells were made from;
- explain how inkwell placement and desk arrangement protected the manuscript from spills;
- describe the penknife's three roles at the scribe's desk: shaper, eraser, and third hand;
- explain what the surface-oil comparison test reveals about handling the page, and frame the history honestly;
- arrange an efficient workstation and justify the position of each tool.
★ Reading this lesson: ★ marks the passages you most need to remember — for the unit quiz, the class test, and the lessons ahead. Lexicon terms are bolded wherever they appear.
Working this lesson: each body section closes with a ❦ workbook moment — a short prompt to record the section in your own way before you move on. In the Assignment Manual, exercises marked ★ will be on the test; the symbol beside each exercise tells you its kind: ✎ written work, ⚒ hands-on practical, ◐ both. A ❦ Workbook path under an exercise shows how to do the same work on paper when the physical version is not possible, and some exercises name a keepsake — the piece worth keeping from the lesson.
Your Assignment Packet
Your Assignment Packet for this lesson holds the full Lexicon Handout (every term, with the core terms marked ◆), the Materials list, the guided practice, and the complete Assignment Manual — everything below in printable form, for your workbook. Three signposts in this lesson point into it:
- Exercise I — The Writing Desk Layout Study ◐ — waits at the end of the Demonstration, where the full arrangement has been shown.
- Exercise II — The Surface Oil Comparison ⚒ — waits at the end of The Careful Hand, where the oils themselves are explained.
- Exercise III — The Blotting Sand Test ⚒ — waits at the end of Why Ink Needed Drying, where the wet line's danger is clearest.
Work each exercise where its signpost stands, or save them all for the Assignment Manual — the packet carries the same exercises either way.
The Inkwell and Its Keeping
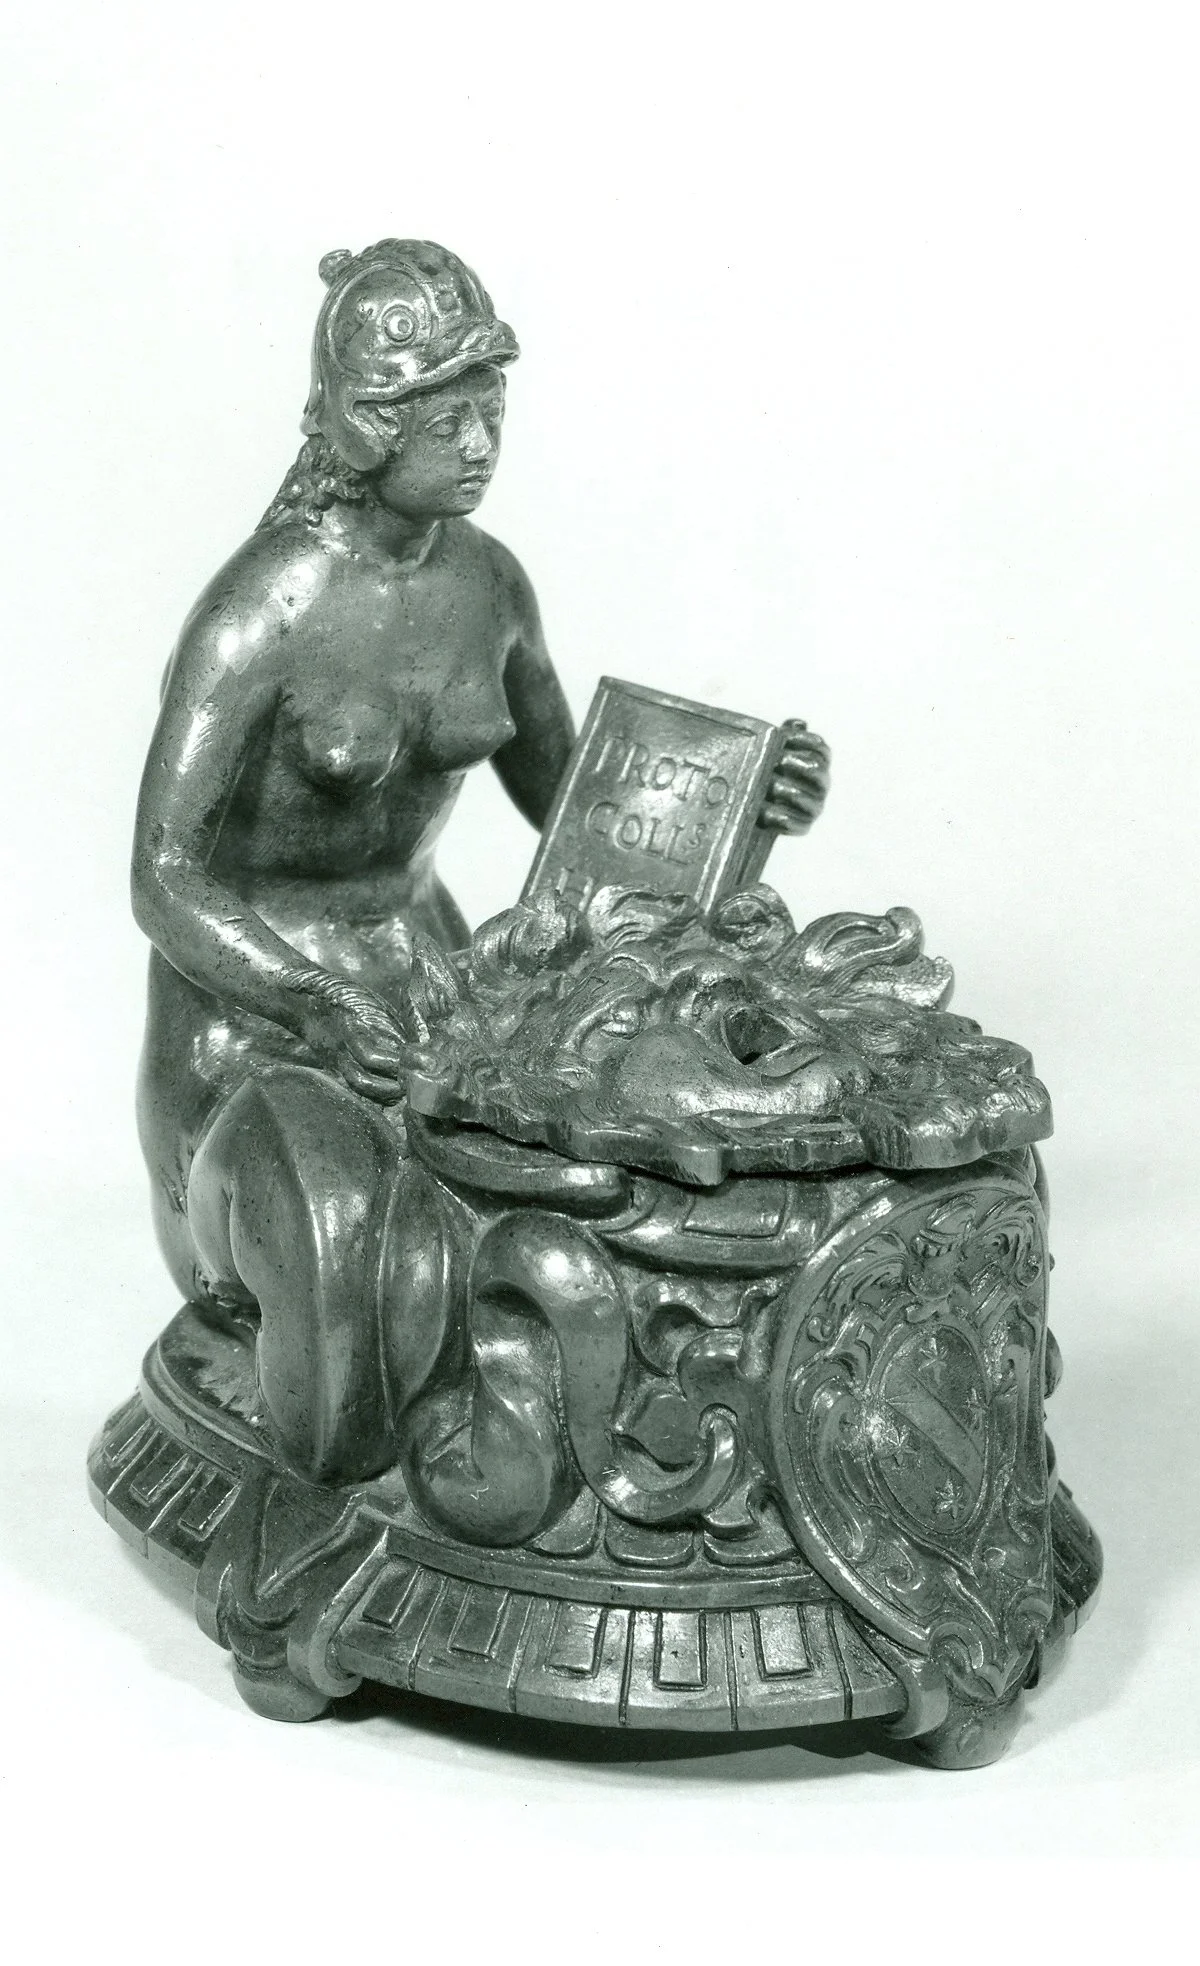
An inkwell as desk sculpture: Italian, late 1500s — the ink hides under the lion-mask lid.
Inkwell (Italian, Veneto, late 16th century), copper alloy. Robert Lehman Collection, The Metropolitan Museum of Art, New York. Public domain.
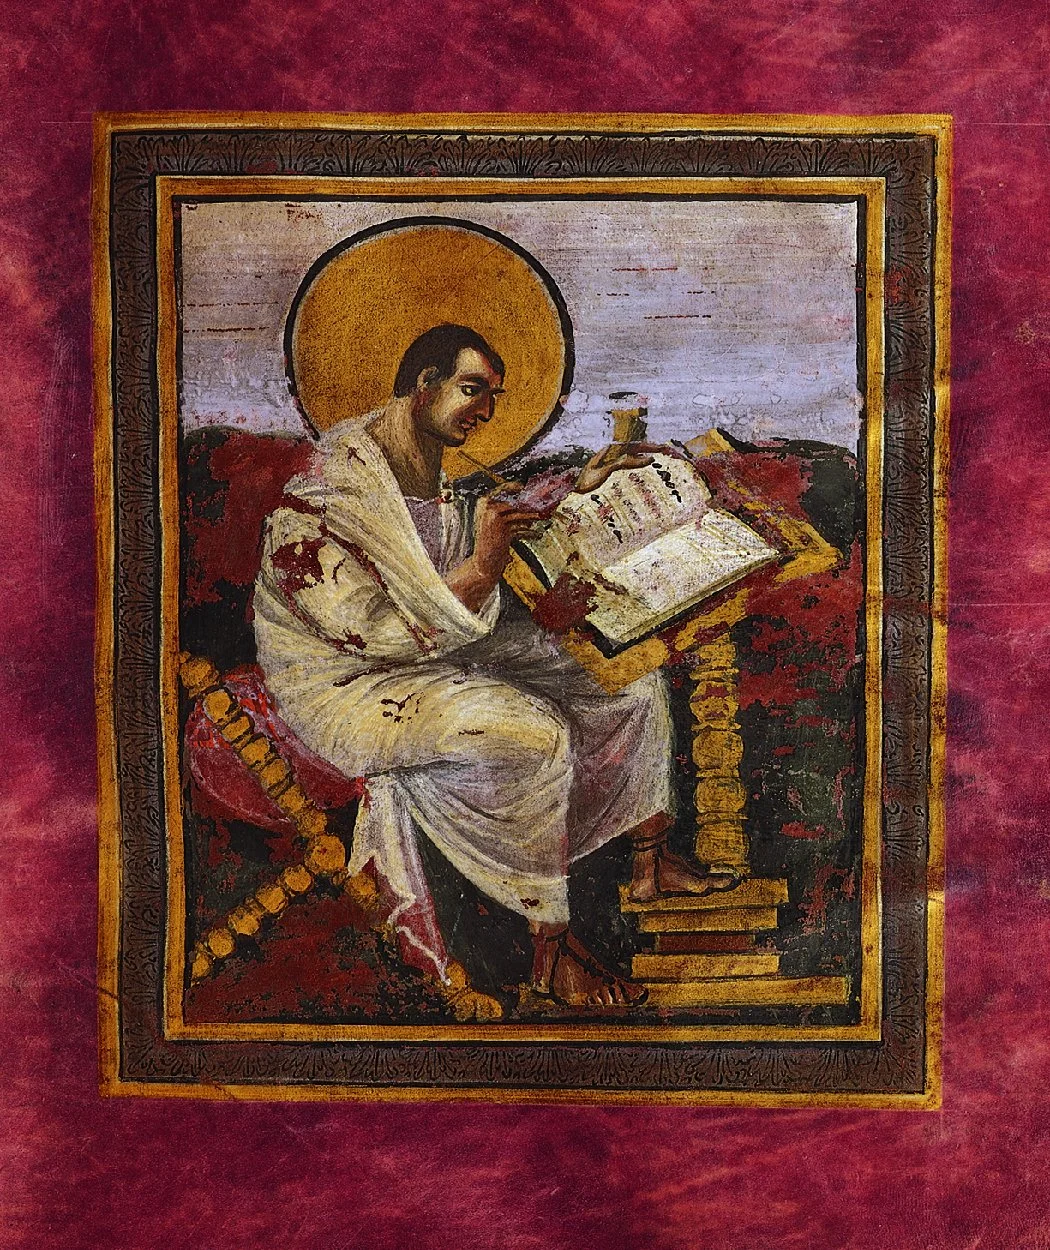
Around the year 800, Matthew keeps his ink pot in his hand while he writes — ink travels with the scribe.
St Matthew writing, from the Coronation Gospels (Aachen, c. 800), Imperial Treasury, Vienna. Public domain.
A functional writing desk required far more than a pen and a sheet of paper. Around the scribe stood a small population of supporting tools, each with a specific purpose and, just as important, a specific place. The desk was not a pile of supplies. It was an arrangement, and the arrangement did work.
The inkwell — the small lidded jar that held the ink — was the most consequential object on the desk after the pen itself, because everything depended on the ink being where the pen expected it, and nowhere else.
Inkwells were made in several materials, including fired ceramic, metal, glass, and hollowed animal horn. An inkwell made of horn even kept its own name, the inkhorn, and horn ink containers are documented across the medieval centuries: light, durable, and easily carried, the horn was one of the most practical containers a traveling scribe could own. Near waterways, some writers even used seashells as ink cups. The Metropolitan Museum of Art holds a brass inkwell, cast and inlaid with silver and copper and attributed to Iran in the late twelfth or early thirteenth century: material evidence that the inkwell was not only a tool but a crafted object worth a metalworker's skill.
★ Medieval images of scribes at work show real care in how the ink pot was kept. Some desks held the pot in a metal hoop fixed to the desk's side; others had wells carved directly into the desk, or a dedicated holding spot, so the container could not wander. One illumination — a painted picture in a manuscript — shows a scribe with two pots at hand, one for black ink and one for red. The lesson is consistent across all of them: the inkwell lived outside the direct path of the writing arm, where a sleeve or an elbow could not find it.
Check in: The inkwell lived outside the direct path of the writing arm, fixed so it could not wander. What was that placement protecting the page from?
❦ In your workbook: record the inkwell and its keeping in your own way — copy, sketch, or note what matters: its materials from ceramic to seashell, its horn name, and the fixed place it was given on the desk.
Pounce: A Messy Word for a Real Practice
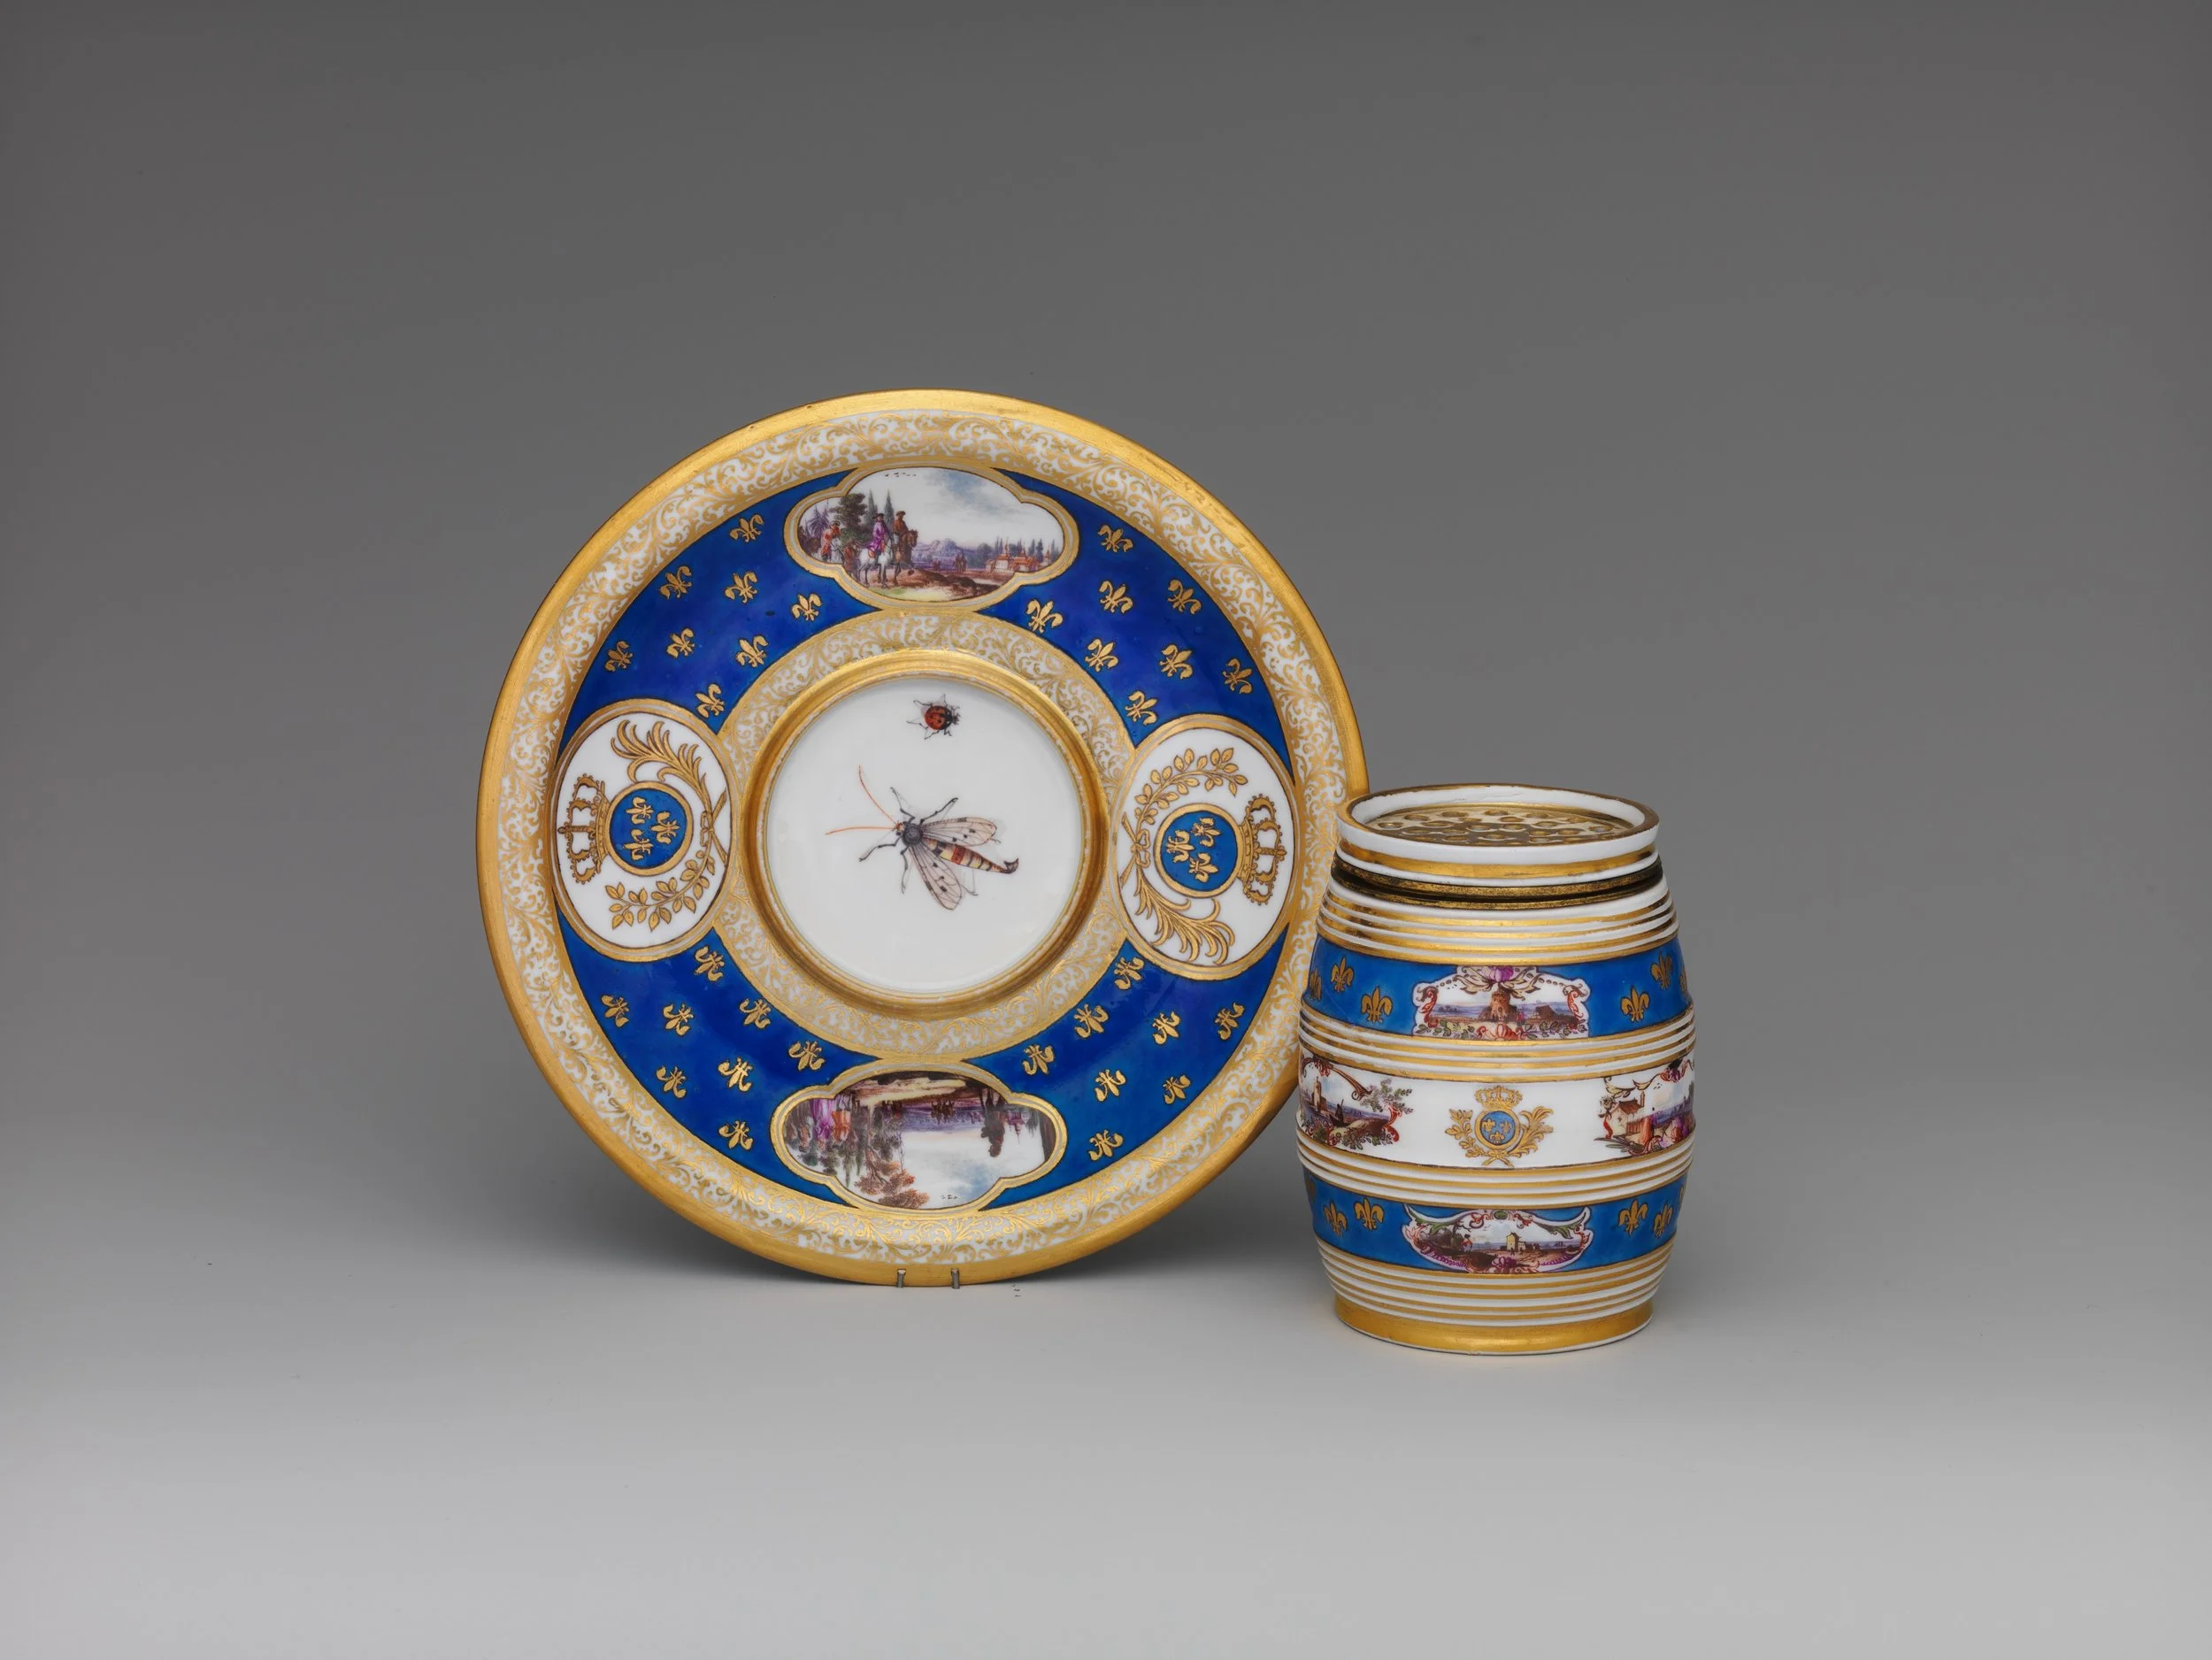
A real pounce pot: porcelain, about 1740 — the pierced top shook the drying powder over wet ink.
Pounce pot and stand, Meissen Manufactory (German, 1740–50), porcelain. The Metropolitan Museum of Art, New York. CC0.
★ Among the most interesting objects on the desk was the sander: a small lidded container, often cylindrical with a perforated top, holding a fine powder. A surviving sixteenth-century example in the King's Collections is made from a goat's horn with silver fittings and shaped like a mermaid. Even a humble tool could be made beautifully.
Here is where the lesson gets honest, in the way this class tries to be. The historical terminology around these powders, pounce, sand, what went into the shaker and what it was for, is messy. Names and substances varied by place, century, and purse, and no single neat definition covers every practice. Rather than force a tidy label onto untidy history, we will teach what the evidence securely supports.
★ What the evidence supports is this. Powdered materials were used to prepare writing surfaces: the Museum of Writing's research collection includes a medieval sander described as filled with gum-sandarac or pumice, "sprinkled over parchment then gently rubbed in, before writing, to degrease it." Surface preparation could make parchment or paper more receptive to writing, remove grease, and modify the surface. This is not the same thing as sizing, the gelatinous coating applied during manufacture, which is a different process entirely.
Separately, sand or powder was used to dry fresh writing: the same collection notes a sander could "also be filled with chalk or biotite, a form of mica, to dry the ink after writing." Different fillings for different jobs, in the same little pot.
★ So the securely teachable picture is not "pounce had two official functions." It is: powdered materials prepared surfaces, and sand or powder dried writing, and the words and recipes wandered. That wandering is not a failure of the history. It is the history, and a scribe's student should know it.
Check in: A fellow scholar announces, "Pounce dried the ink — that was its job." Correct them carefully, in your own words: what two jobs did powdered materials do, and why is one neat name the wrong souvenir to take from this lesson?
❦ In your workbook: record pounce and the sander in your own way — copy, sketch, or note what matters: the pot that sprinkles, the powders that filled it, and the two jobs they did at different moments of the work.
Why Ink Needed Drying
★ Different historical inks behaved differently on the page, and the scribe had to know the temperament of each. What they shared was a vulnerable interval: between the moment the line was laid down and the moment it was truly set, the writing could be smeared by a sleeve, a hand, or a closing page. The careful scribe protected wet writing until it was set, with sand or powder, with patience, and with a hand that knew where not to rest. Why inks set the way they do, the chemistry beneath the behavior, belongs to Unit II, where you will make inks yourself.
Powdered drying methods are especially well documented in later writing practice. Sand survives between the pages of seventeenth- and eighteenth-century account books, where it was scattered over fresh entries to prevent wet writing from transferring to the facing page. Similar powdered drying methods continued into the age of blotting paper. The evidence reminds us that the tools and practices of the writing desk changed over time; not every object or technique described in this lesson belonged equally to every medieval scriptorium.
❦ In your workbook: record why ink needed drying in your own way — copy, sketch, or note what matters: the vulnerable interval, what threatened a wet line inside it, and how sand and patience protected it.
→ In your packet: Exercise III — The Blotting Sand Test ⚒ puts this section to work.
The Penknife's Many Hands
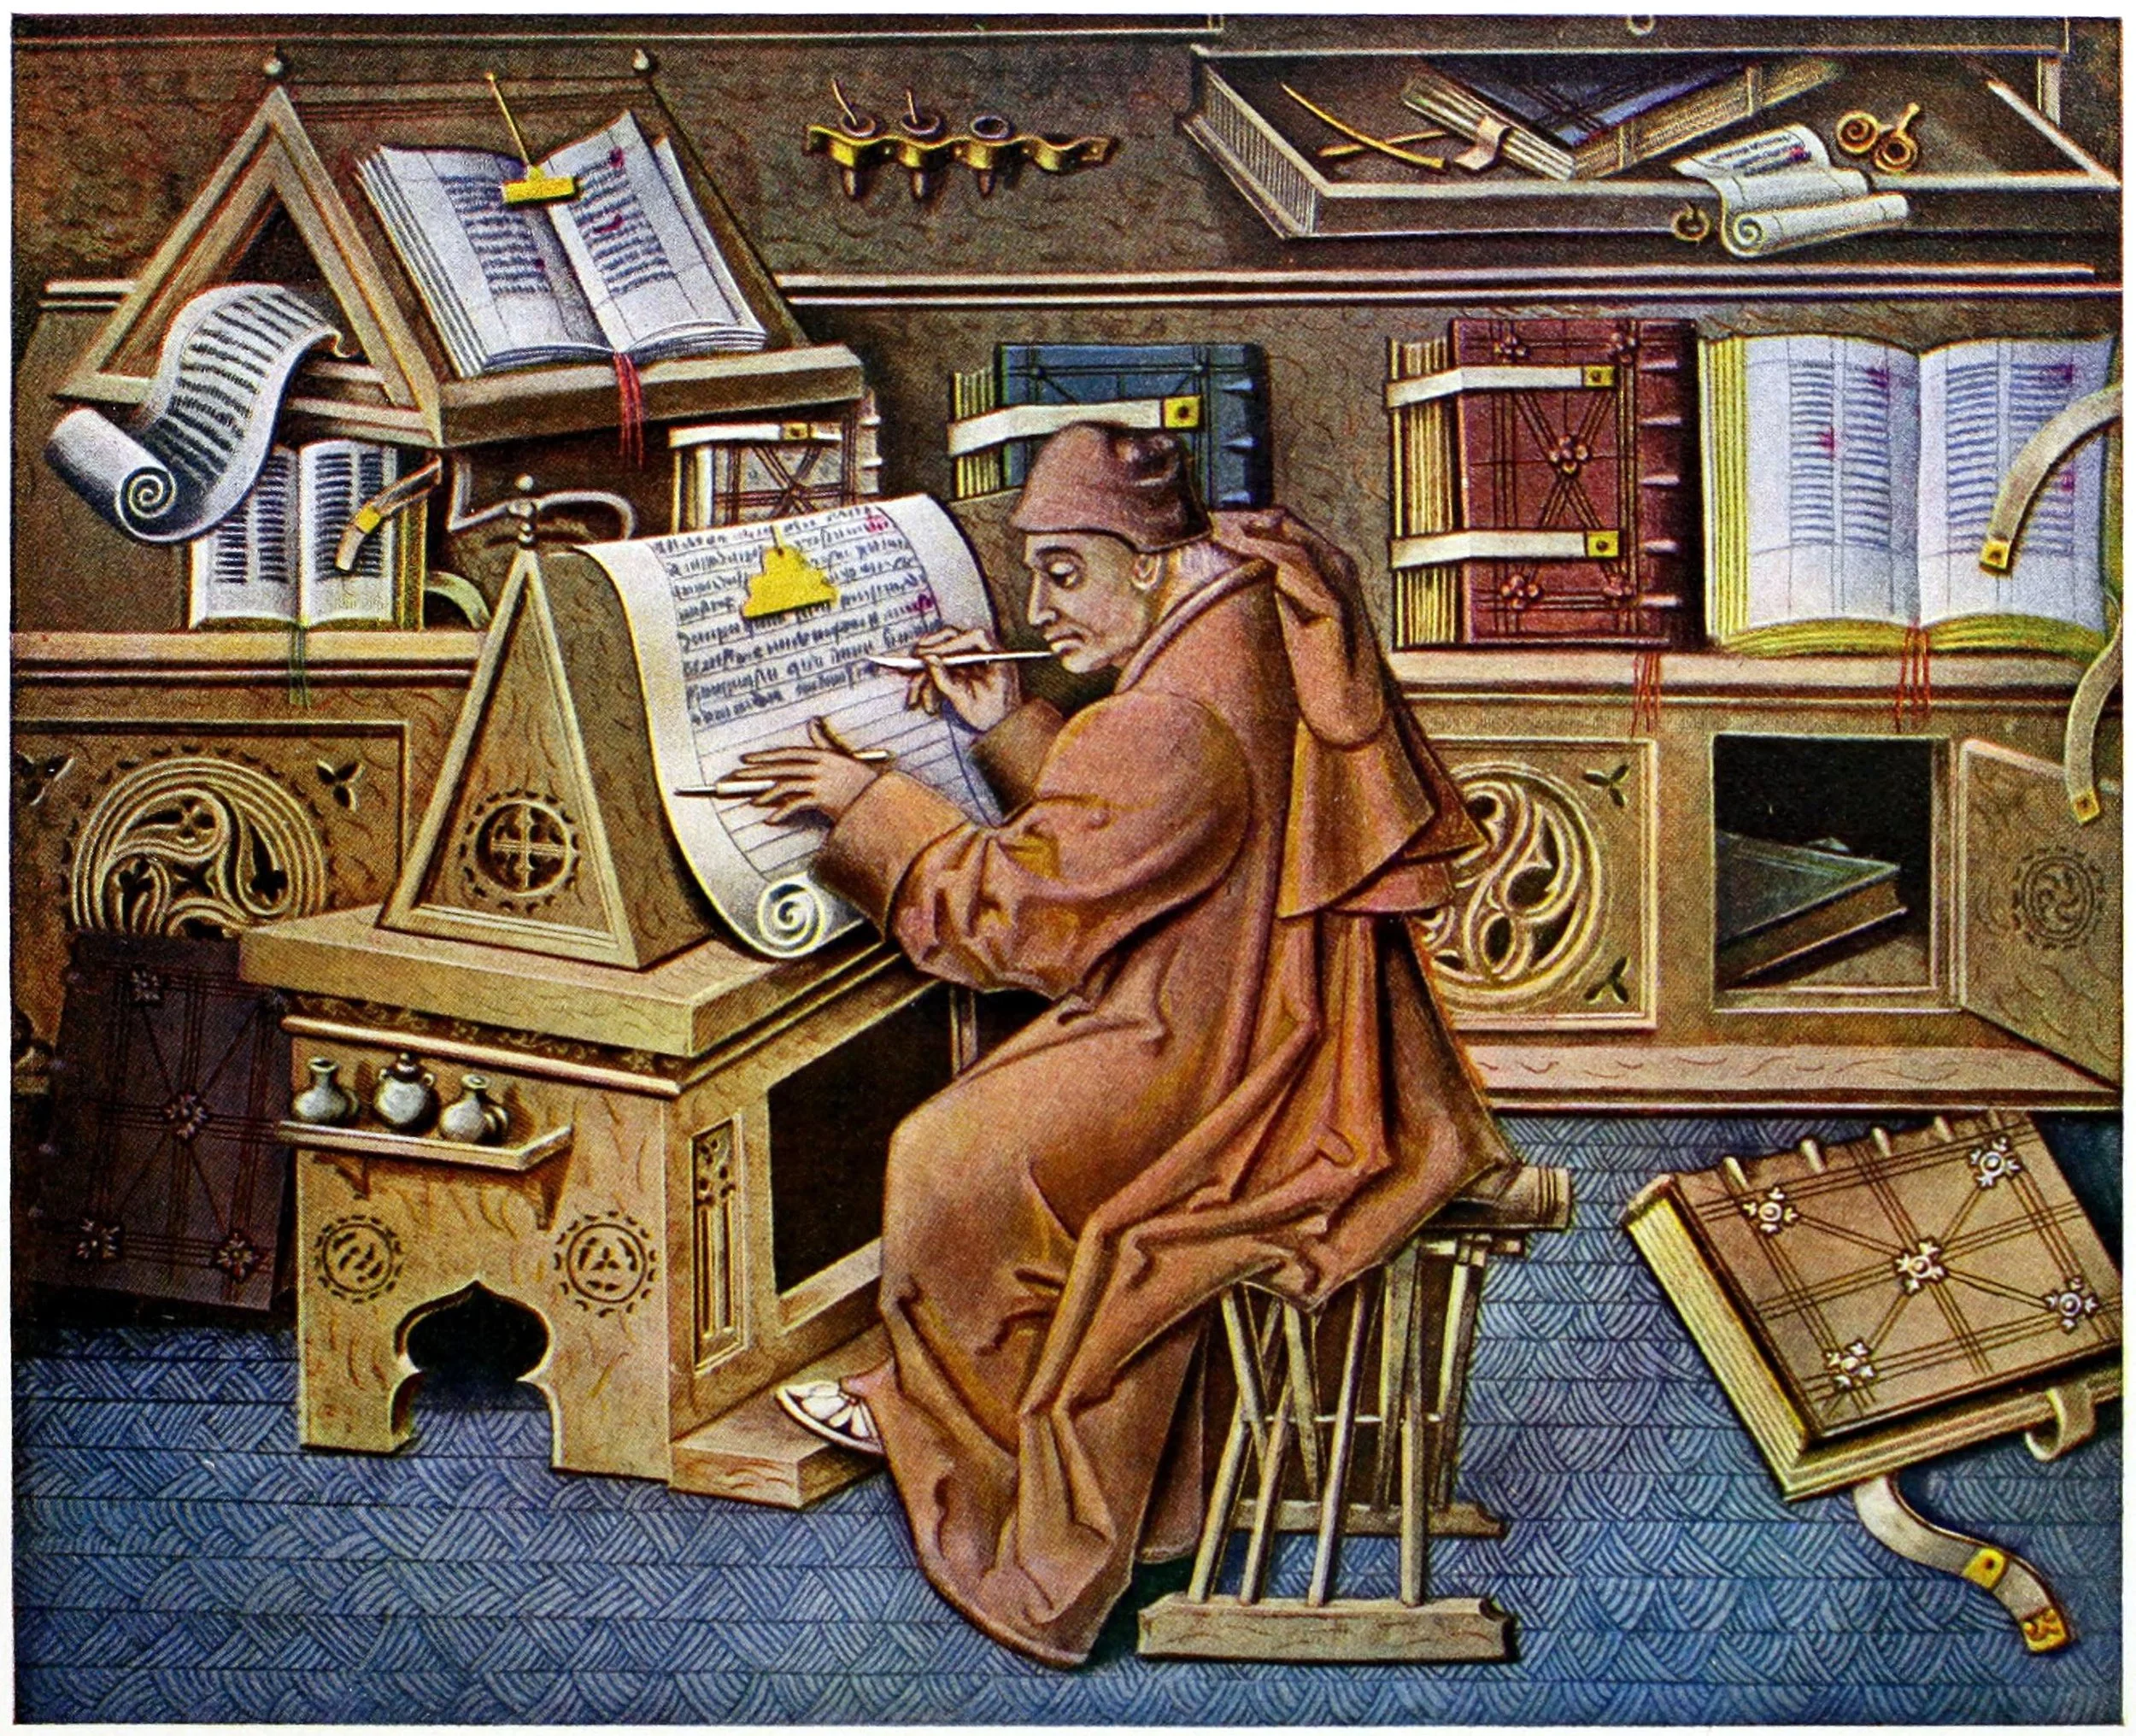
Quill in one hand, penknife in the other: Miélot steadies the sheet with the knife while he writes.
Jean Miélot at his desk, miniature by Jean le Tavernier from the Miracles de Notre Dame (c. 1458), Bibliothèque nationale de France, Paris. Public domain.
The penknife, the scribe's small desk blade, has already appeared in your studies. It shaped the quills of Lesson 2. But at the desk it proved to be the most versatile tool the scribe owned.
Its first job was maintenance: the quill nib wore with use and had to be cut back and reshaped constantly, which is why the knife never left the desk. Its second job was correction: a misspelled word on parchment could be scraped away with the blade, the surface re-prepared, and the line rewritten, one reason so many medieval corrections are nearly invisible today.
★ Its third job is the most revealing. Manuscript illuminations show scribes using the tip of the penknife to steady the page while writing, for example in a French manuscript of about 1315 to 1325, where a hermit-scribe works with his knife doing exactly this. Rather than laying the hand across fresh ink, the scribe anchored the page with the tool. One object, three professions: shaper, eraser, and third hand.
❦ In your workbook: record the penknife's many hands in your own way — copy, sketch, or note what matters: shaper, eraser, and third hand, and the illumination that teaches the third.
The Careful Hand
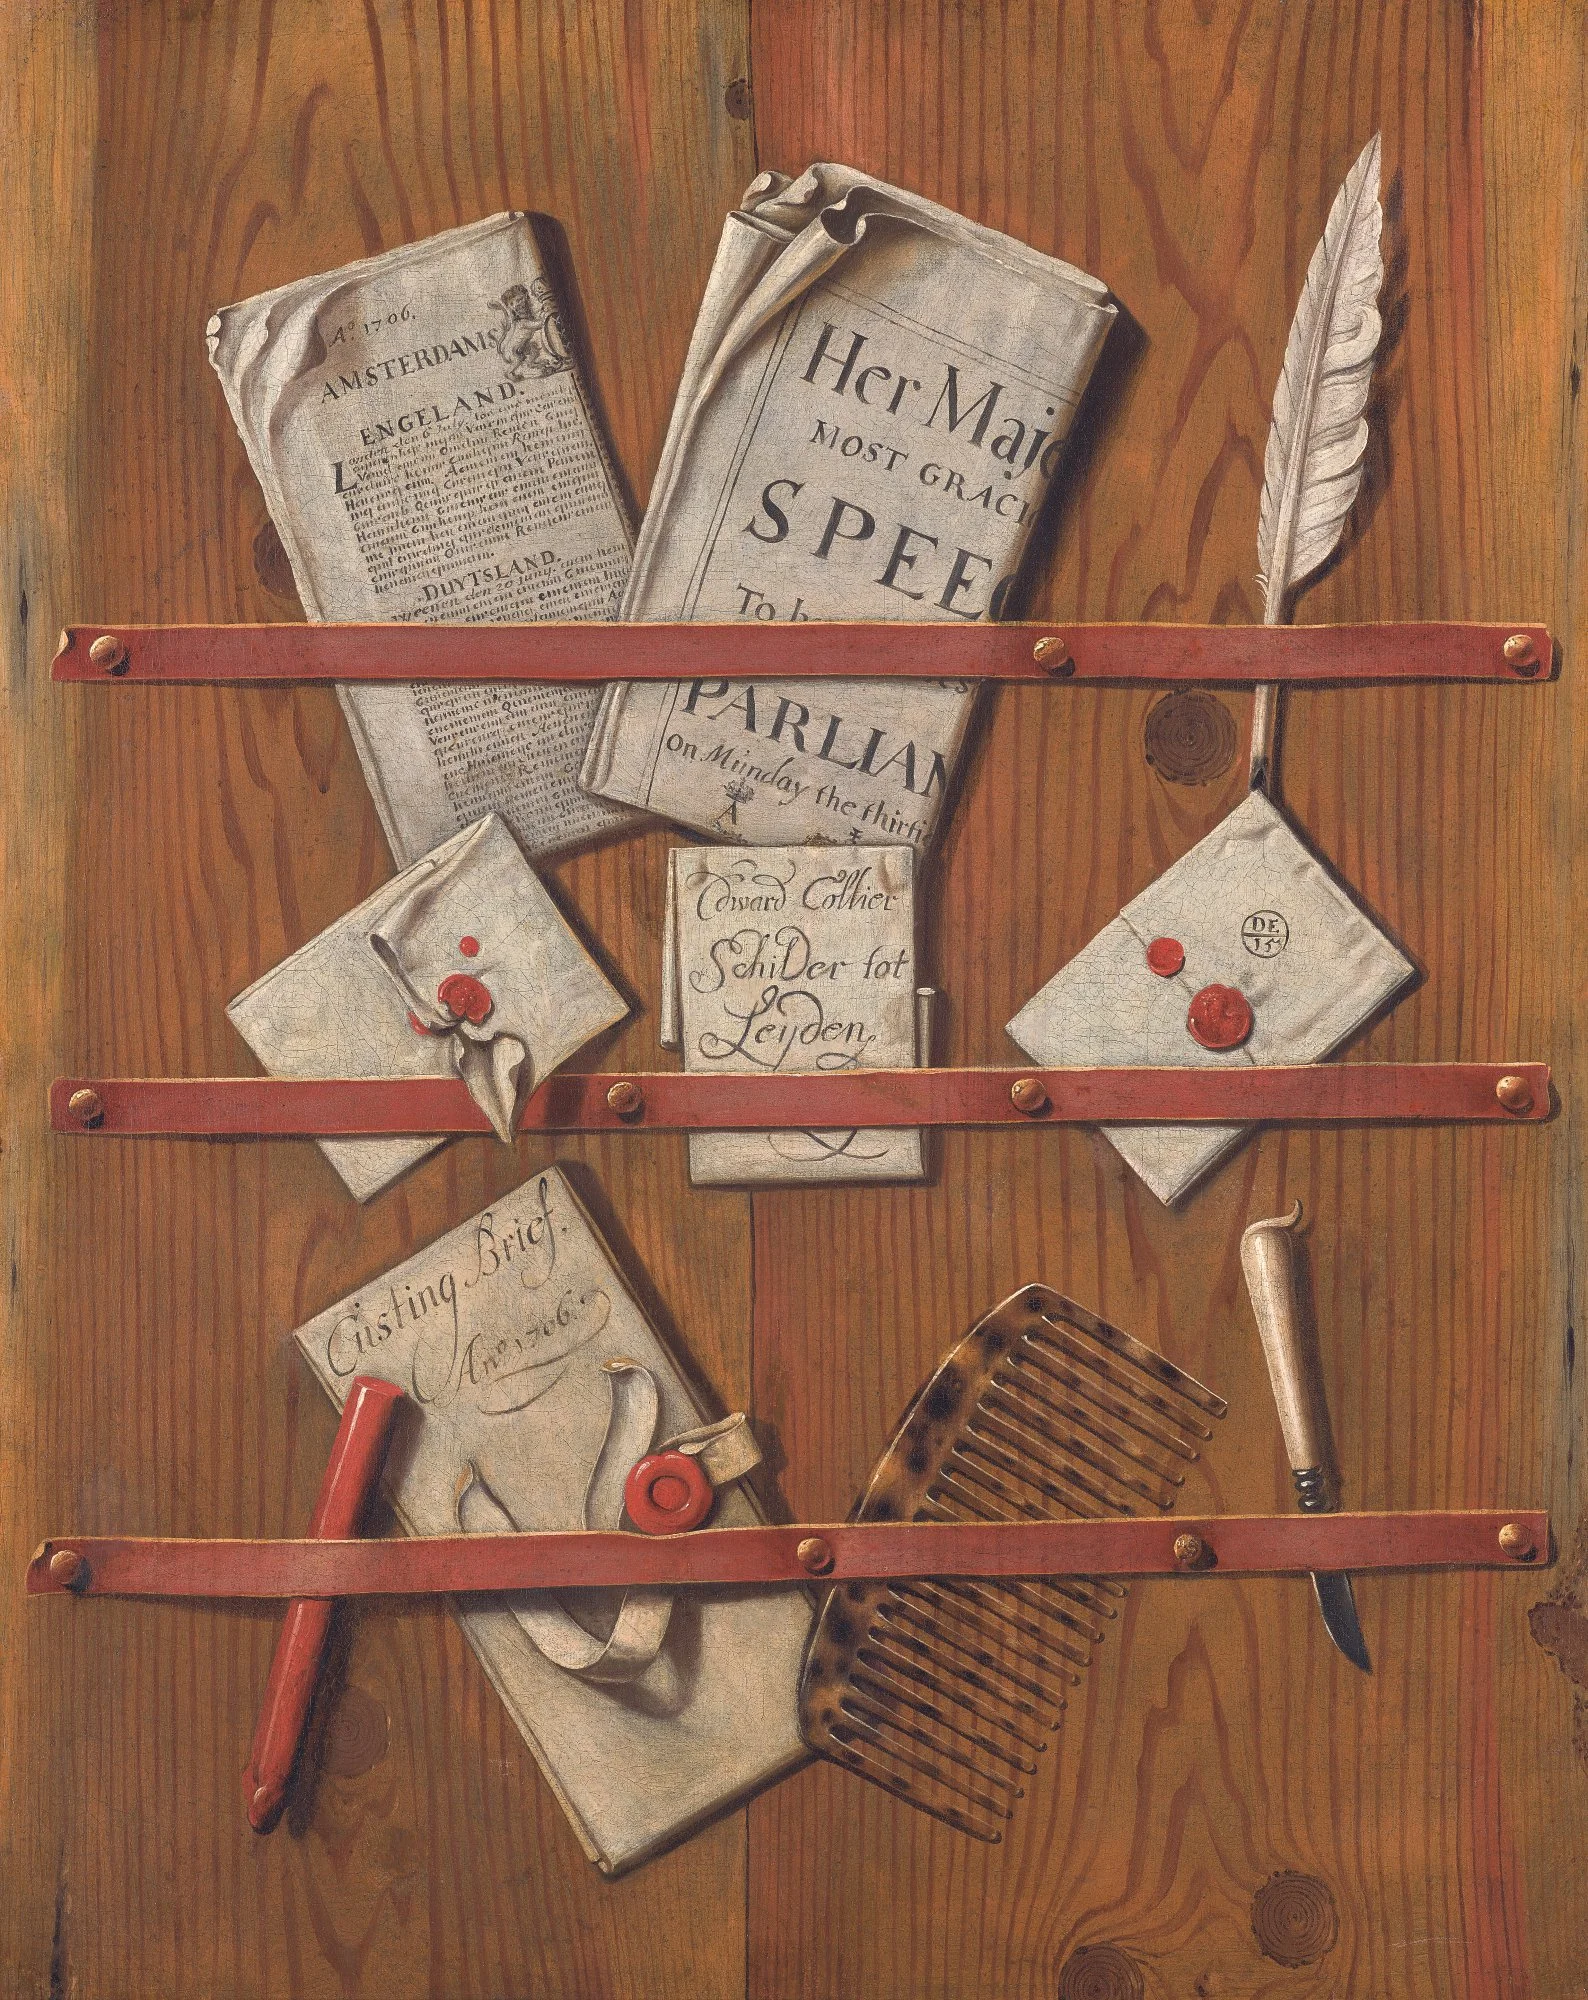
A 17th-century desk wall: letters, a quill, and sealing wax all kept within reach on a letter rack.
Edwaert Collier, Trompe l'oeil with a Letter Rack (17th century). Public domain.
★ A clean writing surface matters. Modern observation helps us understand why: natural oils transferred from the hand can change how some inks behave on a surface. Medieval images also show scribes using tools such as the penknife to steady the page rather than continually placing the hand upon the writing area. We should not assume that medieval scribes explained this behavior using modern chemistry, but we can test the material effect ourselves.
That is precisely what your demonstration will do. The non-writing hand still had essential work, steadying the page, maintaining alignment, but the manuscript evidence shows the skilled scribe giving it a tool for the job: the penknife's tip. The hand guided; the tool touched.
Check in: In your own words: what may we honestly claim about scribes and skin oil, and what must we not claim?
❦ In your workbook: record the careful hand in your own way — copy, sketch, or note what matters: what hand oils do to ink on a surface, the behavior the medieval images actually show, and the claim this lesson will not make.
→ In your packet: Exercise II — The Surface Oil Comparison ⚒ puts this section to work.
Professor Nocturne
Pause here, scholars, and look at the desk we have been describing, not as a list of objects, but as a single answer.
Every object on it answers a vulnerability of the work: spilled ink, a wet line, an uncooperative surface, a worn nib, an error, a page that shifts beneath the hand.
The inkwell's placement answers the spill. The sander answers the slow-drying line. The powder answers the uncooperative surface. The penknife answers the worn nib, the error, and the hand that must not touch the page.
Nothing on the scribe's desk is decoration. Nothing is accident. Each object is a small decision about risk, and the desk, taken together, is the scribe's whole philosophy of careful work, made visible.
Now arrange your own desk, and test what the scribes knew.
Guided Observation: Tool & Workspace Analysis
Before beginning the practical exercises, examine your own writing workspace and record your observations.
Study:
- the stability of your ink container
- the placement of your tools relative to your writing hand
- the texture of your paper surfaces
- how your non-writing hand naturally steadies the page
- any oils or marks your fingers leave on scrap paper
Consider the following questions:
- Why would a scribe keep the inkwell outside the path of the writing arm?
- What happens when you touch a paper surface and then try to write on it?
- Why would a powder work better than wiping the page with a cloth?
- Which tool on your desk serves the most functions?
- What does the arrangement of your workspace assume about the behavior of liquid ink?
Record your observations carefully within your workbook.
Demonstration: Desk Arrangement & Ink Care
Work with ordinary household materials: any small lidded container or cup for ink, clean, dry blotting sand, a scrap-paper supply, a pencil or ruler to stand in for the historical penknife (see the safety note below). No special purchases are needed.
A note on the penknife: this lesson teaches the historical penknife and its real functions, but students do not need a blade on the desk to learn workstation arrangement. Throughout this demonstration, a pencil, ruler, or other blunt object represents the penknife, for steadying the page, pointing, and positioning. The actual cutting work of quill maintenance belongs to a later lesson, with appropriate supervision and safety instruction.
Position the Ink Container
Place your ink container outside the direct path of your writing hand, to the side opposite your writing arm if you are right-handed. Note how the placement changes what your sleeve and elbow can reach.
Arrange the Tools
Set out your pen, your penknife-substitute, your ruler, and your blotting sand so each is reachable without crossing over the writing surface. Sketch the arrangement.
Test Surface Oils
Lightly press your thumb onto one section of a scrap sheet; leave a neighboring section untouched. Place one small drop of ink on each section using a quill, dip pen, or eyedropper. Let both dry fully, then compare: diameter, edge sharpness, feathering. Record exactly what differs, and record it honestly if almost nothing does. Depending on the paper, the ink, the sizing, and how much oil your thumb transferred, you may see a dramatic difference or barely any. An unchanged result is a valid result.
Prepare and Blot
Write several small lines of ink on a fresh scrap sheet. Lightly sprinkle clean, dry sand over the wet writing, let it sit briefly, then tilt the sheet and brush the sand gently away into a dish. Inspect the lines: note where the sand drew moisture and where the pigment stayed.
→ In your packet: Exercise I — The Writing Desk Layout Study ◐ puts this section to work.
Materials
Required (Level One — household items)
- Paper scraps: plain paper for the oil-comparison and blotting-sand tests. Printer paper, notebook paper, or any clean scrap will do.
- Ink or dark paint: any bottled ink, fountain-pen ink, or thinned dark paint for the drop tests and writing lines. An eyedropper or the tip of a dip pen applies the drops.
- A writing pen: a quill, dip pen, or any pen that can lay a line of ink — the Demonstration and Exercise III write lines with it, and the eyedropper alone cannot.
- A small lidded container or cup: your stand-in inkwell. Any small jar with a lid teaches the placement lesson.
- Clean, dry sand: a spoonful from a craft store, a sandbox, or a beach visit, sifted free of shells. This is your blotting sand. A small dish to catch it in.
- A pencil or ruler: your penknife-substitute for steadying the page, pointing, and positioning. No blade is needed for this lesson.
- Your thumb: the source of the sebaceous oils, the natural oils your skin produces. Use it unwashed — the oils are the point of the test.
Suggested (Level Two — historically closer)
- A quill or quill-style dip pen and dark ink: the scriptorium writing kit. Iron gall or carbon ink behaves most like the historical materials; the lesson's tests were designed for real dip ink.
- Parchment paper: the manuscript surface. Modern parchment paper from a craft store is a plant-fibre paper made to look like the prepared skin the monks wrote on; it takes powder differently than printer paper, and differently from real parchment too.
- Powdered cuttlebone: the historical pounce. Available from pet-supply shops (sold for birds); a pinch rubbed into parchment before writing recreates the surface-preparation the lesson describes.
- A horn or ceramic cup: the historical inkwell. A small ceramic condiment cup with a lid approximates the weight and stability of the medieval pot.
No purchased kits or specialty tools are required. The core lesson (desk arrangement, the oil comparison, the blotting-sand test) is fully achievable with paper, ink, sand, and a pencil.
Reflection Questions
Answer the following questions in your workbook.
- Why did scribes keep tools like the penknife and the sander within reach rather than fetching them as needed?
- What did powdered materials do for the scribe, and why should we be careful about giving those practices a single neat name?
- What did your oil-comparison test show, and what does it suggest about handling the page?
- Why might the inkwell's position matter more than it first appears?
- You have now studied the workspace, the pen, and the surface separately. What does the arranged workstation do that none of its parts can do alone?
- Which tool's hidden second job surprised you most, and why?
Professor's Review
And so our first unit ends where all manuscript work truly begins: at a desk that is ready.
Look at what you have built across these four lessons. In our first, you surveyed the workspace. In our second, you learned why the scribe chose this pen. In our third, you learned why the scribe chose this surface. And tonight, you learned why the desk is arranged the way it is: how the inkwell, the sander, the penknife, and the careful hand form a single system for protecting liquid ink and the page it falls upon.
You came to this unit with empty hands. You leave it with an arranged desk, a pen you understand, a surface you have tested, and tools whose every position you can justify. There is exactly one thing missing, and you have felt its absence in every lesson so far.
The ink. In our next unit, we make it.
PROFESSOR QUILLBERRY NOCTURNE
Scrollwork Library
Master Scribe & Illuminator
Cross-Class Connections
Runes · Lesson 1 — The Structural Wedge
My scholars begin where all writing begins: a tool cut for its material, and a surface that smears if you drag across it while wet. Five thousand years before this scriptorium, the vulnerable interval was already teaching scribes to arrange their work around wet marks. Come and learn the discipline at its source.
Runes · Lesson 18 — The Celtic Manuscript Tradition
Read my Insular scribes with Professor Nocturne's lesson in hand: the wedge at the top of every tall letter is the quill's own signature, and the quill stayed sharp because a penknife never left the desk. My scribes are his scribes, seen from the letters' side. Come and meet them.
PROFESSOR THISTLELOOM WEBBLETHORN
Runes & Ancient Writing

Potions · Unit I, Lesson 2 — The Scriptorium & Workspace Zoning
I zone my laboratory the way Professor Nocturne arranges a desk: each work in its place, and the records at a dry desk far from steam and spills. My scholars draw a labeled map of their benches; his draw a labeled diagram of their desks. Come and draw the same drawing in my room, and learn why the philosophy holds in both.
Potions · Unit I, Lesson 3 — Vessels, Jars & Blown Glasswork
An inkwell is a vessel before it is anything else, and it keeps ink the way my jars keep preparations: lidded, inspected, and trusted only when sound. In my laboratory you will learn to judge glass the way he teaches you to judge a well. A scholar who has learned the one will never mistreat the other.
Potions · Unit VI, Lesson 48 — Midnight Carbon & Oak Gall Inks
What sits in your inkwell, I take apart in my laboratory: carbon ink, which endures by sitting still, and iron gall ink, which endures by biting in. I am glad to send my scholars to Professor Nocturne for the writing of it. Return the courtesy, and learn from me why the ink behaves as you watched it behave.
Potions · Unit VI, Lesson 50 — Paper Aging & Manuscript Staining
Tonight you watched ink in its first vulnerable minutes. My Lesson 50 watches ink and paper across centuries, corrosion and all, and holds the honesty rule every keeper of manuscripts needs: an aged appearance is a craft technique, never a deception. Come and learn the long view.
PROFESSOR CRIMBLEBREW MUDDLENOOK
Potions Laboratory • Master Apothecary • Head of House Meridies

Creative Arts · Unit IV, Lesson 15 — Pigments, Paints & Color Charts
The red in the scribe's second pot began as earth and stone on my grinding slab. In my workshop you will grind pigment yourself and chart the colors, the same colors Professor Nocturne's illuminators lay in borders a hair's breadth at a time. When your pigment runs true, you will know which stone to thank.
PROFESSOR COGBRANCH TIMBERCLANK
Creative Arts Workshop
Further Reading & Sources
For scholars who want to go deeper into the scribe's world, these are the places I send my own students first.
*Christopher de Hamel. Scribes and Illuminators. British Museum Press, 1992.* The classic short introduction to medieval manuscript production: each stage from the preparation of vellum, pens, paints, and inks to the writing of the scripts and the final decoration. De Hamel follows real scribes and illuminators as working professionals, not anonymous monks. An ideal next book after this lesson.
*Raymond Clemens and Timothy Graham. Introduction to Manuscript Studies. Cornell University Press, 2007.* The standard student-friendly textbook for the field. Part 1, "Making the Medieval Manuscript," walks through the whole production process: writing surfaces, inks, ruling, writing, rubrication, decoration, and binding. Lavishly illustrated with manuscript pages.
The Metropolitan Museum of Art. "Inkwell with Twelve Zodiac Medallions." Late 12th to early 13th century, attributed to Iran. Object 44.131. Met: Inkwell with Twelve Zodiac Medallions A brass inkwell, cast and inlaid with silver and copper: material evidence for the historical inkwell as a crafted object. Study the photographs closely; this is what a fine inkwell looked like in the hand.
King's Collections, King's College London. "The tools and material of the written word." King's Collections: Tools of writing A 16th-century goat-horn sander with silver fittings, shaped like a mermaid, and a 17th-century capstan inkwell: the forms historical writing tools took.
Gilbert Redman. "Scriptorium: Tools — Medieval Manuscripts." Redman: Scriptorium Tools The penknife's many uses, including steadying the page as shown in Royal MS 14 E III (France, c. 1315 to 1325), and ink pots kept in desk hoops, desk-carved wells, and holding spots.
Erik Kwakkel. "Dirty Medieval Books." Medievalbooks.nl. Kwakkel: Dirty Medieval Books Sand and fingerprints surviving in historical books: physical traces of how ink was dried and pages were handled. Short, vivid, and full of photographs; the best single blog post on what medieval books reveal about their makers' hands.
The Museum of Writing — research collection. The collection this lesson quotes for its medieval sander: filled with gum-sandarac or pumice, "sprinkled over parchment then gently rubbed in, before writing, to degrease it", or filled with chalk or biotite, a form of mica, to dry the ink after writing.
Browse the Scrollwork shelf in the school Library for readable editions of these works.
Submit your work for this lesson using the form below.
THE UNIT I QUIZ
SCROLLWORK LIBRARY · UNIT I · LESSONS 1–4
Unit I is complete: the desk is set, the pens are understood, the surfaces are known, and the tools stand in their places. This quiz gathers the whole unit, all four lessons, into one sitting. Take it from memory first, before you look back at your notes, because it measures what has stayed with you. If you completed the Exercises marked ★ in your lesson packets, you have already practiced most of what it asks.
The quiz packet is a single download. Part I gathers questions from every lesson in the unit, Part II matches the unit's vocabulary, and the answer key waits at the back for self-checking. When you have finished, score it honestly, note the result in your workbook, and revisit any lesson whose questions went wrong before you move on to Unit II.
CONTINUE IN THE SCROLLWORK LIBRARY
← Previous · Lesson 3: Writing Surfaces Through History Next · Lesson 5: Soot & Charcoal Ink →
Unit I — All Four Lessons Scrollwork Library — All 26 Lessons
The rest of Unit I: Lesson 1 · The Scriptorium Desk · Lesson 2 · Reed Pens & Feather Quills · Lesson 3 · Writing Surfaces Through History
From the Scrollwork Shelf
The printed companions to this lesson, from Professor Nocturne’s shelf in the shop.
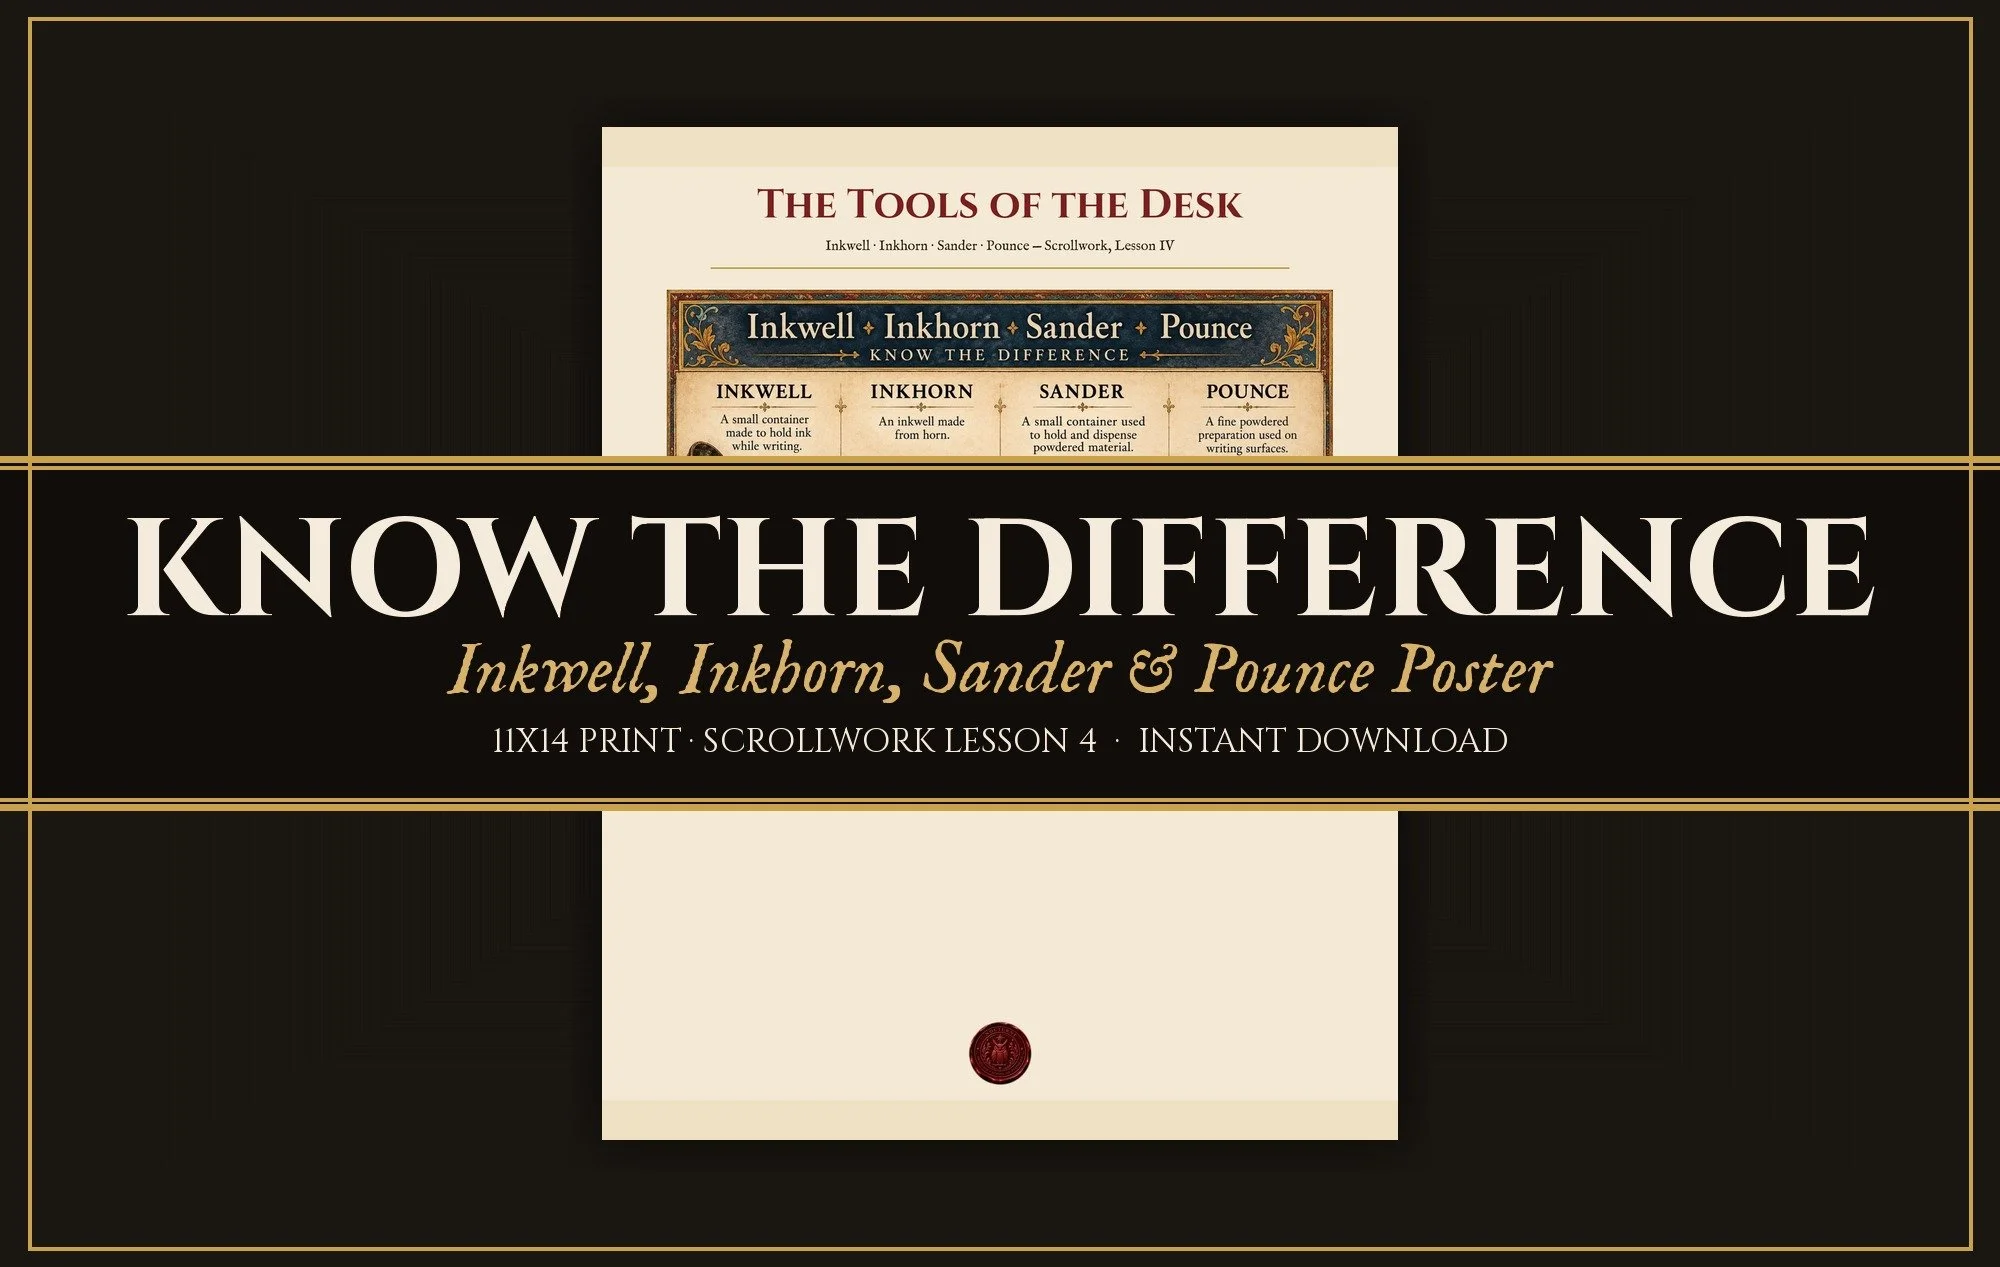
Scrollwork — Know the Difference Poster: Inkwell, Inkhorn, Sander & Pounce (Unit I, Lesson 4)
$4.95
View in the Shop