

Creative Arts
Unit V, Lesson 20Clay II: Vessels, Tiles, Relief & Molds
Professor Cogbranch Timberclank
Master Artisan, Head of House Occidens
The Creative Arts Workshop • School of Evershade
Professor's Introduction

Back to the clay bench, scholars. Your hands know the three first methods now. Today the clay grows up.
Lesson 19 gave clay its first forms: the pinched pot, the coiled wall, the rolled slab. This lesson gives it its repeatable forms. A vessel shaped to a purpose so exactly that apothecaries stocked it for three centuries. A tile pressed into relief, so a wall can carry a picture in clay. And a mold, the potter's quiet revolution, which lets one good form become a hundred honest copies. Professor Muddlenook's laboratory shelves are full of descendants of these ideas, and Professor Webblethorn's tablets have cousins in the relief work.
We will also talk honestly about fire, because a clay lesson that pretends every scholar has a kiln is a lesson lying to most of its readers. Real kilns exist, and firing in one is an adult's craft with an adult's rules. Air-dry clay and the household oven are the honest alternatives for most benches, and this lesson will tell you plainly what each can and cannot do, so your work succeeds at the level you actually have.
The drill today is the test tile set: small pieces, each one an experiment, each one labeled with what the clay did. Potters have kept test tiles for as long as they have fired pots. Ours begin the habit.
PROFESSOR COGBRANCH TIMBERCLANK
Creative Arts Workshop
Master Artisan, Head of House Occidens
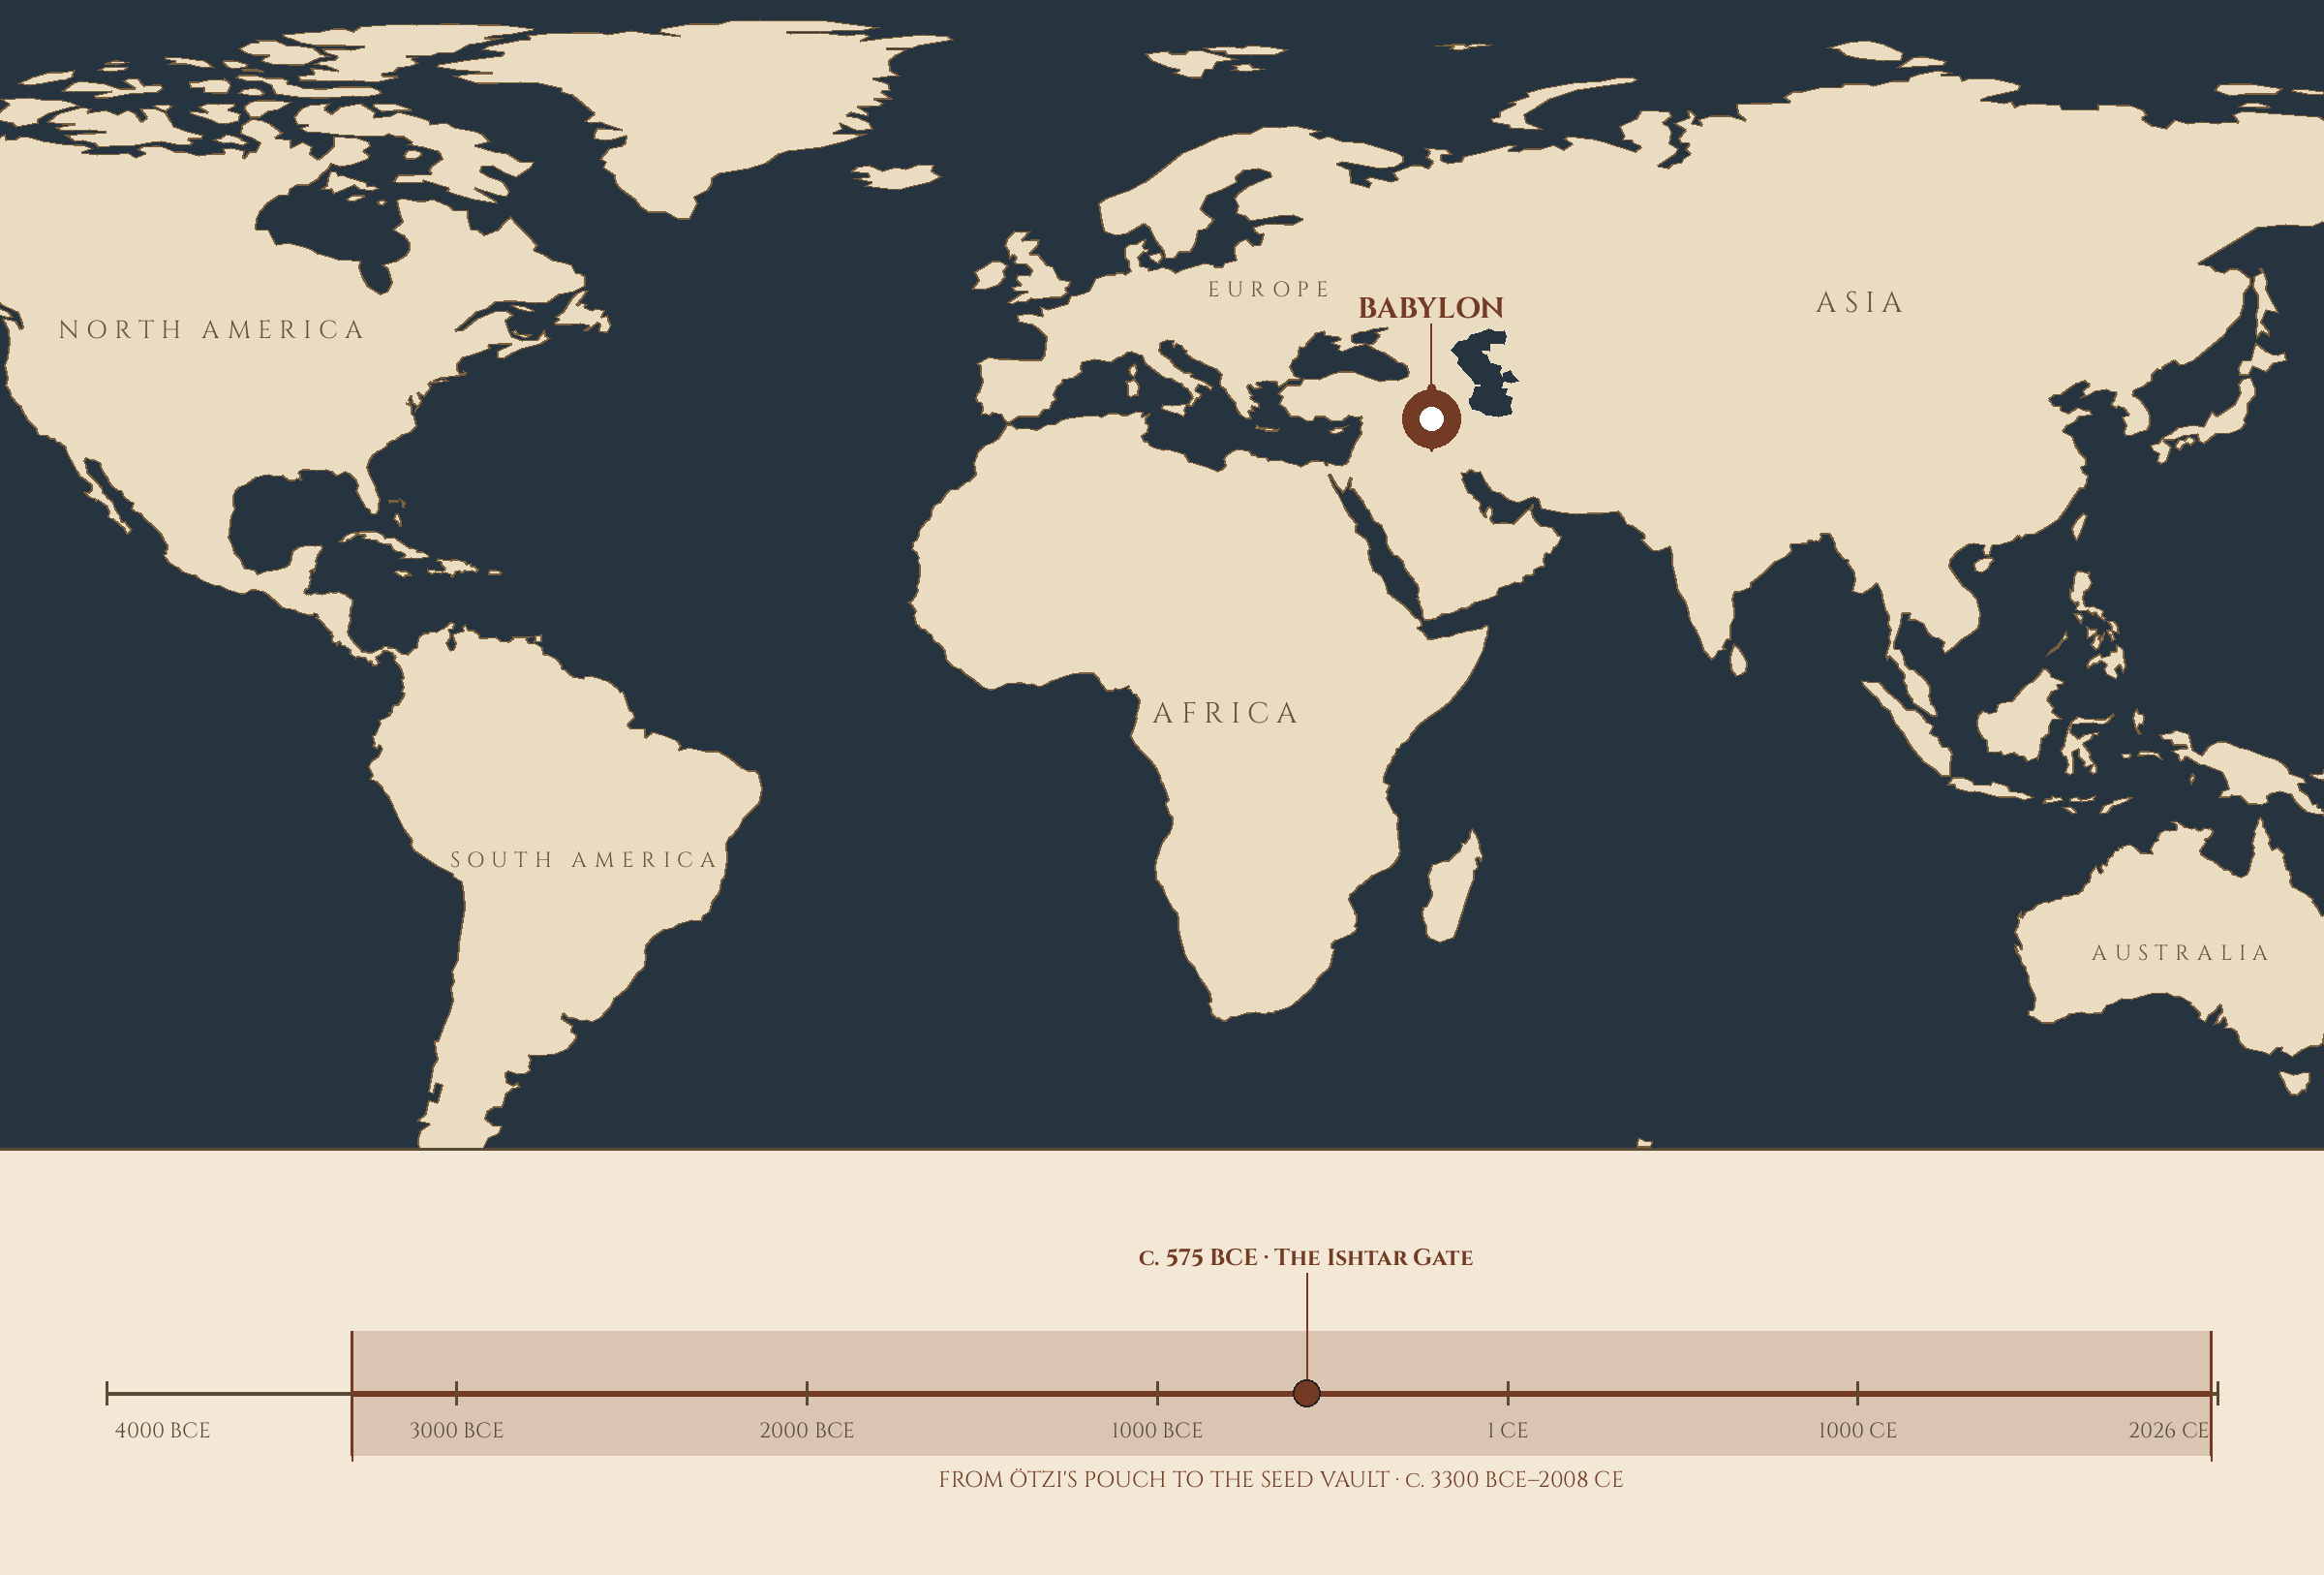
Where and when: Babylon — c. 575 BCE, the Ishtar Gate.
Lesson Objectives
By the end of this lesson, students should be able to:
- Describe the albarello: its shape, its road from the Near East to the Italian apothecary, and how it was sealed and labeled.
- Explain how molded bricks carried the relief animals of the Ishtar Gate, and how Roman terra sigillata ware was thrown inside a mold and signed.
- Build a vessel with an albarello's proportions by coil and slab methods.
- Press a relief into a tile and read the result honestly.
- Take a simple one-piece mold and release a casting cleanly, and care for the mold afterward.
- State honestly what a kiln does that air-drying and oven-curing do not, and choose the right finish for a piece's purpose.
Your Assignment Packet
This lesson's assignments live in its packet: the Lexicon Handout (every term, course terms marked ◆), the Assignment Manual, and the Reflection Questions. Download the packet before you begin and keep it beside you as you read — work from it as each subject is taught, or take the assignments as homework afterward.
The Apothecary's Jar
Walk into an Italian pharmacy of the year 1500 and the shelves speak to you in jars. The albarello came north from the Near East along the spice roads, a cylindrical jar of tin-glazed earthenware, most often a hand's span to a forearm tall — reference books say about eighteen centimeters, though many surviving Italian examples stand twenty-five to thirty-four, its body straight or gently waisted so a hand can grip it, its mouth wide and flanged. That tin-glazed ware is maiolica: clay painted with a white glaze made opaque with tin oxide, then decorated in color on that white ground — the white ground is what let the apothecary's jars carry writing and painting fit to read across a shop. The mouth tells the storage system: these jars were not corked. A circle of parchment or leather was laid over the top and tied down with cord, a seal that kept powders dry and showed at a glance if it had been disturbed, which is a lesson Professor Muddlenook's scholars will recognize from their own jar-sealing lesson.
The wide mouth admits a scoop. The straight sides stack close on a shelf. And the jar was named for what it held — usually by a parchment label tied or pasted on, sometimes by a cartouche painted right into the glaze, naming the contents, a powder, a root, a prepared medicine, so the jar could be read across the room by lamplight. The Metropolitan Museum holds albarelli from Naples and from Valencia, some in blue and white, some in the coppery lusterware Spain was famous for, and they are beautiful in a way that serves the work: a pharmacy's jars were its signboard and its filing system at once.
Your build today copies the proportions, not the glaze: a cylinder a little narrower at the waist, a mouth made for tying down, and a front panel left smooth for the name of what it will hold. Build it by coils on a slab base, or from a slab wrapped and joined, as Lesson 19 taught. A jar that knows what it is for stands straighter.
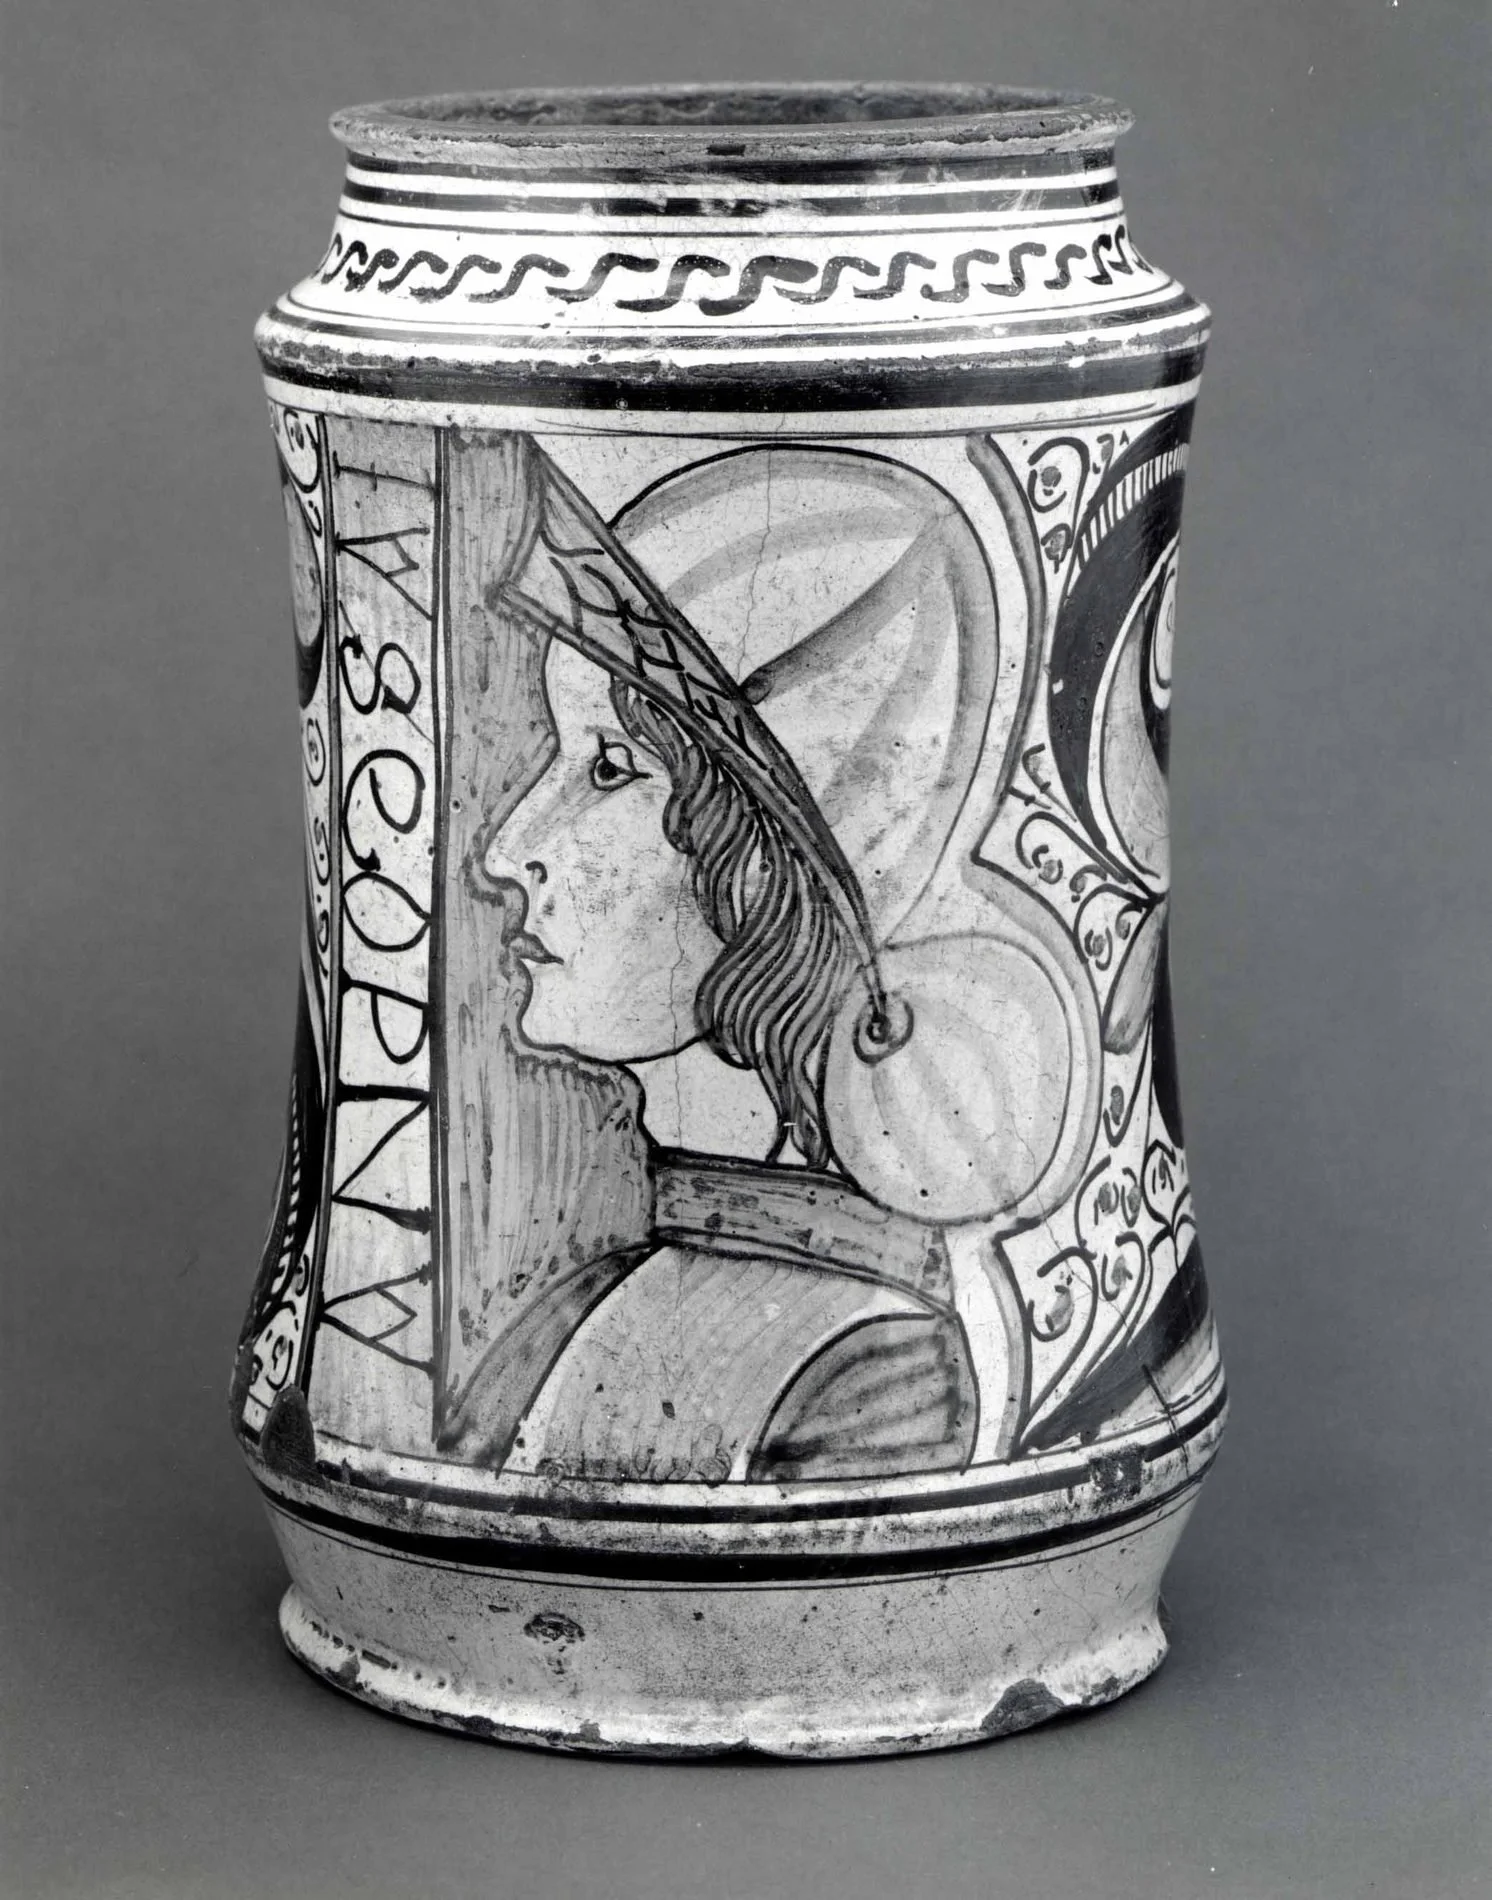
A maiolica apothecary jar (albarello), Italian, probably Naples, late 15th century — tin-glazed earthenware, height 13½ in. (34.3 cm), the waisted cylindrical form in profile.
The Metropolitan Museum of Art (Object 1975.1.1138), Open Access (CC0).
Relief, Brick, and the Mold
Relief is where clay learned to multiply. In Babylon, around 575 BCE, the builders of the Ishtar Gate faced a problem of scale: a processional way of glazed blue brick, carrying striding lions, bulls, and dragons, each animal many bricks tall. The solution was the mold at architectural size. Bricks of fine clay were pressed into wooden forms, the animal reliefs made from bricks formed in reusable molds so that beast matched beast down the whole wall, and the blue glaze, laid over the relief, imitated the lapis lazuli the king could praise in his own inscription. The gate's frontal half stands rebuilt today in Berlin's Pergamon Museum, and its animals are, in the plainest sense, this lesson's subject: clay, molded, repeated, and true.
Rome industrialized the idea at table scale. Terra sigillata, the glossy red ware the National Museum of Ireland describes as mass-produced from the first century BCE to the third century CE, was made by throwing the pot inside a mold: bowls, dishes, and cups whose relief decoration came from the mold's carved interior, produced first in Italy and then in Gaul by the workshop load. And the potters signed their work, stamping their names into the ware, so that a bowl in Ireland still carries its maker's name from a Gaulish bench. A mold, scholars, is not a shortcut around skill. It is skill stored in a form, so the hundredth piece can be as true as the first, and it asks its own skill in return: the form must release, the clay must be pressed into every detail, and the mold itself must be kept clean enough to tell the truth.
Fire, Honestly
Here is the honest account of finishing, because this is where clay lessons usually start to shade the truth.
A kiln fires clay to temperatures, commonly 900 degrees and far beyond, at which the clay itself changes: it hardens into permanent ceramic, and at the higher firings vitrifies — turns glass-dense and waterproof. Low-fired earthenware stays porous and holds food safely only under a sound, food-safe glaze. That change is fire's gift and no substitute matches it. Air-dry clay hardens by losing water only. It is real material and fine for tiles, markers, models, and practice, but it softens again if it soaks, and it is never food ware. The household oven cures some clay bodies and hardens polymer and low-fire preparations at modest temperatures; it does not fire earthenware, and no oven piece should be sold or used as if it had been kiln-fired. Level One of this school means household means, honestly named. A scholar who labels a piece for what it is (air-dried, oven-cured, kiln-fired by an adult at a community kiln) is doing the same work as the apothecary painting the true name on the jar.
Where a community kiln, school kiln, or pottery studio is available, firing is an adult-led step under Lesson 5's rules of heat, and pieces go in bone dry, because steam in a wall does in a hot kiln quickly what trapped air does slowly.
A Sealed Note from Professor Timberclank
Fire is the adult's part of this craft, scholars, and the boundary is bright.
A kiln is loaded, fired, and opened by an adult, or not at all. A household oven used for clay is an adult's step too, with the work attended, the room aired, and food kept entirely out of the arrangement until the oven has been cleaned and aired after. Clay labeled for ovens is the only clay that goes in one. What a supplier's packet does not permit, this workshop does not attempt.
Under that rule, the rest of the lesson is gentle: keep the dust rule from Lesson 19, clay worked damp and wiped up wet; keep tools for cutting molds under Lesson 3's knife discipline; and keep every mold clean and dry between uses, because a mold put away damp grows more than clay ever will. We stop. We make it safe. Then we begin again.
PROFESSOR COGBRANCH TIMBERCLANK
Creative Arts Workshop
Master Artisan, Head of House Occidens
Technique: Vessels, Relief, and Molds
Build the vessel. Start with a slab base cut to the jar's footprint. Raise the wall by coils, joining every ring as Lesson 19 taught, and keep the profile in mind as you climb: straight sides, a gentle narrowing at the waist, and a rim flared slightly outward for the tying-down of a cover. Or wrap a slab: roll it to the guide sticks, cut it to height and circumference, score, wet, and join the seam with a coil of soft clay pressed along the inside. Either way, smooth the front panel flat and leave it plain. That panel is the jar's face, and it will carry a painted or incised name in the apothecary manner.
Press the relief. Carve or build your design into a flat tile of leather-hard clay, or press a carved stamp, a leaf, a coin's edge, or a found texture into a fresh tile and lift straight up, never dragging. Clay records pressure exactly, so press once, firmly, and read what you actually got. Relief rewards a bold, simple design. Fine scratchy detail fills in and sulks.
Take the mold. Choose a simple object or a carved tile with sloping sides and no undercuts. For a press mold, roll a slab, lay it over or into the form, and press the clay into every corner with a pad of cloth or your thumbs, working from the center out so no air is trapped. Let it firm to leather-hard within the mold, then ease it free with a straight lift. For a mold you mean to keep, work the clay negative carefully, dry it thoroughly, and store it clean, dry, and labeled.
Care for the mold. Brush it clean while dry with a soft brush, never wash it in a flood, dry it fully before shelving, and check its face before every use. A mold is a promise about the next hundred pieces. Keep it like one.
A medieval English encaustic floor tile (13th–14th century) bearing a king holding flowers, made by pressing a carved wooden block into soft clay and filling the impression with cream slip before glazing and firing.
The Metropolitan Museum of Art (Object 2015.391.2), Open Access (CC0).
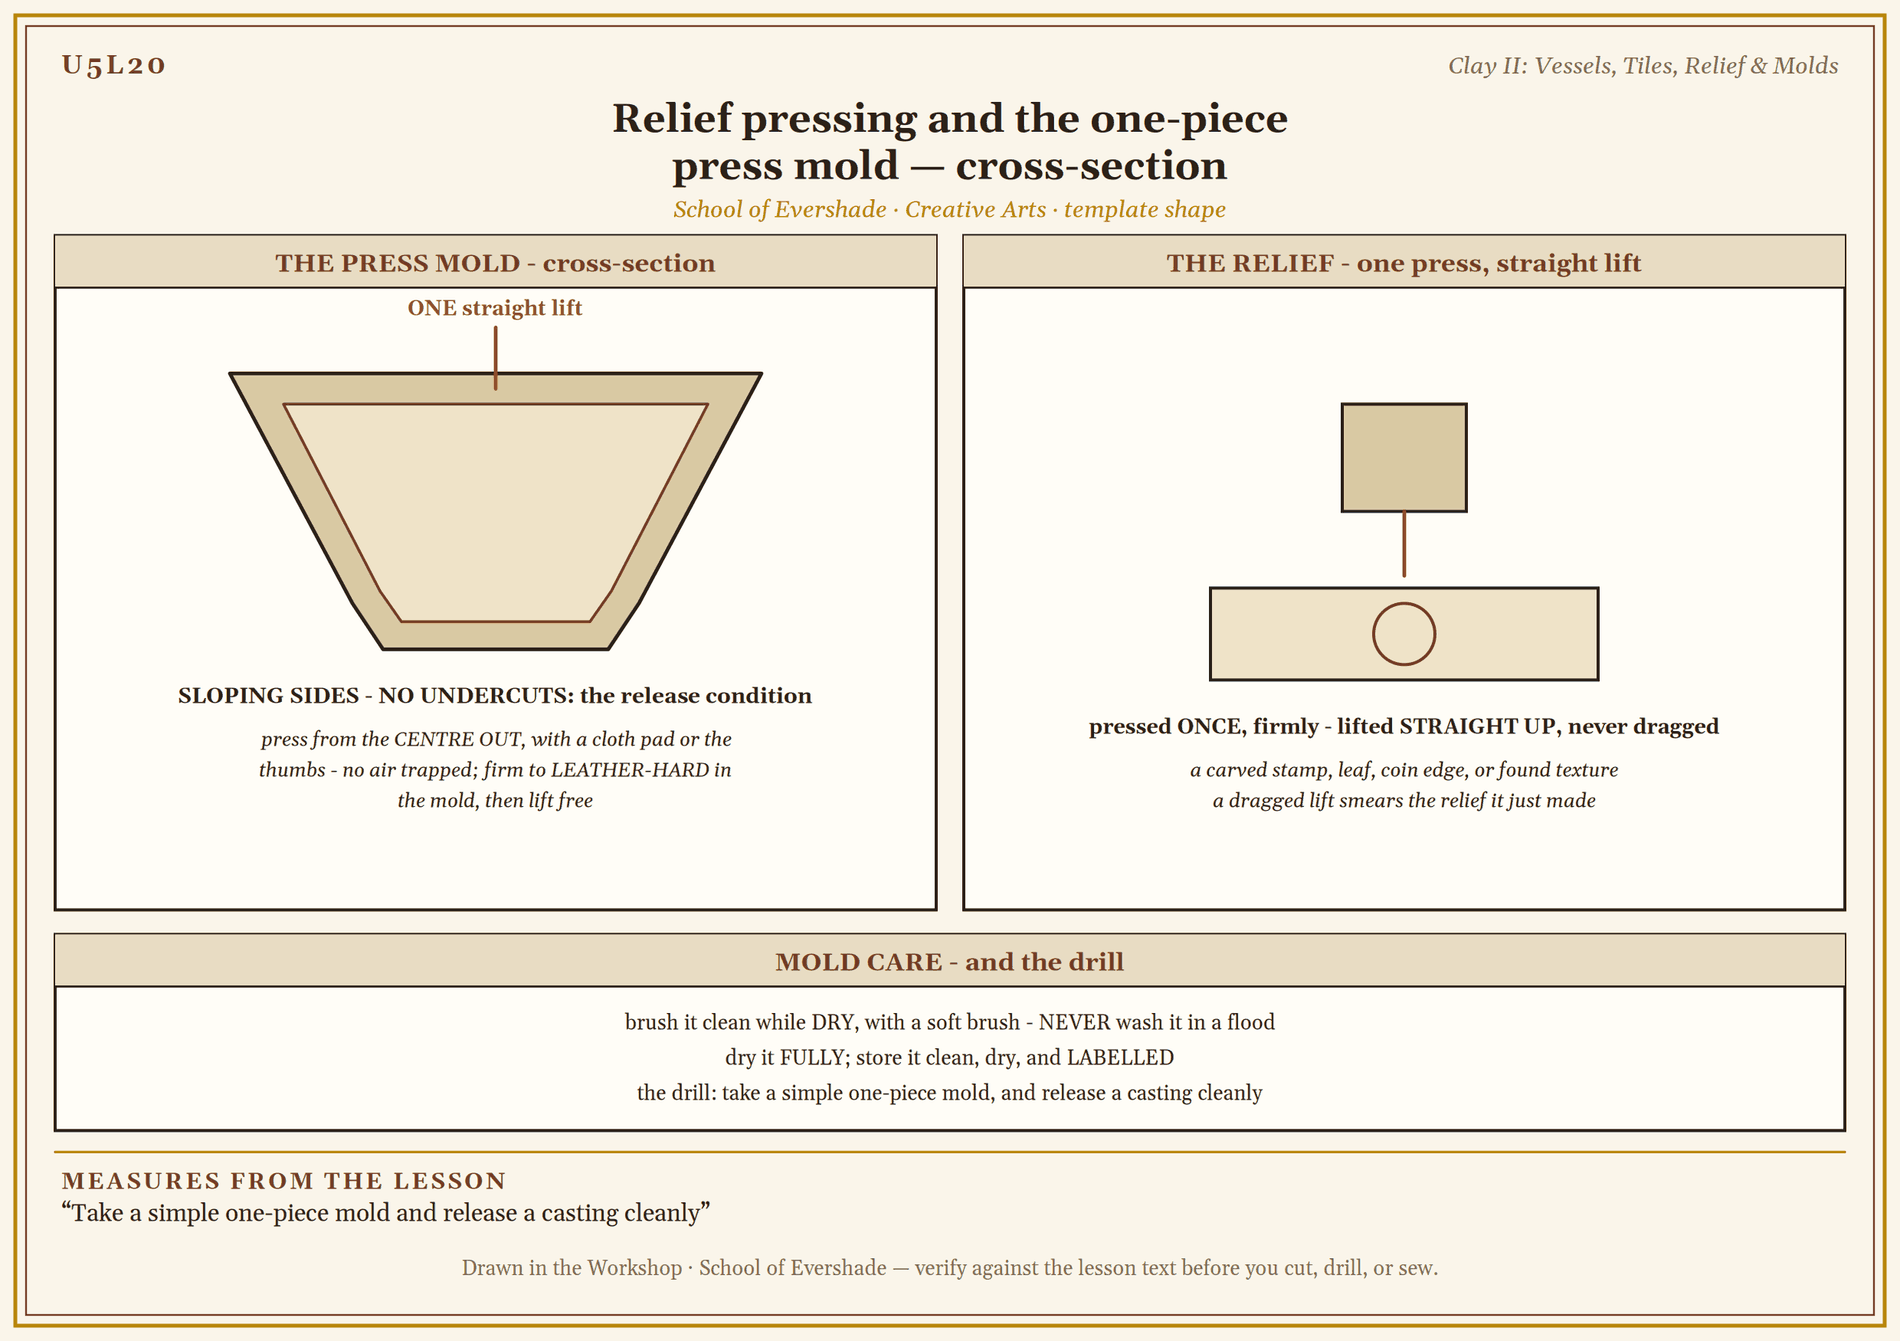
Relief pressing and the one-piece press mold — cross-section
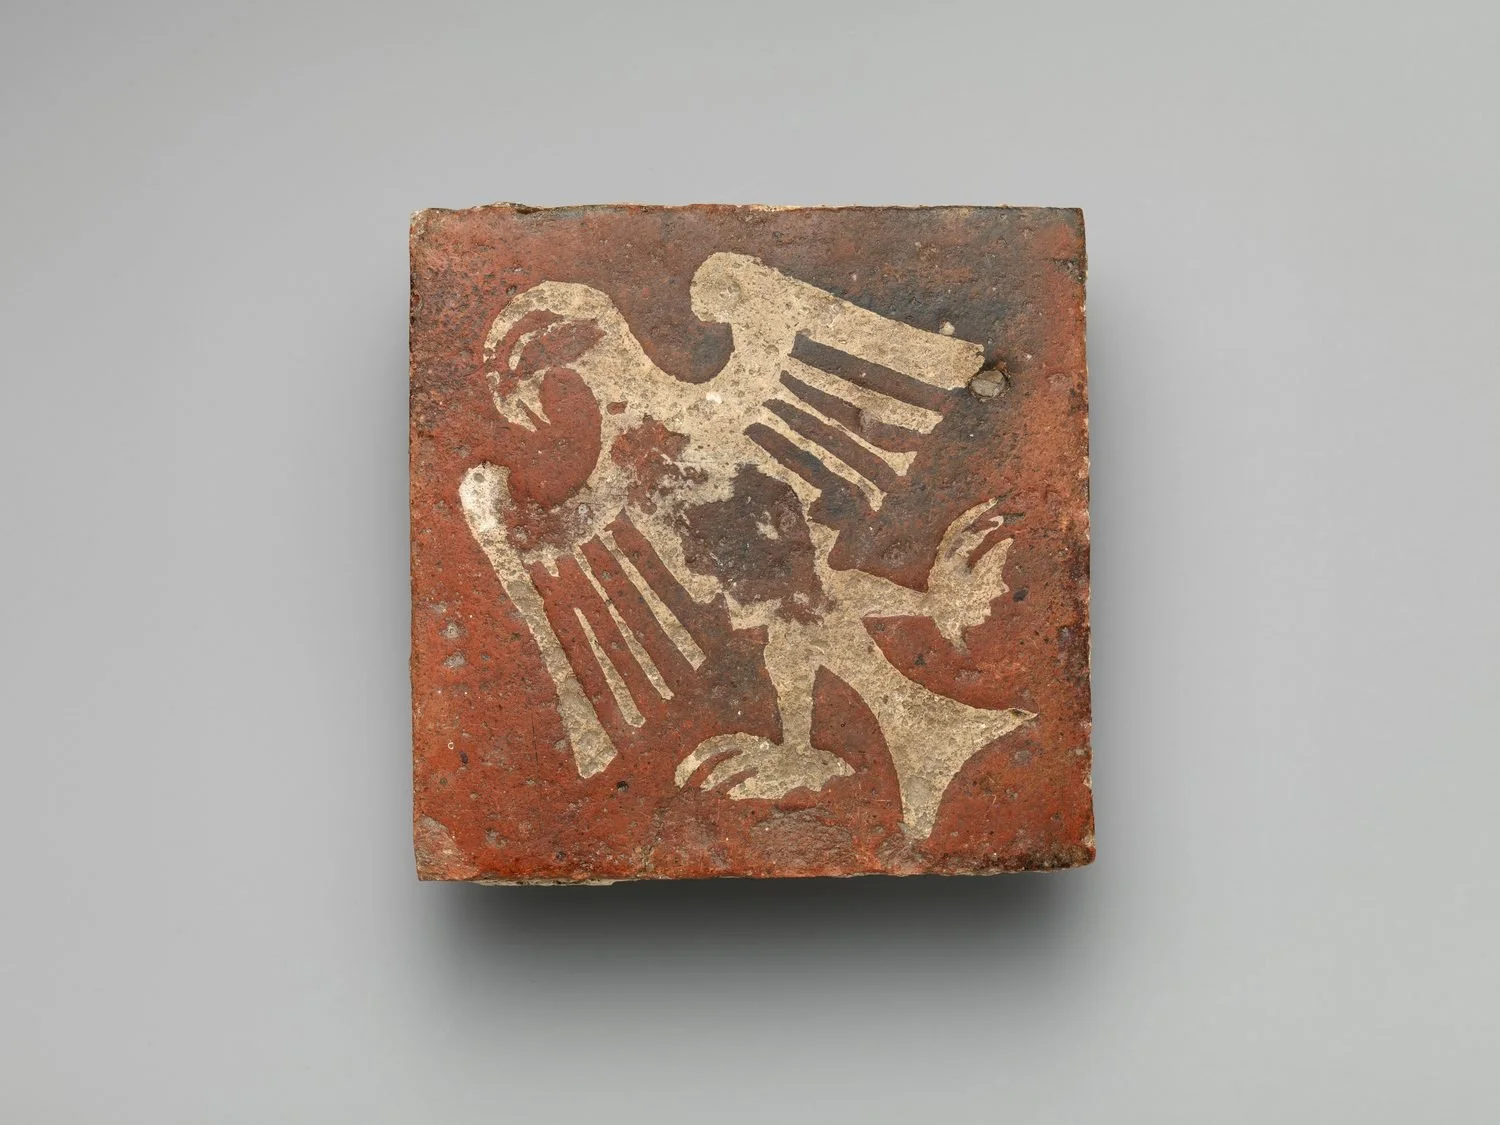
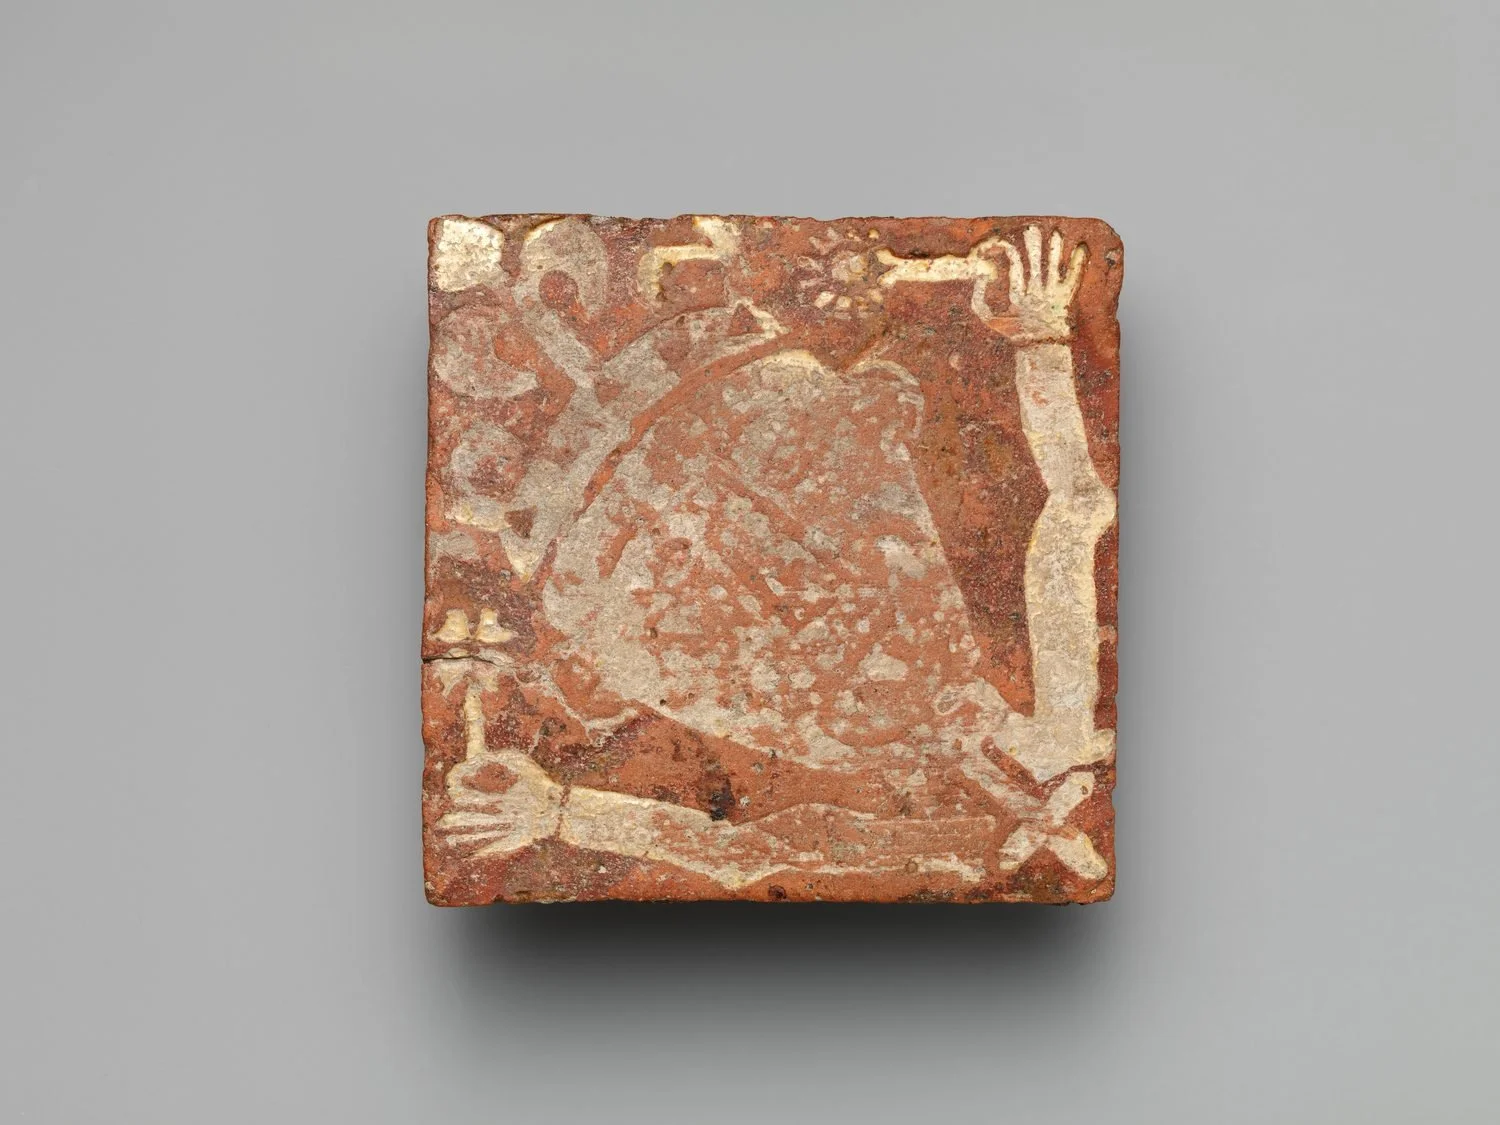
A second medieval encaustic tile (late 13th–14th century) with an eagle motif, same inlaid-slip technique.
The Metropolitan Museum of Art (Object 2015.142), Open Access (CC0).
Practice Practical: The Test Tile Set
This drill is checked for labeling before drying, one clean mold release, and an honest reading of every tile.
- Set out the tiles. Cut four slab tiles, each the size of your palm, rolled to the guide sticks. Before anything else, scratch a number on the back of each while it is soft: 1, 2, 3, 4. A test you cannot identify afterward is a story, not a test.
- Tile 1, the relief. Press your stamp or texture into the tile once, firmly, and lift straight. Leave it exactly as it came out, good or bad.
- Tile 2, the mold taken. Press a slab into or over your chosen form with the cloth pad, center outward. Rest it to leather-hard in the form, then lift it free in one motion. Note whether it released cleanly, and where it clung.
- Tile 3, the mold's casting. Press fresh clay into the mold you made or the form you used, and release it as before. Set the two mold pieces side by side: the mold and what it made.
- Tile 4, the vessel wall. Cut a tile from the same slab stock as your vessel's wall, with a coil join pressed across it, as a record of your joining. This tile predicts how the jar's seams will behave as they dry.
- Build the jar alongside. While the tiles rest, raise the albarello vessel by coil or wrapped slab, with its plain front panel. Set it with the tiles.
- Label what the clay did. Under each tile's number in your notebook, write the result in plain words: relief depth, release, sticking points, join sound or cracked. These four lines are the drill's real product, and they are what I will read first.
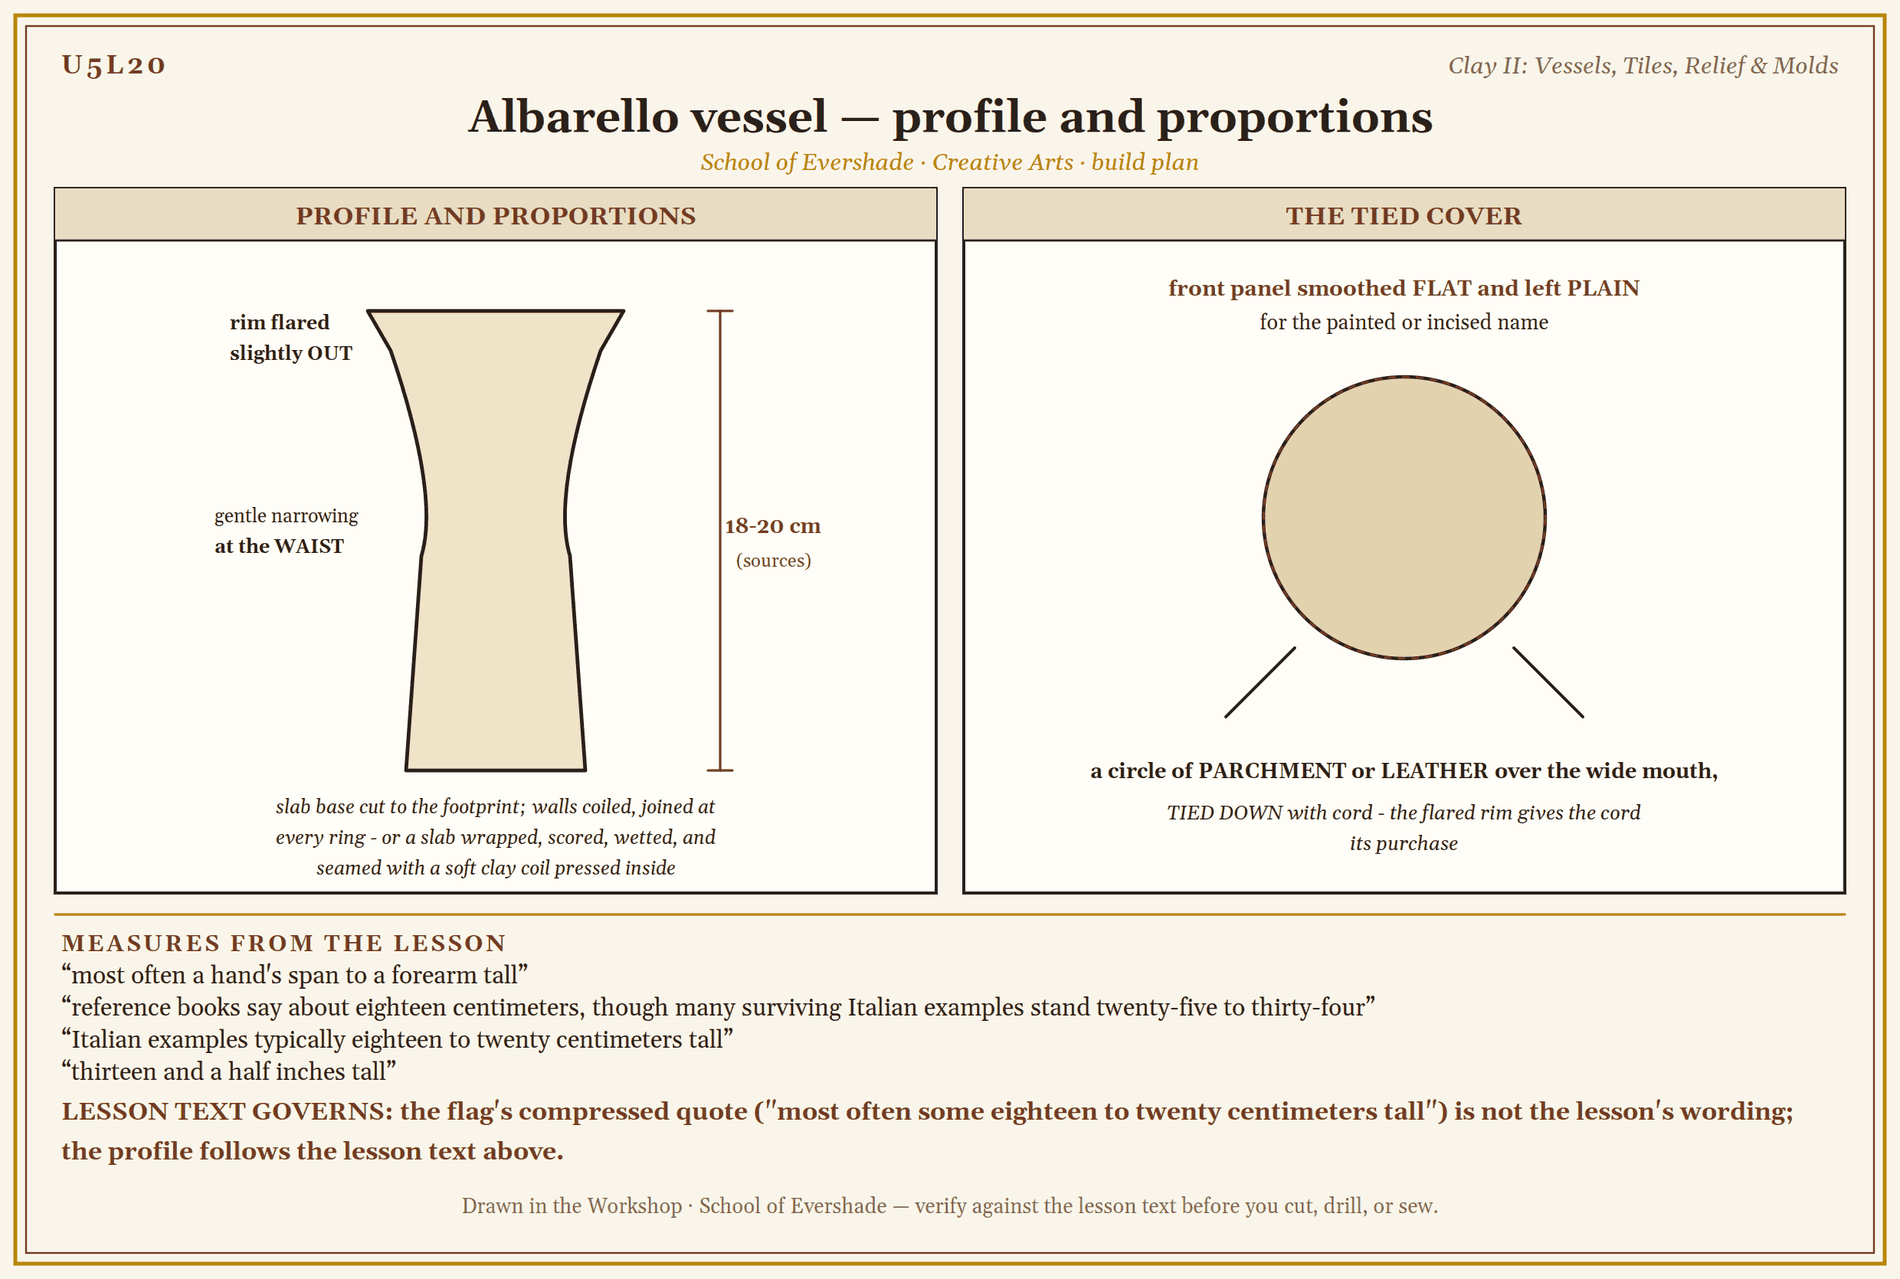
Albarello vessel — profile and proportions
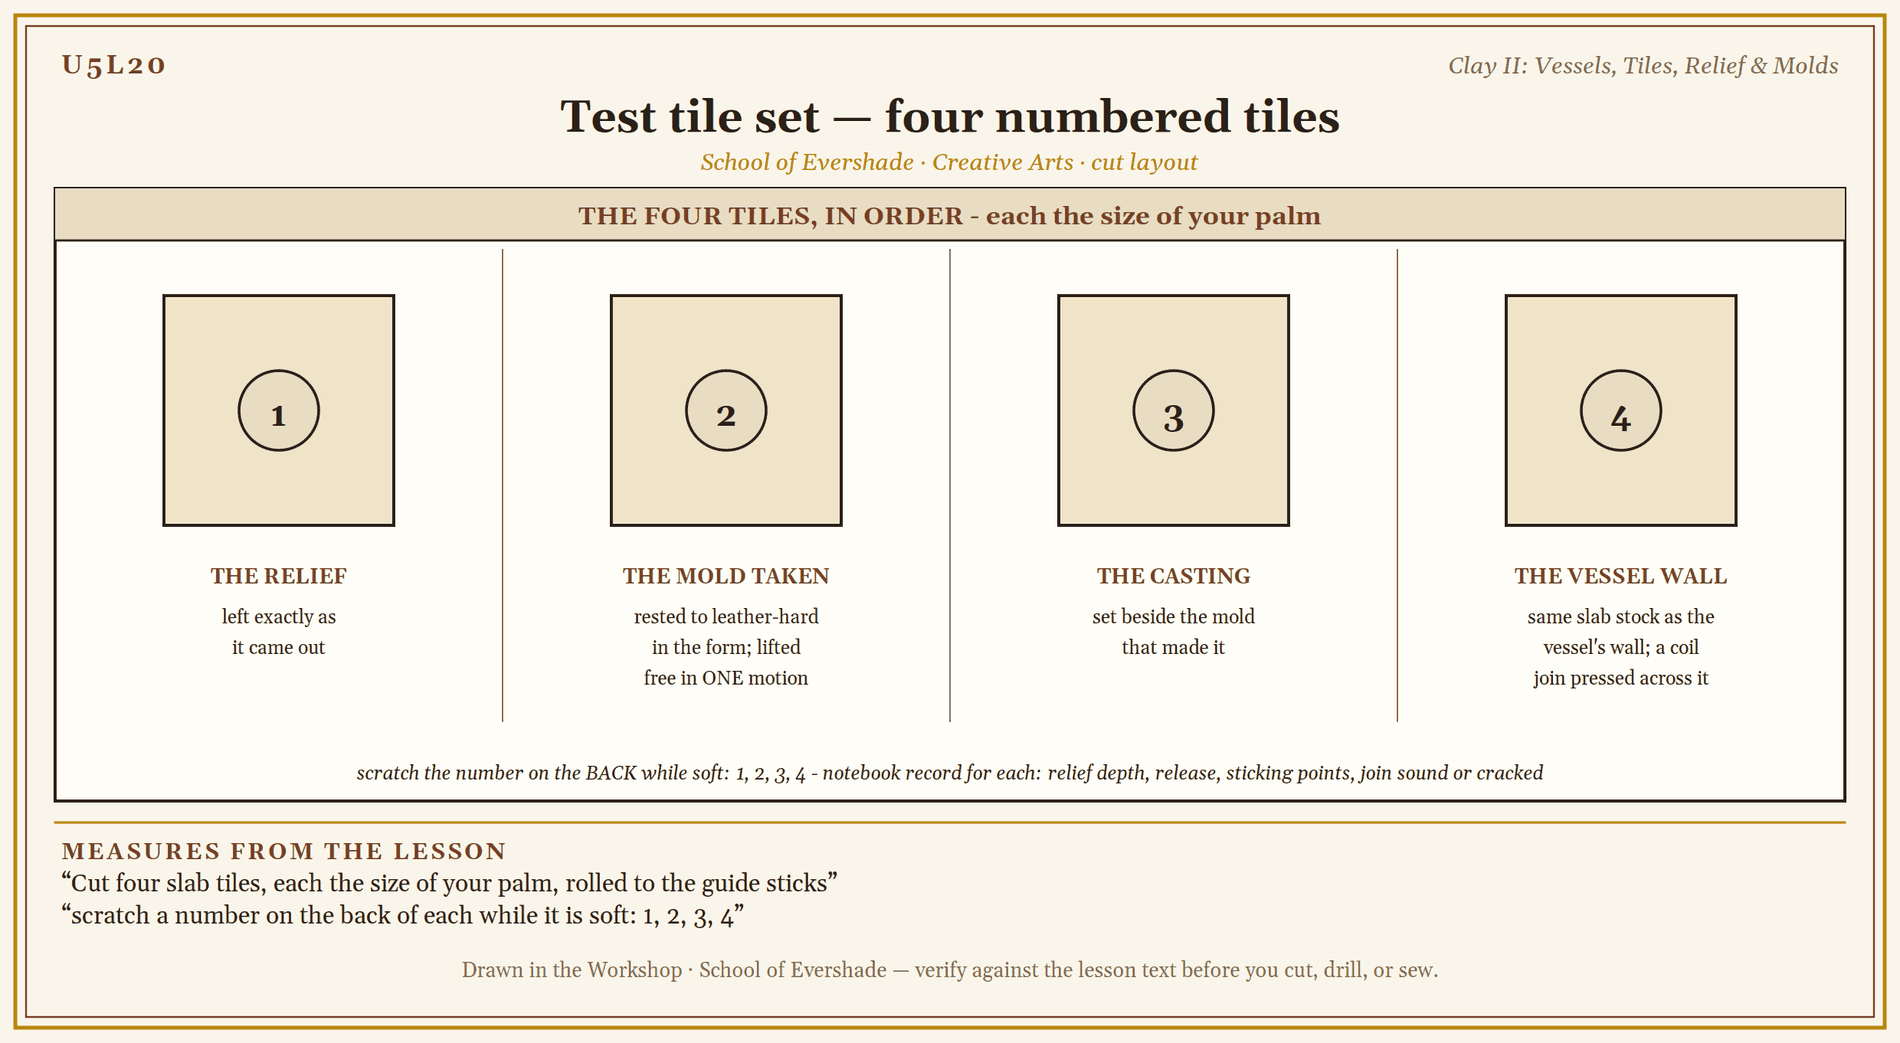
Test tile set — four numbered tiles
Assignment Manual
Assignment key: ✎ written work · ⚒ hands-on practical · ◐ both
Assignment I ⚒ — The Test Tile Set and the Jar
Complete the Practice Practical in this lesson: four numbered test tiles (relief, mold taken, casting, wall-and-join), each with its notebook record of what the clay did, and the albarello vessel built with its plain name panel.
Assignment II ✎ — The Jar That Reads Itself
Write a short study of the albarello: its shape and why the shape suits a pharmacy, its road from the Near East to Italy and Spain, how its mouth was sealed, and how its painted front did the work of a label, a signboard, and a filing system. End with the sealing lesson the jar teaches Professor Muddlenook's scholars in their own first unit.
Assignment III ◐ — Honest Finishes
Take one piece from Lesson 19 or this lesson and finish it at the level your household honestly has: air-dried and painted, oven-cured if its clay permits and an adult leads, or prepared for a kiln with an adult. Label the piece permanently with its finish and its date, and write the label's defense: what the finish can bear, what it cannot, and why the label must say so.
Materials
Level One (household)
- Air-dry clay or earthenware clay, wedged and ready from Lesson 19
- Slab base board, guide sticks, and rolling pin; coil tools from Lesson 19
- A smooth panel left plain on the vessel for its painted name; water-based paint for the name panel after drying
- Stamps and texture tools: carved eraser or potato stamps, leaves, shells, cord, coins for edge patterns (texture only, pressed and lifted straight)
- A simple object with sloping sides for the press mold (a small bowl or cup shape), and cloth pads for pressing
- Labels and a pencil for the test tiles; a notebook for the tile record
Level Two (historical)
Everything in Level One, plus:
- Earthenware clay for pieces destined, with an adult, for a community or school kiln
- A carved wooden stamp or a simple wooden brick-form, in the Ishtar manner, for repeat relief
- Parchment or a leather circle and cord, to seal the vessel's mouth in the apothecary manner
- A plaster or bisque press mold properly made, to compare its release and its care with the clay mold
Both levels build the same jar, press the same relief, and take the same mold. Level Two seals its jar the old way and keeps a mold built to outlast the term.
Reflection Questions
Answer the following questions in your workbook.
- The albarello's mouth was made to be tied shut with parchment and cord. What does a seal that shows disturbance protect, and where else in this school is that same protection at work?
- Babylon's builders molded bricks so beast would match beast down a whole wall. What is gained, and what is lost, when a craft moves from each piece unique to each piece repeated?
- Roman potters stamped their names into mold-made ware made by the thousand. What is a maker's name doing on a mass-produced bowl?
- This lesson insists a piece be labeled for the finish it truly has. Why is honest labeling a maker's virtue and not just a rule of the shop?
- Your test tiles answered four small questions. What question would you set a fifth tile to answer, and how would you set it up so the answer could be trusted?
Professor's Review
The jar stands on the bench with its face left plain for a name, scholars, and beside it four small tiles that tell the truth. That pairing is the whole lesson.
You know the vessel form the apothecaries trusted for over three hundred years and why its mouth is shaped for a tied seal. You have pressed a relief, taken a mold, and watched it give its casting back, and you can say without flinching what fire does and what our household finishes honestly do instead. Professor Muddlenook's shelves and Professor Webblethorn's tablets are kin to your bench now, and you know the kinship is in the clay itself.
Keep the mold dry and the tiles with their notebook page. Next lesson the bench builds for the Greenhouse in earnest: the plant press, where Lesson 2's leveling comes back to decide whether a flower dries flat or spoils.
PROFESSOR COGBRANCH TIMBERCLANK
Creative Arts Workshop
Master Artisan, Head of House Occidens
Further Reading & Sources
The Metropolitan Museum of Art. "Maiolica: Apothecary Jar (Albarello)," Robert Lehman Collection 1975.1.1138. An Italian albarello, probably Naples, late fifteenth century, tin-glazed earthenware, thirteen and a half inches tall: the form, the glaze, and the painted decoration in the museum's own record.
The Metropolitan Museum of Art. "Pharmacy Jar," 41.190.225. A sixteenth-century Valencian lusterware jar. The record tells the albarello's road: introduced from the Near East along the spice trade, cylindrical with a slightly concave waist, its mouth commonly sealed with parchment tied with string, its painted symbol naming a powder within.
Wikipedia. "Ishtar Gate." Nebuchadnezzar's gate of about 575 BCE: bricks of finely textured clay pressed into wooden forms, the animal reliefs made from bricks formed in reusable molds, the blue glaze imitating lapis, and the frontal gate as rebuilt in Berlin's Pergamon Museum.
National Museum of Ireland. "Roman Samian Ware." Terra sigillata in the museum's account: mass-produced in Italy and then Gaul from the first century BCE to the third century CE, its relief bowls thrown within a mold, and its potters' names signed into the ware.
Wikipedia. "Albarello." The jar's general record: Near Eastern roots, tin glaze, mouths sealed with parchment or leather tied with cord, and Italian examples typically eighteen to twenty centimeters tall.
Wilson, Timothy. Ceramic Art of the Italian Renaissance. London: British Museum, 1987. The standard survey of maiolica and its makers, the albarello among them. Print reference; consult in a library.
Student-friendly starting points for exploring this lesson's world. All links verified October 2026.
- The Metropolitan Museum of Art. "Pharmacy Jar," 41.190.225. Read the museum's short record and look at the jar: the waisted body, the wide tied mouth, and the painted sign of its contents are all visible at a glance.
- National Museum of Ireland. "Roman Samian Ware." How a mold-made Roman bowl traveled as far as Ireland, and why the potter's name stamped in it still matters to the museum that holds it.
Submit your work for this lesson using the form below.
CONTINUE IN THE CREATIVE ARTS WORKSHOP
← Previous · Lesson 19: Clay I: Pinch, Coil & Slab Next · Lesson 21: Building the Plant Press →
Unit V · Clay & the Garden Bench Creative Arts Workshop · All 39 Lessons
Bookstore Shelf The Library · Creative Arts Shelf Course Supplies
The rest of Unit V: Lesson 18 · Outdoor & Garden Tools · Lesson 19 · Clay I: Pinch, Coil & Slab · Lesson 21 · Building the Plant Press · Lesson 22 · Garden Structures & Cold Frames