

Creative Arts
Unit V, Lesson 18Outdoor & Garden Tools: Handling, Cleaning & Care
Professor Cogbranch Timberclank
Master Artisan, Head of House Occidens
The Creative Arts Workshop • School of Evershade
Professor's Introduction

Boots by the door, scholars. Unit V works outdoors, and it begins the way all outdoor work should begin: at the tool rack, before anyone touches a plant.
A garden tool is a promise. The trowel promises to dig where you point it and nowhere else. The pruners promise to cut what you choose and nothing you did not. Those promises hold only if the tool is carried safely, kept sharp, and kept clean, and the last of those matters more than most gardeners ever learn. A blade can carry sickness from one plant to the next the way a shared cup carries a cold through a household. Professor Fernfoot teaches you when and where a plant should be cut, and her word governs every living thing in the garden. This lesson teaches the tool itself: its history, its handling, and its care.
You will run the full tool-care drill today on real tools: carry, clean, disinfect, oil, store. It is humble work. It is also the work that decides whether the Herbology propagation lessons later this unit's season go well or badly, and a workshop is judged by humbler work than by fine work, every time.
PROFESSOR COGBRANCH TIMBERCLANK
Creative Arts Workshop
Master Artisan, Head of House Occidens

Lesson Objectives
By the end of this lesson, students should be able to:
- Trace the garden tool's history from the digging stick to Roman iron tools to the invention of the secateurs.
- Tell bypass pruners from anvil pruners, and say which work each action suits.
- Explain plainly how plant disease travels on a dirty blade, and why disinfecting between plants matters.
- Carry edged garden tools safely: blades closed, points down, never swung, never left in a path.
- Run the full tool-care sequence: clean, disinfect, dry, oil, and store.
- State the boundary of this lesson: the tool is taught here; when and where to cut a plant is Professor Fernfoot's teaching.
Your Assignment Packet
This lesson's assignments live in its packet: the Lexicon Handout (every term, course terms marked ◆), the Assignment Manual, and the Reflection Questions. Download the packet before you begin and keep it beside you as you read — work from it as each subject is taught, or take the assignments as homework afterward.
The First Tools in the Garden
The first garden tool was a stick. Long before metal, before pottery, before anyone had bred a plant on purpose, people dug with a pointed stick: to lift roots and bulbs, to loosen soil around a plant worth encouraging, to make a hole for a seed worth planting again. The digging stick is humanity's first garden tool, and its descendants are in your hands today. A trowel is a digging stick that went to school.
Rome gave the garden its iron. Roman gardeners and farmers worked with spades shod in iron — one famous survivor keeps its ash wood handle after some eighteen centuries, and with iron hoe blades, rake heads, pruning hooks, sickles, and bill hooks. The pruning hook deserves a scholar's attention: a curved blade for reaching into a vine or a fruit tree and drawing a cut toward you, controlled and close. Rome's gardeners were professionals working walled gardens and market plots, and their kit would be recognized at any garden bench today: dig, hoe, rake, cut, carry. The tools changed slowly because the work changed slowly, and the work is the same work you will do.
For most of that long history, cutting a stem meant a knife or a hook, and two hands' worth of care. The one-handed pruner is a young invention. Secateurs were devised in France in the early 1800s; the design is credited to the Marquis Bertrand de Molleville, a French aristocrat who had spent the Revolutionary years exiled in England, and the tool appears in his garden writings by 1813. For the first time a gardener could hold a branch steady with one hand and cut it cleanly with the other. Every pair of pruners in every garden shed since descends from that idea.
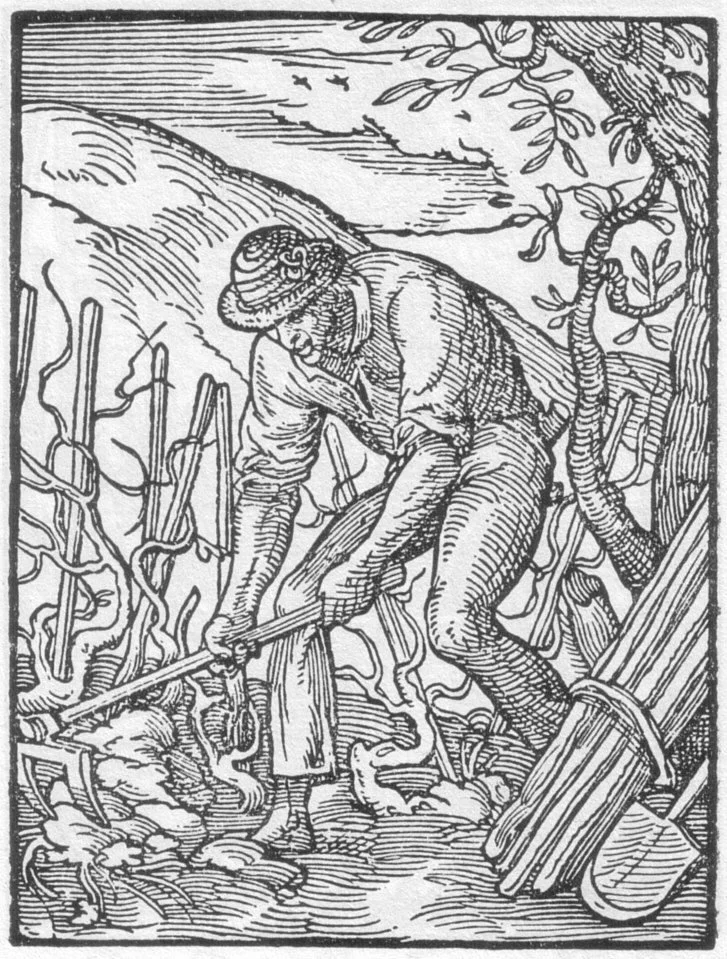
A vine-dresser with his tools, 1568 woodcut — pruning hook and blades carried and in use among the vines.
Woodcut from the Ständebuch (Book of Trades), Frankfurt, 1568. Public domain, via Wikimedia Commons.
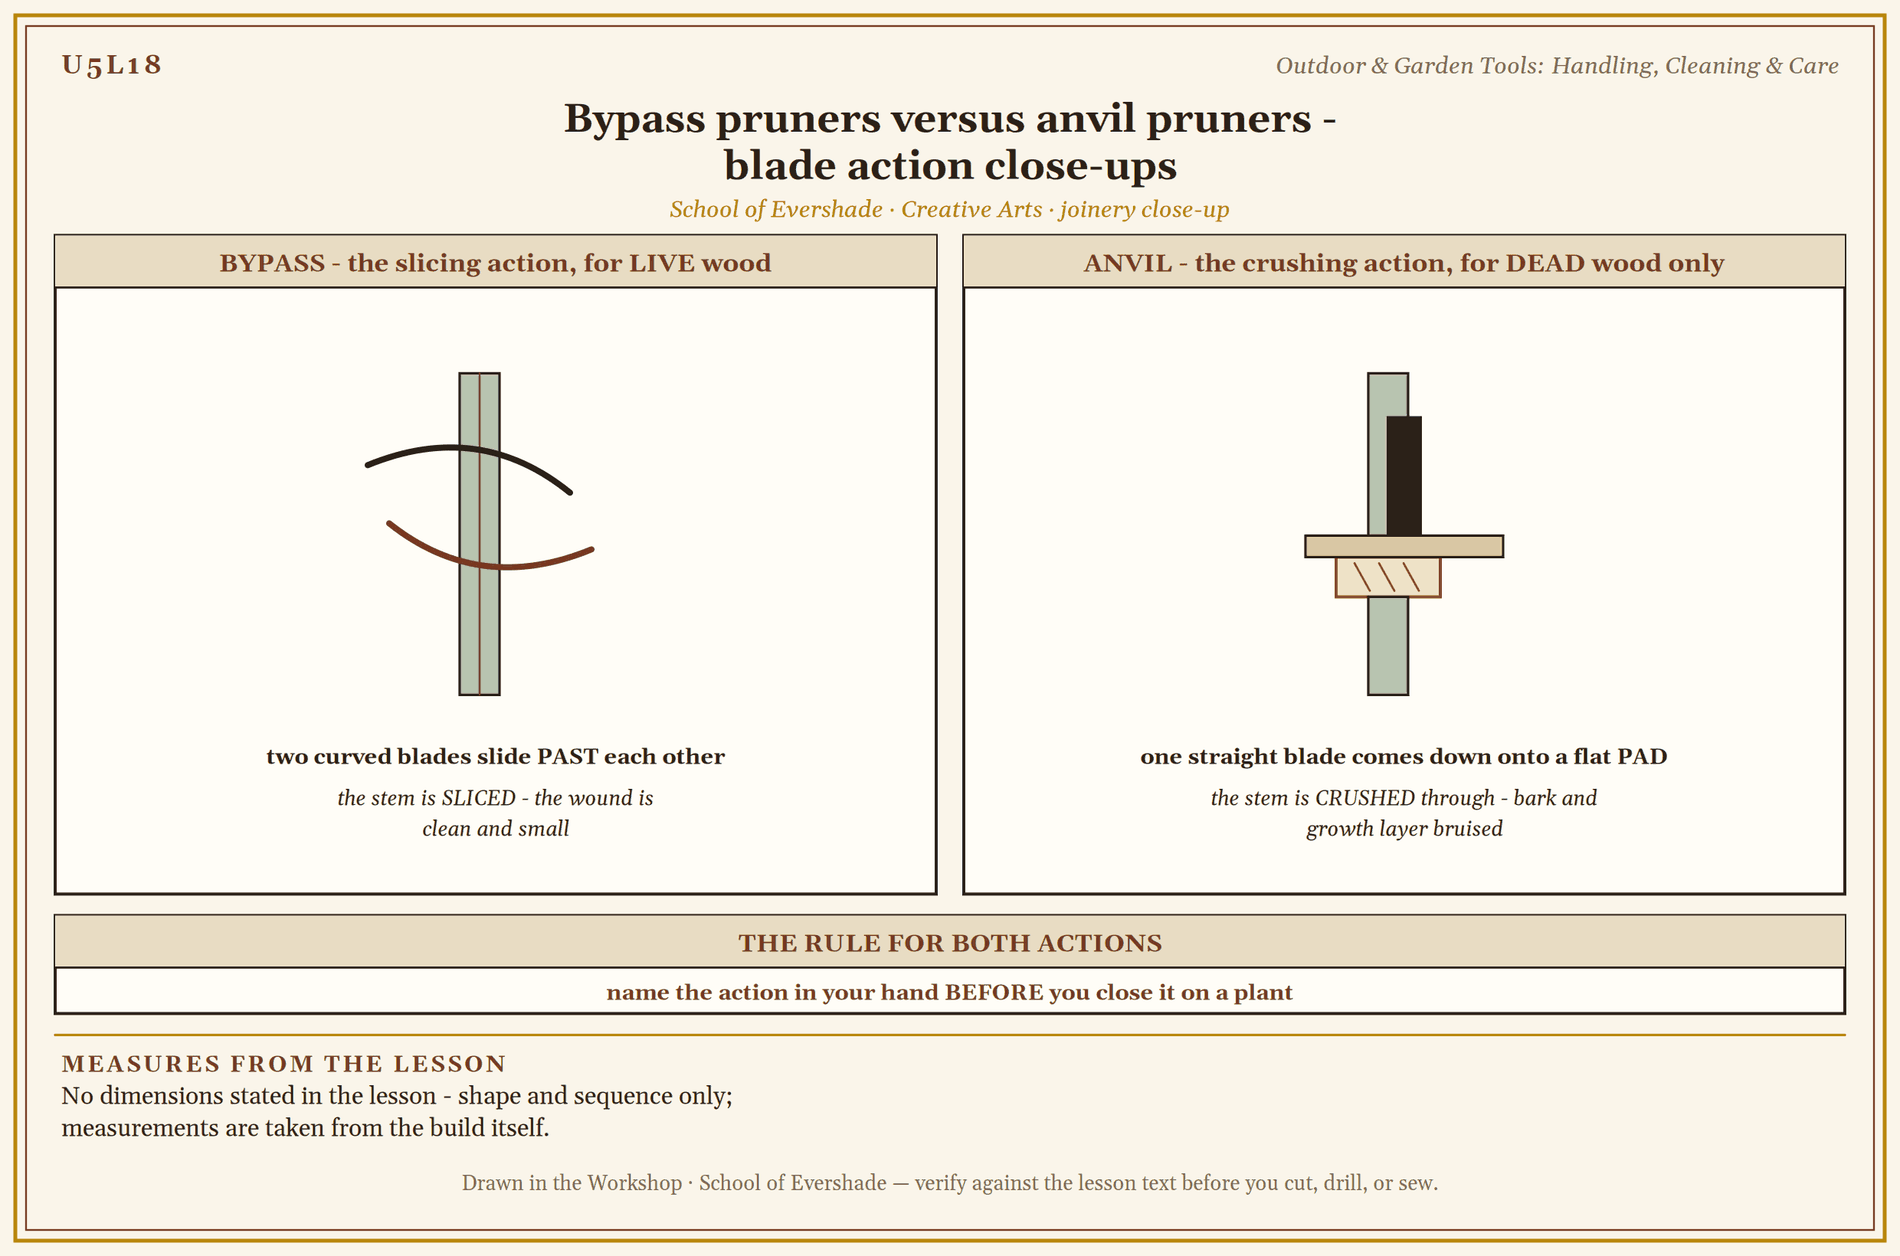
Bypass pruners versus anvil pruners - blade action close-ups

A farmer with the tools of field work, 1568 woodcut.
Woodcut from the Ständebuch (Book of Trades), Frankfurt, 1568. Public domain, via Wikimedia Commons.
Two Actions, Two Jobs
Look at a pair of secateurs and name its action before you use it, because the two actions are different tools wearing one shape.
Bypass pruners work like scissors. Two curved blades slide past each other, and the stem is sliced between them. The cut is clean, the wound is small, and living tissue heals from a clean wound far better than from a crushed one. Bypass is the action for live wood: stems, green growth, the cuttings work of the Greenhouse.
Anvil pruners work like a knife on a chopping board. One straight blade comes down onto a flat pad. The pad supports the stem, and the blade crushes through it. On dead wood that crushing costs nothing, and the anvil's leverage makes hard, dry branches easier. On living wood it bruises the bark and the growth layer around the cut, and a bruised cut is an open door.
This workshop keeps both, labeled, and reaches for each only at its own work. A scholar who cannot say which action is in their hand is not ready to close it on a plant.
Why a Clean Blade Is a Kind Blade
Here is the mechanism, stated plainly, because it is the science this lesson stands on.
Many plant diseases are caused by fungi and bacteria too small to see. They live in a sick plant's sap and tissue. When a blade cuts that plant, sap and fragments stay on the blade. When the same blade cuts a healthy plant a moment later, it presses those fungi and bacteria directly into a fresh wound, and a wound is a plant's open door. The gardener's own tool becomes the road the disease travels down the row. Gardeners and pathologists have watched it happen with blights, cankers, and wilts for as long as they have looked.
The defense is as plain as the mechanism. Sap and soil come off the blade first, with a brush, a cloth, and water, because disinfectant poured over dirt protects the dirt. Then the clean blade is disinfected and left in contact for the minutes the method needs, and dried. Between gardens, between plants, and always after a plant that looked sick: that is the rhythm the Royal Horticultural Society teaches its gardeners, and it is the rhythm of this bench. Tools dried and lightly oiled do not rust. Tools put away clean do not carry yesterday's sickness into tomorrow's work. Care of the tool is care of the garden, done in advance.
A Sealed Note from Professor Timberclank
Garden tools are blades that work outdoors, where the ground is uneven and the company is busy. So the rules travel with the tool.
An edged tool is carried closed, latched, points down at your side, one tool in one hand, never swung and never carried against the body. A tool not in use is set down where eyes can find it: on the bench or the trug, never in the grass, never in a path, never point-up in the soil. A tool is handed over handle first, with words: "handle to you," and it is not released until the other hand has it.
And the hygiene rule, which has no exceptions in my workshop: a blade that has cut a sick plant does not cut another plant until it has been cleaned and disinfected. If you are unsure whether a plant was sick, treat the blade as if it were. We stop. We make it safe. Then we begin again. A minute at the bucket is cheaper than a row of lost plants, and there is no version of this lesson where rushing past the bucket is the right answer.
PROFESSOR COGBRANCH TIMBERCLANK
Creative Arts Workshop
Master Artisan, Head of House Occidens
Technique: Carry, Clean, Disinfect, Oil, Store
Carry. Latch pruners shut. Carry tools in a trug, a bucket, or a tool roll where one is available, edges down and handles up. Walking with an open blade in a fist, points forward, is the accident this lesson exists to prevent. On uneven ground, slow down. The garden will wait.
Clean. Brush off soil at the garden gate, not at the bench. Scrub sap and stuck residue with a cloth, water, and if needed a little soap; dried sap may need a careful scrape with a stick or an old knife kept for the purpose. Work the pivot of the pruners until it moves freely. A tool is clean when a white cloth wiped along it comes away nearly clean.
Disinfect. After cleaning, treat the blades. Household disinfectant or rubbing alcohol on a cloth, wiped over every cutting surface, or a disinfectant soak for the minutes the product directs, both serve. If a bleach solution is ever used, it is an adult's step, and the blades are rinsed and oiled afterward without fail, because bleach eats steel. Disinfect between plants in propagation work, and always after sick material.
Dry and oil. Dry every surface fully; water left in a pivot is tomorrow's rust. Then a drop of oil on the pivot and a thin wiped film along the blade. The film should be a sheen, not a puddle: wipe on, wipe off, and what remains is the protection.
Store. Tools live in their place: hung by their handles or laid in the tool roll, edges protected, pruners latched, out of the weather and out of the path. A tool put away clean, oiled, and in its place is a tool that will be found ready by the next scholar, which is the whole ethic of a shared workshop in one sentence.
Practice Practical: The Tool-Care Drill
This drill is checked for safe carrying, a clean blade honestly tested, disinfection done in the right order, and tools stored in their places.
- Carry to the bench. Latch the pruners. Load every tool into the trug or bucket, edges down, and carry them to the work area without anything open in your hands. Set each tool on the bench, visible, none in the grass.
- Name the actions. Pick up each cutting tool and name its action aloud: bypass or anvil, knife or hook. Match each to its job: live wood, dead wood. A tool you cannot name stays closed.
- Practice cuts in scrap. Using the bypass pruners, make five cuts in the pruned scrap stems, each just above a bud scar or a node, watching the blade pass and the cut stay clean. Using the anvil pruners, make three cuts in dead wood. No living plant is cut in this drill. The scrap is the lesson.
- Clean. Brush off soil, scrub the blades and the pivot until the white-cloth test nearly passes, and wash the trowel and fork the same way.
- Disinfect. Treat every cutting surface with disinfectant, in the order learned: clean first, then disinfect. Leave the contact time the product directs. Rinse only if your method requires it, as bleach does, and only with an adult handling that step.
- Dry, oil, store. Dry each tool fully. Oil the pivots and wipe a sheen along each blade. Oil a wooden handle lightly if it looks dry. Carry the tools back in the trug and put each in its place, pruners latched. The bench and the rack should both be able to show the next scholar exactly what was done.
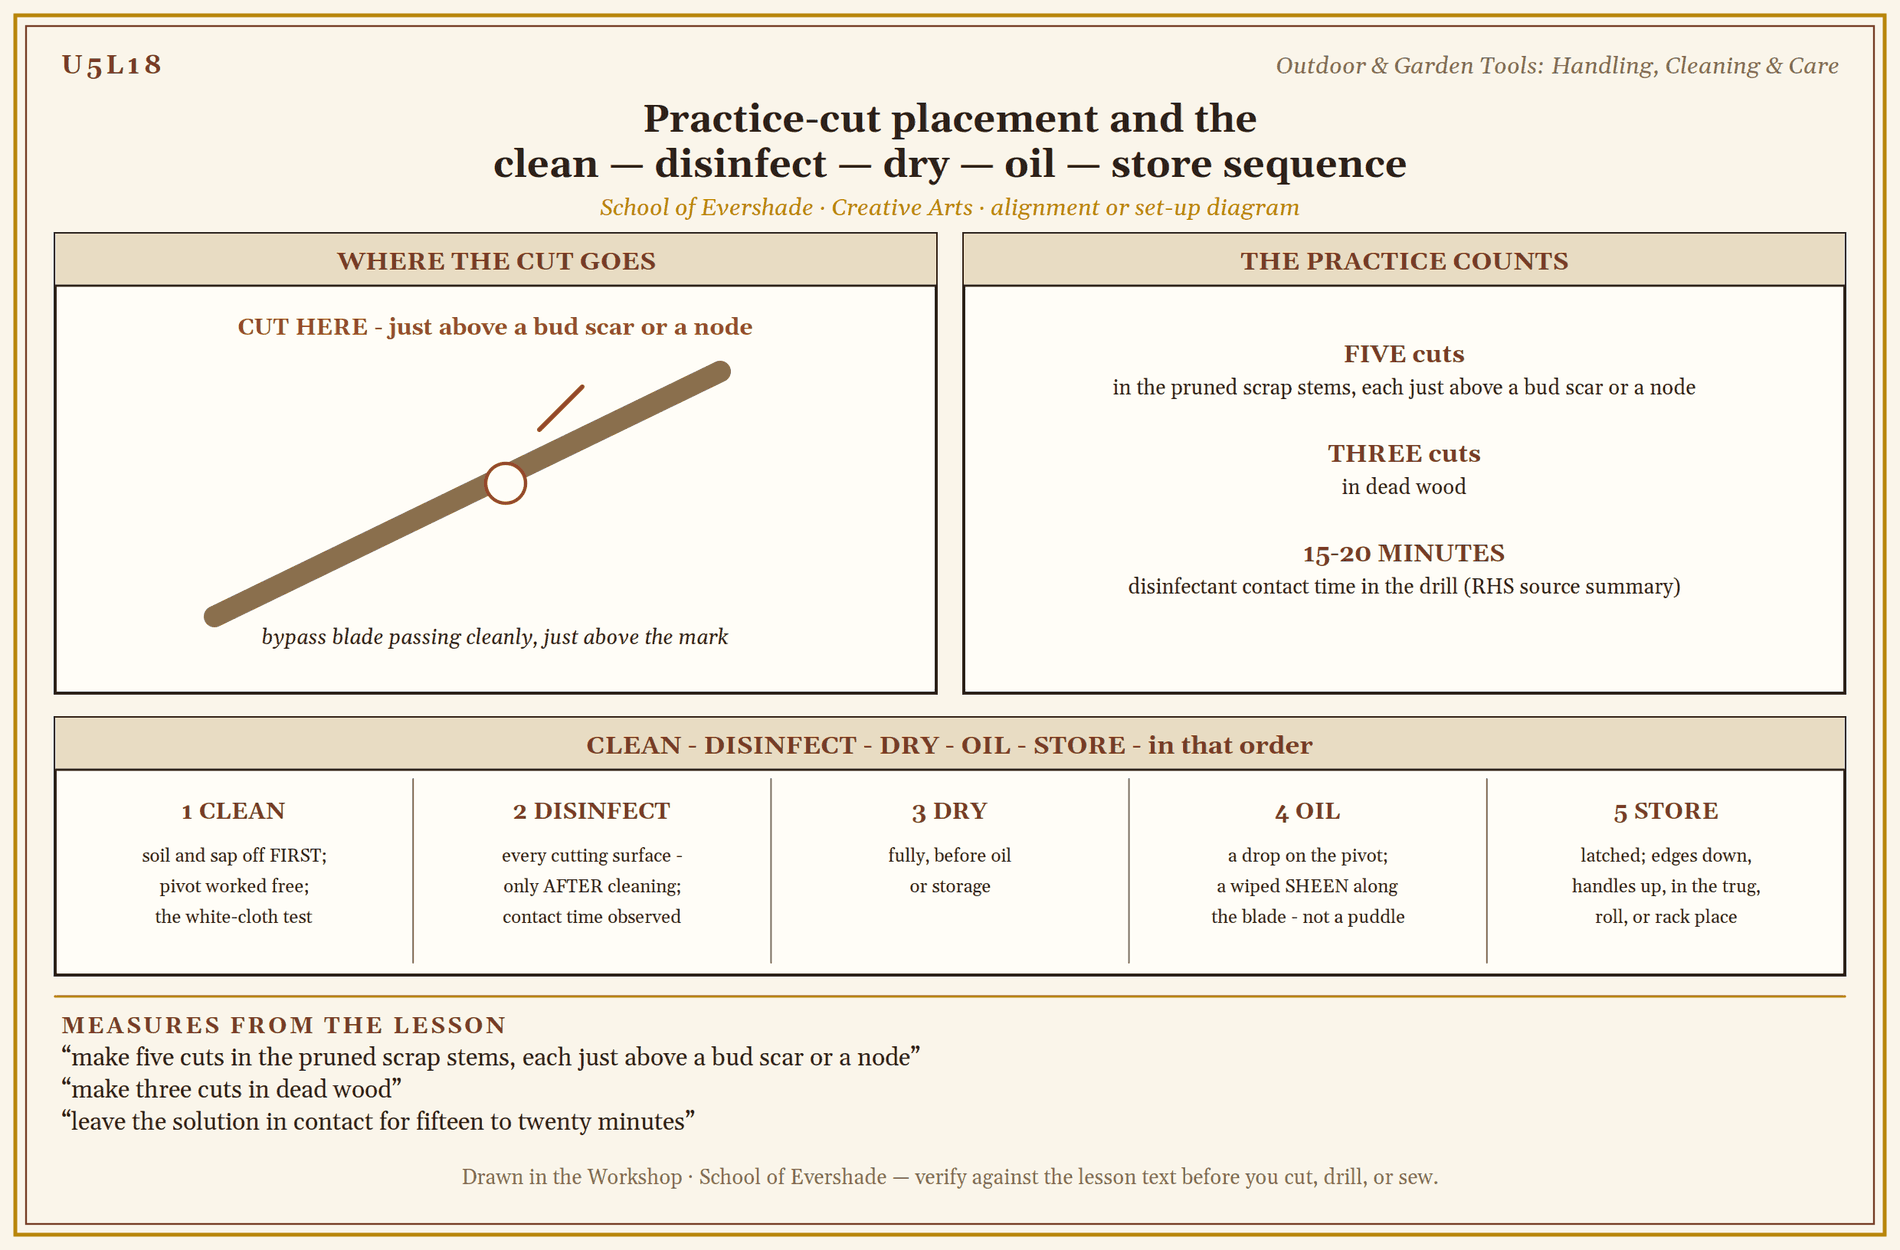
Practice-cut placement and the clean — disinfect — dry — oil — store sequence
Assignment Manual
Assignment key: ✎ written work · ⚒ hands-on practical · ◐ both
Assignment I ⚒ — The Tool-Care Drill
Complete the Practice Practical in this lesson: tools carried safely, actions named, practice cuts made in scrap only, and every tool cleaned, disinfected, dried, oiled, and stored. Your drill record lists each tool and each step it received.
Assignment II ✎ — The Road a Disease Travels
Write a one-page explanation, in your own words, of how a fungal or bacterial disease moves from a sick plant to a healthy one on a gardener's blade. Cover the sap on the blade, the fresh wound, and why cleaning must come before disinfecting. End with the rhythm this workshop keeps: between gardens, between plants, and always after sick material.
Assignment III ◐ — A Tool's Biography
Choose one garden tool from home or the castle grounds and write its biography: what it is, its action or working principle if it has one, the oldest ancestor you can trace for it in this lesson (digging stick, Roman iron, French invention), its condition today, and the care it received from you as part of the work. Sketch the tool and label its parts.
Materials
Level One (household)
- One pair of bypass secateurs and, if the household has them, one pair of anvil pruners
- A hand trowel and one other garden hand tool (fork, hoe, or cultivator)
- A bucket of water, a stiff brush, old cloths, and a little soap
- Household disinfectant or rubbing alcohol, with its container kept for reference
- Light household oil (camellia oil, or any plain light machine oil) and a small oily rag kept in a sealed metal tin
- Pruned scrap stems and dead branches from the garden, gathered for practice cuts
- A trug, bucket, or rolled cloth for carrying tools
Level Two (historical)
Everything in Level One, plus:
- A pruning hook or billhook pattern tool to examine beside the secateurs, the Roman ancestor beside the French invention
- A whetstone or fine file for edge work, and a strop
- Linseed oil for wooden handles: a wiped coat keeps ash and oak handles from drying and splitting, as they were kept for centuries. A cloth that has wiped linseed oil is never wadded up and never tossed in a bin or left in a heap: linseed oil makes heat of its own as it dries, and a rag left heaped can smolder and catch with no flame anywhere near it. Spread the cloth flat to dry outdoors on a surface that cannot burn, or lay it in a sealed metal tin of water until it can go out with the household hazardous waste. If an oily cloth is found already wadded and warm, leave it where it lies and fetch an adult. We stop. We make it safe. Then we begin again.
- A leather tool roll or a wooden tool box in the market gardener's manner
Both levels run the same drill. Level Two keeps the older kit beside the newer and learns the edge work that made it last. That edge work raises a burr: the thin, curled ribbon of metal a file or stone raises on the far side of an edge being sharpened, which tells the sharpener the edge has been reached along its whole length; the burr is then stropped or honed away, and what remains is the sharp edge itself.
Reflection Questions
Answer the following questions in your workbook.
- The digging stick and the iron-shod Roman spade do the same work two thousand years apart. What does the garden tool's slow change tell you about the work itself?
- Why does a clean wound heal better than a crushed one, and what does that decide about which pruners you reach for?
- The disinfecting rule says: if you are unsure whether a plant was sick, treat the blade as if it were. Where else in this course does the workshop choose the careful reading of an uncertain case?
- Professor Fernfoot decides when and where a plant is cut. Professor Timberclank teaches the tool. Why does the school keep those as two teachings, in two rooms?
- A shared workshop runs on tools put away ready for the next scholar. What does the state of a tool rack tell a visitor about the workshop that uses it?
Professor's Review
The rack is in order, scholars, and so is the lesson.
You can carry a blade like someone who respects it, name the action in your hand, and say exactly how sickness rides a dirty tool and how the bucket and the cloth stop it. You know where this lesson's authority ends: at the plant itself, where Professor Fernfoot's teaching begins. A scholar who knows the boundary of their own lesson knows more than one who does not.
Keep the oily rag in its tin and the rhythm in your hands. Next lesson we leave iron for the material under it: clay, the oldest shaped substance in the world, and the pots and markers the garden has been waiting for.
PROFESSOR COGBRANCH TIMBERCLANK
Creative Arts Workshop
Master Artisan, Head of House Occidens
Cross-Class Connections

Herbology · Unit III, Lesson 19 — Vegetative Propagation: Stem Cuttings
Herbology · Unit III, Lesson 20 — Vegetative Propagation: Root Division
Herbology · Unit III, Lesson 21 — Vegetative Propagation: Layering & Runners
My propagation lessons work with blades at every step, scholars: stem cuttings, root division, layering and runners. Each of them carries a plain note sending you to this bench, because the tool work is taught here — how to carry a blade, clean it, disinfect it between plants, dry it, oil it, and store it — while when and where to cut stays with me in the Greenhouse. Come and learn the cutting itself in my three lessons, and keep Professor Timberclank’s care of the tool as the rule under every cut. The note is a reference, not a prerequisite: take his lesson before, after, or alongside mine.
PROFESSOR BERYL FERNFOOT
Herbology Greenhouse
Further Reading & Sources
Royal Horticultural Society. "Cleaning Hand Tools: Maintenance Tips." The gardener's standard routine: clean tools after every use, disinfect blades and leave the solution in contact for fifteen to twenty minutes against diseases such as Phytophthora root rot, bacterial canker, and box blight, oil the pivots, and dry tools to keep rust away. This lesson's drill follows it closely.
Wikipedia. "Pruning Shears." The secateurs' record: the invention credited to Bertrand de Molleville in the early 1800s, the bypass action for live wood, and the first anvil pruners made by Walther Schröder's firm in Kiel in 1923.
Lovely Greens. "Ancient Gardening and Roman Cooking at the British Museum." A garden writer's tour of the museum's Roman-British tools: iron-shod spades, one with its ash handle surviving, a hoe, a rake head, pruning hooks, a sickle, and a bill hook.
The Garden Professors, University of Kentucky Extension. "Managing Diseases without Fungicides: A Focus on Sanitation," by Nicole Gauthier. A plant pathologist on sanitation as disease control: pathogens travel on tools, shoes, and soil, blades are disinfested between cuts, and bleach, when used, must be followed by rinsing and oiling against corrosion.
Jashemski, Wilhelmina F. The Gardens of Pompeii, Herculaneum and the Villas Destroyed by Vesuvius. New Rochelle, NY: Caratzas, 1979–1993. The great excavation record of Roman gardens, their plantings, and their tools, recovered from the ash. Print reference; consult in a library.
Student-friendly starting points for exploring this lesson's world. All links verified October 2026.
- Royal Horticultural Society. "Cleaning Hand Tools: Maintenance Tips." Start here for the routine itself, with the RHS's own timings and its list of the diseases a dirty blade spreads.
- Lovely Greens. "Ancient Gardening and Roman Cooking at the British Museum." A two-thousand-year-old spade with its wooden handle still on it, photographed and described by a gardener who knows the modern versions by heart.
Submit your work for this lesson using the form below.
CONTINUE IN THE CREATIVE ARTS WORKSHOP
← Previous · Lesson 17: Seal Matrices & Waxwork Next · Lesson 19: Clay I: Pinch, Coil & Slab →
Unit V · Clay & the Garden Bench Creative Arts Workshop · All 39 Lessons
Bookstore Shelf The Library · Creative Arts Shelf Course Supplies
The rest of Unit V: Lesson 19 · Clay I: Pinch, Coil & Slab · Lesson 20 · Clay II: Vessels, Tiles, Relief & Molds · Lesson 21 · Building the Plant Press · Lesson 22 · Garden Structures & Cold Frames