

Creative Arts
Unit I, Lesson 2Hands, Eyes, Measuring, Marking & Leveling
Professor Cogbranch Timberclank
Master Artisan, Head of House Occidens
The Creative Arts Workshop • School of Evershade
Professor's Introduction

Set up your bench, scholars, the way Lesson 1 taught you. Today the bench gets its oldest tools, and you get the habit that separates makers from people who merely own tools: measure before you cut, mark before you measure twice in your head, and check the work for true. True is the workshop word for correct in every direction at once: a board is true when it is straight along its length, a surface level when it is horizontal, a post plumb when it is vertical, and a corner square when it meets at a right angle.
There is a saying in every workshop language on Earth, and it is always some version of the same sentence: measure twice, cut once. It is not a proverb because it sounds wise. It is a proverb because the other way round is expensive.
Hands do the work in this room, but eyes do the deciding. Today we train both. You will learn the instruments that tell a maker whether a thing is the right length, the right angle, level, and plumb, and you will learn where every one of them came from. Level means horizontal: neither end higher than the other. Plumb means vertical: straight up and down, the direction a weighted line hangs, and the word comes from the Latin plumbum, lead, the metal the weight was commonly made from. Some of them are older than the castle. One of them is older than writing as the Runes scholars study it, nearly. All of them still work.
PROFESSOR COGBRANCH TIMBERCLANK
Creative Arts Workshop
Master Artisan, Head of House Occidens
Lesson Objectives
By the end of this lesson, students should be able to:
- Measure and mark accurately using a ruler, calipers, and a square, and read a simple plan.
- Check a surface for level using a spirit level and a water level, and explain how each works.
- Check a post or board for plumb using a plumb line and bob.
- Lay out a line using a string line, and explain its ancient uses.
- Describe the history of the cubit, the A-frame level, the chorobates, and the spirit level.
- Explain why marking happens before cutting, and what "true" means at the bench: level, plumb, square, and straight.
Your Assignment Packet
This lesson's assignments live in its packet: the Lexicon Handout (every term, course terms marked ◆), the Assignment Manual, and the Reflection Questions. Download the packet before you begin and keep it beside you as you read — work from it as each subject is taught, or take the assignments as homework afterward.
Measuring in the Ancient World
Before there were rulers, there were bodies. The oldest measuring instruments are the ones every scholar is carrying: the hand span, the foot, the pace, the forearm. The cubit, elbow to fingertip, was the builder's measure across Egypt and the Near East, and it worked well enough to raise temples that still stand. But my cubit is not your cubit, and a temple cannot be built on a measure that changes with the mason. So the cubit was standardized, cut into rods of wood and stone that were kept carefully and checked against one another. A wooden cubit rod survives from the tomb of the Egyptian architect Kha, who lived about 3,400 years ago; it is kept today in the Egyptian Museum in Turin, a working tool buried with the man who used it.
Other civilizations cut their measures just as carefully. Some of the oldest known scales come from the cities of the Indus Valley, about 4,500 years ago, divided with a precision that suggests trade and building both depended on strangers agreeing about length. In England, an inch was once described in a statute of 1324 as the length of three grains of barley, round and dry, laid end to end — a memory rule for the real standard, an iron yard bar. Medieval towns kept standard measures, an ell rod or a bushel, fixed at the church door or the market cross, so buyer and seller could settle a dispute against the same measure. Every one of these is the same idea wearing different clothes: a measure is a promise that two people mean the same thing.
Your ruler is the descendant of Kha's rod. Treat it with the same respect. A ruler that is bent, chipped, or read carelessly is a promise broken.
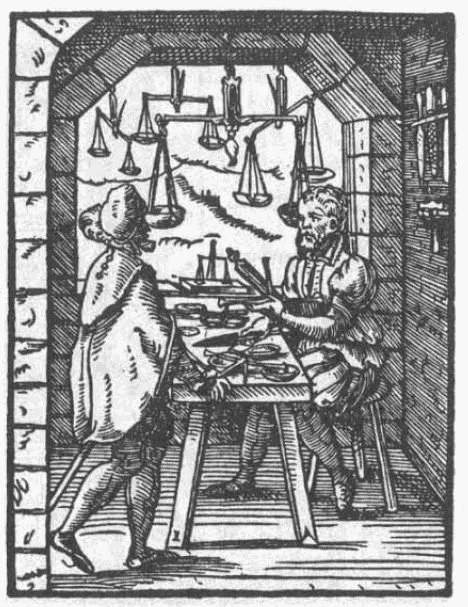
The scale/balance maker's workshop, 1568 — beam balances being made and hung for sale.
Woodcut from the Ständebuch (Book of Trades), Frankfurt, 1568. Public domain, via Wikimedia Commons.
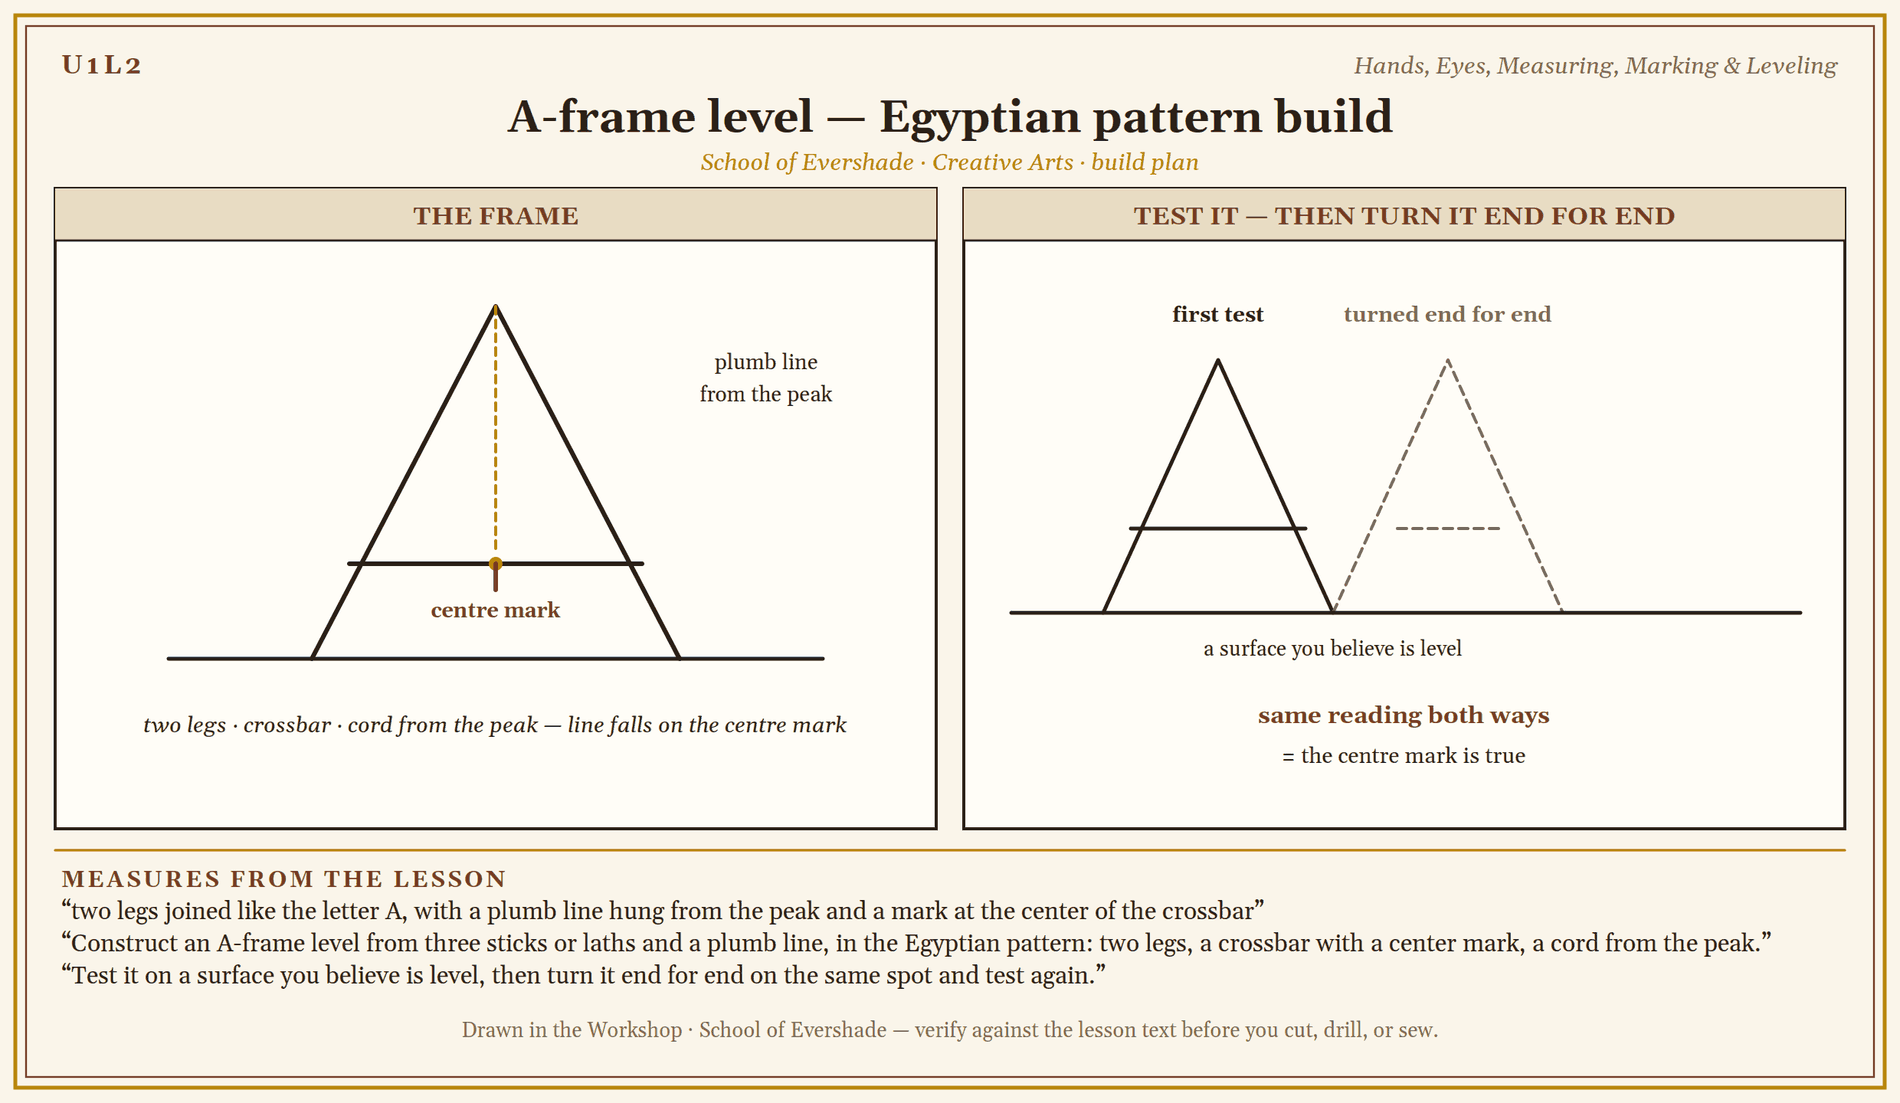
A-frame level — Egyptian pattern build
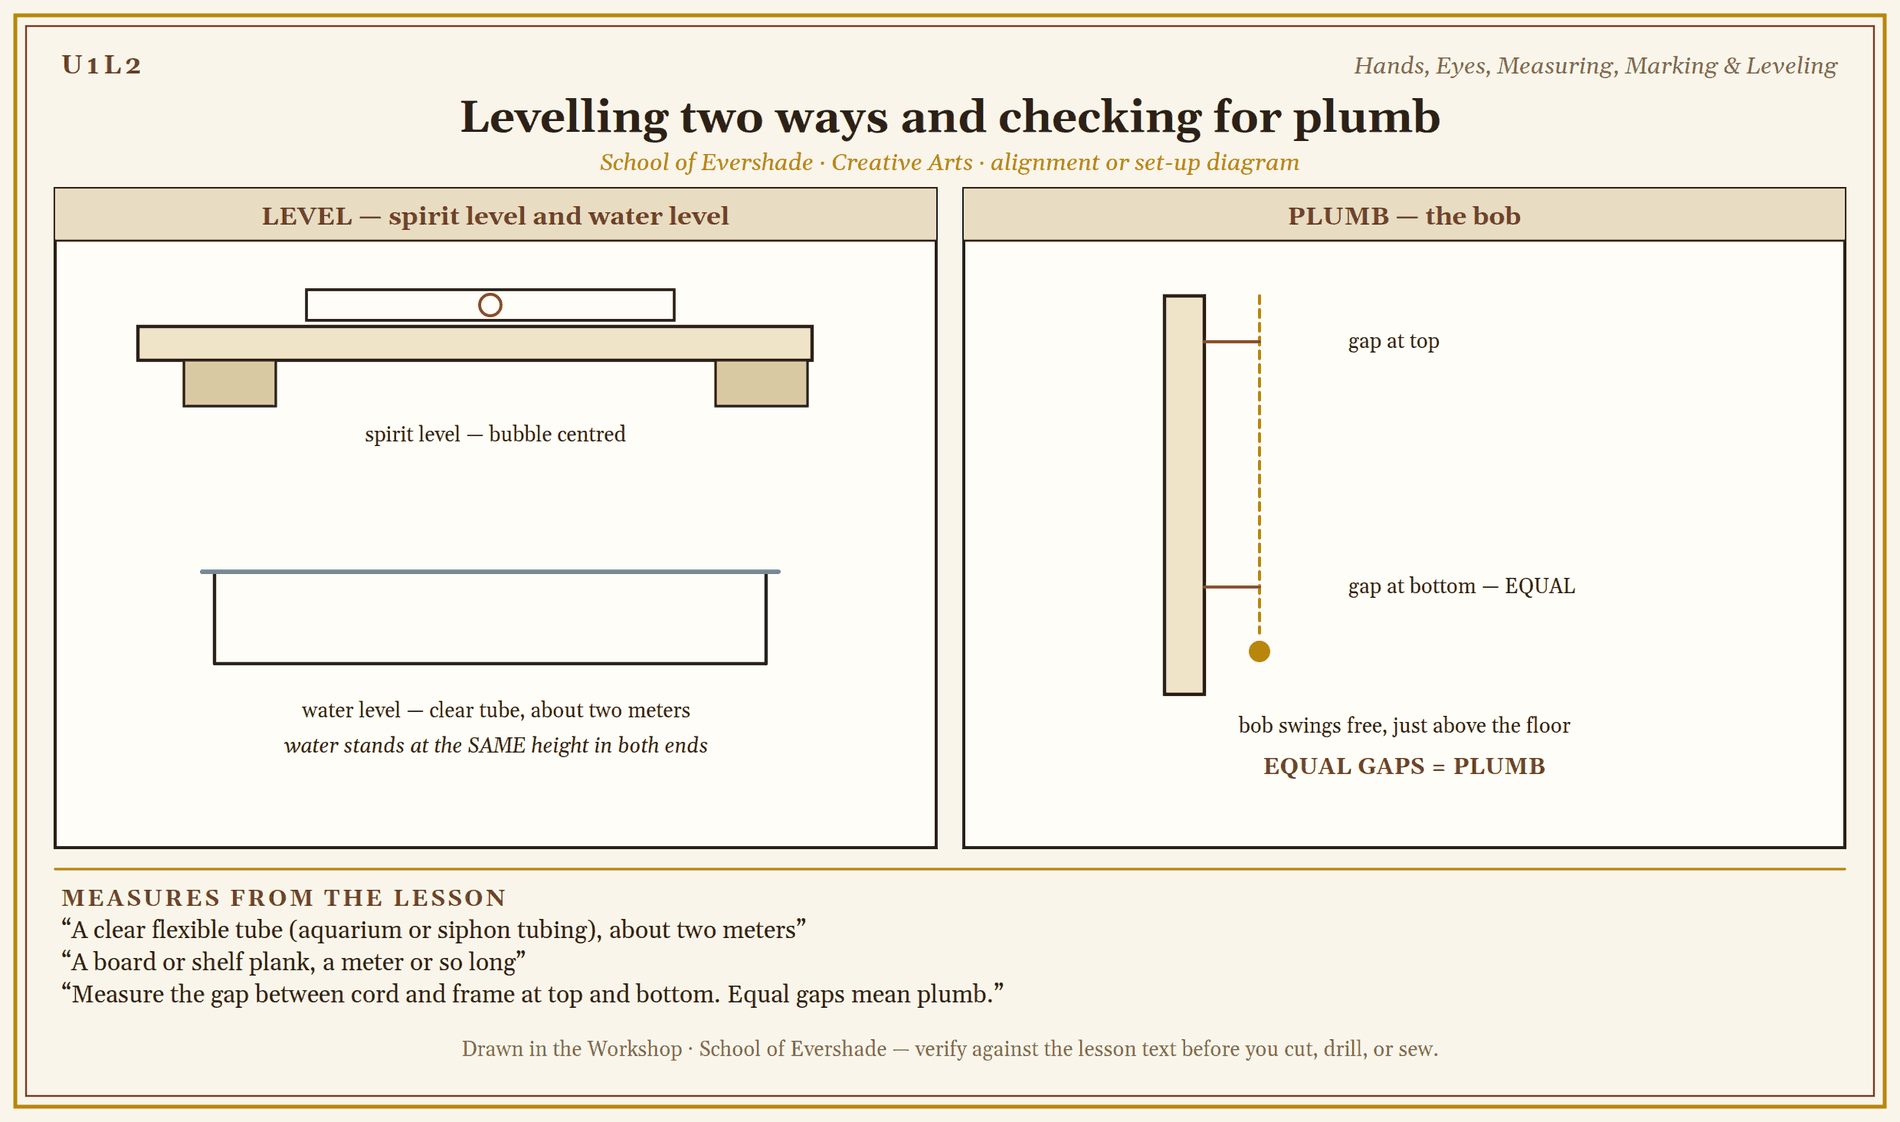
Levelling two ways and checking for plumb
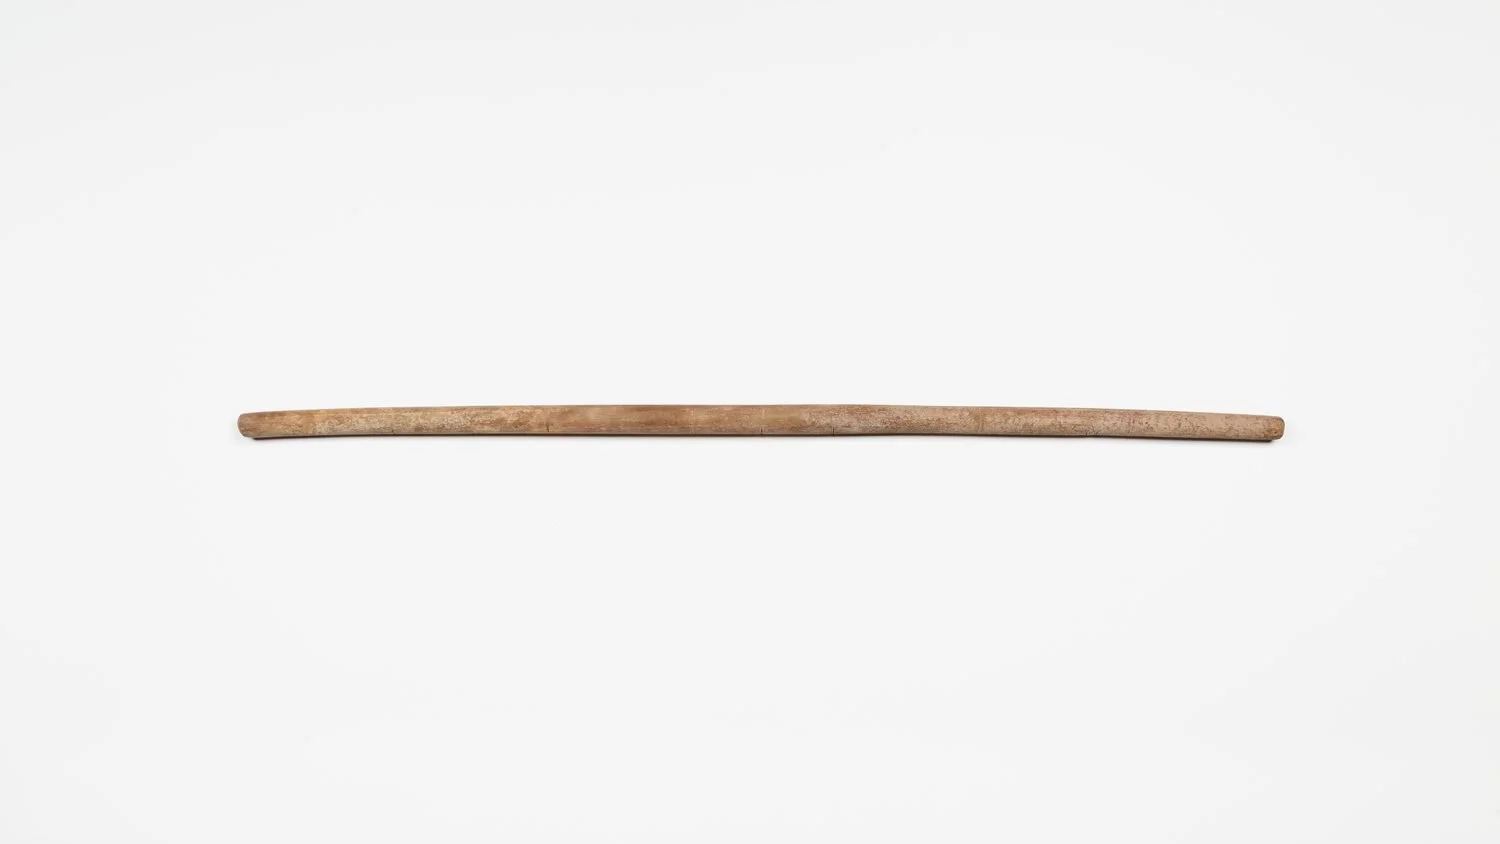
A complete Egyptian cubit measuring rod, Middle Kingdom, Dynasty 12–13 (ca. 1981–1640 BCE), wood, 70.5 cm long, its graduated divisions cut along the face.
The Metropolitan Museum of Art (Object 15.3.1128), Open Access (CC0).
Level and Plumb in the Ancient World
Length is only one question. The others are: is it flat, is it upright, and is it straight between here and there?
The Egyptian answer to upright and flat was an elegant wooden instrument, the A-frame level: two legs joined like the letter A, with a plumb line hung from the peak and a mark at the center of the crossbar. Set the frame on a surface and the weight settles; if the line falls on the center mark, the surface under the feet is level. Turn the same thinking sideways and the plumb line alone checks whether a wall stands vertical. Egyptian builders checked the great stonework of temples and tombs with these simple instruments, and Roman builders after them.
The Roman answer, for leveling across distance, was grander. The architect Vitruvius, writing in the first century BCE, describes the chorobates: a straight beam about twenty feet long, with plumb lines at each end and, for when the wind moved the plumb lines, a channel cut along its top to be filled with water: when the water touched both ends of the channel equally, the beam was level. Water, being honest, found its own level. Roman aqueducts ran for miles on gradients measured with such instruments, falling only a little over enormous distances so the water would flow and not stagnate. The water level in this lesson works on the chorobates' own principle: a clear tube and the same honest water.
For straight lines over distance, builders stretched a cord. A taut string between two points is a straight line you can see and touch, and cords darkened with pigment could be snapped against timber or stone to leave the line behind as a mark. Egyptian and later builders marked with stretched, pigmented cords long before the modern chalk line, and Japanese carpenters developed the same idea into the ink line, drawn from a silk cord in an ink pot. The tools differ. The geometry does not.
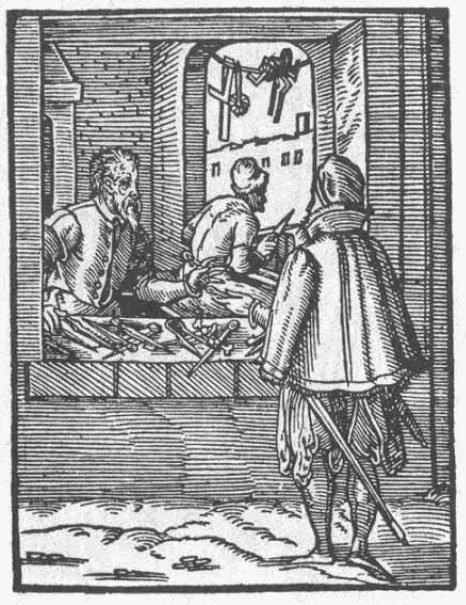
The compass/divider maker's workshop, 1568 — dividers and compasses being made and displayed.
Woodcut from the Ständebuch (Book of Trades), Frankfurt, 1568. Public domain, via Wikimedia Commons.
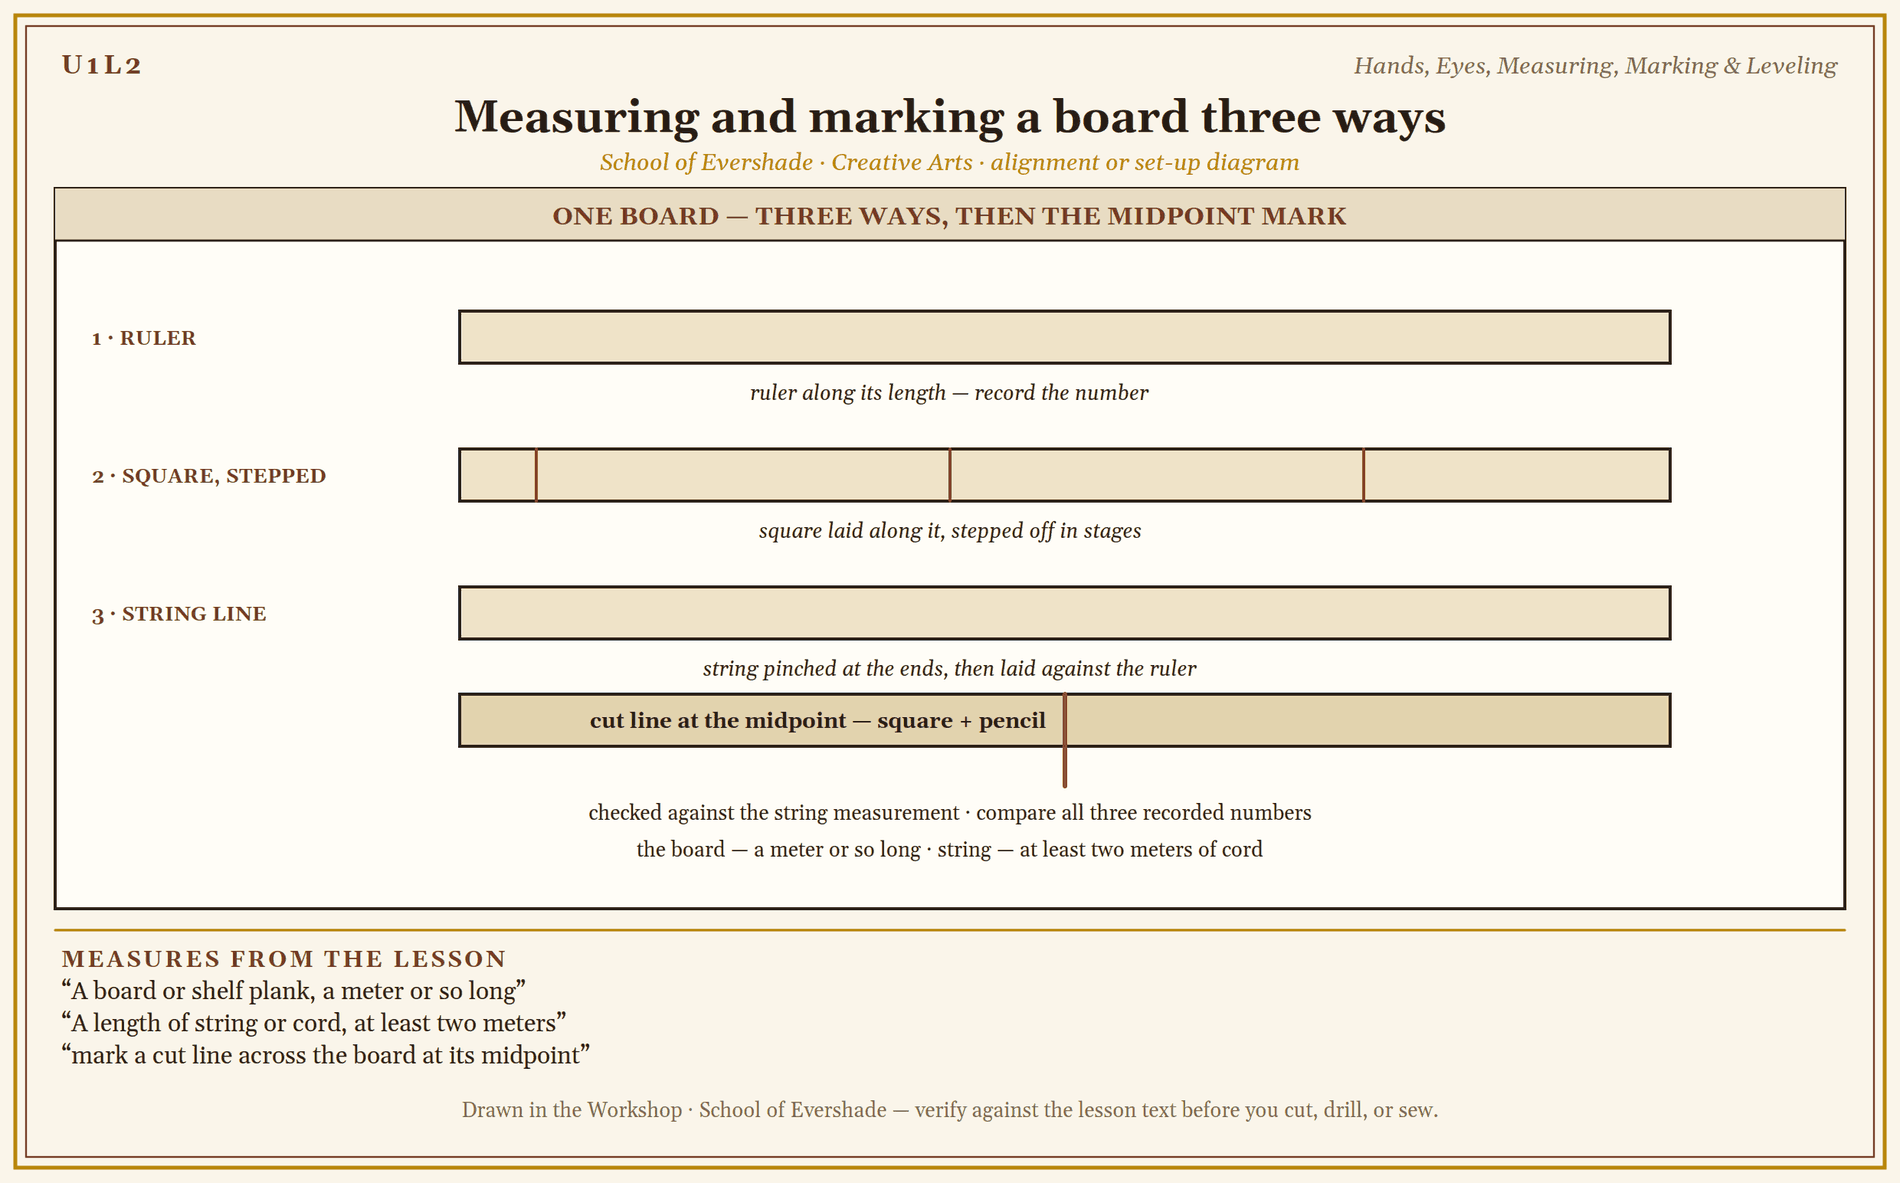
Measuring and marking a board three ways
The Spirit Level and the Modern Bench
The bubble level is the youngster of this lesson. The spirit level, a sealed glass tube of spirit with a bubble of air trapped inside — in modern levels the vial is curved very slightly so the bubble seeks the highest point — appeared in the 1660s and is credited to the French scientist and traveler Melchisédech Thévenot. For the first time, a maker could carry level in a coat pocket instead of a twenty-foot beam or a bucket of water. Within two centuries, spirit levels were standard kit for builders, engineers, and surveyors everywhere.
The modern bench adds a few more descendants. The steel framing square was patented in its familiar form in 1819 by Silas Hawes, a Vermont blacksmith, and made squares cheap, flat, and accurate enough for every carpenter to own one. A square is an instrument for laying out and checking right angles; try squares and framing squares have served carpenters for centuries, and the builder who cannot trust a corner cannot trust the piece. Calipers, which measure by comparison and carry a measurement from one object to another, are far older: Roman calipers survive, and the tool's principle was never improved, only refined.
None of this makes the old instruments wrong. In this lesson you will level the same board with Thévenot's bubble and with Rome's water, and you will find they agree, because they are both answering the same question to the same authority, which is gravity. That is why this workshop teaches the old tools first. The scholar who understands what the plumb line is doing understands what every measuring tool is doing, including the ones not yet invented.
A Sealed Note from Professor Timberclank
Scholars ask me which they should trust, the mark or their eye. Trust the mark, and make the mark worthy of trust.
Your eye is a fine instrument for beauty and a poor one for measurement. It will tell you a board looks level while the board is quietly wrong, and a thing quietly wrong in Lesson 2 is loudly wrong in Lesson 26, when the shelf will not sit and the box will not close.
Measure it. Mark it. Check it against something that cannot flatter you: water, a hanging weight, a bubble in glass. Then cut. The tools are patient. Be patient with them.
PROFESSOR COGBRANCH TIMBERCLANK
Creative Arts Workshop
Master Artisan, Head of House Occidens
Reading a Plan and Marking
A plan is a promise made in advance, in numbers, so that the cutting can be done without guessing. In this course, plans begin simple: a drawing of the piece, its measurements written on it, and marks where cuts and holes belong. Before any build in this workshop, you will do three things in order: read the whole plan through once without touching a tool; measure and mark the material in pencil, checking each measurement against the plan as you make it; and check the marked piece for true, square corners, level where level matters, before any cutting begins.
Marking tools are chosen for the material. Pencil on wood and paper, read clearly and erased cleanly. A scriber or awl point scores a fine line in wood or metal that a saw can follow and that will not smear. Chalk and ink lines serve long straight runs across big work. What matters is not the tool but the rule: the mark is made first, checked second, and cut last. A maker who cuts to an unchecked mark has simply moved the mistake earlier.
Practice Practical: Until All the Checks Agree
This drill is checked for agreement between methods, not for speed. Repeat it until all three of your measuring methods tell the same story.
- Measure the board three ways. Lay your board flat. Measure its length with the ruler. Measure it again with the square laid along it, stepping the square's length off in stages. Measure it a third time with the string line: stretch the string along the board, pinch at the ends, then lay the string against the ruler. Write down all three numbers. If they disagree, find out why before going on. That investigation is the lesson.
- Mark it. Following your three measurements, mark a cut line across the board at its midpoint: first with the square and pencil, then check the mark against the string measurement. A correct mark, checked twice, in two different ways.
- Level the board two ways. Set the board on blocks. Lay the spirit level on it and adjust until the bubble centers. Now check the same board with the water level: fill the clear tube with water, hold its ends up at each end of the board without spilling, and adjust until the water stands at the same height in both ends while resting at the board's surface. Bubble and water should agree. If they do not, trust the water and investigate the level.
- Check for plumb. Tie your bob to the string. Hold the string against the top of a door frame or post so the cord hangs alongside it, the bob swinging free just above the floor. Let it settle completely. Measure the gap between cord and frame at top and bottom. Equal gaps mean plumb. Write down what you found, honestly, even if the answer is that your door frame leans, as many old door frames do.
- Record. In your workbook, list the three length measurements, the two level results, and the plumb result. Note any disagreement and its cause, once found.
When ruler, square, and string agree on length, and bubble and water agree on level, your hands have learned what this lesson is for.
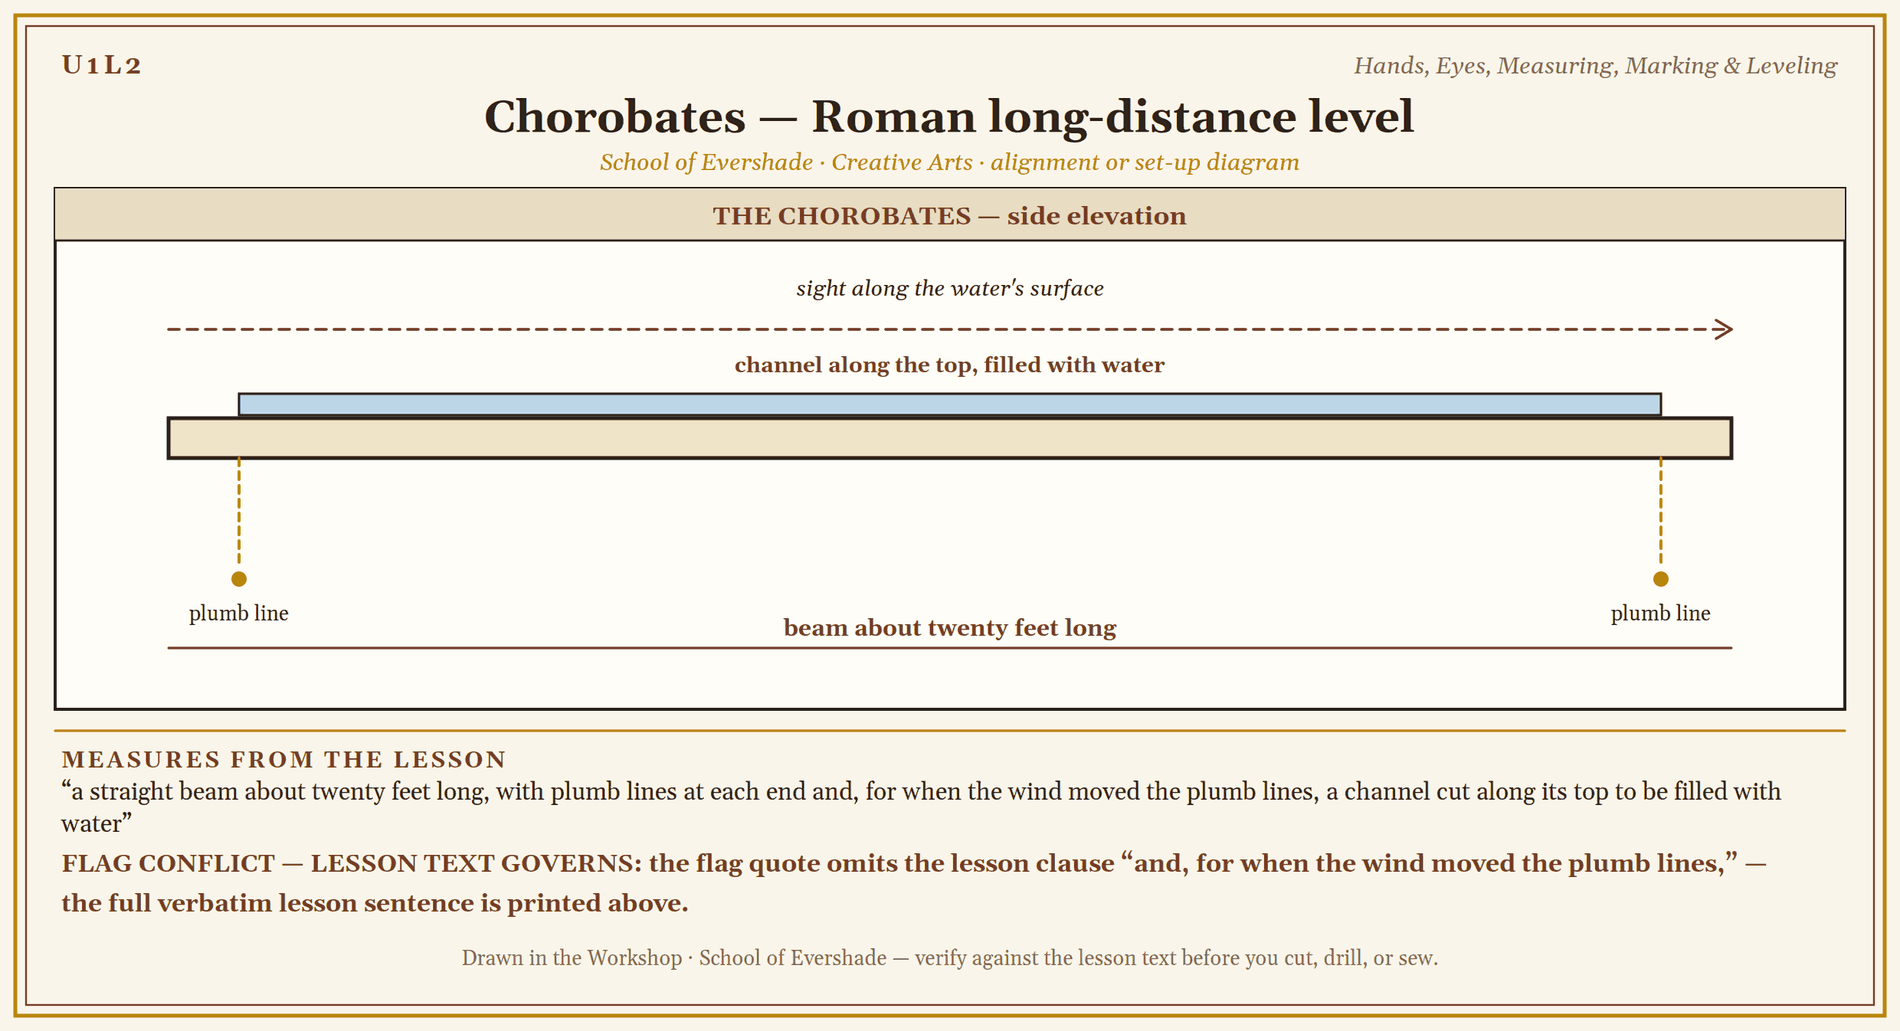
Chorobates — Roman long-distance level
Assignment Manual
Assignment key: ✎ written work · ⚒ hands-on practical · ◐ both
Assignment I ⚒ — The Practice Practical
Complete the drill in this lesson: measure and mark the same board three ways, level it with the spirit level and the water level, and check a post for plumb with the plumb line, until all the checks agree. Record every measurement and every disagreement in your workbook, with its cause.
Assignment II ✎ — Body Measures
Measure your own historical units: your cubit (elbow to fingertip), your span (thumb to little finger, stretched), your foot, and your pace. Write them down in centimeters. Then measure the same tabletop with your cubit and with a ruler, and write a short piece on why builders standardized measures on rods kept by the town or the temple, and what went wrong when they did not.
Assignment III ◐ — Build an A-Frame Level
Construct an A-frame level from three sticks or laths and a plumb line, in the Egyptian pattern: two legs, a crossbar with a center mark, a cord from the peak. Test it on a surface you believe is level, then turn it end for end on the same spot and test again. (A true instrument gives the same reading both ways; if yours does not, your center mark is off, and finding that is the exercise.) Write up your build, your two readings, and your verdict on your own instrument.
Materials
Level One (household)
- A ruler or tape measure, and a pencil
- A carpenter's square, try square, or a book or box corner known to be square
- A spirit level (a phone level app may stand in for the first attempts, but a real level is worth having)
- A length of string or cord, at least two meters
- A small heavy object to serve as a plumb bob: a bunch of keys, a washer, a fishing weight
- A clear flexible tube (aquarium or siphon tubing), about two meters, and a jug of water, for the water level. Indoors alternative: a clear straight-sided bottle nearly full of water, laid on its side
- A board or shelf plank, a meter or so long, and books or blocks to raise one end
- A door frame or post to check for plumb
- Paper and workbook for recording the drill
Level Two (historical)
Everything in Level One, plus:
- A proper plumb bob of brass or turned wood with a fine cord
- A wooden cubit rod or a meter rule of wood, for working in the old measures
- Materials to build an A-frame level: three straight sticks or laths, cord, and a bob
- A mason's line and line pins, or a chalk line, for laying out long straight marks
Both levels teach the same craft: measuring, marking, leveling, and plumbing. The finished skill is identical; only the instruments' ages differ.
Reflection Questions
Answer the following questions in your workbook.
- Which of your three measuring methods disagreed with the others, and what caused it?
- Why did ancient builders standardize the cubit on physical rods instead of trusting the measure of any one person's arm?
- The water level and the spirit level are separated by about seventeen centuries. What do they have in common that makes both honest?
- Which check, level, plumb, or square, do you think your own home would fail most interestingly, and where?
- Why does this workshop insist the mark be checked before the cut, rather than the cut being checked after?
Professor's Review
Your bench now holds the oldest instruments in the workshop, and your hands know the questions they answer. How long. How flat. How upright. How straight.
You have measured one board three ways and made the methods agree, which puts you ahead of every builder who ever trusted a single reading. You have leveled with Rome's water and Thévenot's bubble, and checked a post against a hanging weight, the same authority the Egyptians used. Keep the A-frame if you built one. Hang it on the wall. It will still be telling the truth when the rest of us are guessing.
Next lesson, the work gets edges: cutting, scoring, and clamping, and the rule that keeps all ten fingers accounted for.
PROFESSOR COGBRANCH TIMBERCLANK
Creative Arts Workshop
Master Artisan, Head of House Occidens
Further Reading & Sources
Vitruvius. De architectura (On Architecture), Book VIII. The Roman architect's own description of the chorobates and of leveling instruments for aqueducts, available in English translation through the University of Chicago's LacusCurtius site and in standard editions.
Museo Egizio (Egyptian Museum), Turin. The tomb of Kha. The architect Kha's burial equipment, including his wooden cubit rod, held by the museum that preserves his tomb's contents.
Encyclopaedia Britannica. "Level" and "Surveying." General reference on leveling instruments and the history of surveying practice.
Encyclopaedia Britannica. "Cubit." On the cubit as a unit of length in the ancient world and its standardized forms.
Student-friendly starting points for exploring this lesson's world. All links verified October 2026.
- The British Museum, "Ancient Egypt" learning resources. On Egyptian building, measuring, and the tools of Egyptian craftspeople.
- Smarthistory, essays on ancient Egyptian and Roman art and architecture. Introductions to the buildings these instruments raised, and the precision they demanded.
- Science Museum Group (London), collection articles on surveying and leveling instruments. Histories of levels, squares, and measuring tools, with photographs of surviving instruments.
- Encyclopaedia Britannica. "Theodolite." On the surveyor's angle-measuring instrument, set level with a spirit level for precise work in the field.
Submit your work for this lesson using the form below.
CONTINUE IN THE CREATIVE ARTS WORKSHOP
← Previous · Lesson 1: Welcome to the Creative Arts Workshop Next · Lesson 3: Cutting, Scoring & Clamping →
Unit I · The Workshop Foundation Creative Arts Workshop · All 39 Lessons
Bookstore Shelf The Library · Creative Arts Shelf Course Supplies
The rest of Unit I: Lesson 1 · Welcome to the Creative Arts Workshop · Lesson 3 · Cutting, Scoring & Clamping · Lesson 4 · Piercing, Drilling & Fastening · Lesson 5 · Adhesives, Heat, Wax & Glass · Lesson 6 · The Materials Library