Creative Arts
Unit I, Lesson 6The Materials Library & First Tool-Making
Professor Cogbranch Timberclank
Master Artisan, Head of House Occidens
The Creative Arts Workshop • School of Evershade
Professor's Introduction

Set up your bench, scholars. This is the last lesson of the foundation, and it is the one the rest of the workshop quietly depends on: knowing what things are made of, and knowing it well enough to make your own tools out of them.
Walk the shelves of this room with me in your mind. Wood in boards and offcuts. Paper and board in flat stacks. Clay wrapped against the air. Cloth and cord. A drawer of metal, a crate of stone. That is the materials library, and it is not a storeroom. It is a vocabulary. A maker who knows twenty materials has twenty words to think with; a maker who knows four has four, and every problem gets described in the same four words.
Today you will learn the character of the workshop's six great material families, and then you will do the thing that proves the learning: you will make three tools, a reed pen, a clay wedge stylus, and a folder, each of them older than the castle, older than most of the scripts Professor Webblethorn teaches, and every one of them still in use by somebody on Earth this morning.
PROFESSOR COGBRANCH TIMBERCLANK
Creative Arts Workshop
Master Artisan, Head of House Occidens
Lesson Objectives
By the end of this lesson, students should be able to:
- Describe the character, strengths, and limits of the workshop's six material families: wood, paper, clay, fiber, metal, and stone.
- Explain how each material should be stored, and why storage is part of the craft.
- Cut and shape a reed pen, form a clay wedge stylus, and shape a folder, and test each tool on scrap.
- Describe the history of the reed pen and the wedge stylus in Egypt and Mesopotamia.
- Explain why makers have so often made their own tools, and what making a tool teaches that buying one cannot.
Your Assignment Packet
This lesson's assignments live in its packet: the Lexicon Handout (every term, course terms marked ◆), the Assignment Manual, and the Reflection Questions. Download the packet before you begin and keep it beside you as you read — work from it as each subject is taught, or take the assignments as homework afterward.
The First Writing Tools
The tools you will make today are writing tools, because writing is where tool-making and materials meet most plainly, and because two of the professors across the castle are waiting on the results.
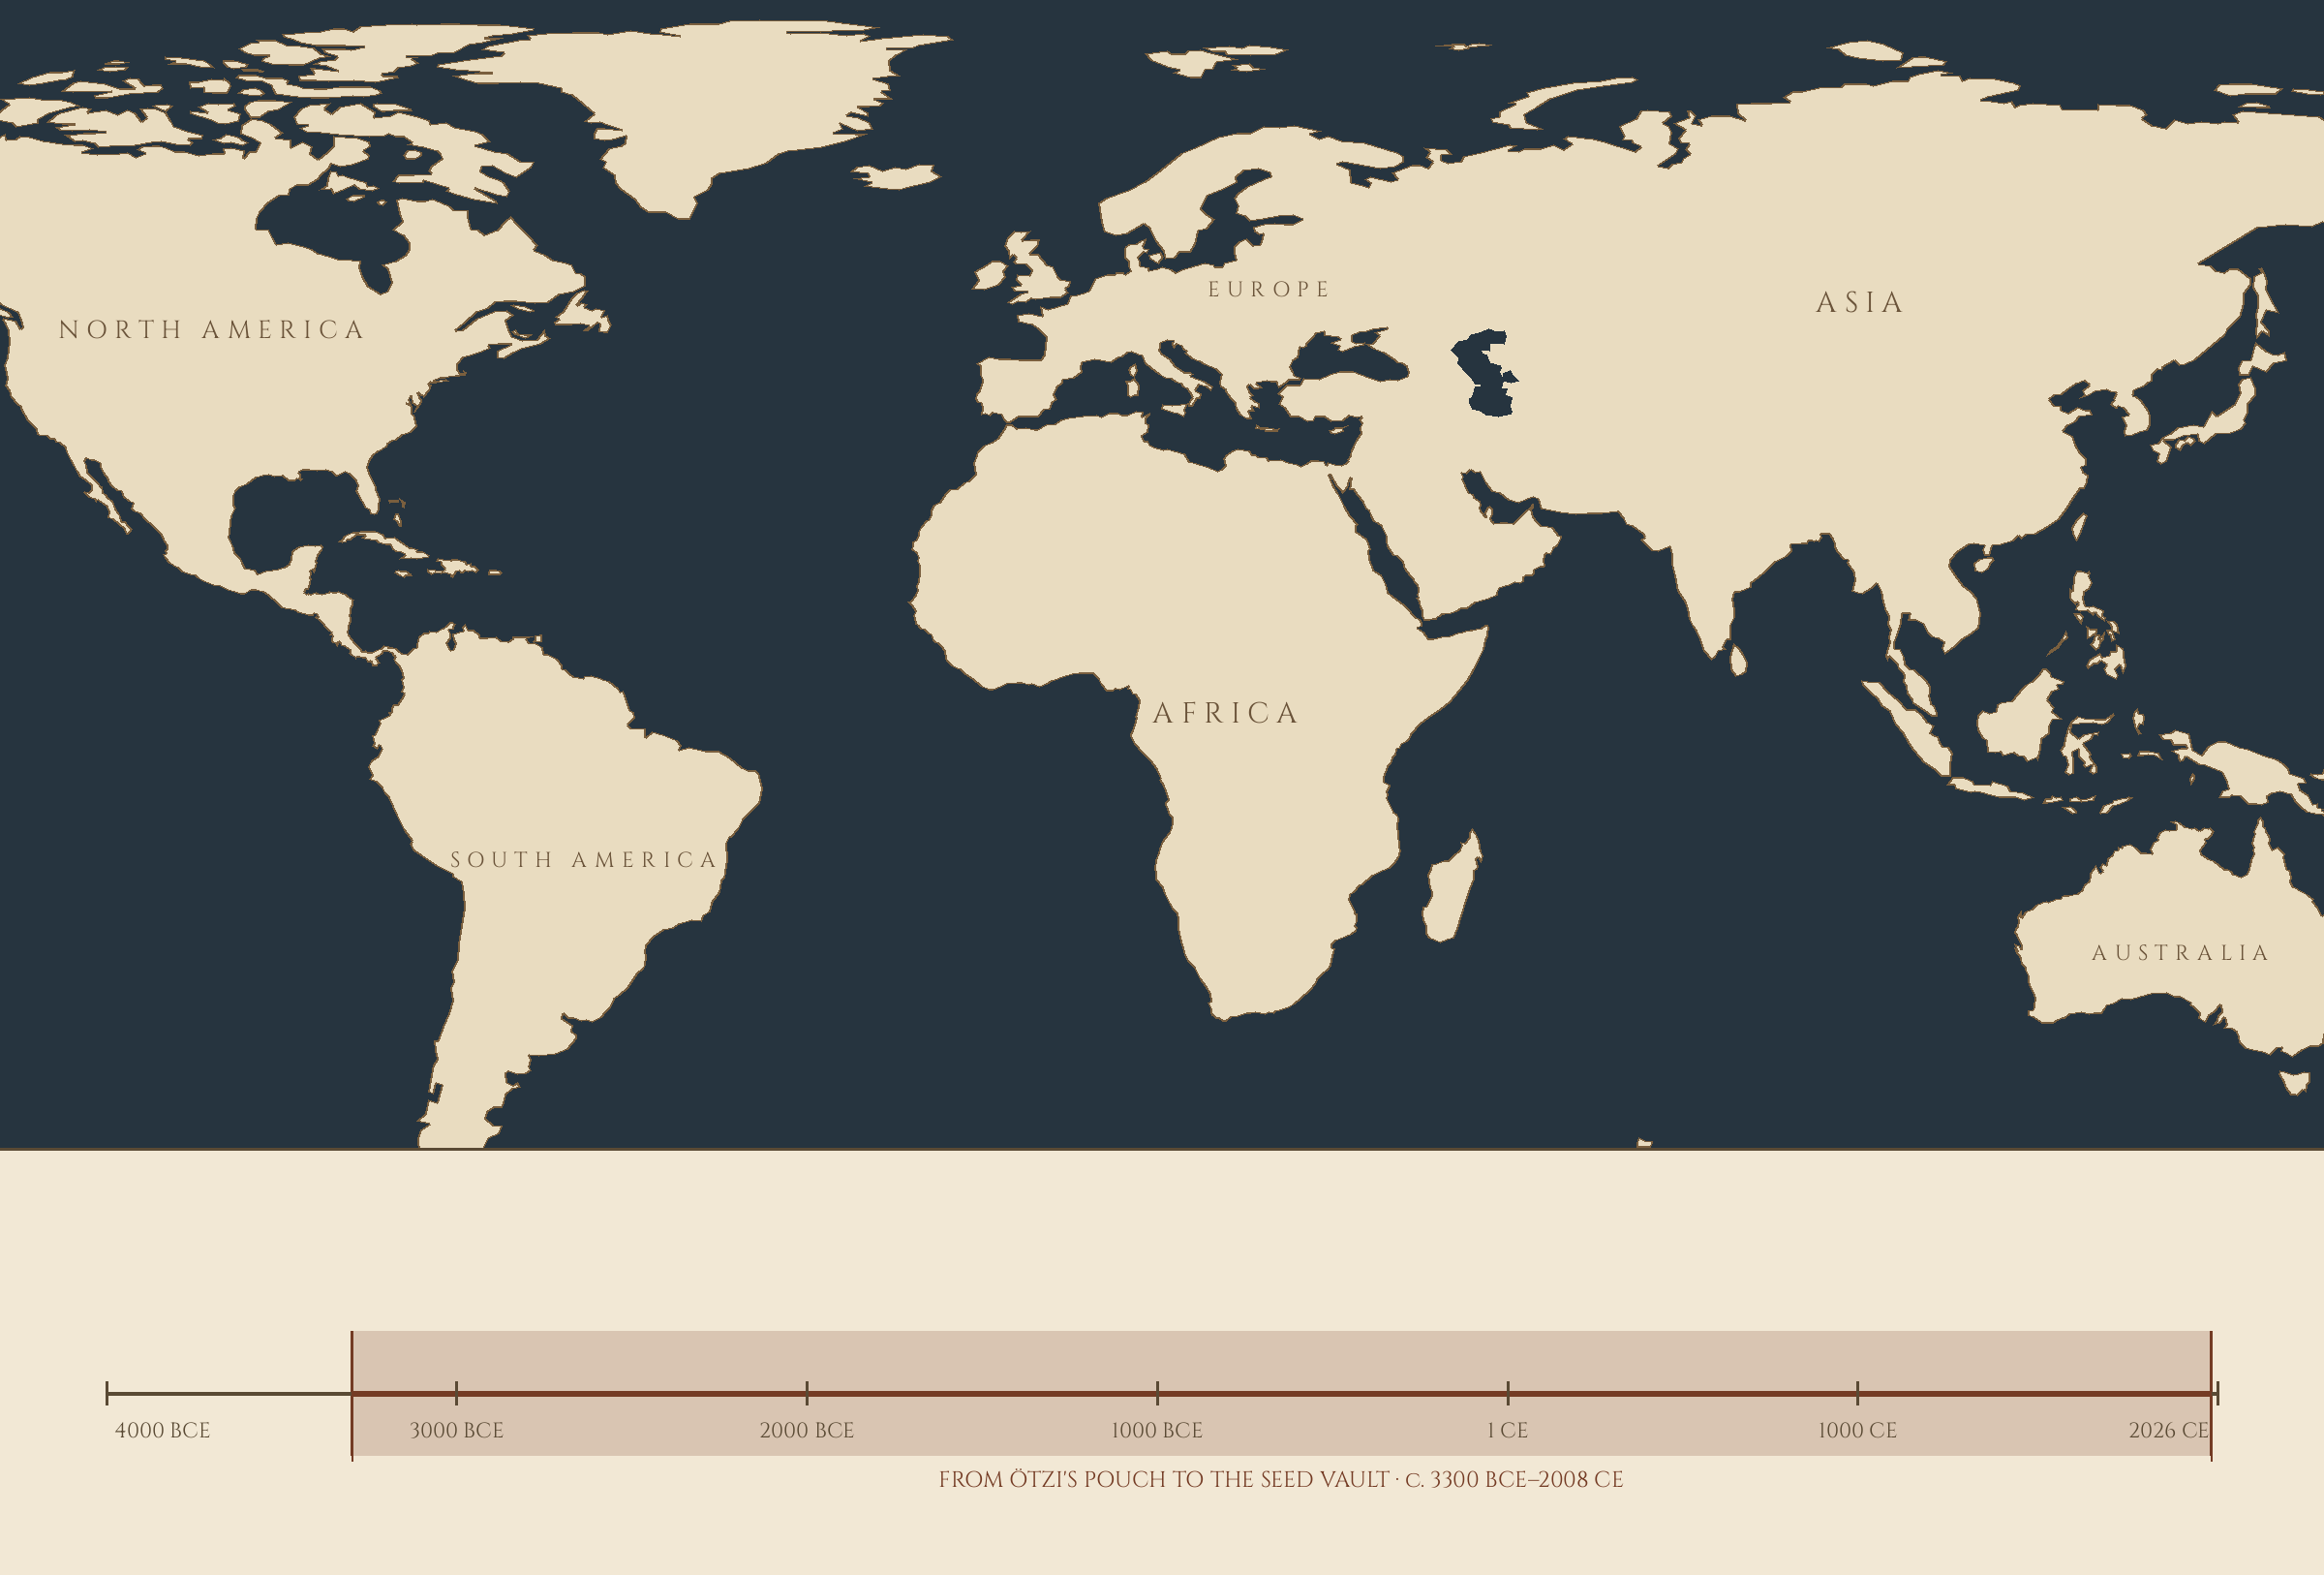
The wedge stylus is the elder. Around 3400 to 3300 BCE, in the city of Uruk in what is now Iraq, accountants keeping track of grain, livestock, and labor began marking small tablets of wet clay with a cut reed: drawn signs and pressed numbers at first. Over the following centuries the reed's impressed end came to leave marks shaped like small wedges or nailheads, and the script that grew from those wedges pressed in rows is cuneiform, the earliest writing system we know. Its tools were as simple as a tool can be: a stem, cut. Its records ran the accounts of empire after empire for well over three thousand years, in clay that outlasted every empire that wrote on it. Scholars still read those tablets today, which makes the wedge stylus, arguably, the most successful tool design in this entire course.
The reed pen is its younger, ink-bearing cousin. Egyptian scribes wrote first with brushes made from rush stems, their ends chewed or frayed to hold pigment, and later with true reed pens: lengths of reed cut to a point or a chisel edge, slit so ink would feed to the tip by the same capillary action Professor Nocturne teaches in Scrollwork. The Greeks called it the kalamos, the Romans the calamus, and the reed pen remained the ordinary writing tool of the Mediterranean and Near East for millennia, outlasting empires and outliving the quill in many regions. It is still cut and used today, by calligraphers working in Arabic, Hebrew, and other scripts whose letterforms it shaped.
The folder is the humblest of the three and the hardest to date, because humble tools are used up and thrown away. Binders and leatherworkers have creased, scored, and smoothed with polished bone and wood folders for as long as books and worked leather have existed; the bone folder in a modern binder's kit is the direct, unchanged descendant. Three tools, three materials, one lesson between them: the maker who understands a material can get a working tool out of it in minutes, with a knife, and has understood something no purchase teaches.
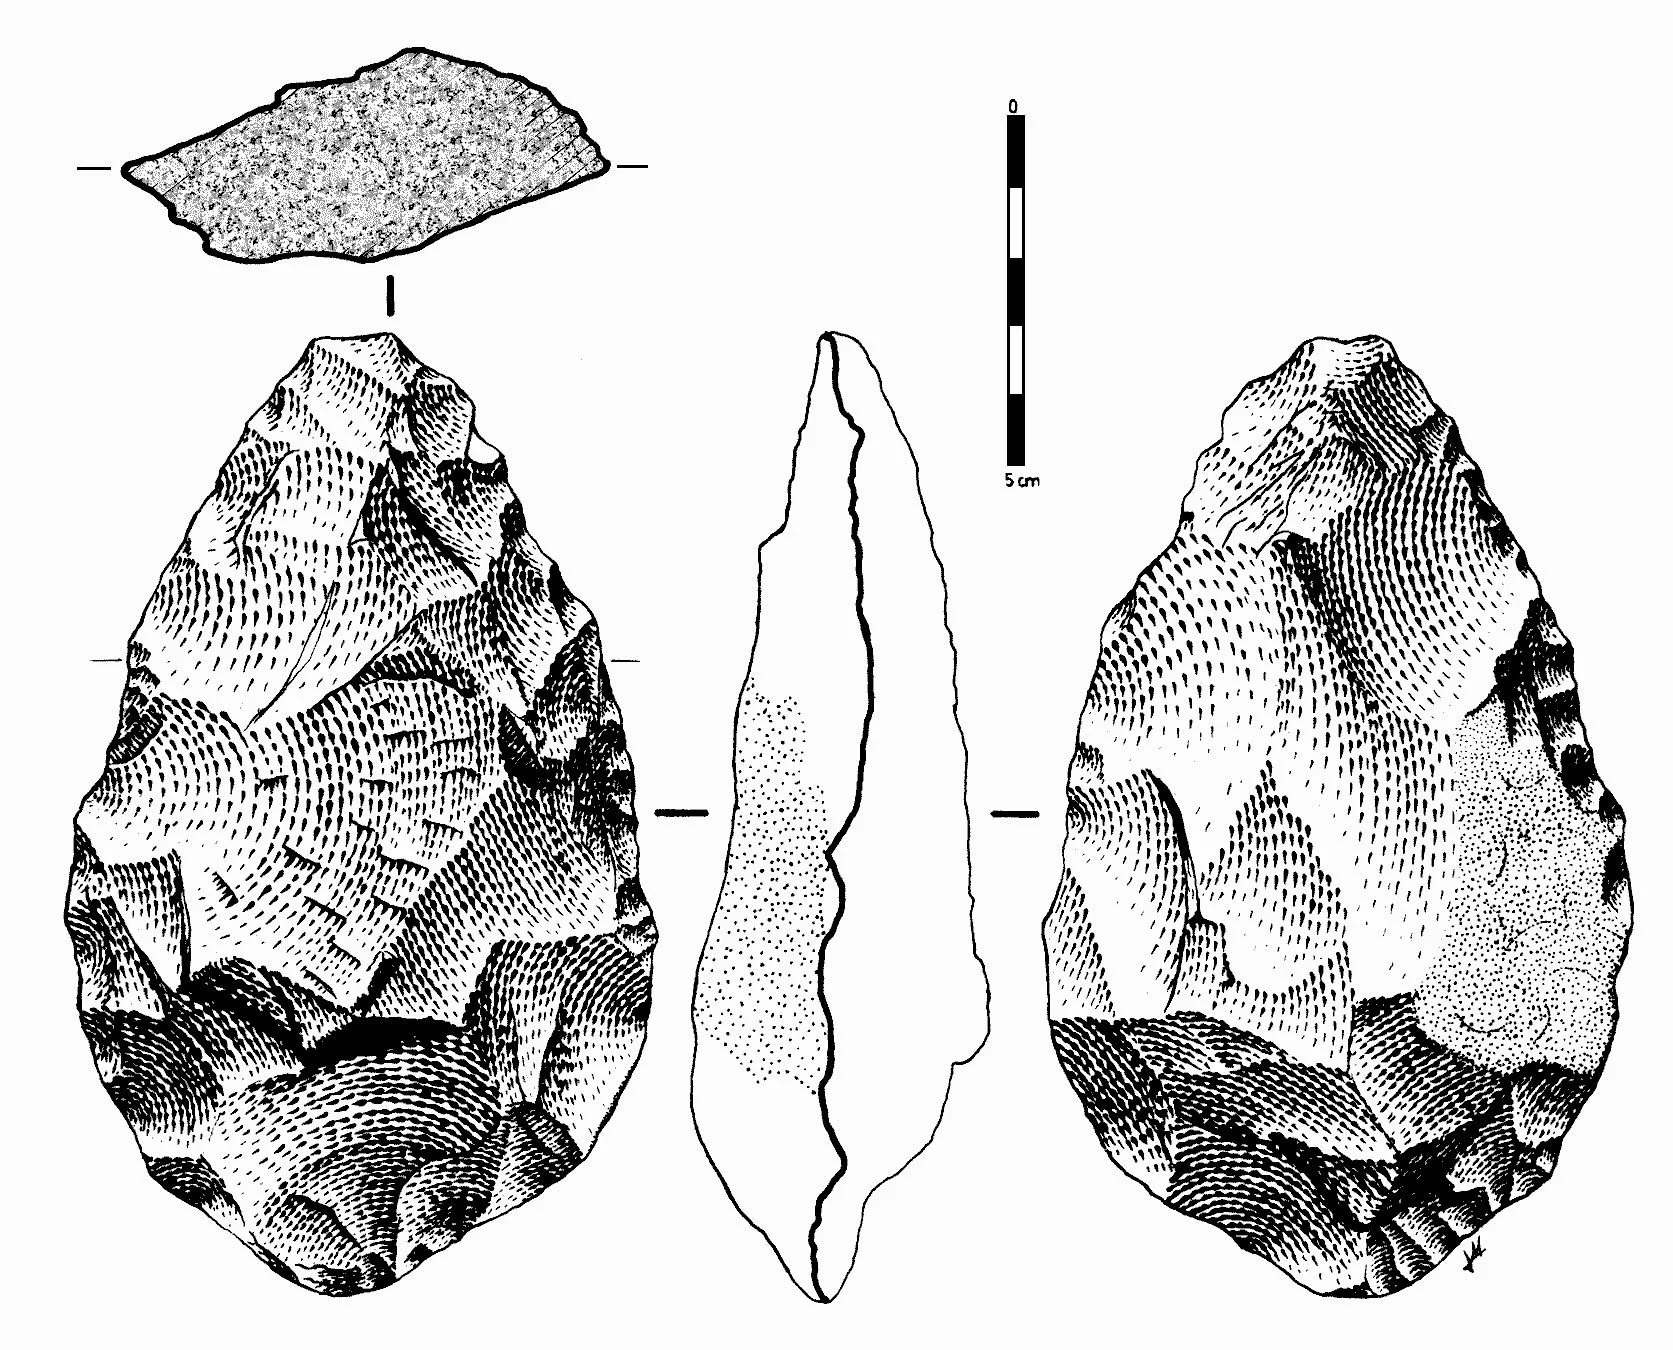
A technical drawing of an Acheulean handaxe from Spain, drawn in the standard archaeological convention — front and back faces with top and side profiles.
Drawing by José-Manuel Benito (Locutus Borg). CC0, via Wikimedia Commons.
Clay wedge stylus — end template and wedge test
The Six Families of the Library
Wood. The workshop's great structural material. It has grain, and the grain rules it: strong along it, splitting along it, stubborn across it. Softwoods cut kindly and dent kindly; hardwoods hold detail and edges and repay patience. Store it flat, dry, and off the floor, stacked so air moves between boards, or it will warp to remind you.
Paper and board. Plant fibers matted and pressed, an invention credited in its refined form to Cai Lun in China in 105 CE, made there from bark, hemp waste, and rags, and improved across the Islamic world before it reached Europe. Paper also has grain: it folds cleaner with it, tears straighter along it, and cracks when folded across it unless scored first. Store flat, dry, and out of sunlight, which eats it slowly and without asking.
Clay. Earth with opinions. Clay is mineral platelets and water, plastic when wet, leather-hard as it dries, and stone-hard only after firing. It shrinks as it dries, which cracks the impatient. Store it wrapped airtight and slightly damp; dried-out clay can be reclaimed by soaking and wedging, one of the library's small mercies. Temper names the state a material is in before you ask it to work: in clay, the moisture and workability of the body as stored and prepared; in metal, the hardness given by heating and cooling.
Fiber. Flax into linen, fleece into wool, cotton, hemp, silk: spun into thread, thread woven, knitted, braided, and felted into cloth and cord. Fiber is the oldest manufactured material family in this lesson, older than fired clay, and the most forgiving to practice on. Store clean and dry, safe from moths, which are scholars of fiber in their own unfortunate way.
Metal. Bronze served the ancient world, iron and steel the world after. Metal holds edges, takes rivets and solder, and conducts heat, which the workshop remembers whenever metal meets the glue pot's shelf. Store dry and lightly oiled where it rusts, and never loose in a drawer with the good tools.
Stone. Soapstone and steatite carve like firm cheese and served beginners and seal-cutters for thousands of years; sandstones and limestones reward the layout skills of Lessons 2 and 3; the hard stones wait for later units and steadier hands. Store stone where it cannot fall on anything, including, especially, feet.
A Sealed Note from Professor Timberclank
One rule governs the whole library, scholars, and it is the rule that keeps a workshop a workshop instead of a rubbish heap with ambitions.
Material is stored like it will be needed, because it will be. The scholar who throws good stock in a damp corner has not saved it; they have spent it. Stock is material kept ready for work: boards, sheets, lengths, and lumps, before any project claims them, and the library's stock is the course's raw vocabulary. And the scholar who keeps every splinter and scrap of string "in case" has not built a library either; they have built a nest, and I say that with professional sympathy.
Keep what serves. Label what you keep. Let the rest go with thanks. A library, of materials as of books, is judged by whether you can find the right thing in it when the work calls.
PROFESSOR COGBRANCH TIMBERCLANK
Creative Arts Workshop
Master Artisan, Head of House Occidens
Technique: Making the Three Tools
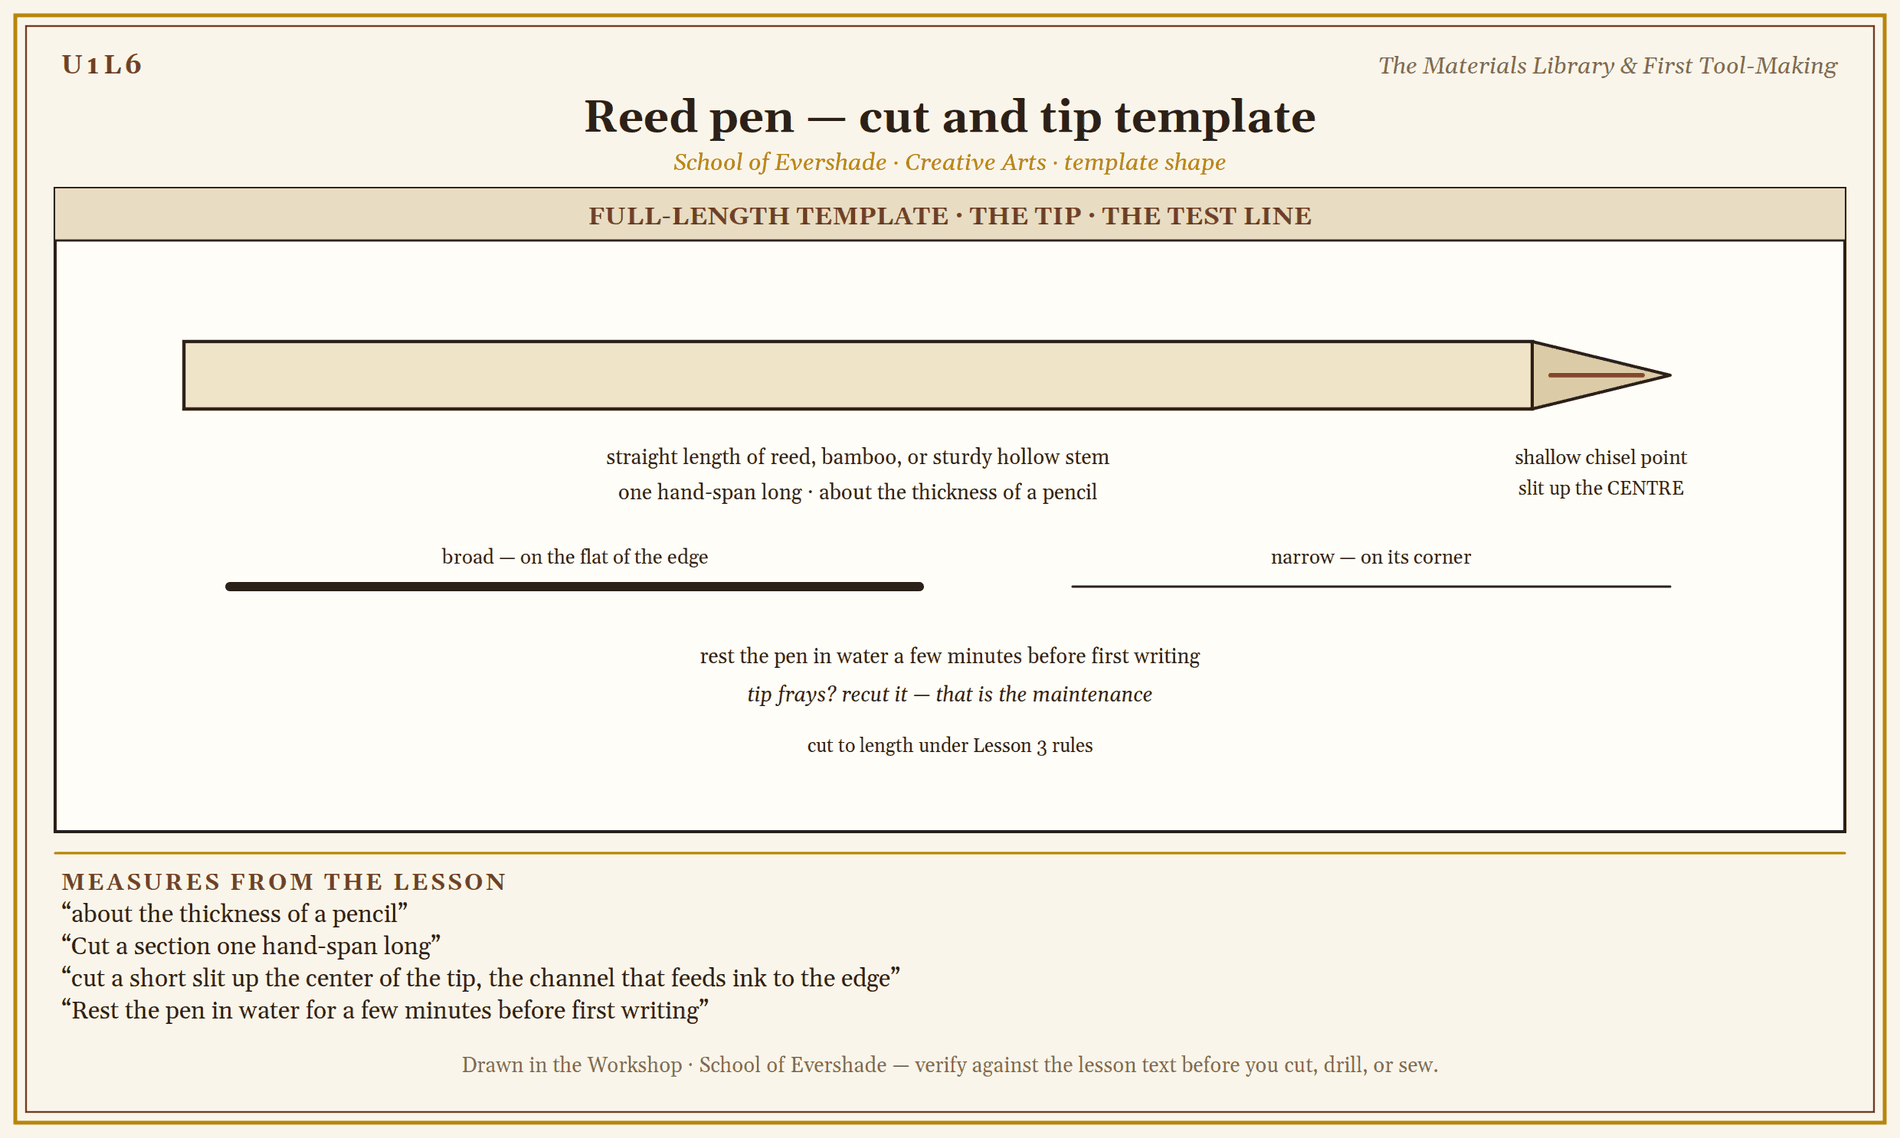
The reed pen. Choose a straight length of reed, bamboo, or sturdy hollow stem, about the thickness of a pencil. Cut a section one hand-span long with Lesson 3's methods: secured, cut away from the body. Shape the writing end to a shallow chisel point with the craft knife, then, with an adult's help for young scholars, cut a short slit up the center of the tip, the channel that feeds ink to the edge. Rest the pen in water for a few minutes before first writing, as reed drinks slowly. Test on scrap paper with any ink or dark paint water: the pen should lay a line whose width changes as you turn it, broad on the flat of the edge, narrow on its corner. Recut the tip when it frays; a reed pen is a tool you maintain, not a tool you mourn.
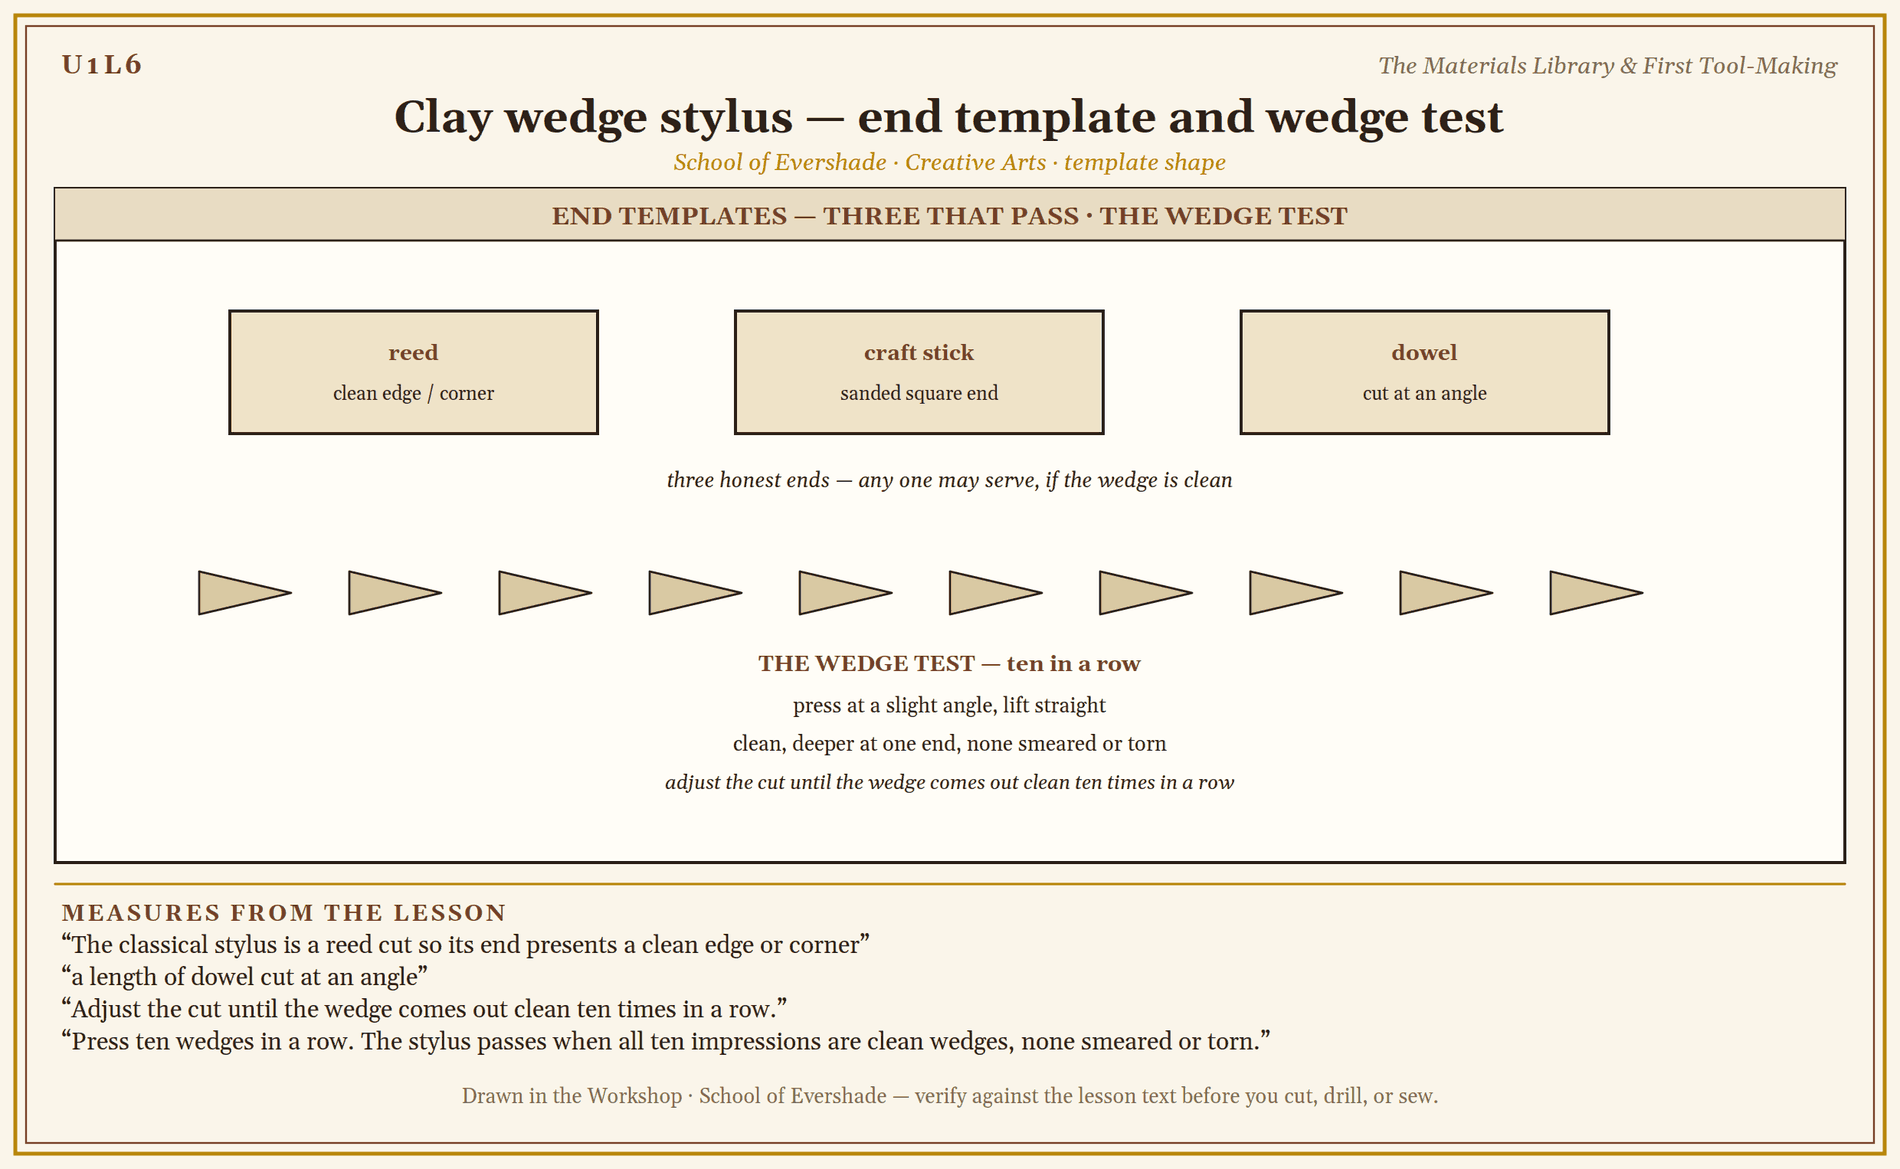
The clay wedge stylus. The classical stylus is a reed cut so its end presents a clean edge or corner; a household scholar can cut one from a thick drinking straw, a craft stick sanded to a square end, or a length of dowel cut at an angle. The test is the mark: press the end into a flattened ball of clay at a slight angle, lift straight, and look for the wedge, a clean triangular impression, deeper at one end. Adjust the cut until the wedge comes out clean ten times in a row. That reliability, not any single pretty mark, is what the accountants of Uruk needed, and it is the standard here.
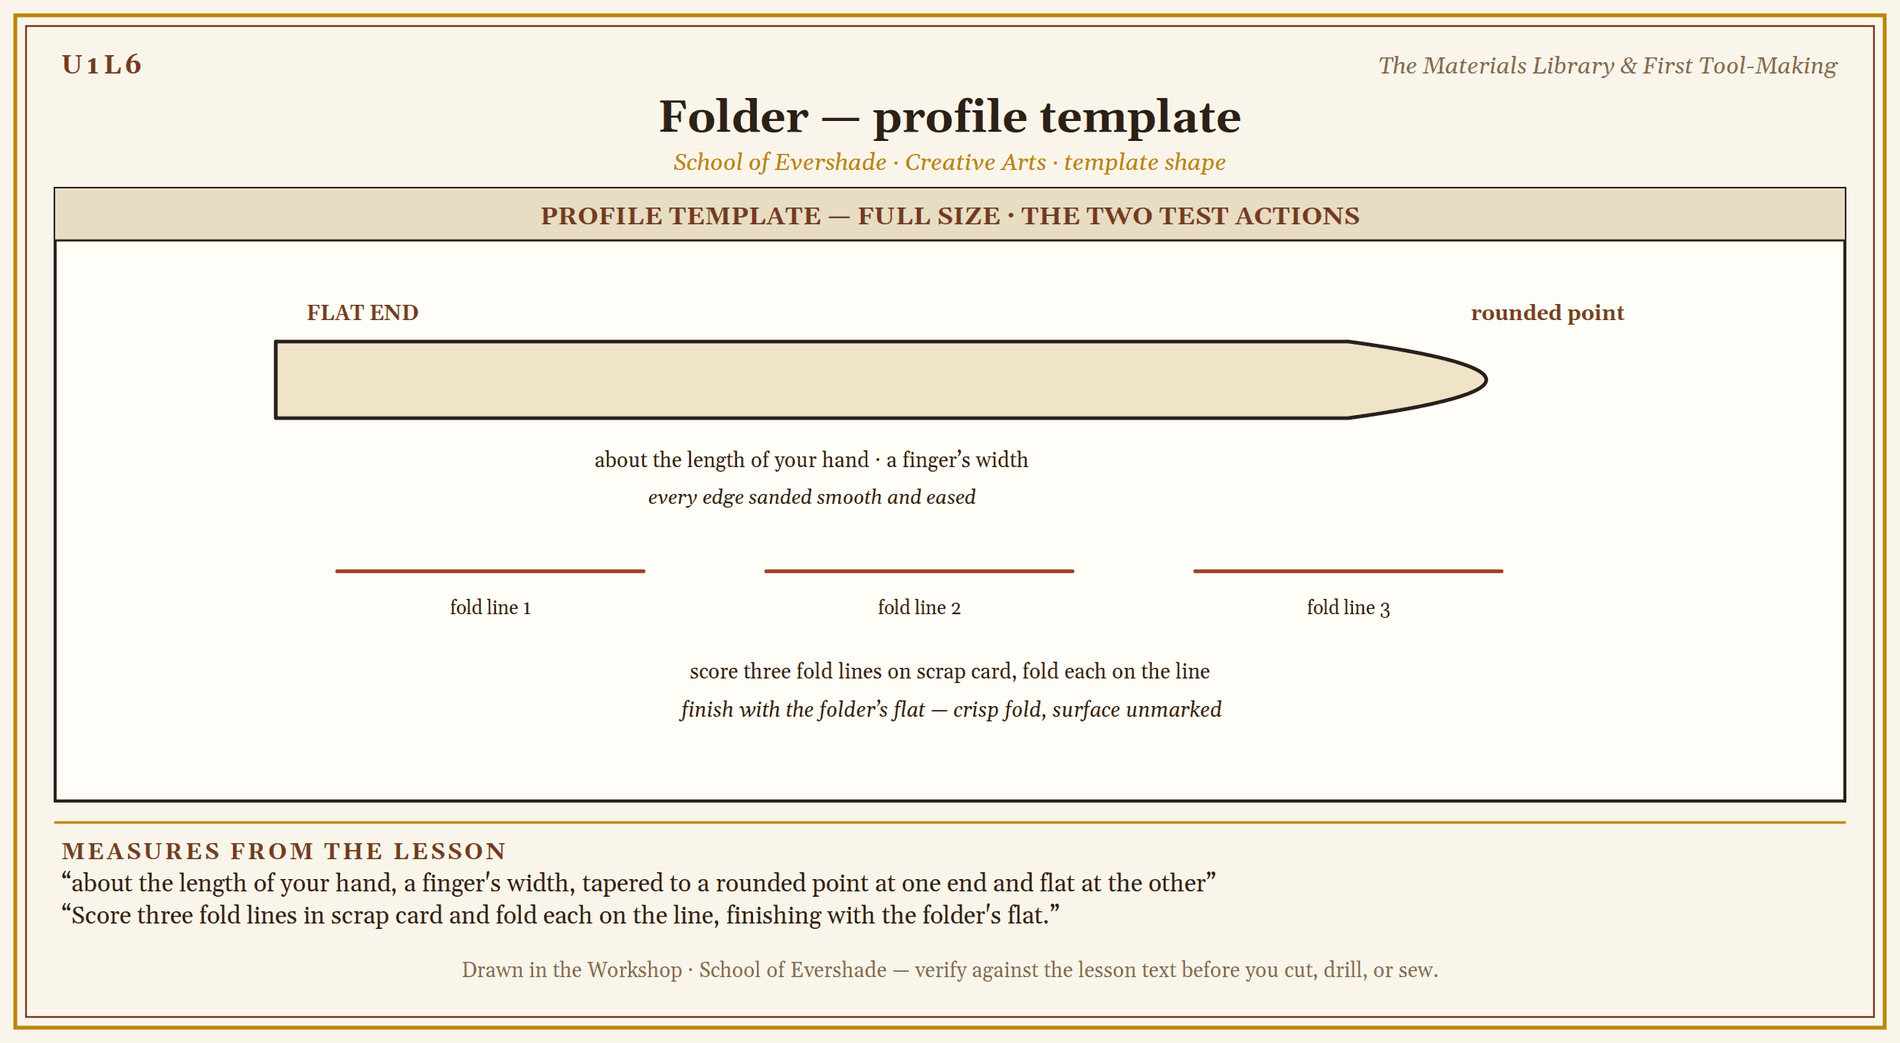
The folder. Shape a flat strip of wood, thick plastic, or (Level Two) bone or horn blank: about the length of your hand, a finger's width, tapered to a rounded point at one end and flat at the other. Sand every edge smooth, since the folder's whole work is done by sliding against paper without tearing it. Test it: score a fold line on scrap card, fold, and run the folder's flat along the crease. A true folder leaves the fold crisp and the surface unmarked.
Practice Practical: Three Tools, Three Tests
This drill is checked by the tests themselves: a tool passes when it does its job ten times cleanly.
- Lay out the library. Bench drill first. Set your six material samples in a row and handle each one: bend the paper, flex the wood, press the clay, twist the cord. In your workbook, write one line per family: what it does well, and what it refuses to do.
- Cut the reed pen. Measure a hand-span of reed and cut it under Lesson 3's rules. Shape the chisel tip, cut the slit (with an adult's help where your household requires it), and rest it in water. Test on scrap: draw lines flat and turned. Recut once, deliberately, and note what the recut improved.
- Make and test the wedge stylus. Cut your stylus end square or angled. Flatten a ball of clay into a small tablet. Press ten wedges in a row. The stylus passes when all ten impressions are clean wedges, none smeared or torn. Adjust the cut and test again as needed; the accountants are patient with you.
- Shape and test the folder. Sand your folder blank smooth, point rounded, edges eased. Score three fold lines in scrap card and fold each on the line, finishing with the folder's flat. The folder passes when the creases are crisp and the card's surface is unmarked.
- Store the library. Label and put away your three tools in a chosen place, and return every material sample to dry, flat, safe storage. The drill ends with three working tools made by your own hands, and a bench as Lesson 1 left it.
When all three tools pass their tests, the foundation is complete: you can measure, cut, join, glue, and choose materials, and you can make a tool when the shelf lacks one.
Reed pen — cut and tip template
Folder — profile template
Assignment Manual
Assignment key: ✎ written work · ⚒ hands-on practical · ◐ both
Assignment I ⚒ — The Practice Practical
Complete the drill in this lesson: tour the six material samples and record their characters, then make the reed pen, the wedge stylus, and the folder, and pass each tool's test (ten clean wedges; a working pen line, flat and turned; three crisp folds with unmarked surfaces). Your three tools are the record of the drill.
Assignment II ✎ — The Material Confesses
Choose one household object and identify its material family from this lesson. Write a short report: the family, two properties of that material the object's maker was relying on, one way the object will eventually fail because of that material, and why no other family on the library's shelves would have served better. Keep it to a page.
Assignment III ◐ — A Shelf of One's Own
Design the storage for your own materials at home: a box, shelf, or corner arranged as a small library, with a place and a label for each family you actually own. Build or arrange it, then write a short account of your decisions, including what you decided not to keep, and why, in light of the sealed note. Photograph or sketch the finished shelf.
Materials
Level One (household)
- For pens: a length of bamboo garden stake, reed, or thick hollow stem; or a wide craft straw for the first attempts
- For styli: craft sticks, a length of wooden dowel, or a thick straw, plus a ball of air-dry or natural clay, or firm dough, to test in
- For folders: a strip of hardwood scrap, a plastic plant label, or a stiff plastic ruler end, and sandpaper in two grits
- A craft knife (Lesson 3's rules, adult supervision for young scholars), cutting mat, and straightedge
- Ink, dark watercolor, or thinned paint, and scrap paper for testing
- Samples for the library tour: a wood offcut, a sheet each of two kinds of paper, a lump of clay, a piece of cloth and a length of cord, a metal spoon or offcut, a smooth stone
Level Two (historical)
Everything in Level One, plus:
- True reed (Phragmites or bamboo of pen thickness) and a traditional penknife for cutting it
- A bone or horn folder blank
- A cut reed stylus of Mesopotamian pattern, and properly prepared wet clay for a test tablet
- Storage fittings: labels, ties, and boxes, to dress your own materials shelf as a small library
Both levels teach the same craft: knowing materials by hand and eye, and making the three tools from them. Level One substitutes household stock freely; the tools work the same, which is rather the point of the lesson.
Reflection Questions
Answer the following questions in your workbook.
- Which material family surprised you most when you handled it, and what did you learn that reading about it had not taught you?
- Why do you think the earliest writing tool we know was a cut stem pressed into mud, and what does its success say about simple tools well understood?
- Your reed pen will fray and need recutting; your stylus will dull. How does maintaining a tool you made differ, in feeling and in care, from replacing one you bought?
- Which rule from the sealed note does your own household's storage most need, and what would obeying it cost?
- Looking back over Unit I: which foundation skill do you most want more practice in before Unit II spends it, and what drill from this unit would give it to you?
Professor's Review
Scholars, look at your bench. Three tools sit there that did not exist this morning, made by your hands out of stem, clay's companion reed, and scrap, and every one of them has ancestors older than Rome.
That completes the foundation. You can set up a bench and keep its covenant. You can measure, mark, level, and plumb. You can cut with the work secured, bore and fasten, fit a joint that needs no hardware, choose a glue and obey the rules of heat, handle glass, and read a material's character well enough to make a tool from it. Every lesson from here to the capstone spends these six lessons' skills, and now they are yours to spend.
Unit II puts them to work at once. Across the castle, scholars are keeping journals, sky logs, and specimen records in loose sheets that blow about and tear. We are going to learn paper and board, binding and boxes, and start giving those records the covers they deserve.
Put your tools away in their places, scholars. You know the drill.
PROFESSOR COGBRANCH TIMBERCLANK
Creative Arts Workshop
Master Artisan, Head of House Occidens
Cross-Class Connections
Runes · Unit I, Lesson 1 — Cuneiform — The Structural Wedge
Runes · Unit II, Lesson 6 — Aramaic
Runes · Unit V, Lesson 17 — Roman Cursive & Uncial
You have made the tools in the Workshop: the wedge stylus, the reed pen. In my classroom those tools take up their proper work. Press the wedge into clay and write as the first scribes wrote; split the reed as my Aramaic scholars do, with the making lesson from your own bench behind the cut. A note in my lessons sends my scholars to you for the making; this invitation sends you to my tablets for the writing.
PROFESSOR THISTLELOOM WEBBLETHORN
Runes & Ancient Writing

Scrollwork · Unit I, Lesson 2 — Reed Pens & Feather Quills
Scrollwork · Unit III, Lesson 9 — Feather Structure & Curing
The Workshop teaches you to choose the reed and prepare the stock; my library teaches the pen itself: its cut, its cure, its temper on the page. Bring the materials knowledge of your Lesson 6 and come learn what a well-made pen does in a scribe’s hand, from the first reed pens of the course to the curing of a feather that will hold its point.
PROFESSOR QUILLBERRY NOCTURNE
Scrollwork Library
Further Reading & Sources
Encyclopaedia Britannica. "Cuneiform." On the earliest writing system, its wedge-shaped signs, and the reed stylus that made them.
Encyclopaedia Britannica. "Paper." On the history of papermaking, from Cai Lun's China through the Islamic world to Europe.
The British Museum. Mesopotamia and ancient writing collections. Cuneiform tablets and the tools that produced them, displayed with the museum's learning resources on early writing.
The Metropolitan Museum of Art. Heilbrunn Timeline of Art History. Essays on the art and writing of the ancient Near East and Egypt, including scribes and their equipment.
Student-friendly starting points for exploring this lesson's world. All links verified October 2026.
- The British Museum, "Writing" learning resources. How early writing worked and what it was written with, tablet by tablet.
- Smarthistory, essays on cuneiform and ancient Near Eastern art. The world of Uruk and the accountants who invented writing to keep its books.
- University and museum bookbinding guides. Many binders' guilds and rare-book libraries publish introductions to the binder's tools, the bone folder first among them.
- Cuneiform Digital Library Initiative (CDLI). Hundreds of thousands of real tablets from museums around the world, photographed and catalogued to explore — the Flood Tablet and the Code of Hammurabi among them.
- The Electronic Text Corpus of Sumerian Literature (ETCSL), University of Oxford. The oldest literature in the world in English translation: hymns, proverbs, and school texts written by the first scribes, in the script this lesson teaches you to cut a stylus for.
Submit your work for this lesson using the form below.
THE UNIT I QUIZ
CREATIVE ARTS WORKSHOP · UNIT I: THE WORKSHOP FOUNDATION
This quiz covers all 6 lessons of Unit I — The Workshop Foundation. Complete it from memory, in one sitting if you can, before consulting your lesson notes — it is a measure of what has stayed with you, not of what you can look up.
The quiz has two parts. Part I gathers the lesson questions, grouped by the lesson they came from. Part II is a vocabulary matching exercise drawn from the unit’s lessons. When you have finished, score it honestly, note the result in your workbook, and revisit any lesson whose questions went wrong before you move on.
CONTINUE IN THE CREATIVE ARTS WORKSHOP
← Previous · Lesson 5: Adhesives, Heat, Wax & Glass Next · Lesson 7: Paper, Card & Board Construction →
Unit I · The Workshop Foundation Creative Arts Workshop · All 39 Lessons
Bookstore Shelf The Library · Creative Arts Shelf Course Supplies
The rest of Unit I: Lesson 1 · Welcome to the Creative Arts Workshop · Lesson 2 · Measuring, Marking & Leveling · Lesson 3 · Cutting, Scoring & Clamping · Lesson 4 · Piercing, Drilling & Fastening · Lesson 5 · Adhesives, Heat, Wax & Glass
From the Workshop Shelf
The printed companions to this lesson, from Professor Timberclank’s shelf in the shop.