

Creative Arts
Unit I, Lesson 4Piercing, Drilling & Fastening
Professor Cogbranch Timberclank
Master Artisan, Head of House Occidens
The Creative Arts Workshop • School of Evershade
Professor's Introduction

Set up your bench, scholars. Lessons 2 and 3 taught you to measure and to cut. Today we learn the other two things makers do to material: make holes in it, and persuade separate pieces to become one piece.
Fastening is where beginners reveal themselves. Anyone can put two boards together. The maker's question is whether they will still be together, tight and true, in ten years, in fifty, in five hundred. The shipwrights and furniture makers of the ancient world answered that question so well that we are still taking their work apart to see how they did it, and the most surprising part of the answer is how little of it needed metal.
By the end of this lesson you will have bored holes with tools older than Rome, driven modern screws with a clear conscience, and fitted three joints in scrap wood that hold with no hardware at all: a notch, a lap, and a peg. Level One scholars will fasten with screws and brackets, and there is no shame in it; the screw is a good servant. Level Two scholars will fit the joint so the wood holds itself. Both produce the same finished piece, and fitting the joint is the way that teaches why the piece holds, which is the point of the lesson.
PROFESSOR COGBRANCH TIMBERCLANK
Creative Arts Workshop
Master Artisan, Head of House Occidens
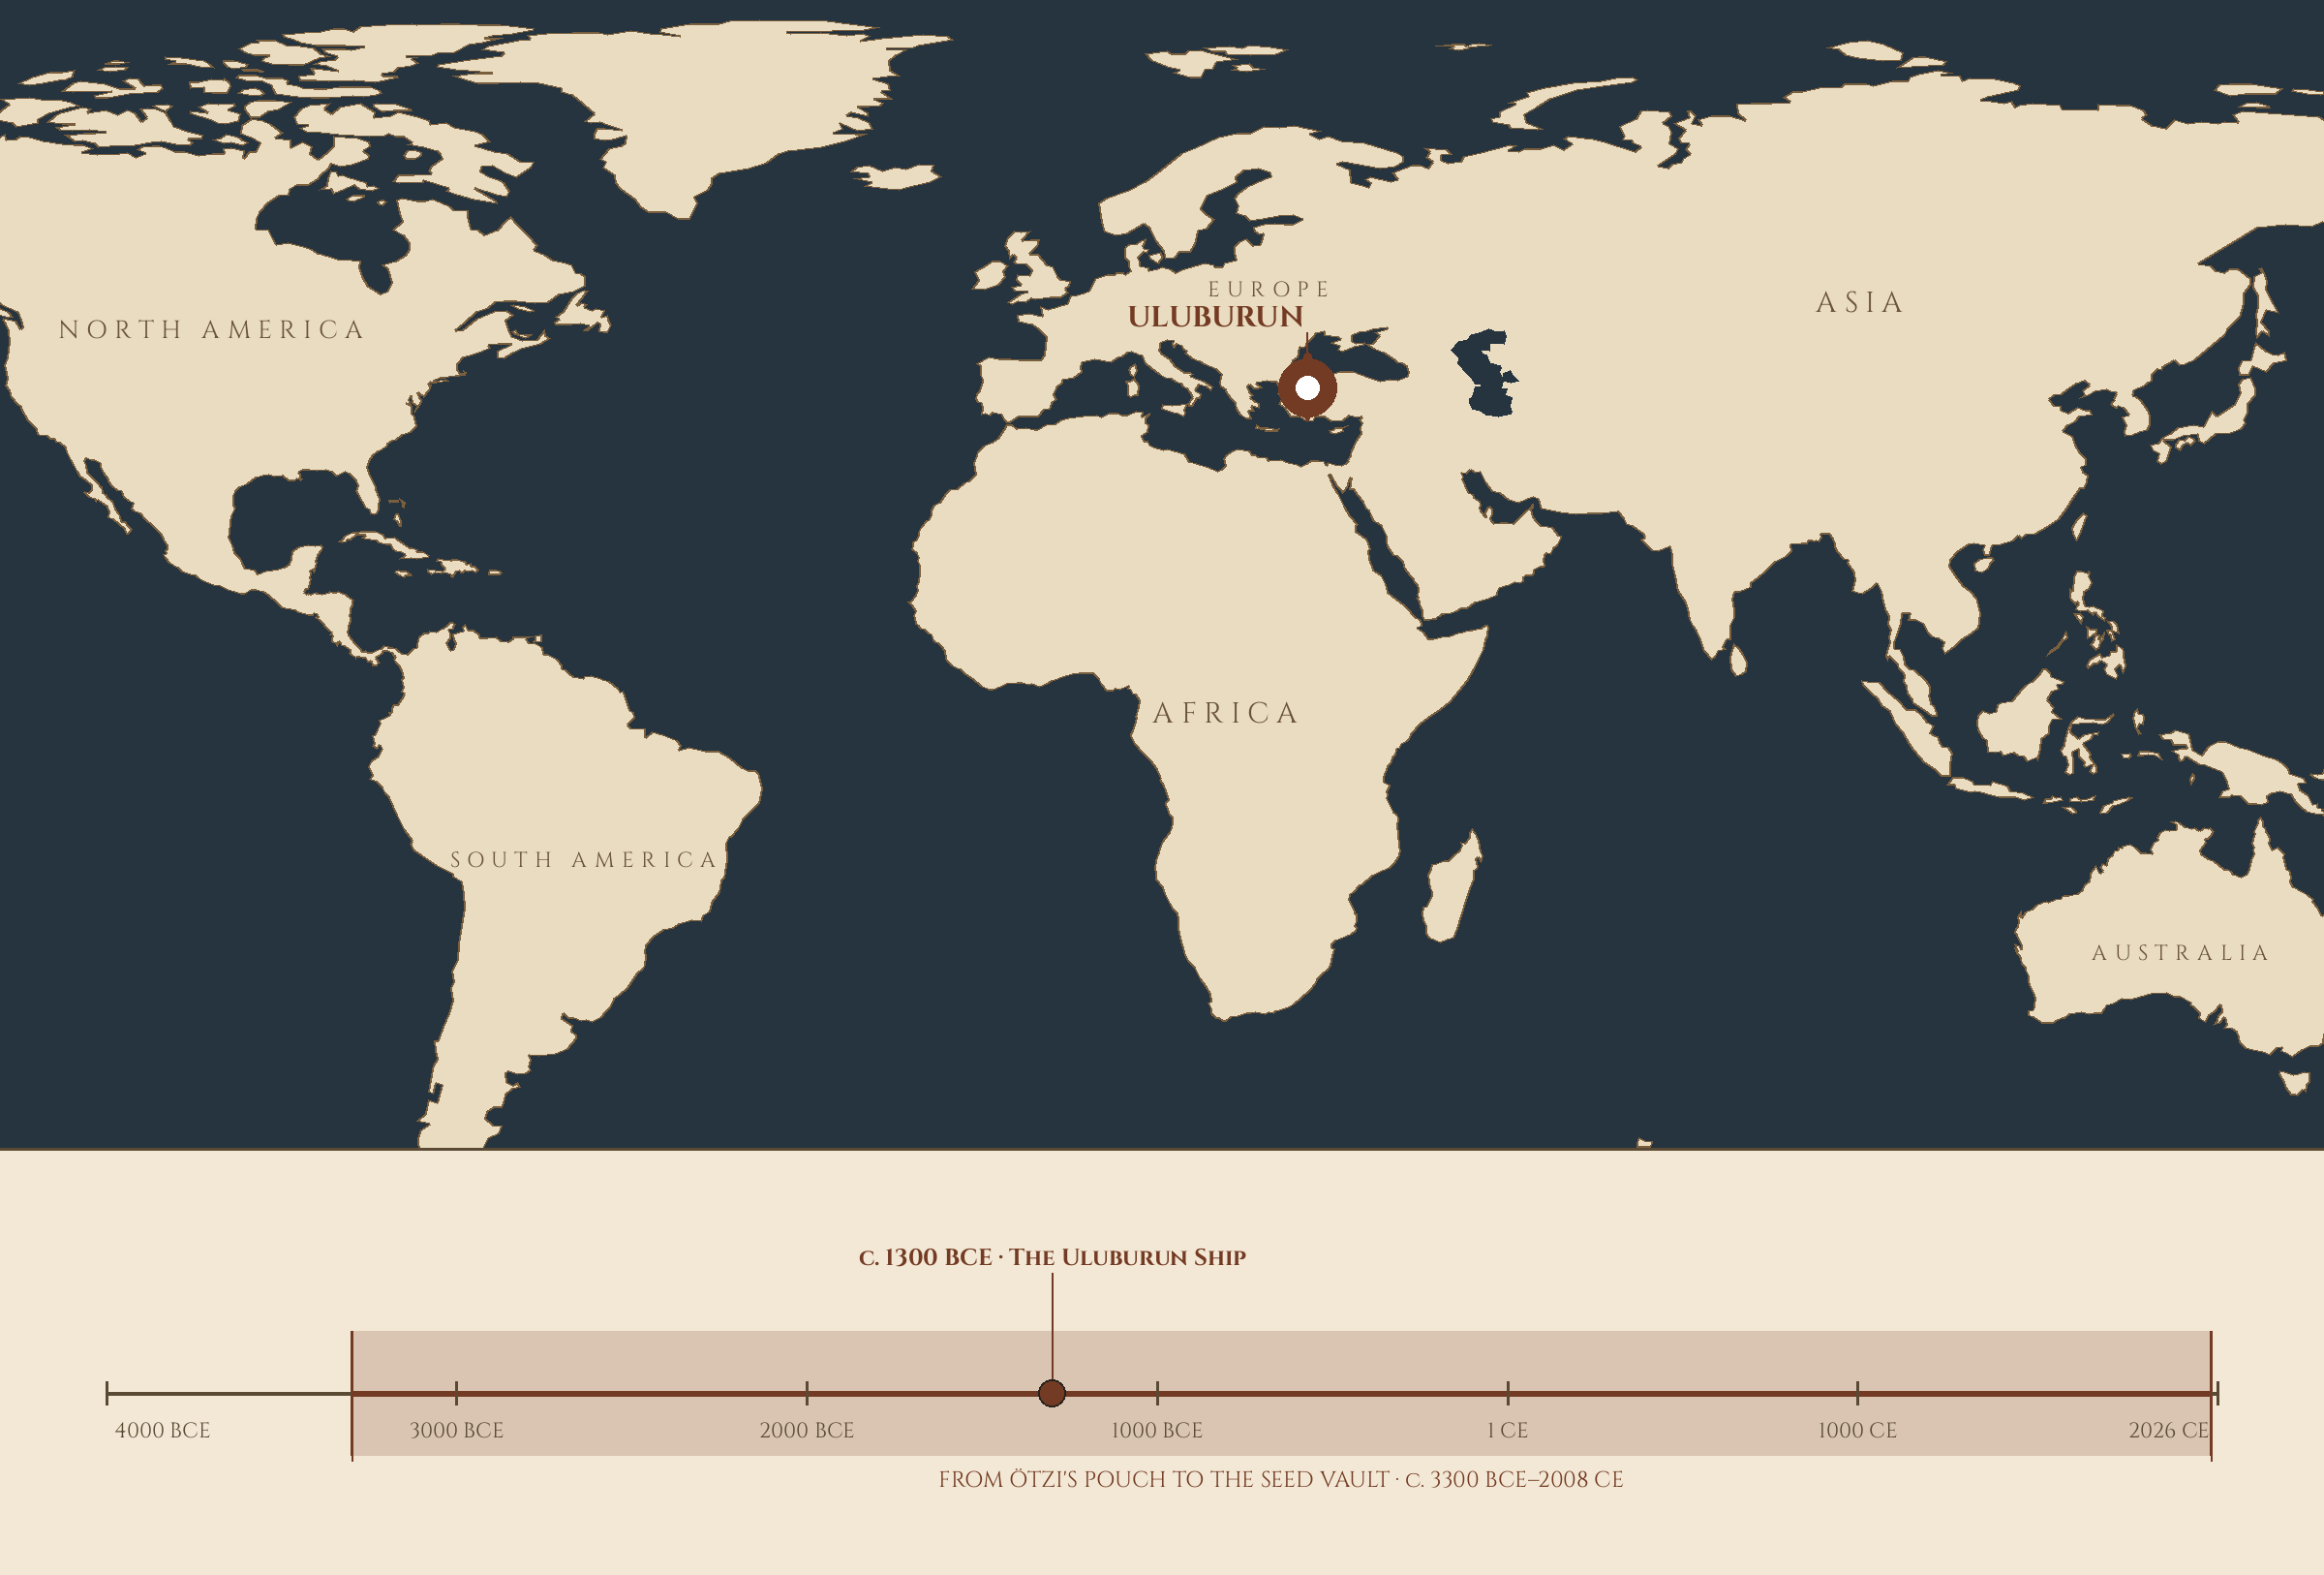
Where and when: Uluburun, off the south coast of Türkiye — c. 1300 BCE, the Uluburun ship.
Lesson Objectives
By the end of this lesson, students should be able to:
- Pierce clean holes with an awl and drill true holes with a hand drill, using a pilot hole where the work calls for one.
- Explain why pilot holes prevent splitting and guide screws, and choose a pilot size sensibly.
- Drive brads and screws straight and seat them correctly in offcuts.
- Lay out and fit three hardware-free joints in scrap: the notch, the lap joint, and the pegged joint.
- Describe the history of the bow drill, the brace, and joinery from Egyptian furniture to the Uluburun ship.
- Explain why screws were rare and expensive for most of history, and what changed in the late eighteenth and nineteenth centuries.
Your Assignment Packet
This lesson's assignments live in its packet: the Lexicon Handout (every term, course terms marked ◆), the Assignment Manual, and the Reflection Questions. Download the packet before you begin and keep it beside you as you read — work from it as each subject is taught, or take the assignments as homework afterward.
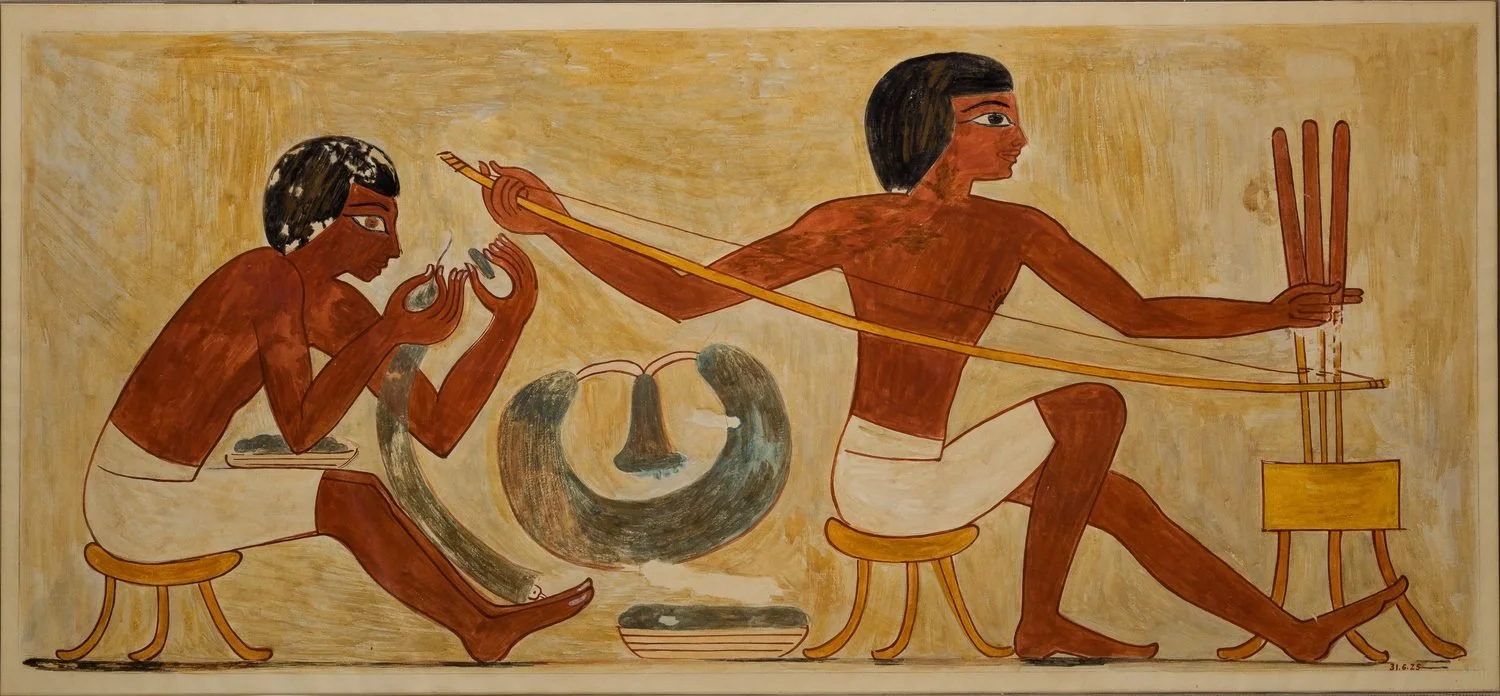
Facsimile painting (Nina de Garis Davies) of an Egyptian workshop scene from the Tomb of Rekhmire: one craftsman stringing a beaded collar while another drills holes in stone bead disks with a bow drill.
The Metropolitan Museum of Art (Object 31.6.25), Open Access (CC0).
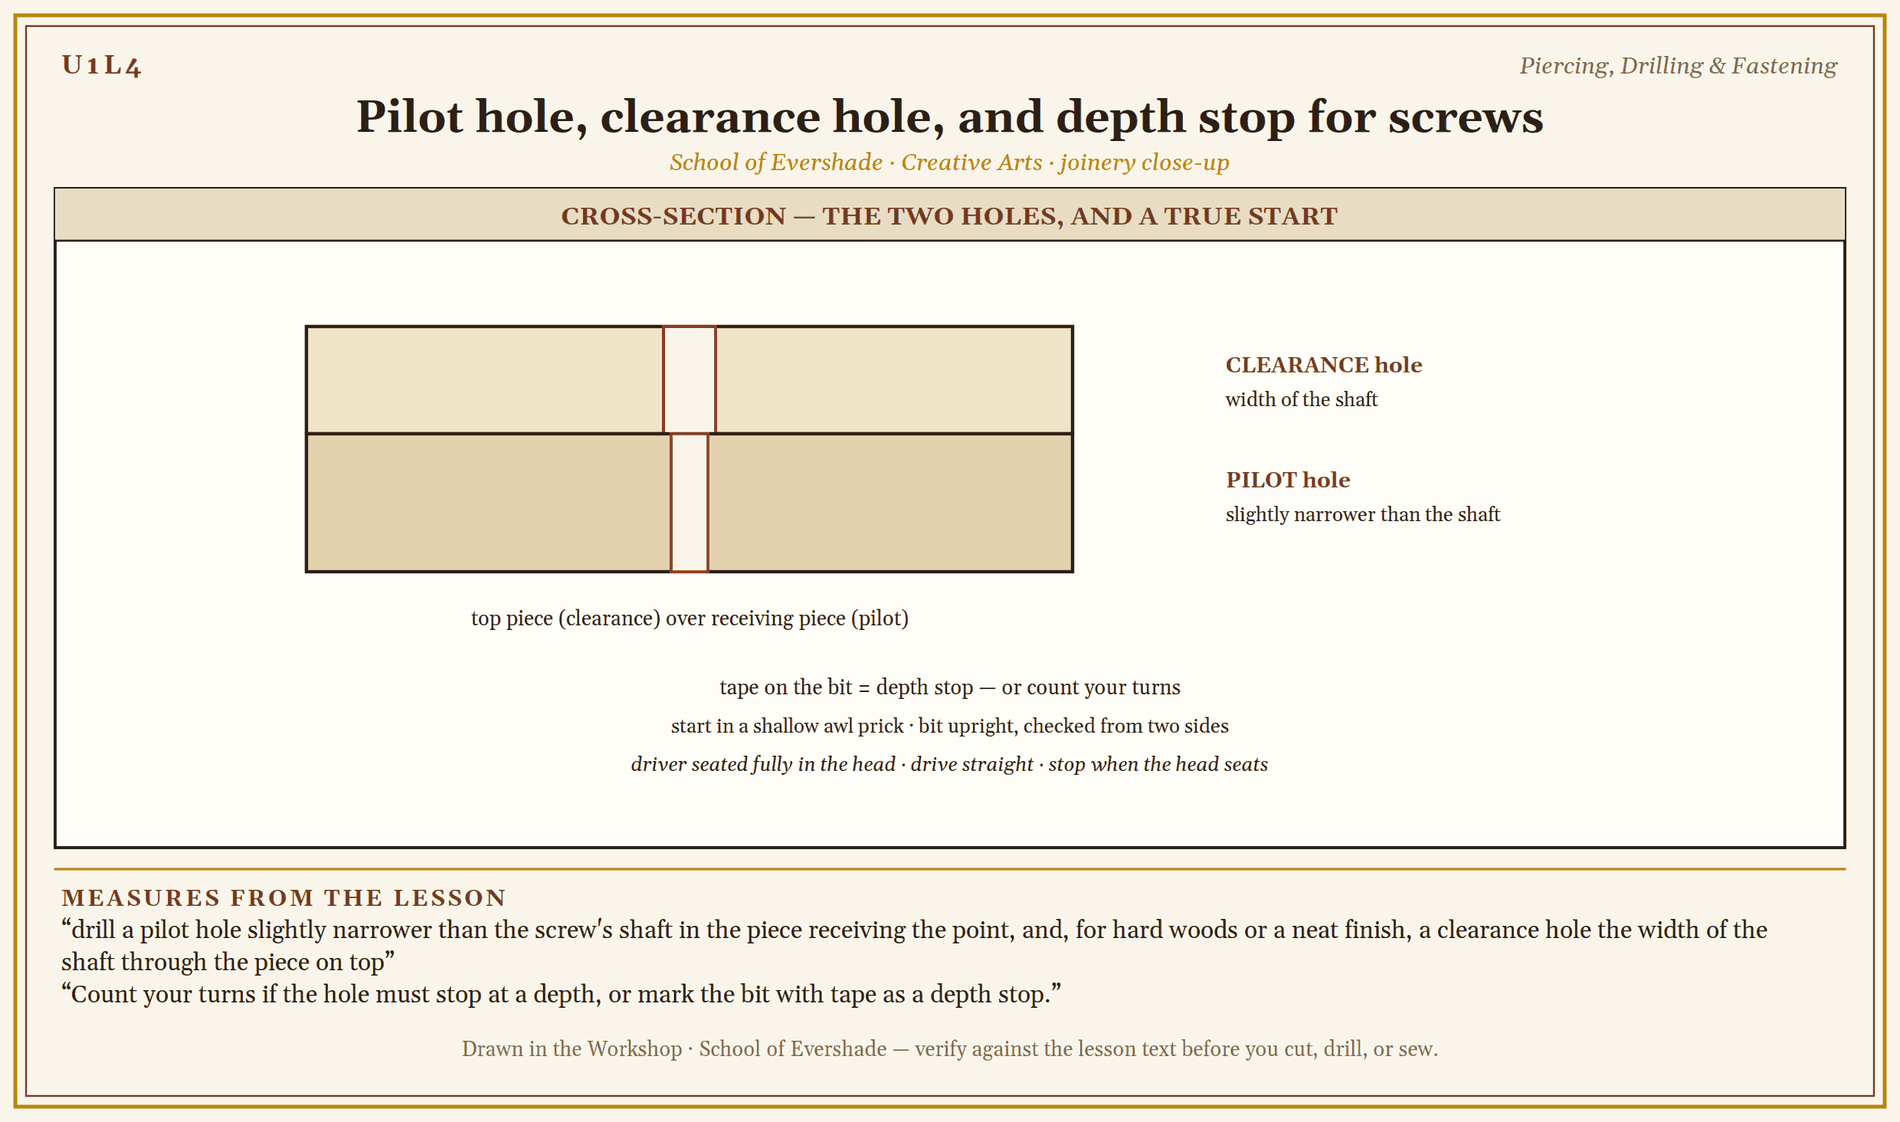
Pilot hole, clearance hole, and depth stop for screws
Holes Through History
The awl is ancient beyond record: pierced hides for clothing and shelter were sewn with bone awls tens of thousands of years ago, and the tool has never needed redesign. The drill took longer to grow up. The bow drill, a spindle rotated by a bow whose string wraps around it, was in use in ancient Egypt, where tomb paintings show craftsmen drilling with it, one hand working the bow, the other bearing down on the cap; the same tool, spun against a hearth board, made fire by friction across much of the world. The pump drill, worked by pumping a crossbar that a flywheel keeps spinning, followed in various cultures. Rome had its drills for the surgeon and the carpenter alike.
The brace, a crank-shaped tool that turns a bit with the whole arm's leverage, appears in European workshops by the early 1400s and stayed the carpenter's main drilling tool for five hundred years, joined later by the hand drill with its turned handle and gears. The power drill on a modern bench is barely over a century old. The holes it makes are identical to the bow drill's. Only the effort changed, and effort, as this workshop keeps pointing out, is information: the scholar turning a brace feels the grain resist, hears the bit work, and learns the wood in a way the scholar squeezing a trigger does not.
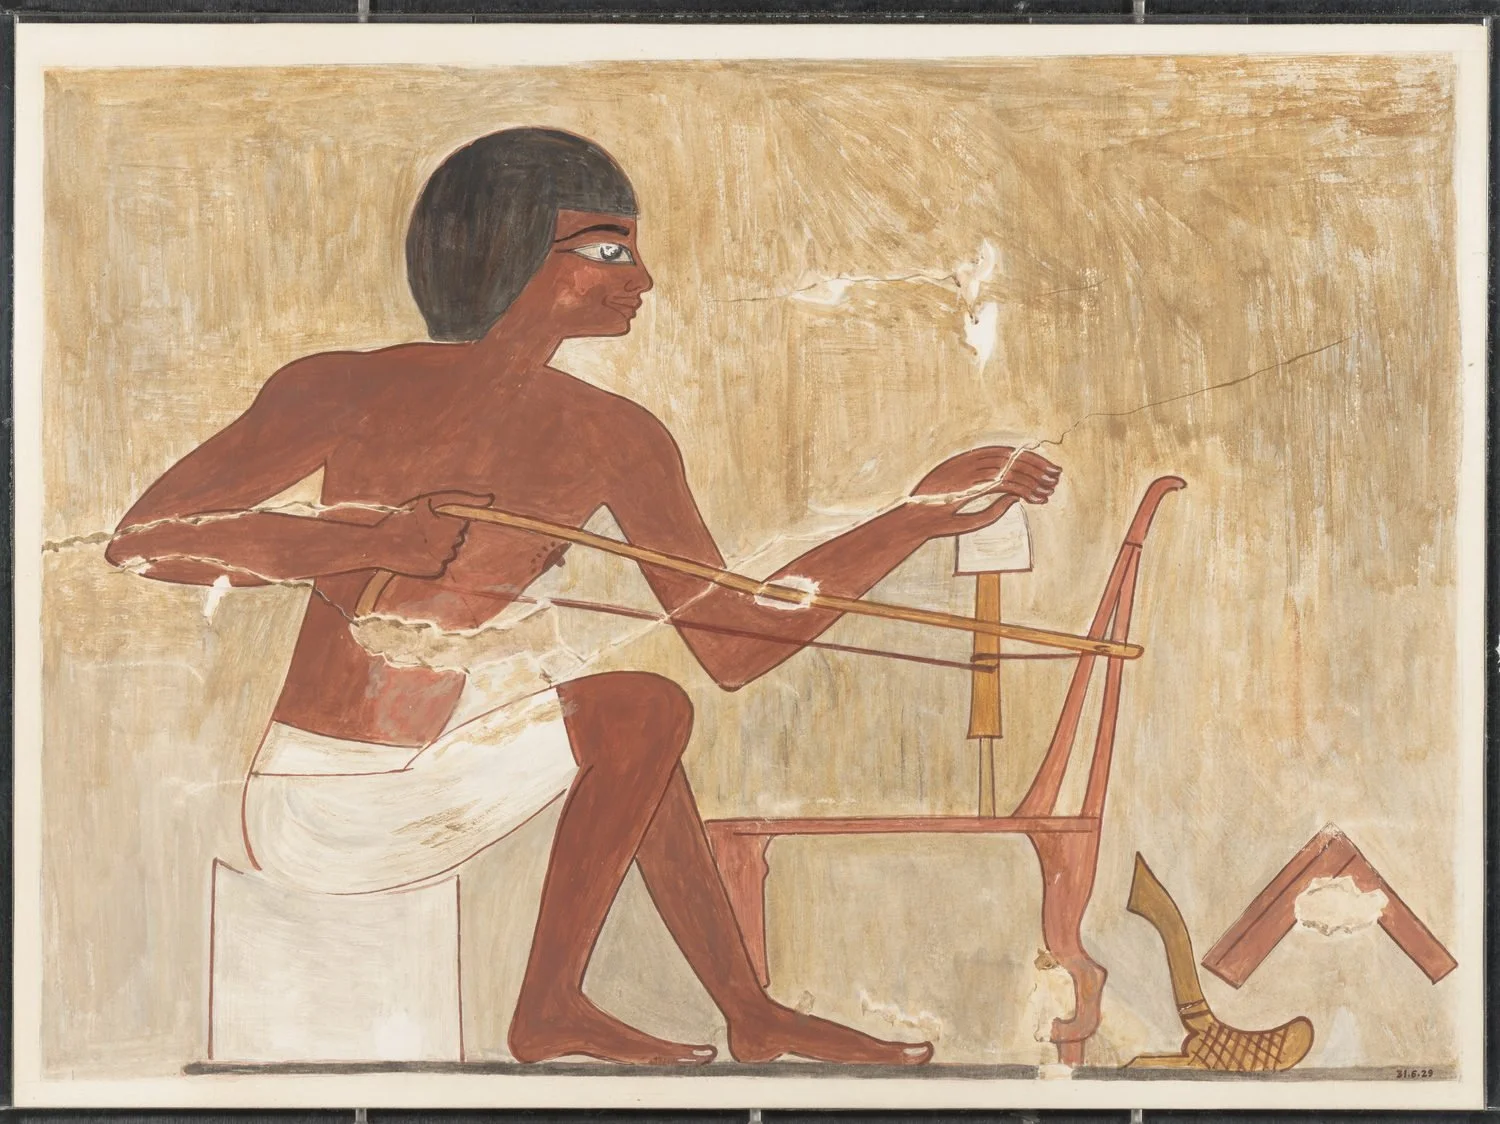
Facsimile painting of a carpenter drilling holes in a chair frame with a bow drill; his adze and level lie on the ground behind the chair.
The Metropolitan Museum of Art (Object 31.6.29), Open Access (CC0).
Pegging the lap, and the drawbore
Joinery: The Fastening That Needs No Hardware
Now the heart of the lesson. For most of history, iron was expensive, steel more so, and screws were handmade luxuries. Wood, however, was everywhere, and makers learned to fasten wood with wood.
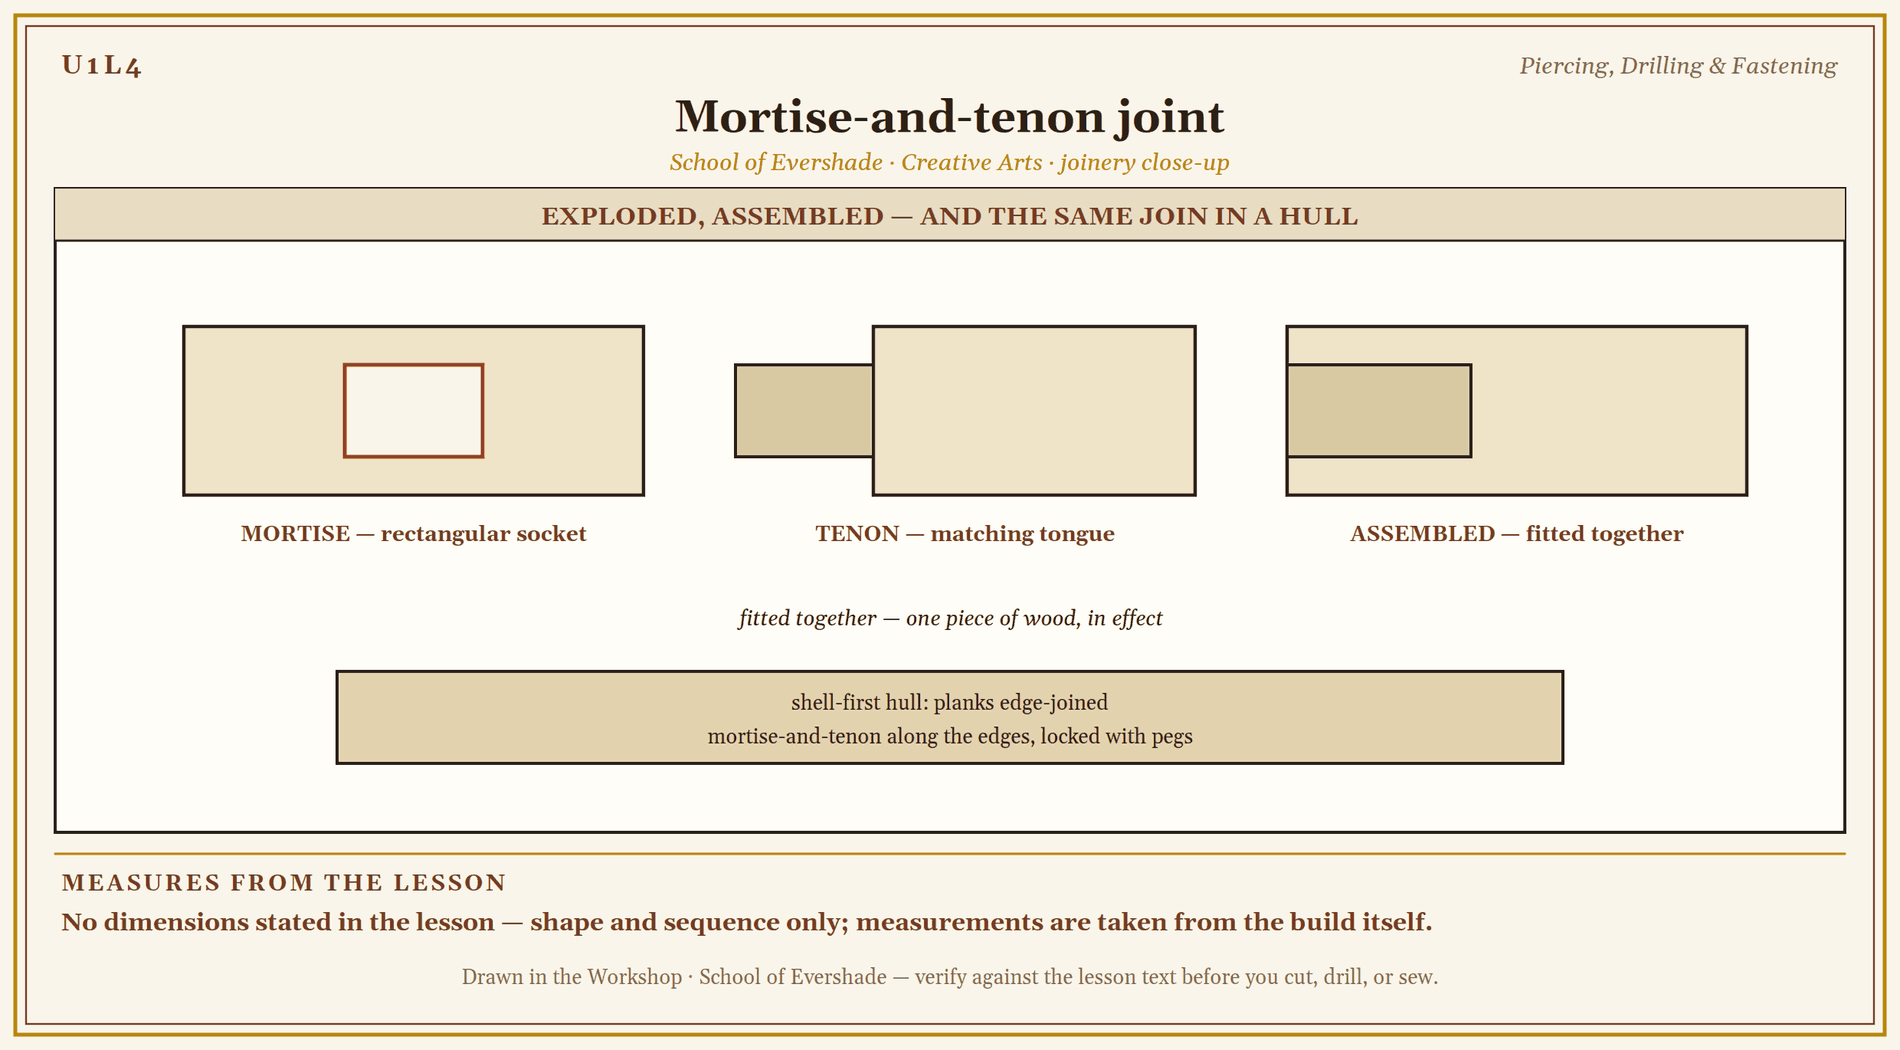
Ancient Egyptian furniture, some of it well over four thousand years old, is joined with mortise and tenon, with dovetails in fine boxes, with dowels and lashings, and it sits in museums today with its joints still tight. A mortise and tenon is the classic joint: a rectangular socket (the mortise) cut into one piece, and a matching tongue (the tenon) cut on the other, fitted together. The most famous proof is a ship. The Uluburun ship, a Late Bronze Age vessel that sank off the coast of what is now Turkey around 1300 BCE, was built shell-first: her hull planks were edge-joined to one another with mortise-and-tenon joints, thousands of them, locked with pegs, a technique the Phoenicians and Greeks after her used for centuries of Mediterranean shipping. A ship is a structure under constant working stress, in water, and her builders trusted shaped wood to hold her together. They were right to.
Medieval timber framing raised the same logic to the scale of houses and barns and cathedral roofs: great posts and beams, tenons into mortises, every joint locked with oak pegs, frames that could be, and sometimes were, taken down, moved, and raised again. Shipbuilders clinched their planks with iron rivets in the northern clinker tradition, but fastened frames to planking with treenails, wooden pegs that swell with the sea's damp and tighten rather than rust. Japanese carpenters carried joinery to its most elaborate form, cutting complex interlocking joints for temples and houses that use almost no nails at all, and are designed to be disassembled for repair. That last idea is the workshop's favorite: a joint that can come apart can be mended, and a structure that can be mended can last indefinitely.
The screw, by contrast, is the newcomer pretending to be the default. The screw thread was known in the ancient world, famous in Archimedes' water screw of the third century BCE, but as a fastener the metal screw stayed rare and costly for two thousand years because every thread had to be cut by hand. Only with screw-making machinery, patented in England in 1760 and improved by the screw-cutting lathes of engineers like Henry Maudslay around 1800, did screws become cheap. The nineteenth century flooded the world with them, and hardware became the easy answer. Easy, and often good. But the joint was there first, and where a piece must be strong, repairable, or beautiful, the joint is there still.
This is why Level Two of this lesson fits joints. Not from nostalgia. Because the geometry that held a Bronze Age ship together will hold your shelf together, and because a scholar who has once felt a tenon seat home understands fastening in the hands, not just in the head.
A Sealed Note from Professor Timberclank
Wood splits when it is surprised. Remember that, and you will prevent most of the damage this lesson can do.
A screw driven into the end of a narrow board is a wedge with a thread on it, and it will find the weak place and open it. So we do not surprise the wood. We drill the pilot hole. A pilot hole is a small hole drilled before a screw or nail, sized to guide the fastening and to give the wood room, so the piece does not split. We start the brad with the awl. We bore across the grain where the work allows and ease the fastening home instead of forcing it.
And if a piece splits anyway, scholars, do not hide it in the scrap box and hope. Bring it to the bench. A split board, glued and clamped by the methods of the next lesson, is very often stronger at the mend than it was before. Splitting is information. Like everything else in this room, it is information first.
One word before the saw and the drill come out, scholars, because these tools ask the same respect the blade asked in Lesson 3. Glasses on before you drill or saw: a chip of wood travels faster than a blink. The work is clamped or held fast before any tool touches it, and your free hand stays clear of the road the saw, the chisel, the awl, and the bit will travel, every time. If a cut wanders, a bit skates, or anything feels wrong in your hands, do not push through it. We stop. We make it safe. Then we begin again.
PROFESSOR COGBRANCH TIMBERCLANK
Creative Arts Workshop
Master Artisan, Head of House Occidens
Technique: Piercing, Drilling, and Driving
The awl. Mark the point with a pencil, then set the awl on the mark and press with a slight twist; the point parts the fibers and the hole follows. For leather and card, work over the mat. Keep the holding hand behind the work, never under the point's path: the awl's road, like the blade's, must end in the bench or the air.
The hand drill. Set the work clamped, mark the point, and start the hole with a shallow awl prick so the bit does not wander. Drill with the bit upright, checking from two sides that it stands true, turning steadily rather than fast. Clear the bit often in deep holes. Count your turns if the hole must stop at a depth, or mark the bit with tape as a depth stop.
Pilot holes and screws. For a screw in wood: drill a pilot hole slightly narrower than the screw's shaft in the piece receiving the point, and, for hard woods or a neat finish, a clearance hole the width of the shaft through the piece on top. Drive the screw straight, with the driver seated fully in the head, turning firmly and stopping when the head seats. A screw forced past its seat strips its hole and holds nothing. Brass screws snap if abused; steel screws split wood if unpiloted. Both failures are prevented by the same thirty seconds with a drill.
Brads and pins. Small pins and brads serve light work: trim, thin stock, holding a joint while glue sets. Start them with the awl, tap them home with light blows, and keep your fingers holding the brad with pliers rather than fingertips once it stands near the surface.
Rivets, briefly. A rivet is a metal pin whose end is hammered into a head after passing through both pieces; it fastened armor, tools, ships, and bridges for centuries and cannot be unscrewed, only drilled out. Scholars meet rivets here as readers, not yet as makers; the jewelry and metalwork of Lesson 29 returns to them with small tools.
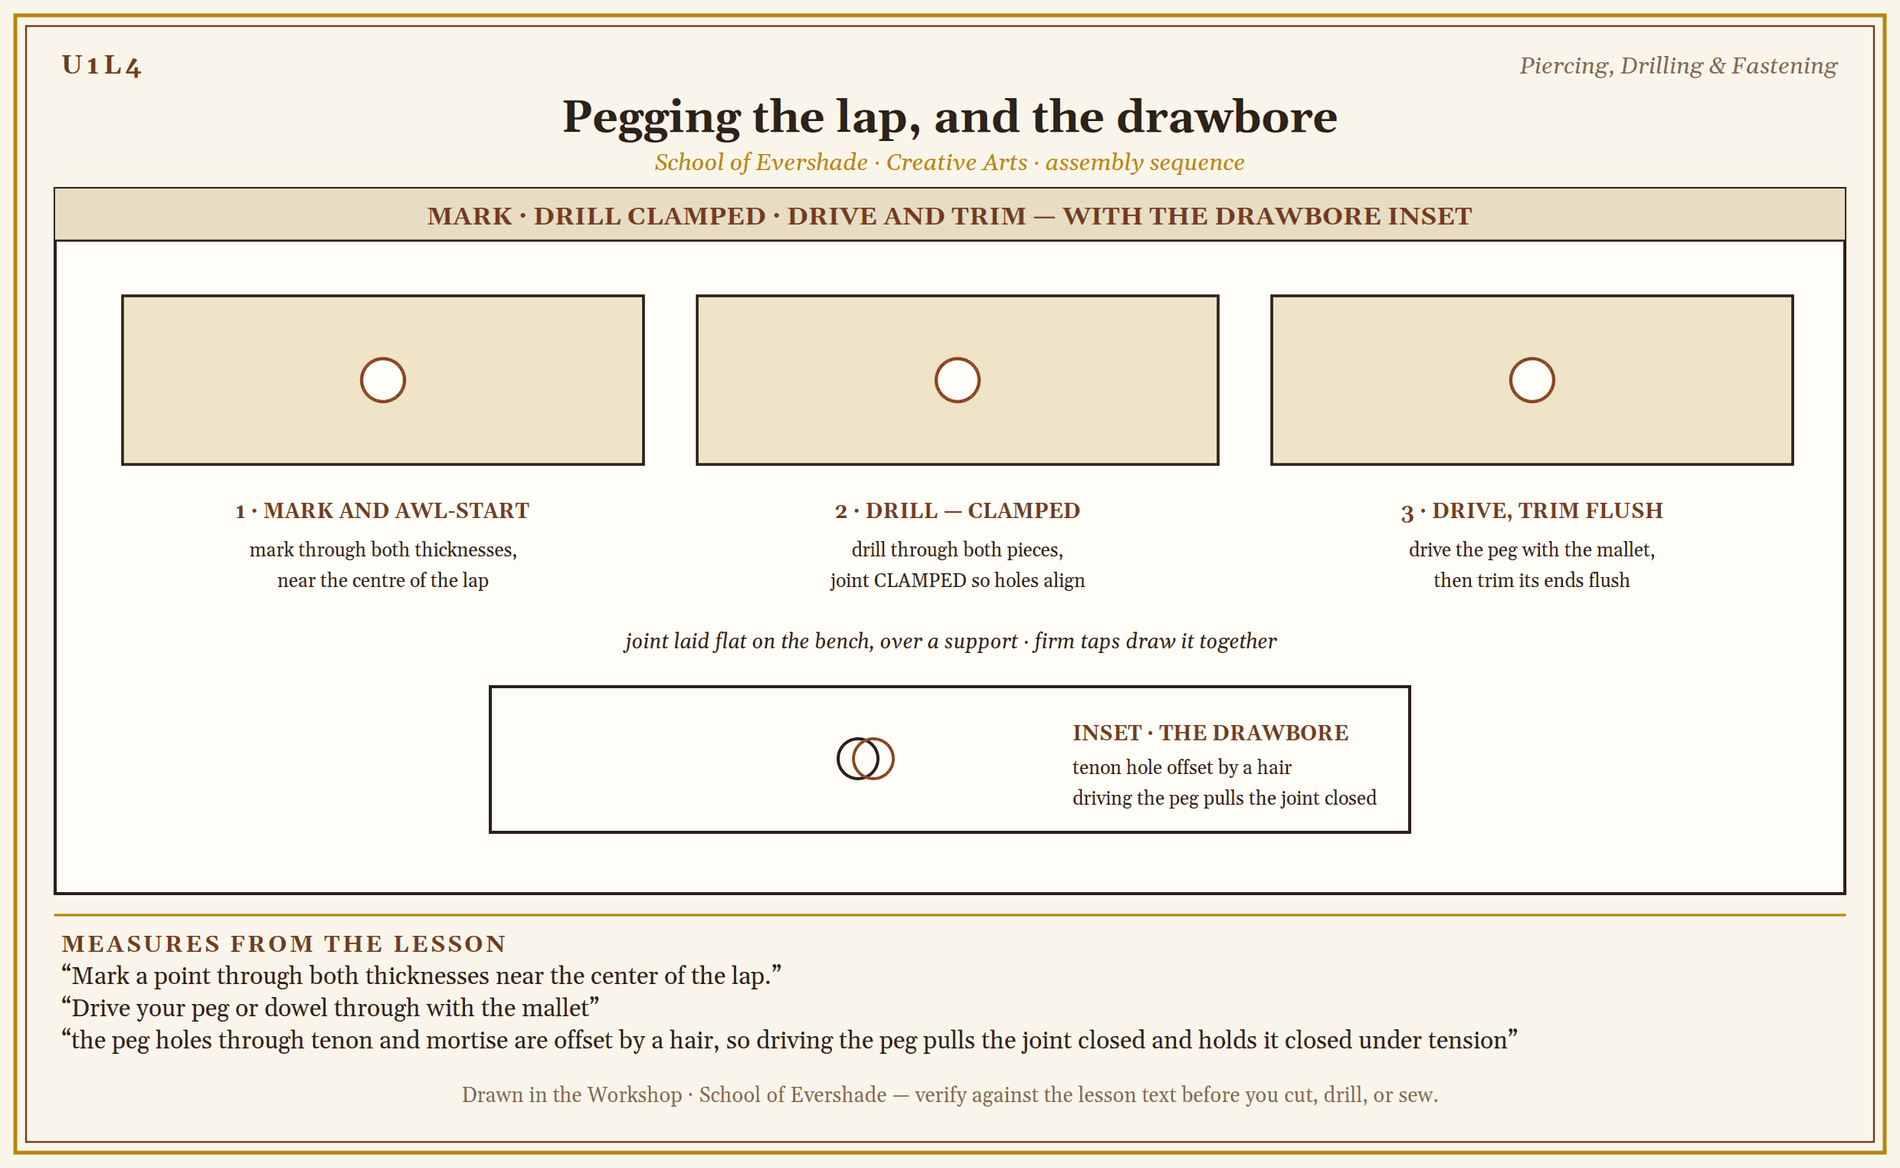
Fitting a joint. Layout comes first, with Lesson 2's marks: knife or pencil lines on every face. Cut to the waste side of the line, test the fit, and pare a shaving at a time. A joint should seat with hand pressure and a tap, not with force. If it will not go, something is still in its way, and force will not remove it politely. The drawbore is a traditional trick of pegged joinery: the peg holes through tenon and mortise are offset by a hair, so driving the peg pulls the joint closed and holds it closed under tension.
Practice Practical: Notch, Lap, and Peg
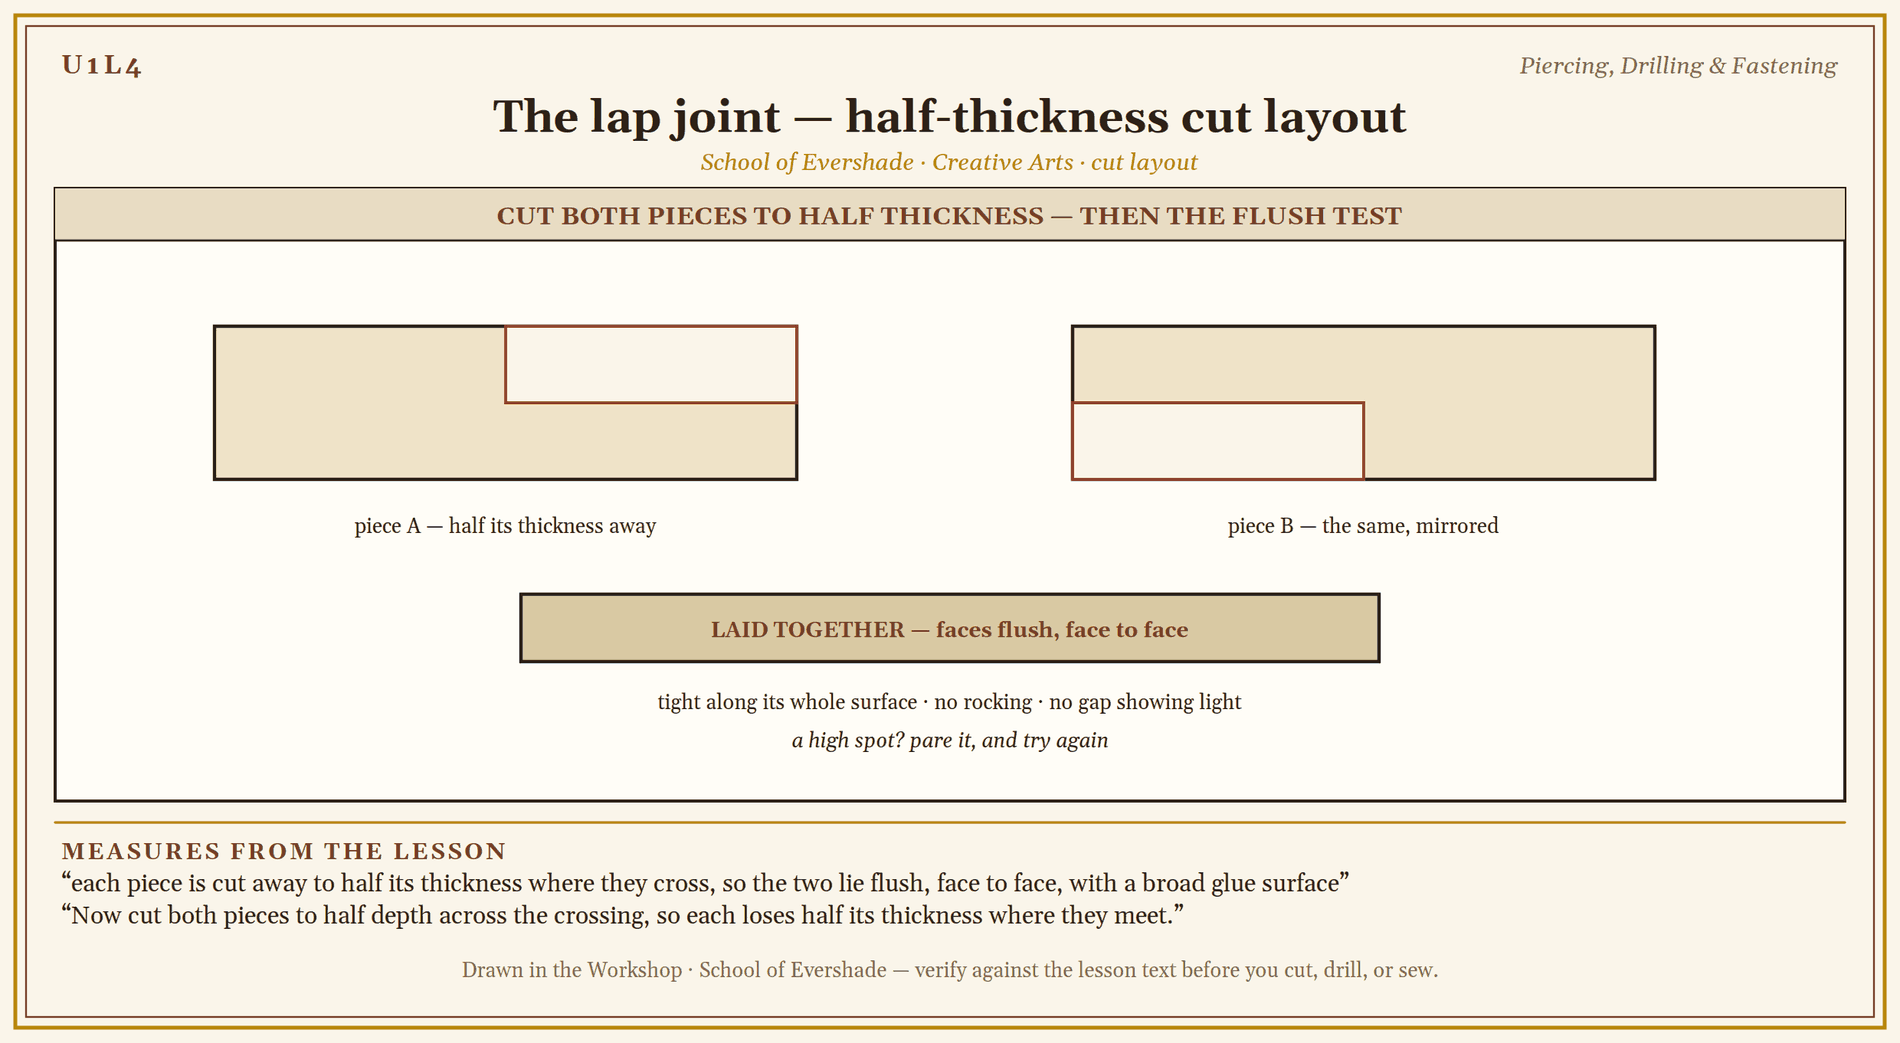
This drill is checked for fit and patience, not for speed. All work is in scrap. A lap joint is a joint in which each piece is cut away to half its thickness where they cross, so the two lie flush, face to face, with a broad glue surface.
One word before the saw and the drill come out, scholars, because these tools ask the same respect the blade asked in Lesson 3. Glasses on before you drill or saw: a chip of wood travels faster than a blink. The work is clamped or held fast before any tool touches it, and your free hand stays clear of the road the saw, the chisel, the awl, and the bit will travel, every time. If a cut wanders, a bit skates, or anything feels wrong in your hands, do not push through it. We stop. We make it safe. Then we begin again.
- Layout. Bench drill first. Choose two similar pieces of scrap. With square and pencil, lay out a cross on both: mark where they will cross, and the width of each on the other. Measure twice. Your Lesson 2 marks are the plan.
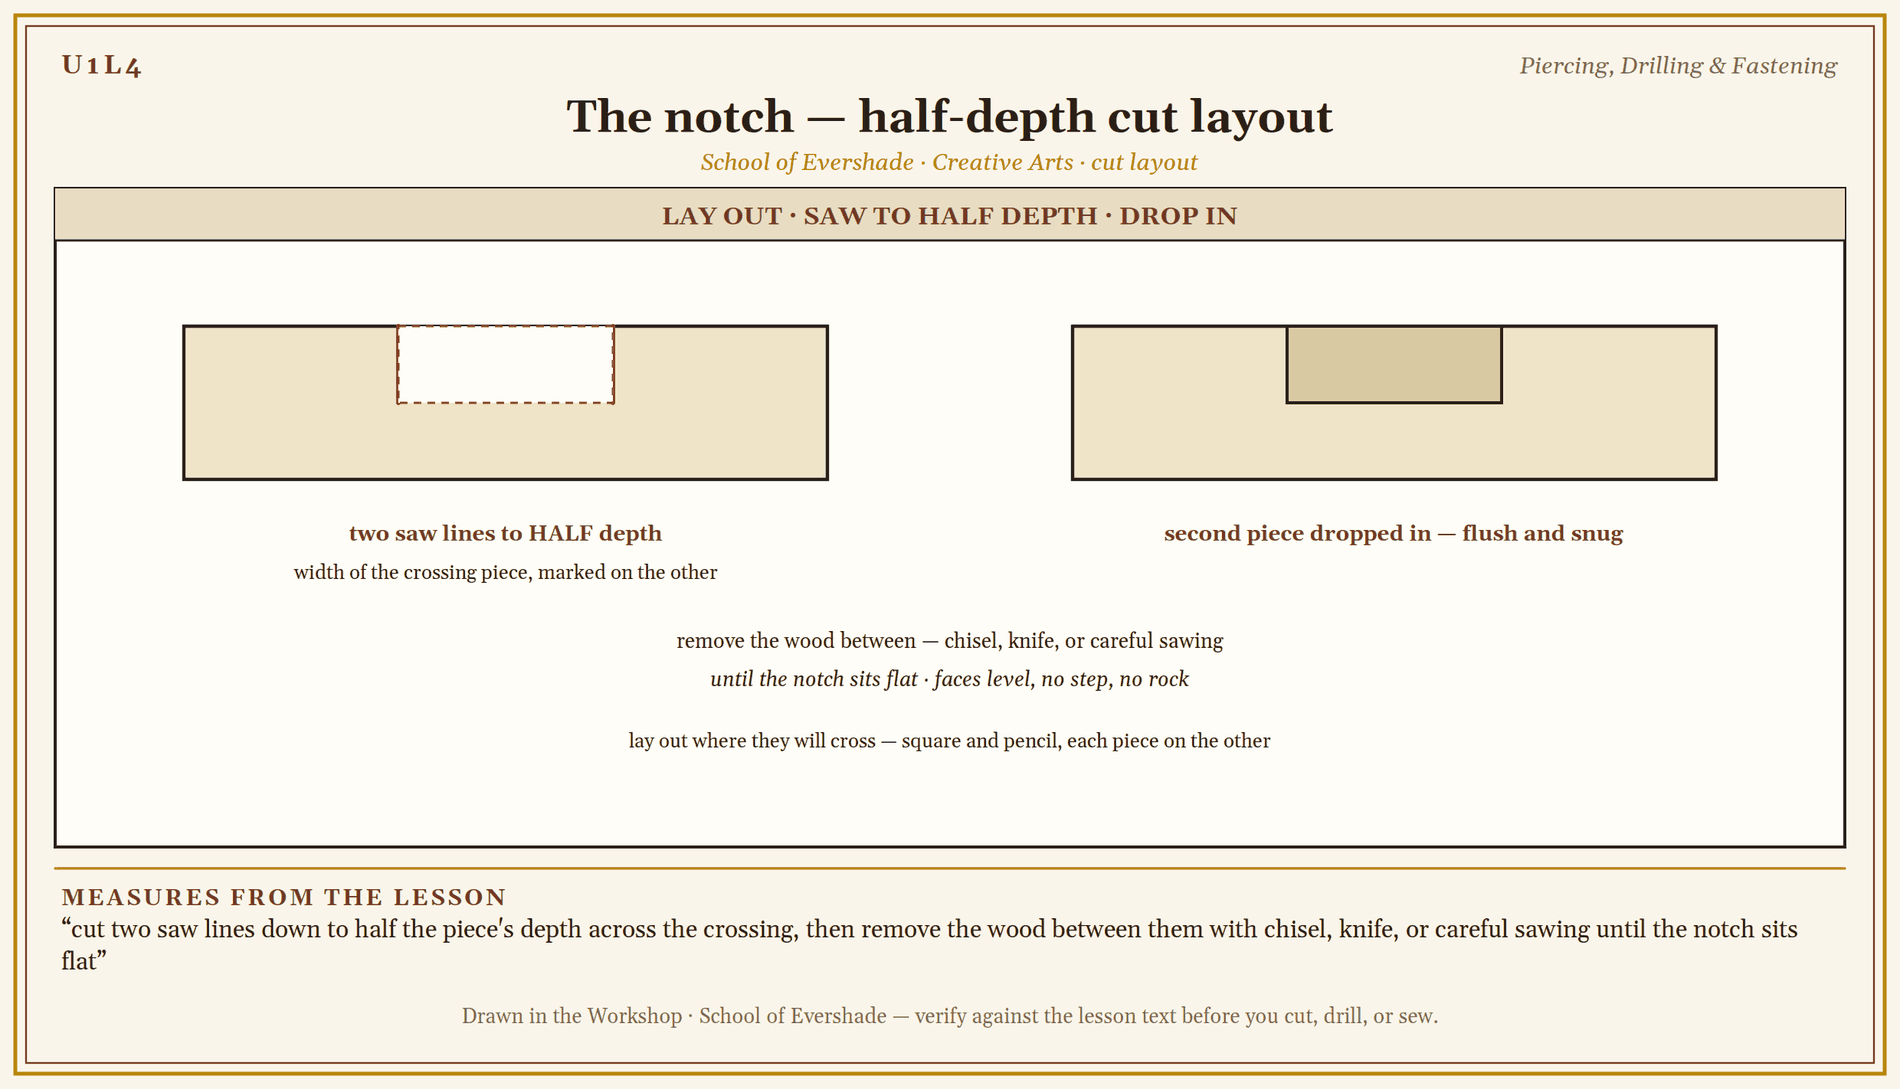
- The notch. On one piece, cut two saw lines down to half the piece's depth across the crossing, then remove the wood between them with chisel, knife, or careful sawing until the notch sits flat. The second piece should drop into the notch and sit flush and snug. Pare a shaving at a time; a notch cut too deep cannot be uncut, but it can be packed and learned from.
- The lap. Now cut both pieces to half depth across the crossing, so each loses half its thickness where they meet. Lay them together: the faces should sit flush, the joint tight along its whole surface. Adjust by paring the high spots. A good lap is a quiet thing: no rocking, no gap showing light.
- The peg. Lay the lapped joint flat on the bench over a support. Mark a point through both thicknesses near the center of the lap. Awl-start it, then drill through both pieces with the hand drill, holding the joint clamped so the holes align. Drive your peg or dowel through with the mallet: firm taps, watching the joint draw together as the peg seats. Trim the peg's ends flush.
- Pilot and screw practice. In a separate offcut, drill a pilot hole and drive a screw until its head seats; then, in a second offcut of the same scrap, try driving the same screw with no pilot hole, carefully, stopping at any sign of a split. Compare the two honestly and write down what the pilot hole bought you.
- Record and put away. Keep the pegged lap joint as your drill piece, labeled with the date. Note in your workbook where each joint is loose, tight, or true. Tools away, bench clean.
When your pegged joint holds both pieces firm with no hardware but a wooden pin, your hands have learned what this lesson is for.
Mortise-and-tenon joint
The notch — half-depth cut layout
The lap joint — half-thickness cut layout
Assignment Manual
Assignment key: ✎ written work · ⚒ hands-on practical · ◐ both
Assignment I ⚒ — The Practice Practical
Complete the drill in this lesson: a notched piece, a lapped and pegged joint, and the pilot-hole comparison, all in scrap. Your labeled, pegged joint is the record of the drill.
Assignment II ✎ — The Shipwright's Evidence
Using the lesson and the sources below, write a short account of how the Uluburun ship was fastened and why that matters to a woodworker today. Include: what mortise-and-tenon construction means when applied to a hull, what the pegs did, and one lesson a modern scholar building a shelf can take from a Bronze Age shipwright.
Assignment III ◐ — The Hardware Drawer
With permission, inventory the fasteners in one household drawer, toolbox, or jar: screws, nails, brads, bolts, pegs, and anything else. Sort them, count the kinds, and write a short piece identifying which three kinds your household uses most, what each is good at, and which one job in your home was done with a joint instead of hardware, if you can find one. Photograph or sketch your sorted fasteners.
Materials
Level One (household)
- An awl or bradawl, and a hand drill (eggbeater type) or a battery drill on its slowest setting, used with an adult's permission and supervision
- A selection of small drill bits, screws, brads, and a screwdriver that fits them
- Scrap wood: offcuts, craft sticks, an old crate or pallet board (checked for nails and staples), for the trial joints
- A saw suitable for your scrap (a small handsaw or pull saw, with adult supervision), clamps, a pencil and square for layout
- Wooden pegs: short lengths of dowel, or whittled pegs, plus matchsticks or toothpicks for small trials
- Safety glasses for drilling
Level Two (historical)
Everything in Level One, plus:
- A brace and bits, or a bow drill setup for demonstration
- Oak, ash, or fruitwood dowel for true treenails
- A mallet for driving pegs and seating joints
- Beeswax, to ease screws in the old manner
- Hardwood scrap of decent quality, worthy of a careful joint
Both levels teach the same craft. Level One fastens with screws and brackets where that serves; Level Two fits the joint so the wood holds itself. Either scholar's trial joints, made in scrap, are the deliverable of the drill.
Reflection Questions
Answer the following questions in your workbook.
- Where did your first joint go wrong: layout, cutting, or patience? How do you know?
- Why did the pilot-hole screw behave differently from the unpiloted one, in your own words?
- Why did expensive metal make wooden joinery so highly developed? What would our furniture look like if screws had always been cheap?
- A pegged joint can be knocked apart and repaired; a glued and screwed joint often cannot. When is each the better choice?
- Which of this lesson's tools felt oldest in your hands, and did its age make it harder or easier to trust?
Professor's Review
Your pegged joint is a small, honest thing, and it is in very old company.
You have pierced with the awl, drilled with your own arm's turning, driven screws the considerate way, and fitted wood to wood so it holds itself. You know why the Bronze Age trusted tenons in a ship's hull, and why your grandfather's generation was the first that could afford to forget how. Forgetting is permitted, scholars, but understanding is better, and your hands understand now.
Next lesson takes up the materials that ask the most respect in the workshop: glue, heat, wax, and glass, including the oldest glue in the world and the rules that keep hot things safe.
PROFESSOR COGBRANCH TIMBERCLANK
Creative Arts Workshop
Master Artisan, Head of House Occidens
Further Reading & Sources
Institute of Nautical Archaeology (Texas A&M University). The Uluburun Shipwreck. Research summaries on the Late Bronze Age ship and her mortise-and-tenon hull construction.
Encyclopaedia Britannica. "Joinery" and "Woodworking." General reference on joints, tools, and the history of the woodworking crafts.
The Metropolitan Museum of Art. Heilbrunn Timeline of Art History. Essays and collection material on ancient Egyptian furniture and its construction.
Encyclopaedia Britannica. "Screw." On the history of the screw from Archimedes' water screw to machine production.
Student-friendly starting points for exploring this lesson's world. All links verified October 2026.
- The Uluburun shipwreck exhibitions, Bodrum Museum of Underwater Archaeology (Turkey) and museum summaries online. The ship's cargo and construction, displayed where she was excavated.
- Smarthistory, essays on ancient Mediterranean art and seafaring. Context for the world the Uluburun ship sailed in.
- Historic timber-framing demonstrations at open-air museums. Watching a frame raised with pegged joints teaches this lesson's geometry in an afternoon.
- Penn State Center for Global Studies, "Ancient Mediterranean Economy: An Early 'Global' Market." A classroom resource built around the Uluburun ship and her cargo, mapping the trade network she sailed in.
- University College London, Digital Egypt, "Furniture in Ancient Egypt." How Egyptian furniture was made and joined, drawn from surviving pieces and the tomb paintings that show the work.
Submit your work for this lesson using the form below.
CONTINUE IN THE CREATIVE ARTS WORKSHOP
← Previous · Lesson 3: Cutting, Scoring & Clamping Next · Lesson 5: Adhesives, Heat, Wax & Glass →
Unit I · The Workshop Foundation Creative Arts Workshop · All 39 Lessons
Bookstore Shelf The Library · Creative Arts Shelf Course Supplies
The rest of Unit I: Lesson 1 · Welcome to the Creative Arts Workshop · Lesson 2 · Measuring, Marking & Leveling · Lesson 3 · Cutting, Scoring & Clamping · Lesson 5 · Adhesives, Heat, Wax & Glass · Lesson 6 · The Materials Library