
Creative Arts
Unit I, Lesson 3Cutting, Scoring & Clamping
Professor Cogbranch Timberclank
Master Artisan, Head of House Occidens
The Creative Arts Workshop • School of Evershade
Professor's Introduction

Set up your bench, scholars. Today the workshop gets its edges out, and we learn the two halves of every cut: the blade, and everything that keeps the blade honest.
Cutting looks simple, which is exactly what makes it dangerous to learn carelessly. A knife wants to follow the path of least resistance, and the path of least resistance is rarely your pencil line. The maker's skill is not in pushing harder. It is in setting up the work so the blade has no choice but to go where you marked: the work clamped firm, the straightedge held true, the cut made in passes, and the free hand always, always out of the road the blade will travel. A clamp is any device that holds work firmly to the bench or to a guide: spring clamps, G-clamps, hand screws, and the bench holdfast, the scholar's second pair of hands, the pair that never tires and never wanders into the cut. A straightedge is a rigid, truly straight guide, metal or hardwood, against which a blade travels; the straightedge, not the hand, keeps the cut honest.
We will learn scissors, craft knives, and scoring, and we will learn them the workshop way: on scrap, slowly, with the clamping learned first and the cutting second. A craft knife, the utility blade of this workshop, is a short, replaceable-bladed knife for cutting paper, card, leather, and thin stock on a mat; its blades are meant to be changed when dull, because a dull blade, which must be forced, is the most dangerous blade in the room. To score is to cut partway through a material along a line, without cutting through it, so the material folds cleanly exactly on that line. A scholar who can clamp properly can learn any blade in this room. A scholar who cannot clamp properly is not ready for any of them, including the scissors.
PROFESSOR COGBRANCH TIMBERCLANK
Creative Arts Workshop
Master Artisan, Head of House Occidens
Lesson Objectives
By the end of this lesson, students should be able to:
- Explain the rule of the clamp: work is secured by a tool, never held by a hand against the direction of a cut.
- Set up work on a cutting mat with a straightedge, and make straight cuts in paper, card, and thin stock that follow a marked line.
- Score a line correctly to produce a clean fold, and explain the difference between cutting and scoring.
- Choose among scissors, craft knife, and utility blade for a given material, and state the safety rule that belongs to each.
- Handle, pass, store, and put away blades safely, including what to do with a dull blade.
- Describe the history of cutting tools from the first stone flakes to the steel scissors of Sheffield.
Your Assignment Packet
This lesson's assignments live in its packet: the Lexicon Handout (every term, course terms marked ◆), the Assignment Manual, and the Reflection Questions. Download the packet before you begin and keep it beside you as you read — work from it as each subject is taught, or take the assignments as homework afterward.
The First Cutting Tools
Cutting is the oldest making there is. The earliest known stone tools, from Lomekwi in Kenya, dated to about 3.3 million years ago, are flakes struck from river cobbles to produce a sharp edge; the classic Oldowan industry of Ethiopia follows at about 2.6 million years. For an almost unimaginable span of time, every cut made by human hands, in food, hide, wood, and cord, was made with an edge of struck stone. The flake was disposable, resharpened by another strike, and the principle it teaches still holds in this room: a sharp edge cuts where you aim it; a dull one wanders.
Metal changed the edge's durability, not its nature. Copper and then bronze blades served the ancient world; iron and then steel made edges that held longer and cut finer. The knife became the universal tool, carried by nearly everyone, used for eating, working, and writing, since the scribe's penknife shaped the quill and scraped the parchment both.
Scissors came later than most scholars expect. Shears, two blades joined by a spring bow that squeezes them together, were used in ancient Egypt from around 1500 BCE and spread through the ancient world. Pivoted scissors, the kind in your drawer, with a screw or rivet at the crossing point, appear in Roman times and became common slowly; quality scissors were a specialty of steel towns, above all Sheffield in England, where firms such as William Whiteley and Sons, which dates its founding to 1760, still trace their trade to those centuries of scissorsmiths. The craft knife on your bench, with its disposable blade, is a twentieth-century answer to an ancient problem: blades dull, dull blades are forced, forced blades slip. Change the blade, and the problem is designed away.
Scoring has its own quiet history. Bookbinders scored leather and board to fold covers cleanly. Glaziers scored glass, often with a diamond point — the hardest, cleanest scorer, long the professional's choice for plate glass — and the job of the score is the same in every material: a shallow, guided weakness that tells the material exactly where to bend or break.
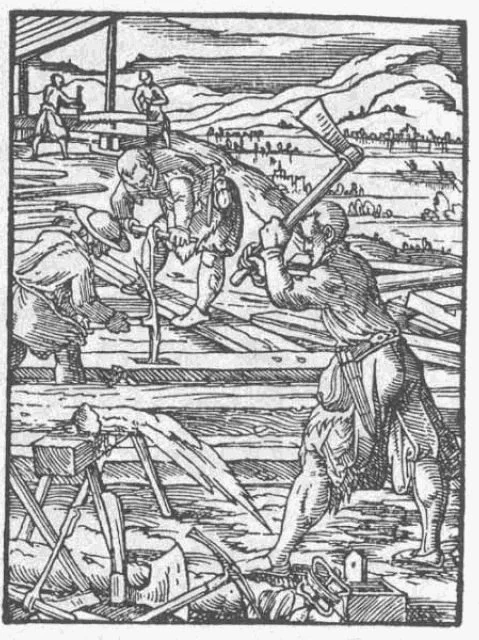
A carpenter sawing a board on a workbench, 1568 woodcut.
Woodcut from the Ständebuch (Book of Trades), Frankfurt, 1568. Public domain, via Wikimedia Commons.
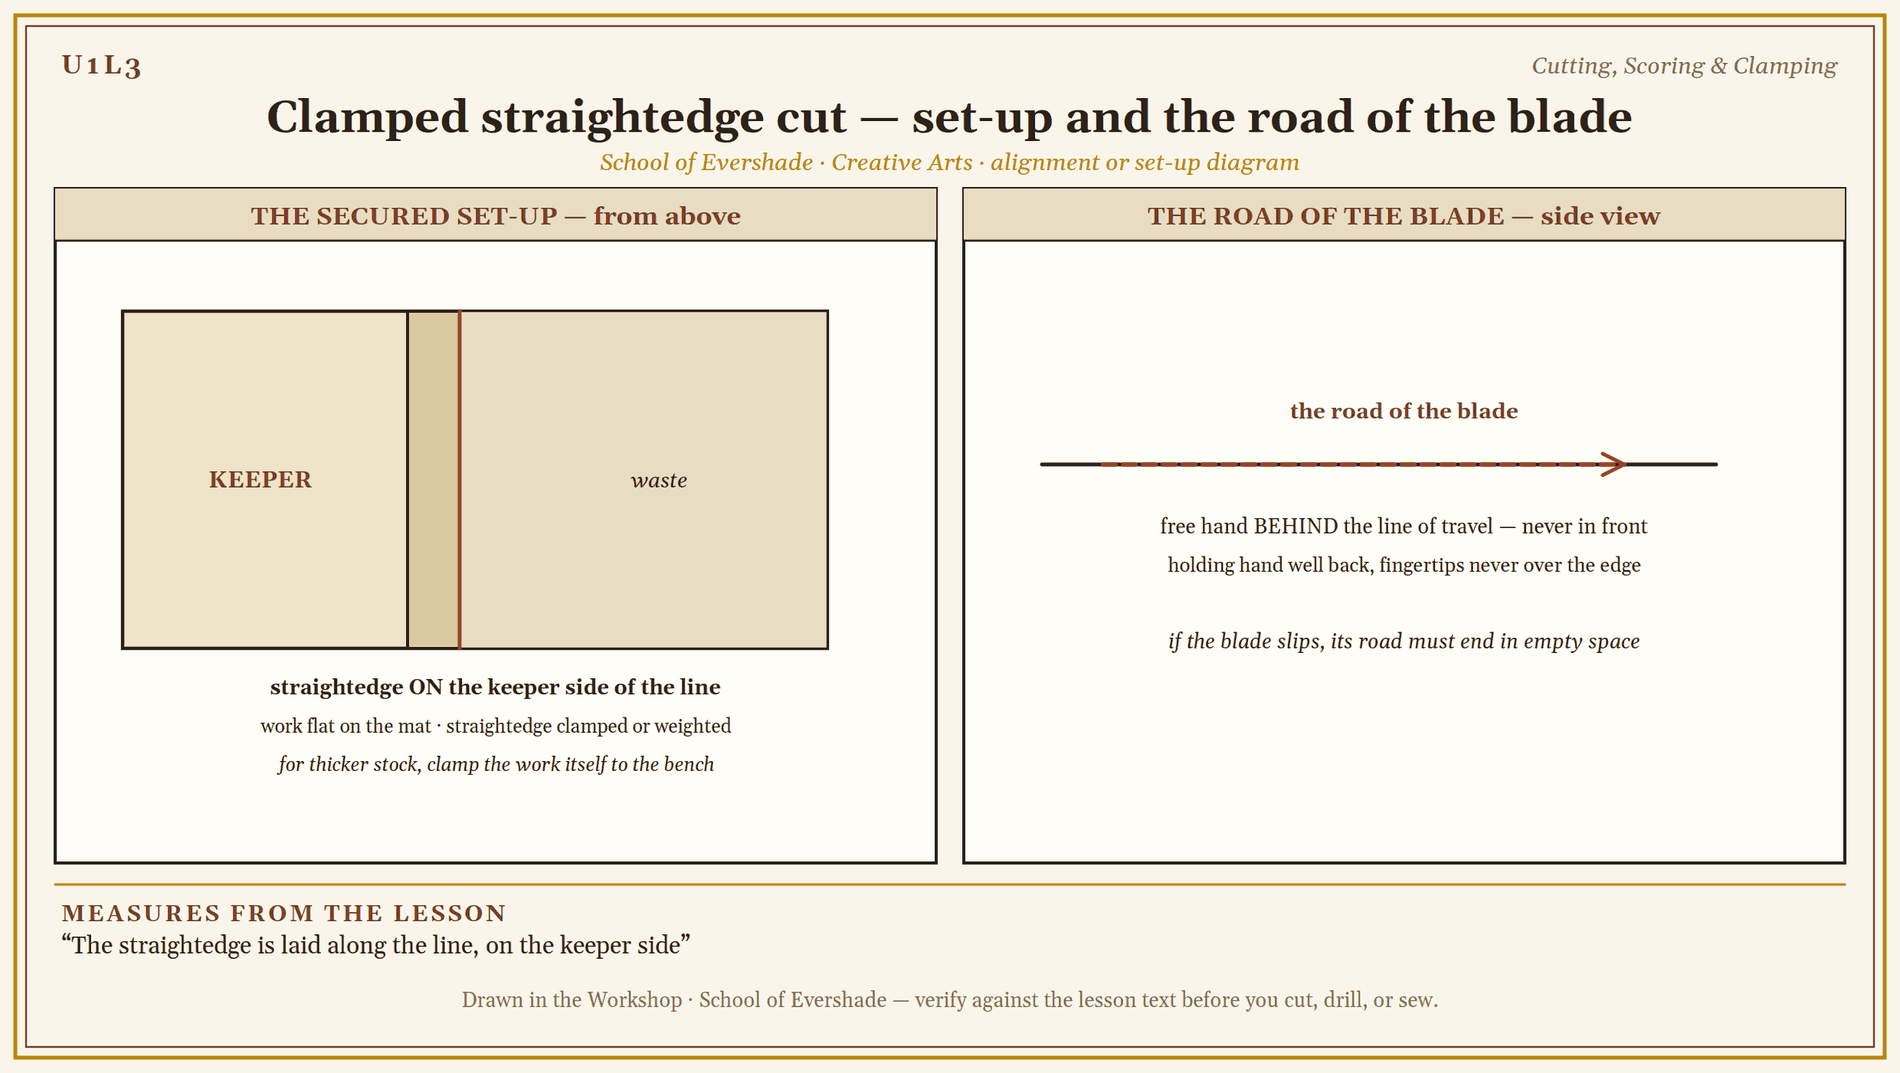
Clamped straightedge cut — set-up and the road of the blade
Cut in passes, and scoring for a fold
Holding the Work: A Short History of the Clamp
Nobody in this lesson's long history ever solved cutting by holding the work in their fingers. They solved it by fixing the work down.
Ancient woodworkers glued and bound assemblies with cord while joints set, and the twisted-cord clamp, a loop tightened by turning a stick in it like a tourniquet, appears in workshops across the world and across centuries because it costs nothing and works. Bench holdfasts, which pin work flat to the bench top with a blow of the mallet, were known to Roman carpenters and are sold today in nearly the same shape. Wooden hand screws, two jaws drawn together by threaded handles, served European joiners and bookbinders for centuries. The iron G-clamp arrived with industrial iron founding in the nineteenth century and gave every bench cheap, strong, one-handed clamping.
The lesson inside the history is this: for thousands of years, makers with every level of technology agreed on one point of practice. The work gets held by something that is not a hand. When you clamp a piece of card to your mat before you cut it, you are not being fussy. You are keeping the oldest safety rule in the making trades.
A Sealed Note from Professor Timberclank
Attend to this one, scholars. It is the note I would carve over the door if carving over doors were sensible.
The blade travels a road. Before any cut, ask where that road ends if the blade slips, skates, or breaks through sooner than you expect. If the answer is anywhere near your hand, move your hand. Move the clamp. Turn the work. There is always a setup in which the road ends in the mat, the bench, or the air. Find that setup before the blade moves, not after.
Cut away from yourself. Keep the free hand behind the line of travel, never in front of it. And if you feel the urge to force a cut, hear it as the tool talking: something is dull, or loose, or wrong. We stop. We make it safe. Then we begin again.
PROFESSOR COGBRANCH TIMBERCLANK
Creative Arts Workshop
Master Artisan, Head of House Occidens
Technique: The Honest Cut
Set up first. The work goes on the cutting mat, flat, with the marked line from Lesson 2 visible. The straightedge is laid along the line, on the keeper side, the side of the material you intend to keep, so that if the blade wanders, it wanders into the waste. The waste side is where mistakes are allowed to live.
Clamp or weight the straightedge. For card and thin stock, a clamped or firmly held straightedge and a mat with grip may serve; for anything thicker, or any cut near the hand, the work itself is clamped to the bench. Fingers holding a ruler are fingers in the road if the blade climbs the edge. Keep the holding hand well back from the line, and never curl fingertips over the straightedge's edge.
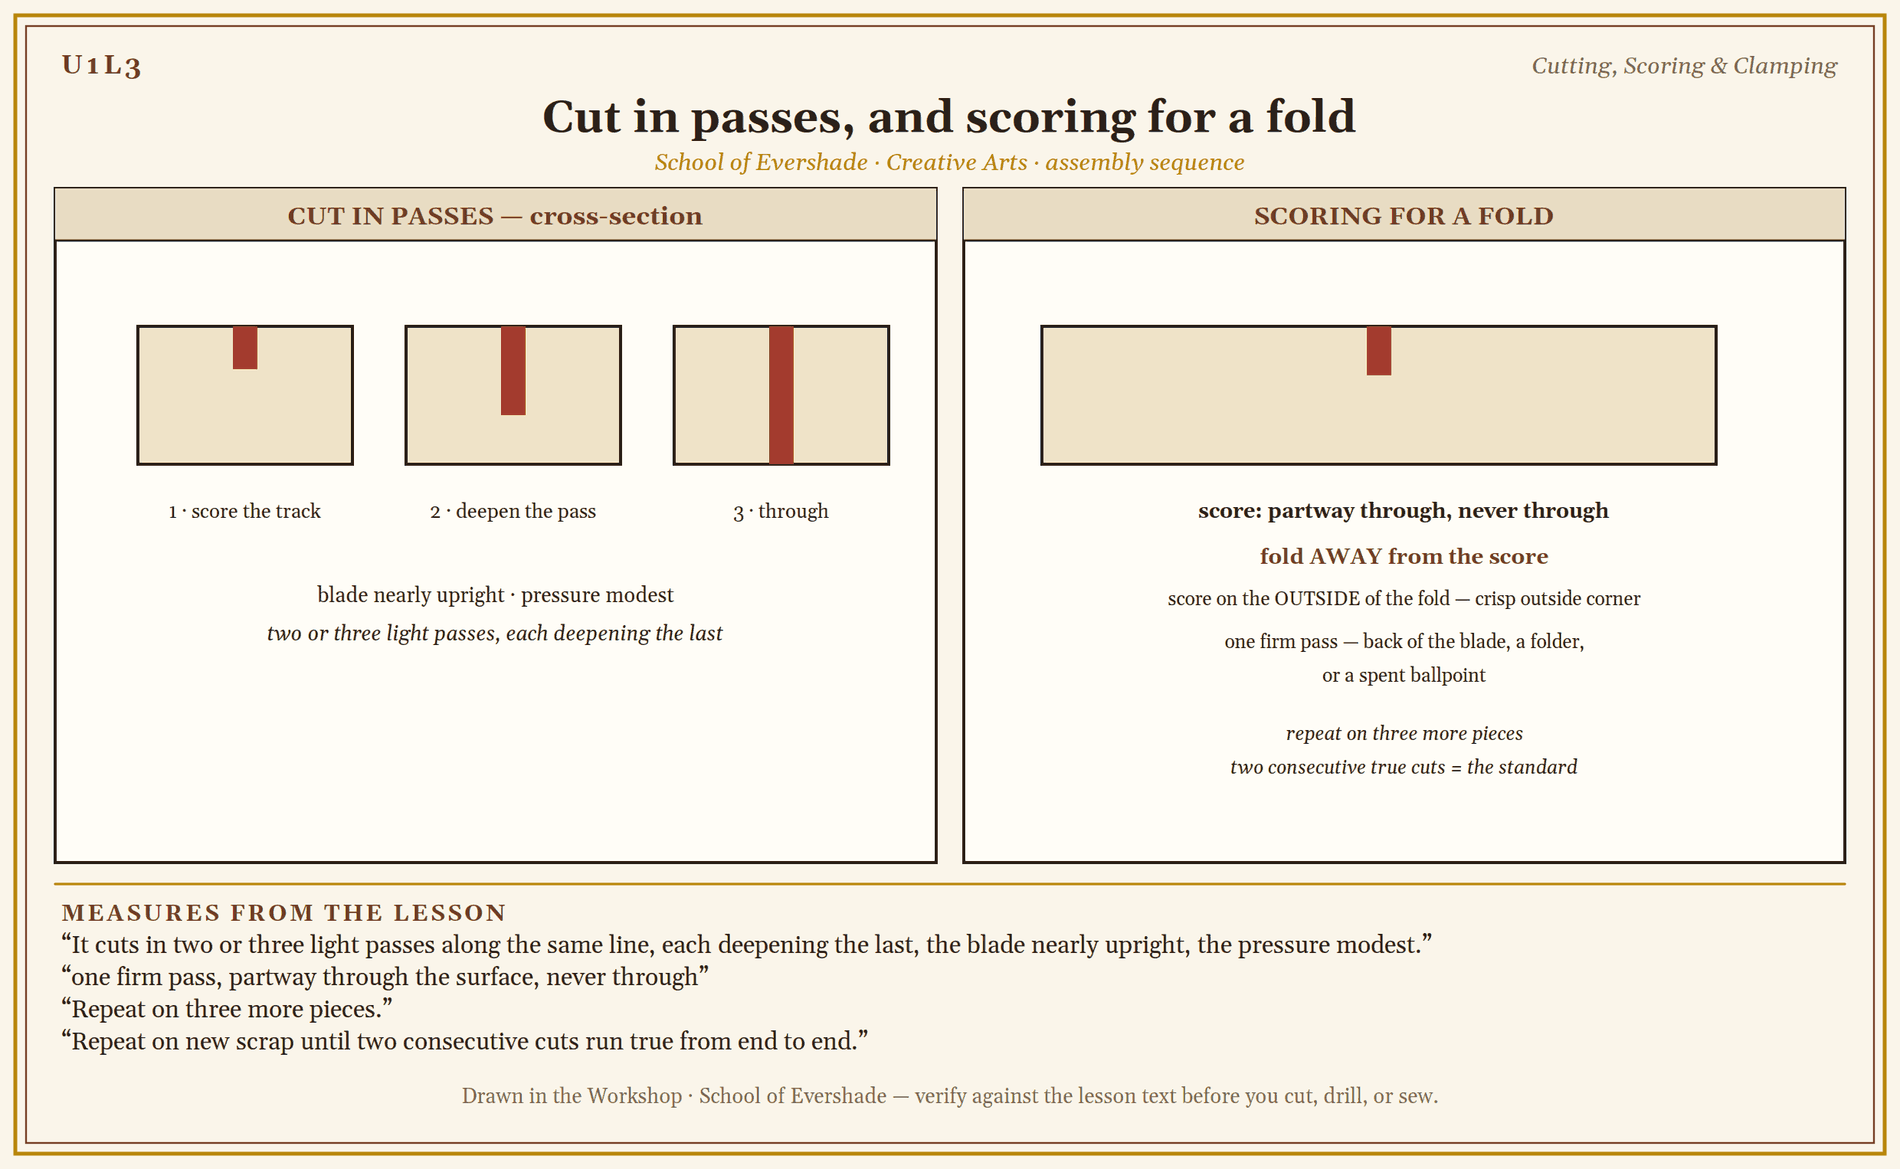
Cut in passes. A craft knife does not cut card in one heroic push. It cuts in two or three light passes along the same line, each deepening the last, the blade nearly upright, the pressure modest. The first pass scores a track; the following passes follow it the way a cart follows a rut. If you are pushing hard, you are doing it wrong and dangerously. Mind the kerf, the width of material a blade removes as it cuts: a saw's kerf is visible, a knife's is nearly nothing, and makers account for the kerf when a piece must finish at an exact size.
Scoring for folds. To fold card cleanly, score the fold line on the outside of the fold with the back of the blade, a folder (Lesson 6), or a spent ballpoint, using the straightedge as guide: one firm pass, partway through the surface, never through. Fold away from the score for a crisp outside corner. Practice on scrap until your folds land on the line and the surface does not crack.
Scissors. Scissors cut by the crossing of their blades and belong to paper, cloth, cord, and thin card. Long cuts want long scissors; curves want small ones. Cut with the middle of the blades, not the tips, keep the work supported, and never walk about with scissors open in your hand. Pass scissors handle-first, closed, the way you would want them passed to you.
Blade care and storage. Blades are changed when dull, capped or retracted when not cutting, and put away in their place at the end of work, never loose in a drawer or a pocket. In this workshop, a blade out of its handle and off the bench is a problem to be solved at once, politely and completely.
Practice Practical: Until the Cut Follows the Line
This drill is checked for accuracy and safe setup, not for speed. Every cut is on scrap.
- Set up. Bench drill from Lesson 1. Mat down, scrap card on it, straightedge and knife ready, clamp within reach. Say the road aloud: where the blade will travel, and where it would go if it slipped. Move anything that answers wrong.
- Score and fold. Mark a line across a piece of scrap card. Score it with one firm pass against the straightedge, fold on the score, and check: a clean fold on the line, surface unbroken. Repeat on three more pieces.
- First pass, second pass. Mark a straight cut line on fresh scrap card. Clamp or secure the straightedge on the keeper side. Make one light pass along the line. Make a second. Cut through on the third if needed. Compare the cut edge to the line: any wandering shows where pressure or setup failed. Repeat on new scrap until two consecutive cuts run true from end to end.
- A curve and a corner. Mark a gentle curve and a square corner on scrap. Cut both with scissors, supporting the work, and then try the corner with the knife in passes. Note which tool served which line better, and write down why.
- Put away properly. Blade capped or retracted and stored, mat cleared, scrap saved in the scrap box for the next drill, bench wiped. The drill is done when the bench is clean and every cut made today is accounted for.
When two consecutive knife cuts follow the line from end to end with a safe setup, your hands have learned what this lesson is for.
Assignment Manual
Assignment key: ✎ written work · ⚒ hands-on practical · ◐ both
Assignment I ⚒ — The Practice Practical
Complete the drill in this lesson: scored folds, straight cuts in passes, a curve and a corner, all on scrap, all with secured setups, until two consecutive knife cuts follow the line end to end. Keep your best cut piece, labeled with the date, as the record of the drill.
Assignment II ✎ — The Road of the Blade
For three cutting jobs (opening a packet, trimming a photograph, cutting cloth for a repair), write a short setup plan for each: where the work is secured, where the blade travels, where the road ends if it slips, and where the free hand waits. One paragraph each. No cutting is required for this assignment; it trains the habit of planning the road before the blade moves.
Assignment III ◐ — Edges Through Time
Choose one cutting tool from the lesson's history (stone flake, Egyptian spring shears, Roman pivoted scissors, the Sheffield scissors trade, or the modern disposable-blade knife). Using the sources below, write a short account of when it appeared, what it was made of, and what problem it solved better than what came before. If you have the modern descendant in your home, add a photograph or sketch of it beside your account, with one sentence on what stayed the same.
Materials
Level One (household)
- A cutting mat, or a thick stack of waste cardboard or an old magazine as a cutting surface
- A craft knife with fresh blades, and safety scissors
- A metal ruler or straightedge (metal, not plastic; blades climb plastic)
- Spring clamps, binder clips, or heavy books to hold work and straightedge
- Scrap card, old cereal boxes, waste paper, and thin scrap stock for drills
- A pencil, for marking lines
- An adult present for all blade work, per your household's rules
Level Two (historical)
Everything in Level One, plus:
- A traditional penknife or fixed-blade craft knife of historical pattern, kept sharp
- A wooden hand-screw clamp or a length of cord for a twisted-cord clamp
- Bone or wooden folder for scoring, ahead of making your own in Lesson 6
- Thicker stock to cut: leather offcuts, thin balsa or basswood, heavy book board
Both levels teach the same craft: secured work, guided blades, honest cuts. The modern mat and disposable blade make it easier to learn, not different in kind.
Reflection Questions
Answer the following questions in your workbook.
- During the drill, where did your cuts wander, and what was the actual cause: pressure, setup, a dull blade, or haste?
- Why does this workshop teach clamping before cutting, rather than the other way around?
- The twisted-cord clamp and the steel G-clamp are separated by millennia and do the same job. What does that tell you about the problem they solve?
- Which rule in the sealed note will you personally need to be reminded of most, and why?
- Think of a time you or someone in your household cut something while holding it. How would this lesson set that job up differently?
Professor's Review
Your bench has done its first cutting, and every cut today was on scrap, which is where cutting belongs until the hands are educated.
You can set up a cut so the blade has nowhere wrong to go, score a fold that lands on the line, and choose the right edge for the material in front of you. You also know your tools' ages now: the flake older than farming, the shears older than Rome, the holdfast older than the castle. A scholar who knows a tool's history handles it with more respect, and respect, in a room full of edges, is a safety device.
Next lesson we make holes and hold things together: piercing, drilling, and fastening, and the oldest fastening of all, the joint that needs no hardware.
PROFESSOR COGBRANCH TIMBERCLANK
Creative Arts Workshop
Master Artisan, Head of House Occidens
Cross-Class Connections

Scrollwork · Unit III, Lesson 10 — Cutting the Quill
Scholars of the Workshop, when a quill is cut in my library, it is cut under a sealed note from Professor Timberclank’s bench, and the knife discipline of your Lesson 3 travels with it. Come and see the other half of the craft: how the cut quill is shaped and slit and coaxed to hold its ink. Your hands already know the blade; here they learn what the blade is for.
PROFESSOR QUILLBERRY NOCTURNE
Scrollwork Library
Runes · Unit II, Lesson 6 — Aramaic
You have learned the honest cut in the Workshop. In my classroom that cut earns its keep: the reed pen of the Aramaic lesson is split with a knife, and a clean split writes a clean letter. A plain note in my lesson sends my scholars to your bench for the knife work; consider this the return invitation, and come put your blade to the script.
PROFESSOR THISTLELOOM WEBBLETHORN
Runes & Ancient Writing
Celestial Studies · Unit II, Lesson 9 — Eclipses
Celestial Studies · Unit VI, Lesson 29 — Sundials: Catching Shadows
Celestial Studies · Course Capstone — Chart Your Sky
Workshop scholars, the Tower’s instruments begin as card and thin stock, and a pinhole projector or a sundial is only as true as its cuts. Notes in my lessons send my own scholars to your Lesson 3 for the cutting craft; this is the return invitation. Come and build the instruments with a maker’s hands: the projector that catches an eclipse, the dial that catches a shadow, and at the last, the charting of your own sky.
PROFESSOR VESPER GLIMMERWICK
Celestial Studies
Further Reading & Sources
Encyclopaedia Britannica. "Scissors." On the history and forms of shears and scissors.
William Whiteley & Sons, Sheffield. The firm's own history of the Sheffield scissors trade, a living link to the steel town tradition described in this lesson.
Science Museum Group (London). Collection articles on tools and cutting implements. Histories and photographs of surviving knives, shears, and workshop tools.
The Metropolitan Museum of Art. Heilbrunn Timeline of Art History. Essays and collection material on the tools and crafts of the ancient world, including Egyptian implements.
Student-friendly starting points for exploring this lesson's world. All links verified October 2026.
- Smarthistory, essays on Paleolithic and ancient tools. On the earliest stone tools and what their edges made possible.
- The British Museum, learning resources on ancient technology. Introductions to early tools and materials, well illustrated from the collection.
- Historic workshop reconstructions at open-air museums. Many museum villages demonstrate the hand screw, the holdfast bench, and the cord clamp in use; watching one for five minutes teaches more than a page of description.
- Smithsonian Institution, Human Origins Program, "Human Evolution Evidence." The Smithsonian's guide to the evidence for early human behavior, whose Stone Tools section presents the earliest known cutting tools and how scholars read them.
Submit your work for this lesson using the form below.
CONTINUE IN THE CREATIVE ARTS WORKSHOP
← Previous · Lesson 2: Hands, Eyes, Measuring, Marking & Leveling Next · Lesson 4: Piercing, Drilling & Fastening →
Unit I · The Workshop Foundation Creative Arts Workshop · All 39 Lessons
Bookstore Shelf The Library · Creative Arts Shelf Course Supplies
The rest of Unit I: Lesson 1 · Welcome to the Creative Arts Workshop · Lesson 2 · Measuring, Marking & Leveling · Lesson 4 · Piercing, Drilling & Fastening · Lesson 5 · Adhesives, Heat, Wax & Glass · Lesson 6 · The Materials Library