

HERBOLOGY
Unit II · Lesson 13THE WATERING MATRIX: CAPILLARY ACTION & ROOT HYDRATION
PROFESSOR BERYL FERNFOOT
Herbology Greenhouse
Master Herbalist
Water is essential, but more is not always better.
Professor's Introduction

Come in and rest a while, scholars.
In our last lessons we studied the soil your familiar stands in: its texture, its chemistry, and the nutrients it carries. Today we turn to the other half of the partnership. Soil without water is only dust. Water without soil is only a puddle. It is the meeting of the two, drop by drop, that makes a garden possible.
Here is something worth knowing early: among beginners, water kills more plants than drought ever will. Kindness, poured too freely from a watering can, drowns the very roots it meant to nourish. This is not a scolding. It is an invitation to learn the plant's language, so that your care lands where it is needed and stops where it is not.
Today you will follow a single drop of water on its journey from the soil surface down through the dark, up into the root, and out through the leaf. You will learn to read the signs of too much and too little. And by the end, you will write a watering plan for your Scholar's Familiar, fitted to that plant, that pot, and that windowsill, and to no other.
Let us begin gently. The water is waiting.
— Professor Beryl Fernfoot, Herbology Greenhouse • Master Herbalist • Head of House Oriens

The line beneath the map is our road: every stop a place where the knowledge of plants changed, every lesson a step along it.
Lesson Objectives
By the end of this lesson, you will be able to:
- Explain capillary action and how it moves water through soil
- Describe how roots absorb water through root hairs
- Distinguish the signs of overwatering from the signs of underwatering
- Perform the finger test and other simple moisture checks
- Water deeply and correctly, and explain why morning watering is best
- Write a watering plan tailored to your Scholar's Familiar
Reading this lesson: ★ marks the passages to remember. They return on the unit quiz and the class test. Check in questions ask the material back as you go; answer them in your workbook when you meet them.
Working this lesson: Your assignment packet is the first download on this page. Work in it as the lesson moves along, answering each assignment as its subject is taught — or read the lesson through for your notes and take the assignments as homework afterward. Both are proper ways to sit this class. Signposts in the reading tell you where each assignment belongs. Written answers are short answers in your own words; a few honest lines are worth more than a filled page.
Your Assignment Packet
This lesson's assignments live in its packet: the Lexicon Handout (every term, course terms marked ◆), Materials, Guided Practice, the Assignment Manual with its answer key for self-checking, the Reflection Questions, and the Workbook Checklist. Download the packet before you begin and keep it beside you as you read.
The Journey of a Drop of Water
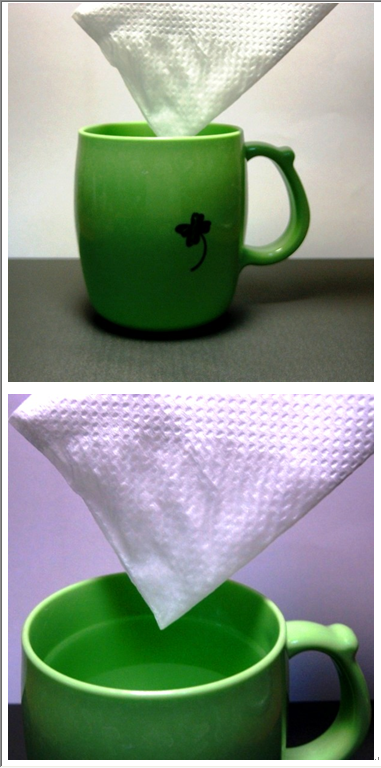
Capillary action, in a mug: only the corner of the towel touched the water, yet the wet front climbed far above the waterline. The towel's fibers form tiny tubes, and water climbs them by cohesion and adhesion — the same climb a soil's pores offer a root, and the same climb that lifts oil in a lamp wick.
Photograph by Stanley, released to the public domain.
Pour water onto soil and watch what happens. It does not simply fall straight down like rain through air. It spreads, creeps, and climbs. In fine soils it can even travel upward, against gravity, through the narrow spaces between particles. This quiet movement has a name: capillary action.
★ Capillary action is the movement of water through narrow spaces, driven by two attractions. The first is cohesion: water molecules cling to one another. The second is adhesion: water molecules cling to surfaces, including the surfaces of soil particles. Together, these two pulls draw water along, up, and through the tiny pores of the soil. The narrower the pore, the stronger the pull and the higher the water can climb. This is why clay soils, with their very fine pores, draw water upward farther than coarse sands do, even though the water moves more slowly through them.
Check in: Name the two attractions that drive capillary action, and say which soil — clay or coarse sand — draws water higher, and why.
You have seen capillary action all your life without naming it. A paper towel dipped in a spill draws the liquid upward. A sugar cube set in tea darkens from the bottom up. The wick of a candle or an oil lamp carries fuel to the flame the same way. Soil is simply a vast bundle of microscopic wicks, and your plant's roots drink from them.
This matters for a practical reason. Water does not only move downward through your pot. It moves in every direction the pores allow, spreading outward and upward from where you pour it. When you water only the surface lightly, the moisture may never reach the deeper roots at all. When you water thoroughly, capillary action helps distribute it through the whole root zone. Understanding this changes how you water, and we will come back to it.
Remember this image: the soil as a bundle of tiny straws, each one lifting water a little higher than gravity alone would allow. Your plant lives among those straws.
❦ In your workbook: record the journey of a drop in your own way — cohesion, adhesion, and the soil as a bundle of tiny straws — copy, sketch, or note what matters.
In your packet: Exercise II — The Capillary Demonstration ⚒ begins here. Work it now, or mark the place and take it as homework — your choice.
How Roots Drink
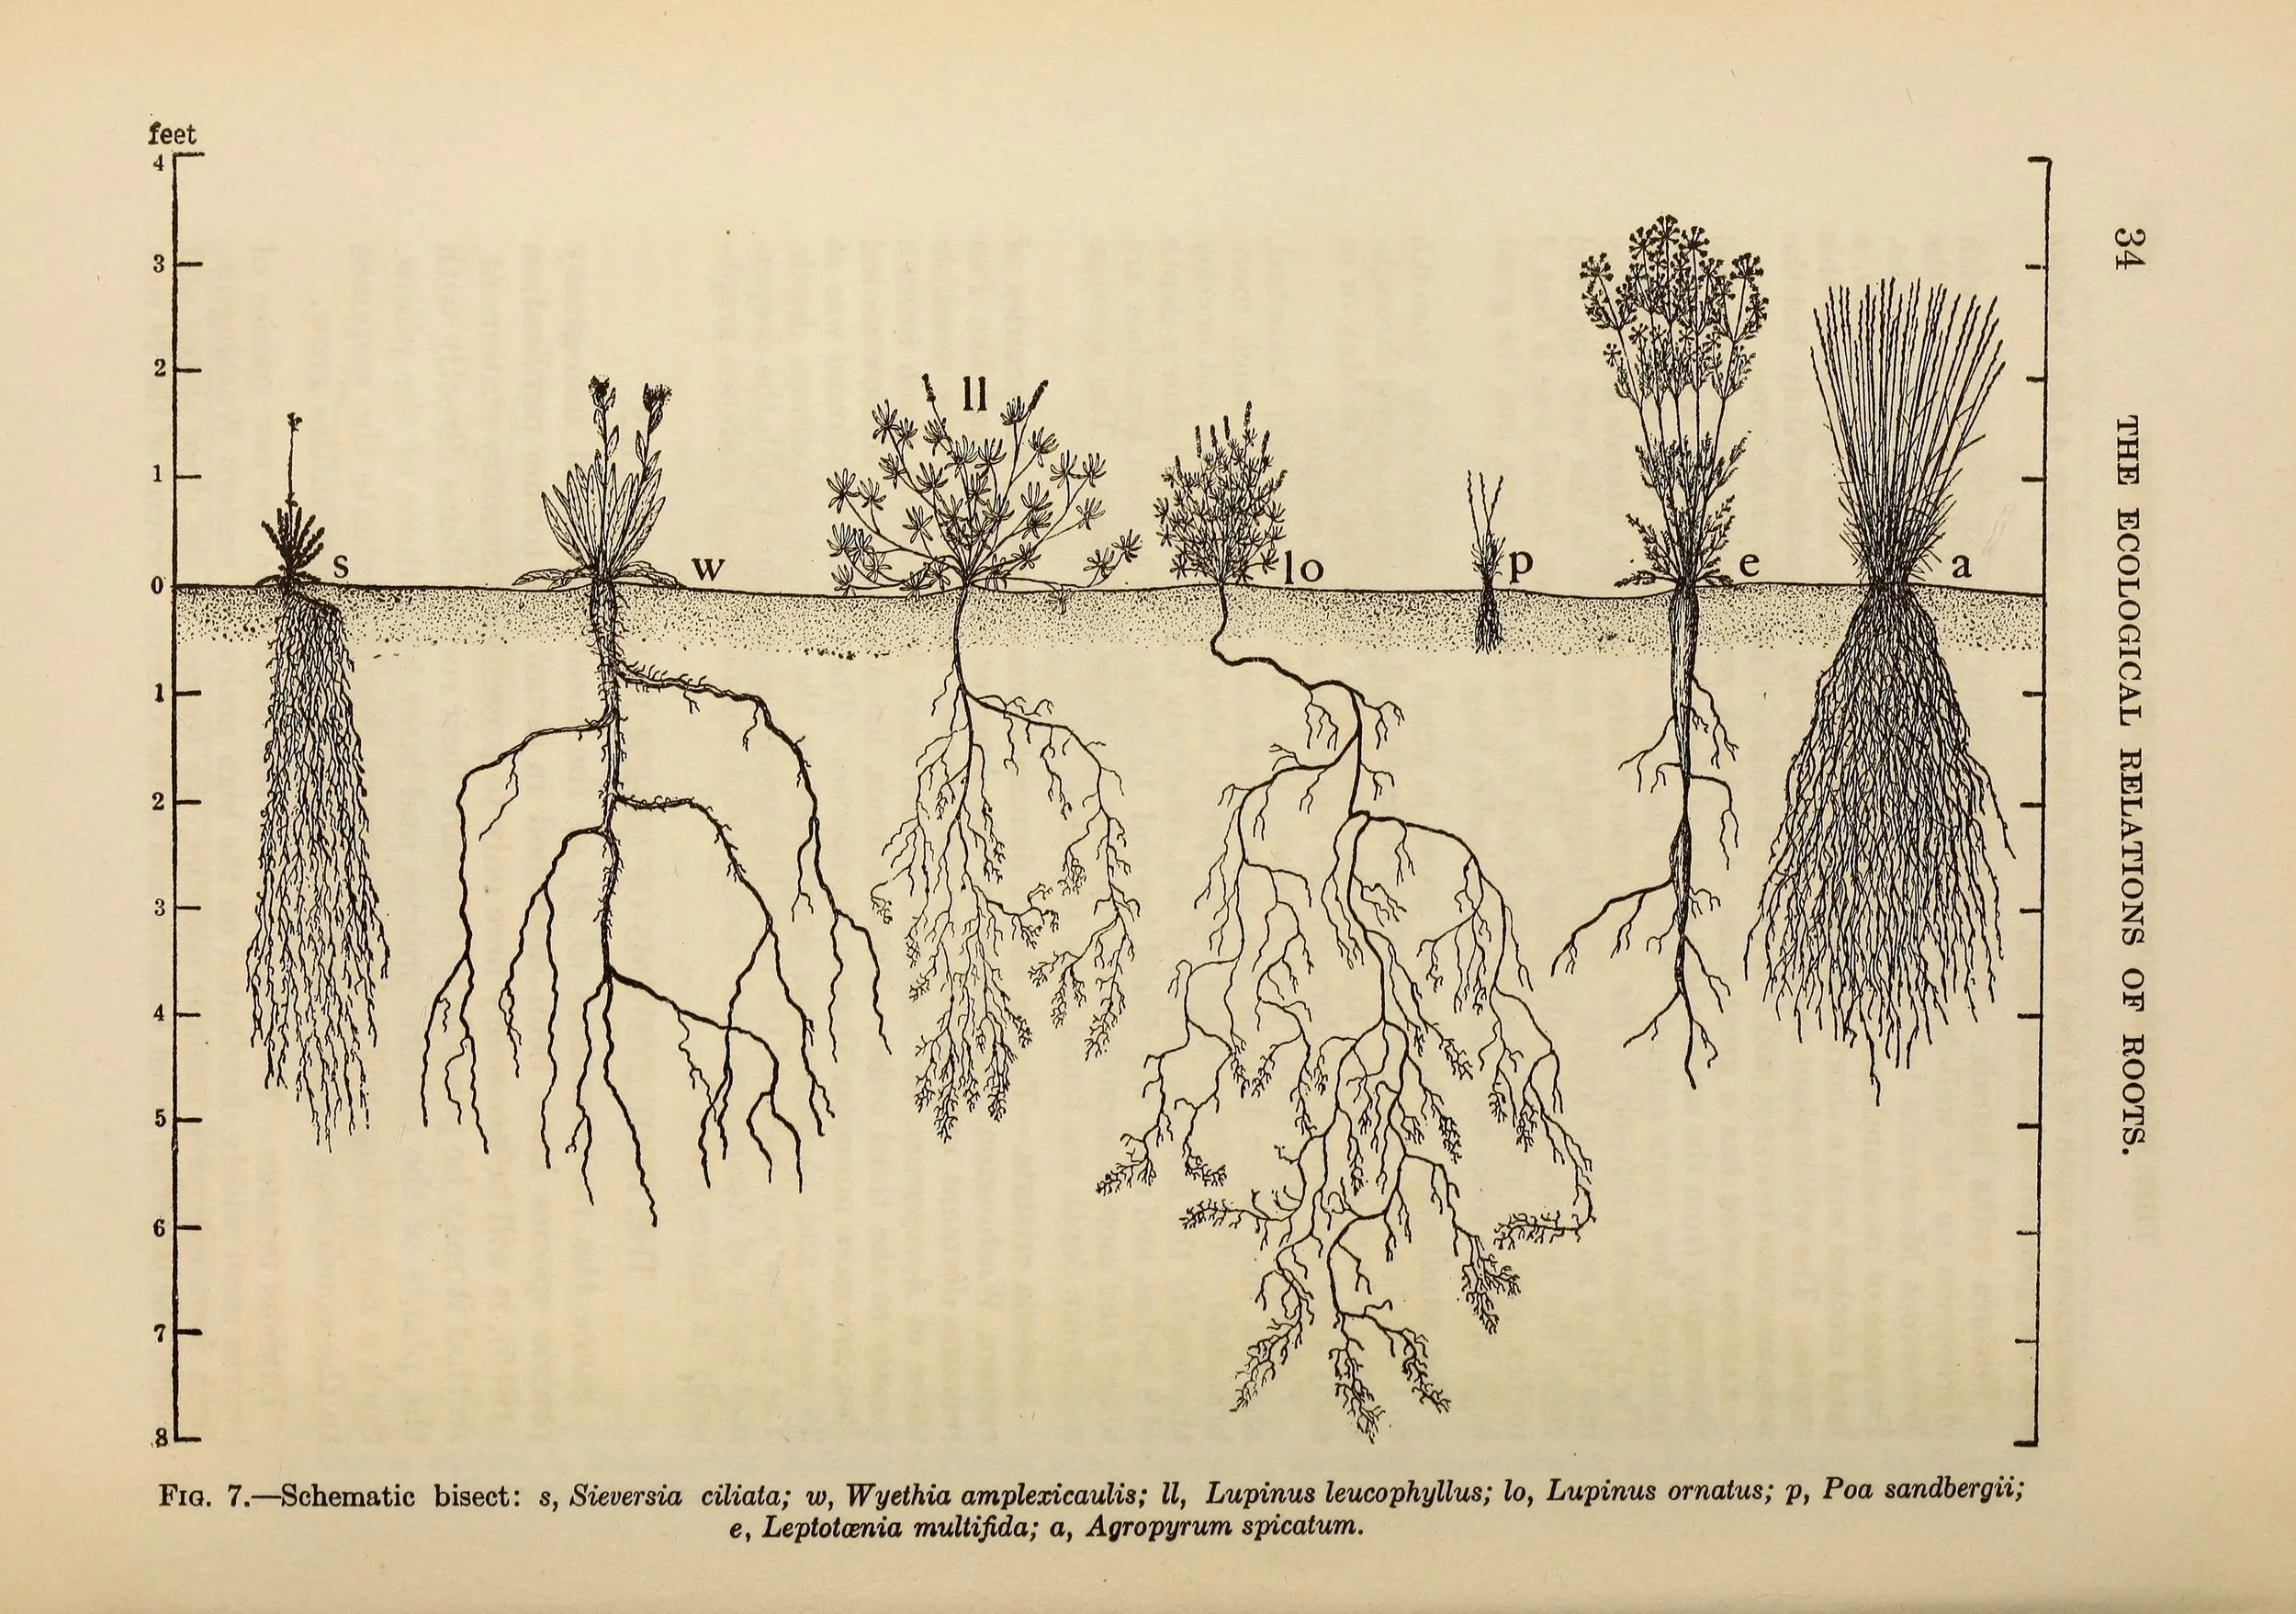
The underground half of the plant, drawn to scale: in Weaver's 1919 root studies, prairie plants a few inches tall above ground sent roots down as much as seven feet. That whole buried volume is the root zone — the space a deep watering has to moisten. The finest roots and their root hairs, too small to draw at this scale, are where the drinking happens.
John Ernest Weaver, The Ecological Relations of Roots (1919), Fig. 7, via the Biodiversity Heritage Library. No known copyright restrictions.
Roots do not gulp. They sip, constantly, through structures so fine you need a magnifying glass to see them.
The working surface of a root system is not the thick root you can see. It is the cloud of root hairs: delicate, hairlike extensions of the root's outer cells, each one vastly increasing the surface area in contact with the soil. A single rye plant, measured by botanists, was found to have miles of roots and billions of root hairs. Your familiar's root system is smaller, but the principle is the same. The hairs are where the drinking happens.
★ Water enters the root hairs by osmosis, the movement of water across a membrane from where it is plentiful to where dissolved substances make it scarce. The inside of a root hair cell holds dissolved sugars and minerals, so water in the surrounding soil film flows inward. From there, water travels cell to cell toward the center of the root, enters the water-conducting vessels, and rises through the stem to the leaves. Some of it becomes part of new growth. Much of it eventually leaves through the leaves as vapor, a process called transpiration, which in turn helps pull more water upward behind it. The plant is a fountain that drinks from below and breathes from above.
★ Two things follow from this. First, roots need water to be present as a film on soil particles, not as a flood filling every pore. Flooded soil has no air in it, and roots, like every living tissue, need oxygen to function. Second, damaged root hairs cannot drink. Rough handling during repotting tears them, which is why a newly repotted plant wilts even in moist soil until its hairs regrow. Handle roots gently, and give a repotted plant a few days of calm recovery.
Check in: Why does a newly repotted plant wilt even in moist soil — and what does that tell you about where the drinking really happens?
❦ In your workbook: record how roots drink in your own way — root hairs, osmosis, and the fountain that breathes from above — copy, sketch, or note what matters.
Professor's Mid-Lesson Note
You are doing beautifully, and I want you to notice something. You now understand water better than most gardeners ever will. You know about the tiny straws in the soil and the tiny hairs on the roots, and you know that drowning and thirst can look alike from above. That knowledge will save more plants than any fertilizer ever could.
The rest of this lesson is practice: how much, how often, and how to tell. Take it slowly. Your familiar is not going anywhere.
— Professor Beryl Fernfoot, Herbology Greenhouse • Master Herbalist • Head of House Oriens
How Much Is Enough
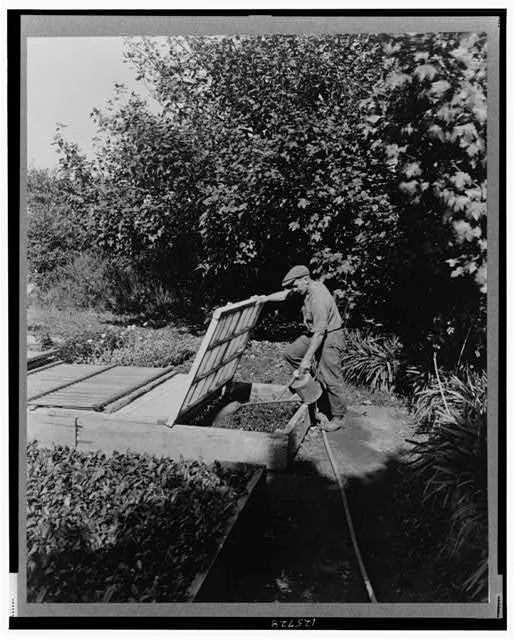
Watering where it counts: a gardener with a can, lid lifted, water aimed at the soil of a cold frame rather than sprayed over the leaves. The lesson's habits are all here in one frame — water the root zone, deliver it gently enough not to wash the soil away, and water the plant's feet, not its face.
Library of Congress photograph. Public domain (no known copyright restrictions).
There is no universal watering schedule, and anyone who sells you one is selling you something. How often a plant needs water depends on the plant, the pot size, the soil mix, the light, the temperature, the humidity, and the season. A mint in a small terracotta pot on a sunny sill in July may need water daily. A spider plant in a large glazed pot in a cool room in January may need it every ten days. The schedule must follow the plant, not the calendar.
★ Instead of a schedule, learn the method: deep watering. Water thoroughly, until water flows freely from the drainage holes at the bottom of the pot. This does three things. It moistens the entire root zone, not just the surface. It flushes out accumulated salts from fertilizers and hard water. And the draining water pulls fresh air down into the soil behind it, which the roots need. Then, and this is the part beginners find hardest, wait. Let the soil dry to the appropriate degree before watering again. For most houseplants, that means the top inch or two feels dry to the touch. For succulents and cacti, let the soil dry completely.
Check in: Deep watering does three things. Name all three — and name the hard part that comes after it.
★ Water in the morning. Morning watering gives any splashed foliage time to dry during the day, which discourages the fungal diseases that thrive on leaves kept wet overnight. It also means less water is lost to the heat of midday evaporation, and the plant has moisture available during its most active growing hours. Evening watering is the second choice. Midday watering in strong sun is wasteful, and water droplets on leaves in intense sun can even scorch them.
Two refinements for the careful student. First, bottom watering: setting the pot in a basin of water for twenty minutes and letting the soil draw moisture up by capillary action. This wets the root zone evenly without compacting the surface, and it is excellent for plants that dislike wet crowns, like African violets. Second, mulch: a thin layer of pebbles, bark, or even dried leaves on the soil surface slows evaporation and keeps moisture steadier between waterings.
And one warning about a modern temptation. Self-watering pots and moisture-keeping gels can be useful, but they can also keep soil perpetually damp, which is exactly the condition that rots roots. No device replaces your finger. Check the soil yourself, every time.
❦ In your workbook: record how much is enough in your own way — deep watering, morning watering, and the two refinements — copy, sketch, or note what matters.
In your packet: Exercise III — The Familiar's Watering Plan ✎ begins here. Work it now, or mark the place and take it as homework — your choice.
Too Much: The Drowning
Overwatering is the most common way beginners kill houseplants. University extension specialists say it plainly: overwatering is the number one killer of indoor plants, and forgetting to water comes second. The tragedy is that it comes from love. The plant looks sad, the owner waters it, the plant looks sadder, the owner waters more. Understanding what is actually happening breaks the cycle.
★ Roots need oxygen. In healthy soil, water clings to particles as a film while air fills the larger pores. In waterlogged soil, water fills every pore and pushes the air out. Root cells, starved of oxygen, begin to die. Dead and dying roots cannot absorb water, which produces the cruelest irony in all of plant care: an overwatered plant wilts, looking exactly like a thirsty one, and the owner waters it again.
Worse, the fungi that cause root rot, such as Pythium and Rhizoctonia, thrive in wet, airless soil. They attack the weakened roots and spread the decay. By the time the above-ground symptoms appear, the damage below is often advanced.
Learn the signs of overwatering:
- Lower leaves turn yellow and drop, even though the soil is wet
- Stems feel soft or mushy near the base
- The soil smells sour or rotten
- The plant wilts despite wet soil
- A green film of algae grows on the soil surface
Check in: An overwatered plant wilts. Why — what has actually failed below the soil line?
If you catch it early, you can save the plant. Stop watering and let the soil dry. Improve air circulation around the pot. In serious cases, unpot the plant, trim away any brown, mushy roots with clean scissors, keeping only firm white or tan roots, and repot in fresh, dry mix. Then water lightly and wait. Recovery is slow, but plants are patient when we give them the chance.
Prevention is simpler than rescue. Always use pots with drainage holes. Never let a plant sit in standing water in its saucer or in a decorative outer pot; empty saucers within an hour of watering. Choose a pot only slightly larger than the root ball, since excess soil stays wet long after the roots have drunk their fill. And check before you water, every time.
❦ In your workbook: record the drowning in your own way — the signs of overwatering, the rescue, and the prevention — copy, sketch, or note what matters.
Too Little: The Thirst
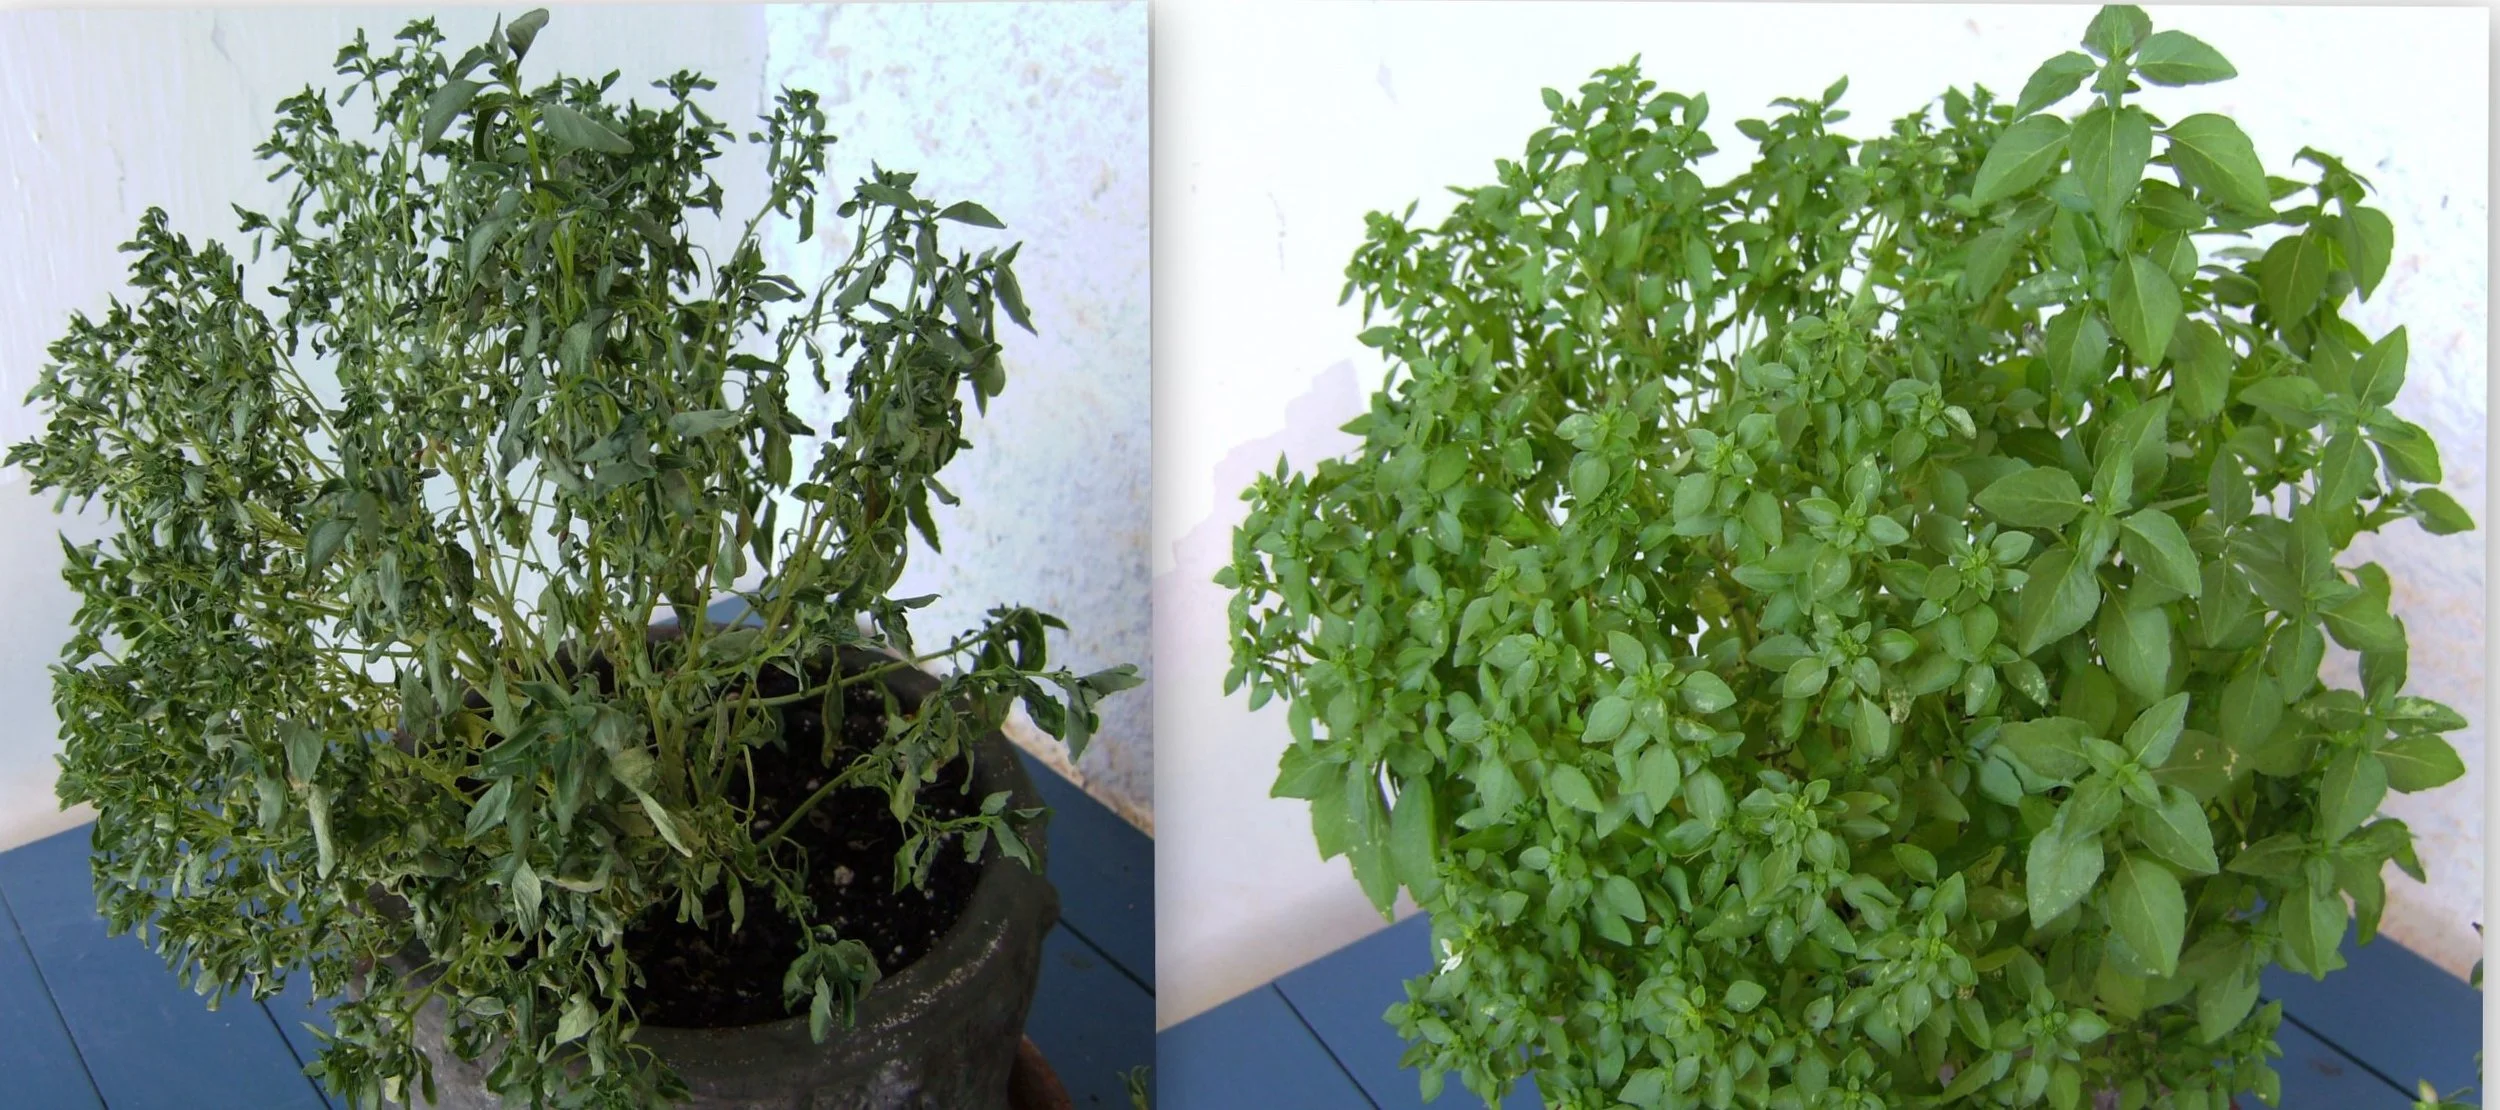
One plant, two states. Left: a basil past thirsty — leaves limp and dull, stems bent, the whole plant collapsed. Right: the same basil after a thorough watering, leaves plump and bright again. A wilt like this is the plant spending its last rigidity to survive; caught in time and watered deeply, it can stand back up within hours.
Photograph by Victor M. Vicente Selvas, released to the public domain.
Underwatering is the more honest problem. It announces itself clearly, and most plants forgive it.
★ When soil dries beyond the wilting point, the point at which roots can no longer extract moisture from the particles, the plant loses more water through its leaves than it can replace. Cells lose their firmness, and the plant wilts: leaves droop, stems sag, the whole plant looks tired. This is the plant's emergency signal, and unlike overwatering, the cause is exactly what it appears to be.
The signs of underwatering:
- Wilting that improves within hours of watering
- Soil pulling away from the edges of the pot
- Dry, crispy leaf edges, often brown
- Soil that feels completely dry several inches down
- A pot that feels unusually light when lifted
Recovery is usually quick and complete. Water deeply, and most plants perk up within hours. For severely dried soil, which can become hydrophobic and shed water instead of absorbing it, bottom watering works best: set the pot in a basin and let capillary action do the work over twenty to thirty minutes.
Check in: Severely dried soil can turn hydrophobic. What does that mean, and which watering method answers it?
A note on lifting: with practice, you can judge a pot's moisture by its weight. A freshly watered pot is heavy. A dry one is light. Experienced growers check this almost unconsciously every time they pass their plants. It is a lovely skill to develop, and it costs nothing.
❦ In your workbook: record the thirst in your own way — the wilting point, the signs of underwatering, and the quick recovery — copy, sketch, or note what matters.
Reading Your Plant: A Side-by-Side Guide
The most important diagnostic skill in watering is telling too much from too little, because the treatments are opposites and the most visible symptom, wilting, appears in both. Keep this comparison in your ledger.
| Sign | Overwatered | Underwatered |
|---|---|---|
| Soil moisture | Wet or soggy | Dry, possibly pulling from pot edges |
| Leaves | Yellow, especially lower leaves; may drop while still soft | Brown, crispy edges; wilting |
| Stems | Soft or mushy at the base | Firm but drooping |
| Soil smell | Sour or rotten | Normal, earthy |
| Response to water | No improvement, or worsens | Perks up within hours |
| Algae or mold on soil | Common | Rare |
When in doubt, check the soil before acting. The finger never lies.
❦ In your workbook: record the side-by-side guide in your own way — copy the comparison into your ledger, sign by sign — copy, sketch, or note what matters.
The Finger Test and Other Moisture Checks
★ The finger test is the oldest moisture meter in existence, and it still works. Push your finger about an inch into the soil near the edge of the pot. If it comes out with soil clinging damply, wait. If it comes out mostly clean and the soil feels dry, water. For larger pots, test two inches down. For succulents, wait until the soil is dry all the way through.
Check in: Your finger comes out with soil clinging damply. What do you do — and what changes for a larger pot, and for a succulent?
Three other checks, each useful in its own way:
The chopstick method. Keep a plain wooden chopstick or skewer pushed into the soil, the way you would test a cake. Pull it out to read the moisture: dark and damp means wait, pale and dry means water. This reaches deeper than a finger and disturbs nothing.
The lift test. Lift the pot after watering and remember its weight. Lift it again in a few days. The difference teaches your hands what dry feels like. Within weeks, you will read your plants by weight alone.
The moisture meter. An inexpensive probe meter gives a numerical reading and is genuinely useful for beginners learning the feel of things. Use it as training wheels, not a permanent crutch. The goal is to develop your own senses, because the meter cannot tell you what the plant looks like, and you can.
Record your readings in your grow ledger for the first few weeks. Note the date, the test result, and whether you watered. Patterns will emerge: your mint drinks faster than your spider plant, the small pot dries before the large one, the sunny sill outpaces the shaded corner. This record becomes the foundation of your watering plan.
❦ In your workbook: record the moisture checks in your own way — finger, chopstick, lift, and meter, and what each one tells you — copy, sketch, or note what matters.
In your packet: Exercise I — The Watering Audit ◐ begins here. Work it now, or mark the place and take it as homework — your choice.
Safety Notes
Water is gentle, but it deserves the same respect as any other tool in the Greenhouse.
Empty saucers and trays within an hour of watering. Standing water is a nursery for mosquitoes, which can breed in even a shallow saucer in warm weather. It also keeps roots sitting in wet conditions that invite rot. Tip the saucer, pour it out, and put the pot back.
Wipe up spills promptly. Wet floors are slippery, and a spilled watering can on tile or wood is a genuine fall hazard. Keep a towel near your watering station and make drying the floor part of the routine.
Take care with water and electricity indoors. Keep watering cans and spray bottles away from lamps, grow lights, power strips, and outlets. Unplug grow lights before misting nearby plants, and never handle electrical equipment with wet hands. If you use a full-spectrum bulb for winter growing, position it where splashes cannot reach it.
Younger students should ask an adult for help lifting heavy water-filled pots and large watering cans. Water is heavier than it looks.
❦ In your workbook: record the safety notes in your own way — saucers emptied, spills wiped, water kept from electricity — copy, sketch, or note what matters.
Guided Observation: Checking Moisture Before You Water
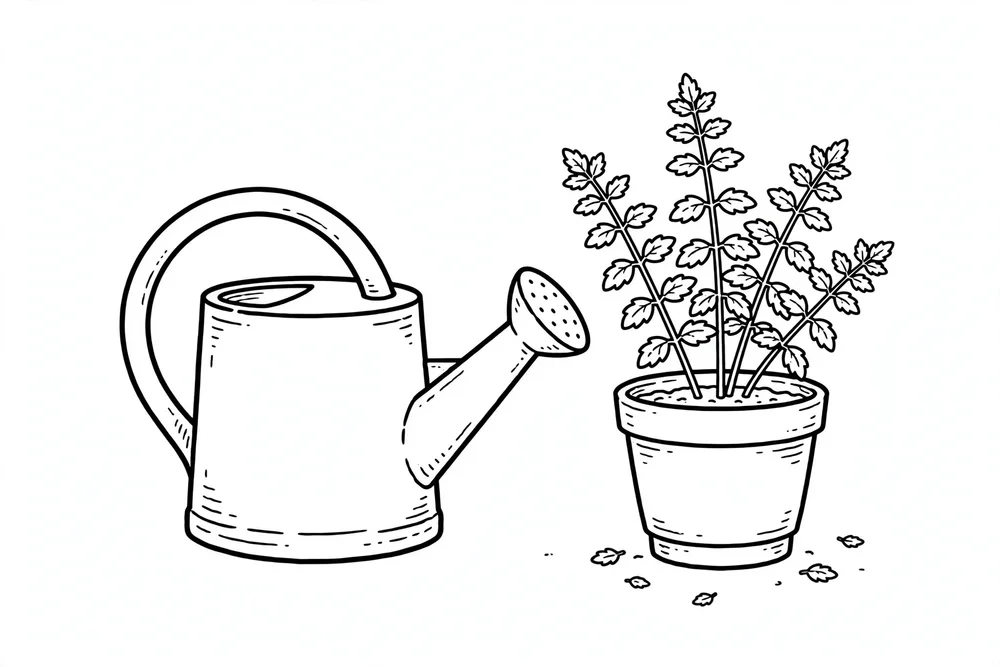
This lesson's observation is a practice of the hands: four moisture checks, worked on your own familiar, in the order the lesson teaches them. No check requires any purchased instrument; the meter is the only optional one, and the lesson itself calls it training wheels.
You will need:
- your Scholar's Familiar in its pot (or a plant you can visit regularly — see the alternative path below)
- a plain wooden chopstick or skewer
- your grow ledger and a pencil
- a probe moisture meter, if you have one (optional)
Begin with the finger test. Push your finger about an inch into the soil near the edge of the pot — two inches down for a larger pot. Read what comes out: soil clinging damply means wait; mostly clean and dry means water. For succulents, wait until the soil is dry all the way through.
Read deeper with the chopstick. Keep a plain wooden chopstick or skewer pushed into the soil, the way you would test a cake. Pull it out to read the moisture: dark and damp means wait, pale and dry means water. This reaches deeper than a finger and disturbs nothing.
Learn the lift. Lift the pot after watering and remember its weight. Lift it again in a few days. The difference teaches your hands what dry feels like.
Record everything. Record your readings in your grow ledger for the first few weeks. Note the date, the test result, and whether you watered. Patterns will emerge, and this record becomes the foundation of your watering plan.
Consider:
- Which check reached the moisture your finger could not?
- Did the chopstick and the lift agree with the finger test, or did one of them surprise you?
- Why does the lesson trust your own senses over any device, in the end?
No living plant of your own? Work these same checks on a plant you can visit regularly — a park tree's soil at its base, a neighbor's garden bed with permission, a store display, even a hardy sidewalk weed in a crack of soil. The observation skills are identical; only the ownership differs.
Materials
Required (Level One — household items)
- Your finger: the oldest moisture meter in existence. Free and always available.
- A wooden chopstick or skewer: for the deep-moisture check described in the lesson.
- A watering can, jug, or cup: anything that pours gently without blasting the soil surface.
- A basin or sink: for bottom-watering experiments and for emptying saucers.
- Saucers or trays: under every pot, emptied within an hour of watering.
- Food coloring and paper towels: for the capillary demonstration in Exercise II.
Suggested (Level Two — historically closer)
- A probe moisture meter: the modern descendant of the gardener's practiced hand; useful while learning the feel of soil.
- A long-spouted watering can: directs water to the soil, not the foliage, as greenhouse growers have long preferred.
- A rain gauge: for students with outdoor plants, to measure what the sky provides before adding more.
Safety notes: Empty saucers and trays within an hour of watering. Standing water breeds mosquitoes. Wipe up spills promptly; wet floors are a slip hazard. Keep water away from lamps, grow lights, power strips, and outlets. Never handle electrical equipment with wet hands. Younger students: ask an adult for help lifting heavy water-filled pots.
Reflection Questions
Answer the following questions in your workbook.
- Why can an overwatered plant and an underwatered plant both wilt, and why does the treatment differ completely?
- Explain capillary action in your own words. Where have you seen it outside of soil?
- Why is morning the best time to water? Give two reasons.
- A friend waters her plant a little bit every day and it is dying. What is likely happening, and what would you advise?
- How does your watering plan reflect your specific plant and conditions rather than a generic schedule?
Workbook Checklist — Lesson 13
In my workbook I have:
- ☐ explained capillary action — cohesion and adhesion moving water through narrow pores — and why clay draws water higher than sand
- ☐ described how root hairs drink by osmosis, and why flooded soil starves roots of oxygen
- ☐ stated the deep watering method and why morning watering is best
- ☐ told overwatering from underwatering by soil, leaves, stems, smell, and response to water
- ☐ performed the finger test, the chopstick method, and the lift test, and recorded the readings in my grow ledger
- ☐ kept the safety notes: saucers emptied within an hour, spills wiped up, water kept away from electricity
- ☐ completed the Watering Audit, the Capillary Demonstration, and my Familiar's Watering Plan — or their adopted-plant paths
☐ Lesson completed Date: ___ Signature: ___
The Professor's Closing Note
You began this lesson by following a single drop of water, and you end it knowing where that drop goes, what it does along the way, and how to tell when there have been too many drops or too few. That is real knowledge, the kind that lives in your hands as much as in your head.
Your assignment now is to write your familiar's watering plan. Not a generic plan. Not my plan. Yours: fitted to your plant, your pot, your soil, your windowsill, and the season you are in. Check it with your finger, refine it with your ledger, and revise it when the seasons turn. A watering plan is a living document, like everything else in the Greenhouse.
Water deeply, wait patiently, and trust your finger. Your plant will tell you the rest.
— Professor Beryl Fernfoot, Herbology Greenhouse • Master Herbalist • Head of House Oriens
Cross-Class Connections

Potions · Unit V, Lesson 36 — Candles & Aromatic Wax Casting
You have met my wick's engine already, in Fernfoot's soil: capillary action, the same climb that lifts water to your roots, draws melted wax up my braided fibers into the flame. Come and watch it work in fire instead of earth — and learn why the size and centering of so small a pump decide the whole burn.

Scrollwork · Unit II, Lesson 8 — Ink Flow & Preservation
Eyes here, scholars. The drop you followed through the soil travels my nib by the same law: adhesion drawing it to the slit's walls, cohesion pulling the column after it, the page's own fibers drinking it down. Learn the drop in the Greenhouse; then come and read it in the line it writes.
Further Reading & Sources
- Diagnosing Houseplants 101: Is Your Plant Diseased or Just Overwatered? — University of Florida IFAS Extension, on telling overwatering from disease
- Avoid Overwatering to Prevent Plant Diseases — University of Georgia Extension, on root rot as a water problem
- Capillary Action — Encyclopedia.com, definitions of capillarity in soil science
- What Is Capillary Action in Soil? — GardenerBible, gardener-friendly explanation of capillary movement
- Underwatered vs Overwatered Houseplants: Signs and How to Save Them — Best Plant Friend, side-by-side diagnosis guide
Browse the Herbology shelf in the school Library for readable editions of these works.
Plants from this lesson stand in the Materia Botanica, the school's shared archive — each kept with its lessons, its keepings, and its cautions. This lesson's company:
Spider PlantRye The whole Materia BotanicaPROFESSOR BERYL FERNFOOT · HERBOLOGY GREENHOUSE
Submit your work for this lesson using the form below.
CONTINUE IN THE HERBOLOGY GREENHOUSE
← Previous · Lesson 12: Photoperiod Dynamics: Understanding Sunlight Next · Lesson 14: Microclimate Calibration →
Unit II — Soils, Sunlight & Growing Environments Herbology Greenhouse — All 37 Lessons
The rest of Unit II: Lesson 8 · Substrate Profile · Lesson 9 · Soil Chemistry: pH · Lesson 10 · The N-P-K Matrix · Lesson 11 · Compost Crucible · Lesson 12 · Photoperiod Dynamics · Lesson 14 · Microclimate Calibration · Lesson 15 · Seasonal Growing Cycles · Lesson 16 · The Growing Plan