

HERBOLOGY
Unit II · Lesson 8THE SUBSTRATE PROFILE: TEXTURE & DRAINAGE
PROFESSOR BERYL FERNFOOT
Herbology Greenhouse · Master Herbalist
Herbology · Unit II: Soils, Sunlight & Growing Environments · Lesson 8
Not all soils behave the same way. Learn to read the ground beneath your plant.
Professor's Introduction

Welcome to the greenhouse, scholars,
Welcome to Unit II, and welcome to the soil.
In Unit I you learned to look closely at your Scholar's Familiar: its leaves, its stems, its roots, its name, its history. Now we turn our attention downward, to the dark and quiet world your plant stands in. Most gardeners treat soil as an afterthought, a brown stuff that holds the plant up. I am here to tell you that soil is not an afterthought. It is half the plant's life.
Everything your familiar drinks, much of what it eats, and the very air its roots breathe all come from the soil. A plant in the wrong soil is like a scholar trying to study in a room with no light: willing, but unable. A plant in the right soil does half your work for you.
This lesson, we learn the first and most lasting thing about any soil: its texture. Texture is the personality of the ground. It decides whether water rushes through or lingers, whether roots push easily or struggle, whether your watering can is a kindness or a flood. And the lovely thing is that you can read it with your own hands, no laboratory required.
Take your familiar's pot in hand, my dears. We are going to meet the ground it stands on.
— Professor Beryl Fernfoot, Herbology Greenhouse • Master Herbalist • Head of House Oriens

The line beneath the map is our road: every stop a place where the knowledge of plants changed, every lesson a step along it.
Lesson Objectives
By the end of this lesson, you will be able to:
- Name the three mineral particles of soil (sand, silt, clay) and describe how each feels and behaves
- Explain how soil texture controls drainage, water retention, and root growth
- Read the USDA soil texture triangle and identify the ideal garden loam
- Perform the ribbon test to estimate a soil's clay content by touch
- Perform the jar-settle test to measure the proportions of sand, silt, and clay
- Write a complete substrate profile for your Scholar's Familiar's soil
Reading this lesson: ★ marks the passages to remember. They return on the unit quiz and the class test. Check in questions ask the material back as you go; answer them in your workbook when you meet them.
Working this lesson: Your assignment packet is the first download on this page. Work in it as the lesson moves along, answering each assignment as its subject is taught — or read the lesson through for your notes and take the assignments as homework afterward. Both are proper ways to sit this class. Signposts in the reading tell you where each assignment belongs. Written answers are short answers in your own words; a few honest lines are worth more than a filled page.
Your Assignment Packet
This lesson's assignments live in its packet: the Lexicon Handout (every term, course terms marked ◆), Materials, Guided Practice, the Assignment Manual with its answer key for self-checking, the Reflection Questions, and the Workbook Checklist. Download the packet before you begin and keep it beside you as you read.
The Ground Beneath Your Familiar
Lift your Scholar's Familiar, pot and all, and look at the surface of its soil. Really look. Is it dark or pale? Does it look loose and crumbly, or smooth and packed? When you last watered it, did the water vanish at once, or did it sit on top in a little pool before sinking in?
Everything you just observed is texture talking.
★ Soil is made of two great families of ingredients. The first is mineral: tiny grains of rock, ground down over thousands of years by weather, water, and time. The second is organic: the remains of things that once lived, leaves and roots and the countless small creatures of the soil, broken down into dark, rich humus. The minerals decide the texture. The organic matter decides the richness. This lesson is about the minerals. Organic matter gets its full lesson soon, and it deserves the wait.
★ Here is the first thing to understand: you cannot change your soil's texture. The proportions of sand, silt, and clay in a soil were set by geology long before any gardener arrived. What you can change is how that texture behaves, by adding organic matter, by watering wisely, by choosing plants suited to what you have. But the texture itself is the ground's given nature. A wise gardener learns to work with it, not against it.
Check in: A soil's texture cannot be changed. Name the three things this lesson says a gardener CAN do instead — change how the texture behaves, and say how.
❦ In your workbook: record the ground beneath your familiar: what you saw on its surface, and the two families every soil is made of in your own way — copy, sketch, or note what matters.
The Three Mineral Players
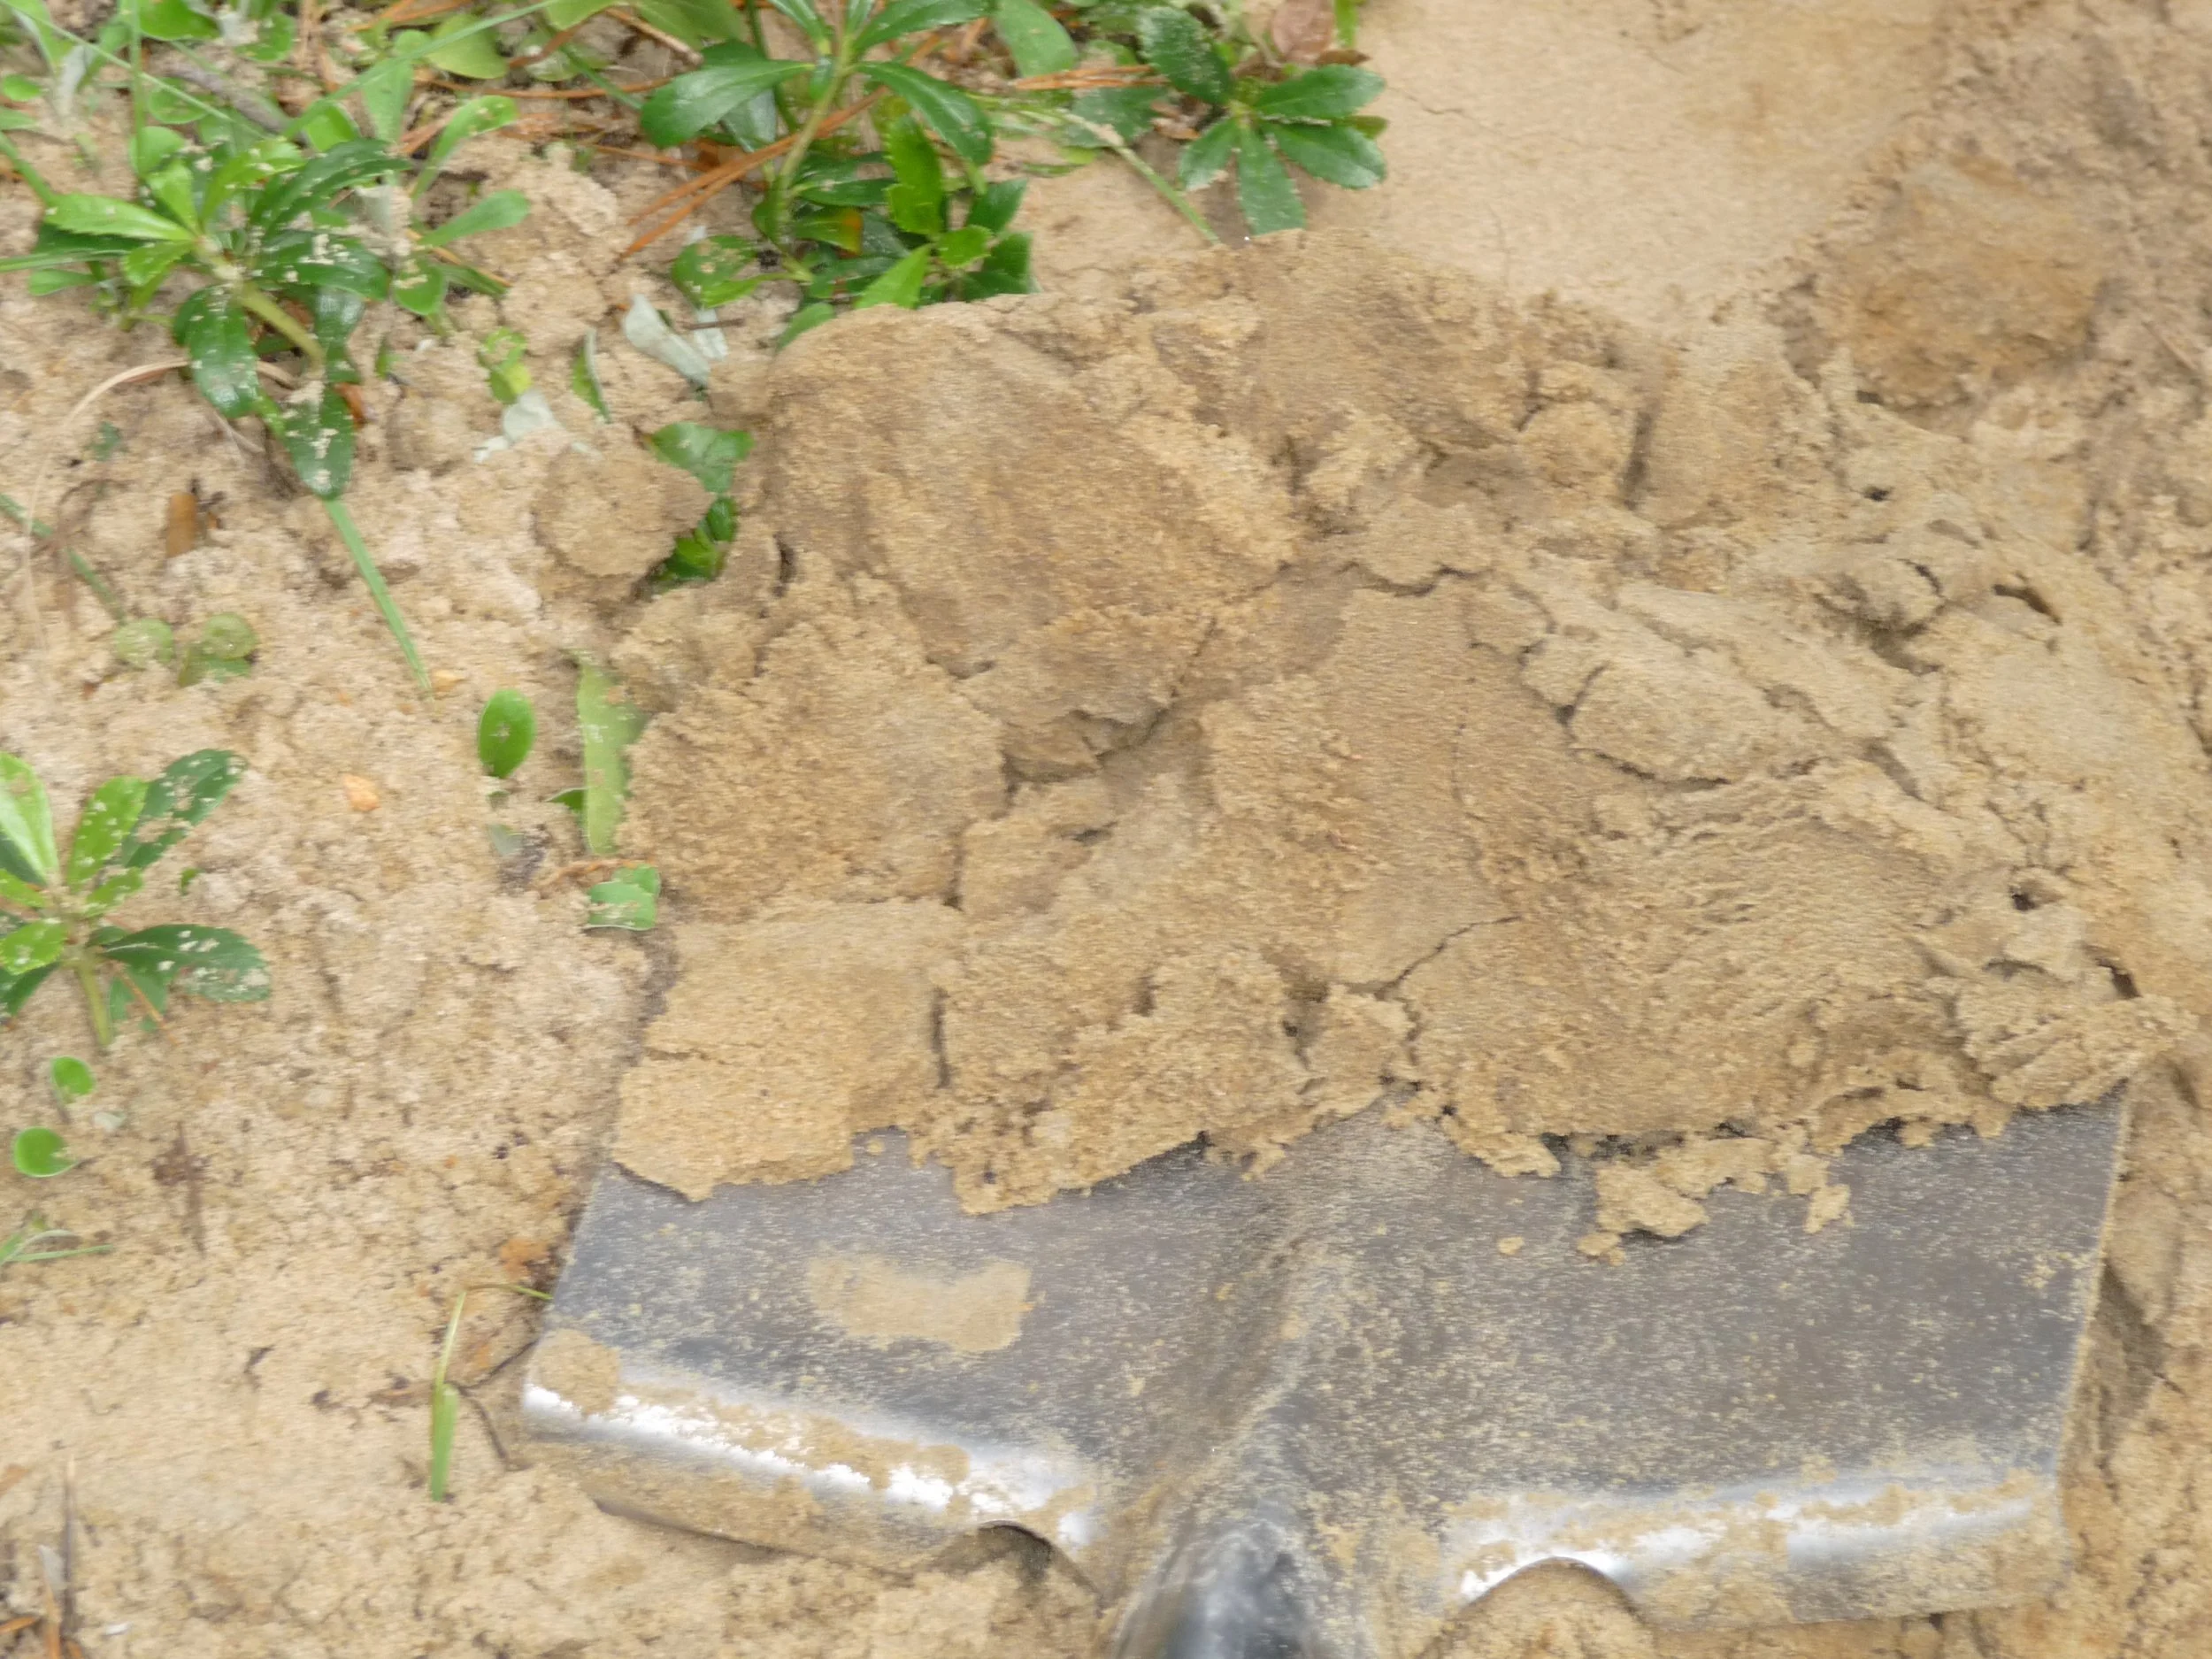
Sandy loam at the spade: pale, loose, and grainy, crumbling as it is lifted. Sand is the sieve of the three mineral players — water rushes through it, air reaches the roots, and almost nothing is held. A soil this sandy will not ribbon, because sand cannot bind.
Photograph, "Sandy loam," released by its author on Wikimedia Commons. Public domain.
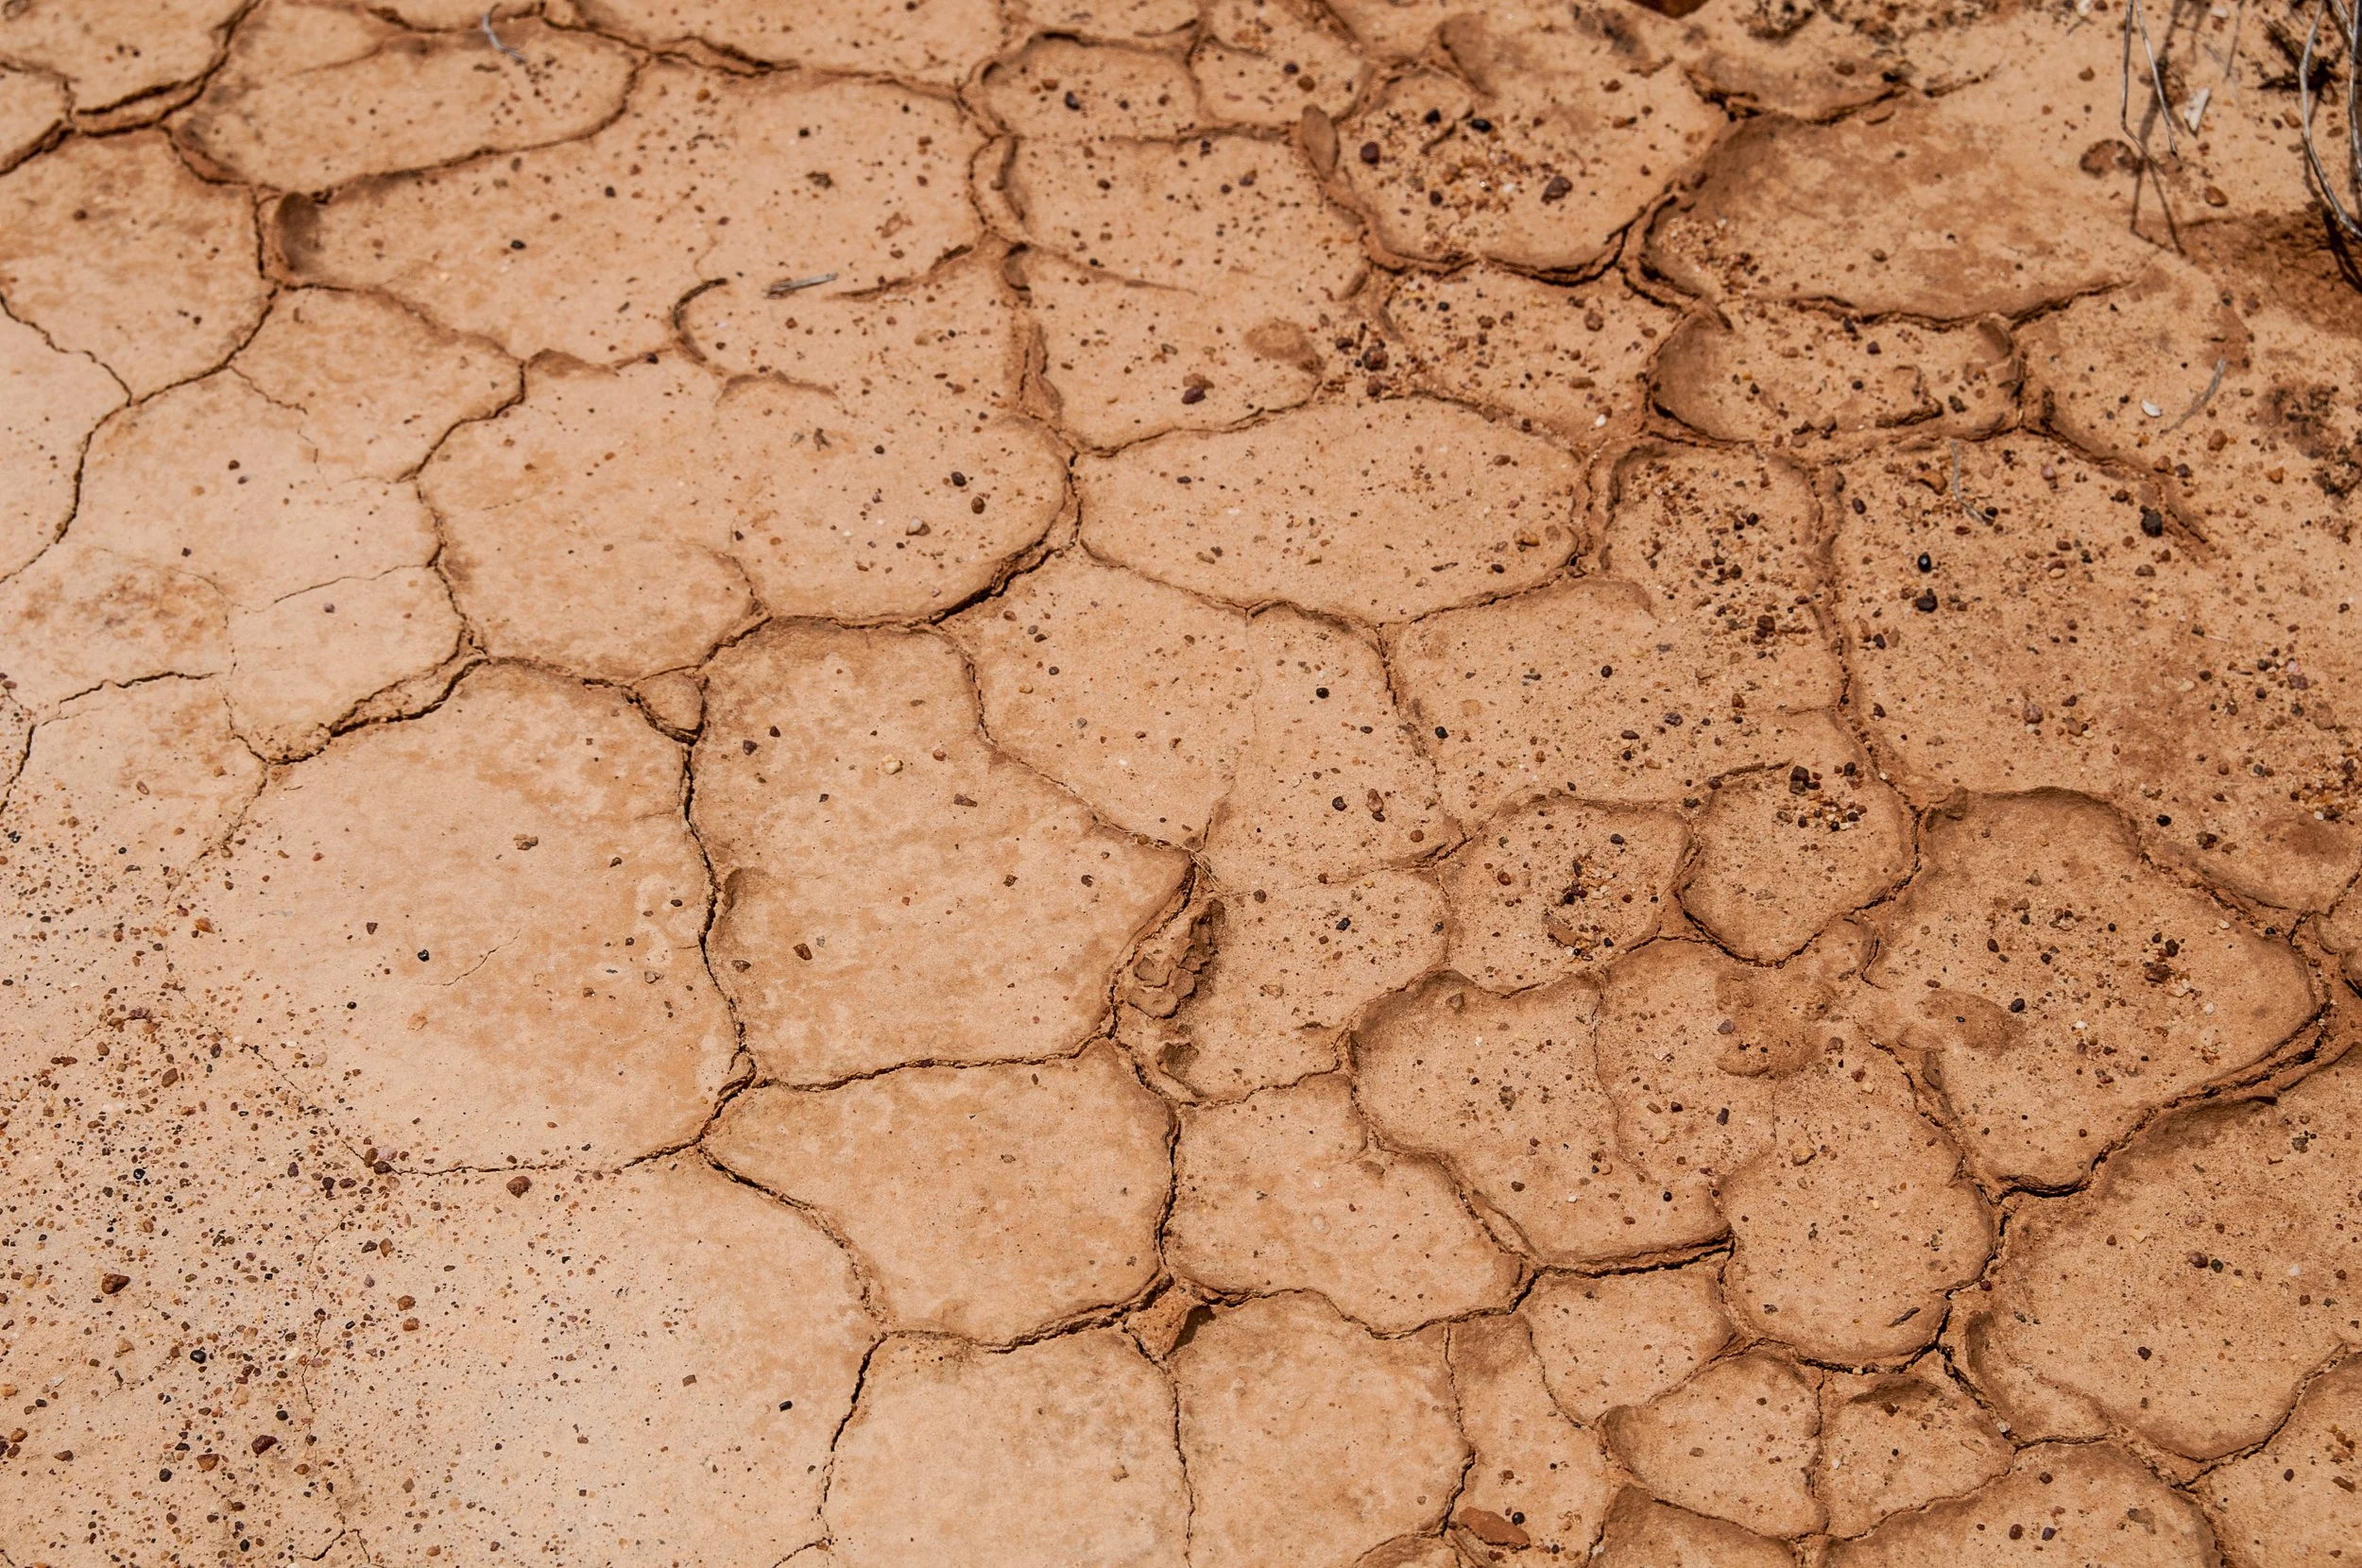
Clay, dry: the same flat plates that mold like putty when wet have shrunk, curled, and cracked into polygons in drought. Dry clay turns hard as brick — this is the other face of the vault that holds water and nutrients so fiercely when it is wet.
Photograph by Wilfredor, near La Guardia, Margarita Island, Venezuela. CC0.
All mineral soil is made of just three particle sizes. They have plain names: sand, silt, and clay. Their differences are enormous.
Sand grains are the giants, from 0.05 to 2.0 millimeters across. You can see individual grains with your naked eye, and they feel gritty between your fingers, like sugar or beach sand. Water rushes through sand. A sandy soil drains almost too well: it dries quickly, it warms quickly in spring, and it lets air reach the roots easily. But it holds almost no water and almost no nutrients. Water and dissolved food wash straight through, and the plant goes thirsty and hungry between waterings. Think of sand as a sieve.
Silt grains are the middle children, from 0.002 to 0.05 millimeters. You cannot see them individually. They feel smooth, like flour or talcum powder, slipping softly between your fingers. Silt holds water better than sand and holds nutrients better too. But silty soil has a weakness: it compacts easily and can crust over at the surface, sealing out water and air. Think of silt as a sponge that can be squeezed too tight.
★ Clay grains are the smallest of all, less than 0.002 millimeters, far too small to see. They are not even round like the others; they are flat plates, stacked like tiny shingles, which gives clay an enormous surface area for its size. Wet clay feels sticky and plastic. You can mold it like modeling clay. Dry clay turns hard as brick. Clay holds water fiercely and holds nutrients fiercely too, more than sand or silt ever could. But it gives them up slowly, drains slowly, and when it is waterlogged, roots cannot breathe. Think of clay as a vault: rich, but locked.
No natural soil is made of only one of these. Every soil is a mixture, and the mixture's name depends on which player dominates.
Check in: Clay is the vault: rich, but locked. What two things does clay hold fiercely, and what happens to roots when the vault is waterlogged?
❦ In your workbook: record the three mineral players: sand the sieve, silt the sponge, and clay the vault in your own way — copy, sketch, or note what matters.
The Texture Triangle
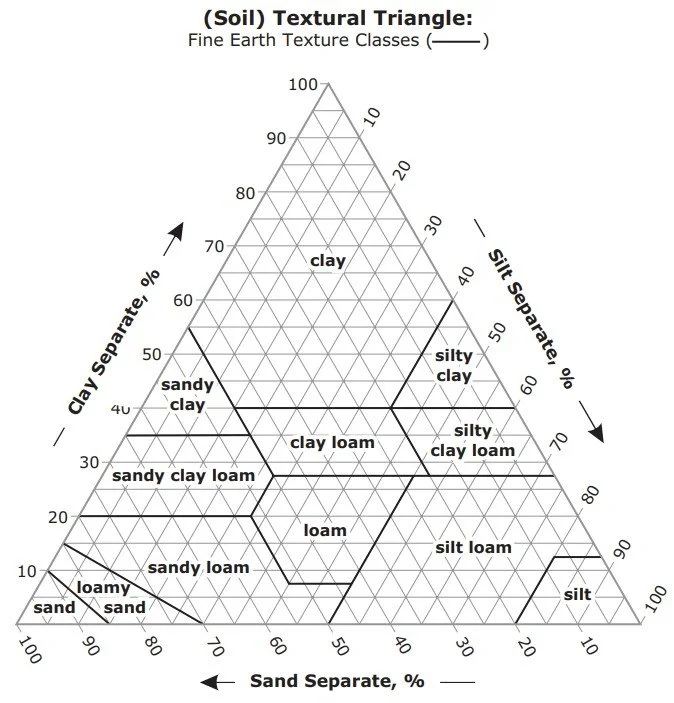
The USDA soil texture triangle. Every soil on Earth sorts into one of its twelve classes; find loam at the center — roughly 40 percent sand, 40 percent silt, 20 percent clay — the balance every other soil is judged against. Plot your jar-test percentages here, as soil judges do.
USDA Natural Resources Conservation Service, from the Field Book for Describing and Sampling Soils. Public domain (U.S. federal work).
Soil scientists needed a way to name every possible mixture, so the United States Department of Agriculture drew a triangle. The USDA soil texture triangle sorts every soil on Earth into twelve named classes: sand, loamy sand, sandy loam, loam, silt loam, silt, sandy clay loam, clay loam, silty clay loam, sandy clay, silty clay, and clay. Each name tells you the recipe. A sandy loam is mostly sand with enough silt and clay to matter. A silty clay is mostly silt and clay, and will behave accordingly.
★ You do not need to memorize all twelve. You need to know one by heart: loam. Loam is the gardener's ideal, the soil every other soil is judged against. It is roughly 40 percent sand, 40 percent silt, and 20 percent clay. It drains well but not too fast. It holds water but not too long. It is loose enough for roots to push through and rich enough to feed them. If you ever buy a bag labeled "loam" or "topsoil," this balanced mixture is what the label is promising.
Most bagged potting mix is not true loam. It is usually built on peat or coir with added perlite, designed to be light and fast draining for containers. That is fine for pots. But when you one day plant in the ground, knowing your soil's true texture class will tell you more about your garden's future than almost anything else.
My dears, do not be daunted by the triangle. You will not be tested on all twelve names. Just remember loam, and remember that every soil is a conversation among the three players. Your hands will learn the rest.
Check in: State loam's recipe from memory — the three percentages — and name what that balance gives a root at each end: drainage, and holding.
❦ In your workbook: record the texture triangle: loam's 40-40-20 recipe, and where a soil of your own would sit among the twelve classes in your own way — copy, sketch, or note what matters.
Pores: The Hidden Architecture
Why does texture matter so much? Because of the spaces between the grains.
Soil is not solid. It is full of pores, tiny tunnels and chambers between the particles, and those pores are where water and air live. Sand grains are large, so the pores between them are large too. These big pores, called macropores, let water drain away quickly under gravity and let air flow freely to the roots. That is why sandy soil drains fast and breathes well.
★ Clay grains are tiny plates packed tightly together, so the pores between them are microscopic. These micropores hold water by capillary force, the same force that pulls water up a paper towel, gripping it against gravity's pull. That is why clay soil stays wet long after rain and why it holds nutrients so well. But those tiny pores leave little room for air, and roots need air as surely as they need water. A drowned root cannot breathe, and a root that cannot breathe rots. This is the quiet cause behind most overwatering deaths: not too much water, but too little air.
Silt sits between, with a mix of pore sizes.
★ The ideal soil has both: macropores for drainage and air, micropores for stored water. Loam has both. That is the whole secret.
Check in: A drowned root is not dying of too much water. What is it dying of, and which kind of pore is missing?
❦ In your workbook: record pores, the hidden architecture: macropores that drain and breathe, micropores that grip and store in your own way — copy, sketch, or note what matters.
The Fourth Ingredient
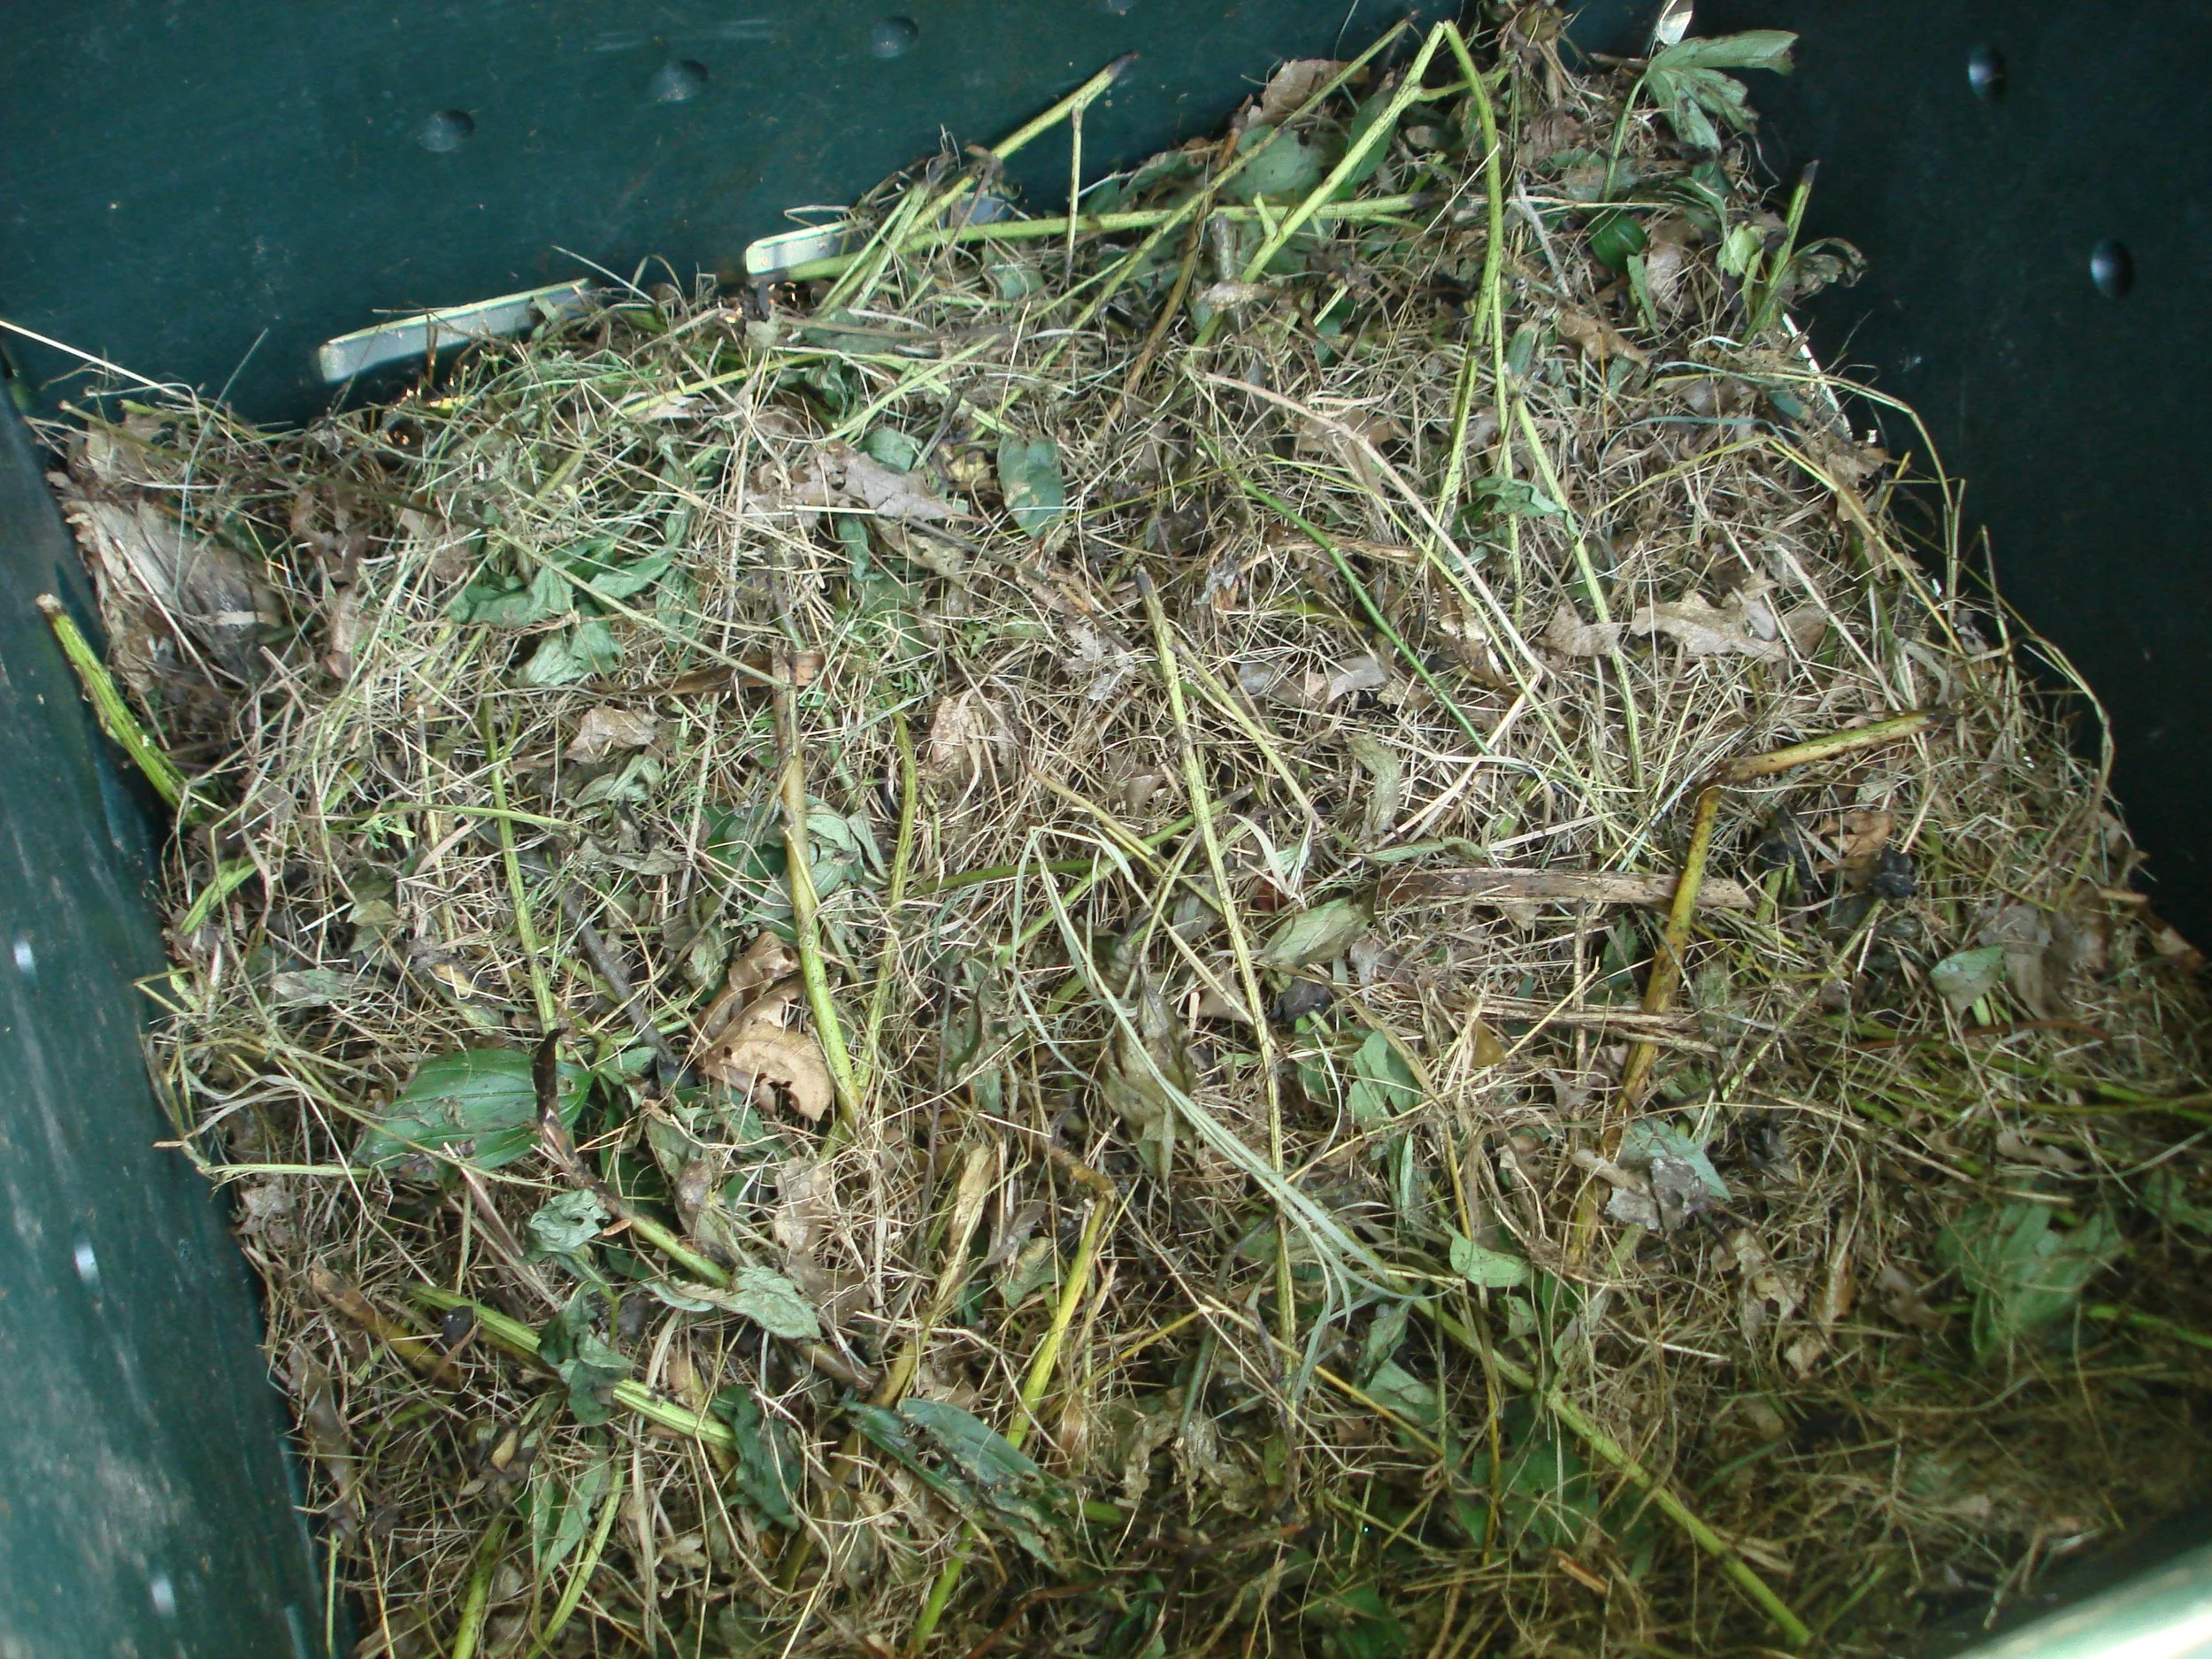
The fourth ingredient, on its way: leaves, stems, and grass clippings in a compost bin — the remains of things that once lived, before the soil life breaks them down into dark humus. Added to a soil, that finished organic matter holds water in sand and props clay's plates apart. Compost, leaf mold, aged bark: the gardener's universal remedy.
Photograph by Ksd5, released on Wikimedia Commons. CC0.
I promised organic matter its own lesson, and it will have one, but I must introduce it here because it is texture's great peacemaker.
★ Organic matter, the dark decomposed remains of leaves, roots, and soil life, improves every texture. In sandy soil, it acts like a sponge tucked among the grains, holding water and nutrients that would otherwise wash away. In clay soil, it props the tiny plates apart, opening channels for air and drainage. It feeds the earthworms and microbes whose tunneling builds the soil's structure year after year.
You cannot change texture, but you can always add organic matter. Compost, leaf mold, aged bark: these are the gardener's universal remedy. Remember this. It will return in many lessons to come.
❦ In your workbook: record the fourth ingredient: how organic matter peacemakes in sand and in clay alike in your own way — copy, sketch, or note what matters.
A Note from Professor Fernfoot
Now, my dears, it is time to get your hands dirty. Truly dirty. The next two tests are the oldest tools in the gardener's kit, and they require nothing you do not already own.
I want you to notice something as you work. Your hands are instruments. They can tell gritty from smooth, sticky from crumbly, in a single squeeze. No machine needed. Gardeners read soil with their fingers for ten thousand years before anyone drew a triangle. You are joining a very old company.
Take your time. Feel everything twice. Write down what your fingers tell you before your eyes argue with them.
— Professor Beryl Fernfoot, Herbology Greenhouse • Master Herbalist • Head of House Oriens
Reading Soil by Touch: The Ribbon Test
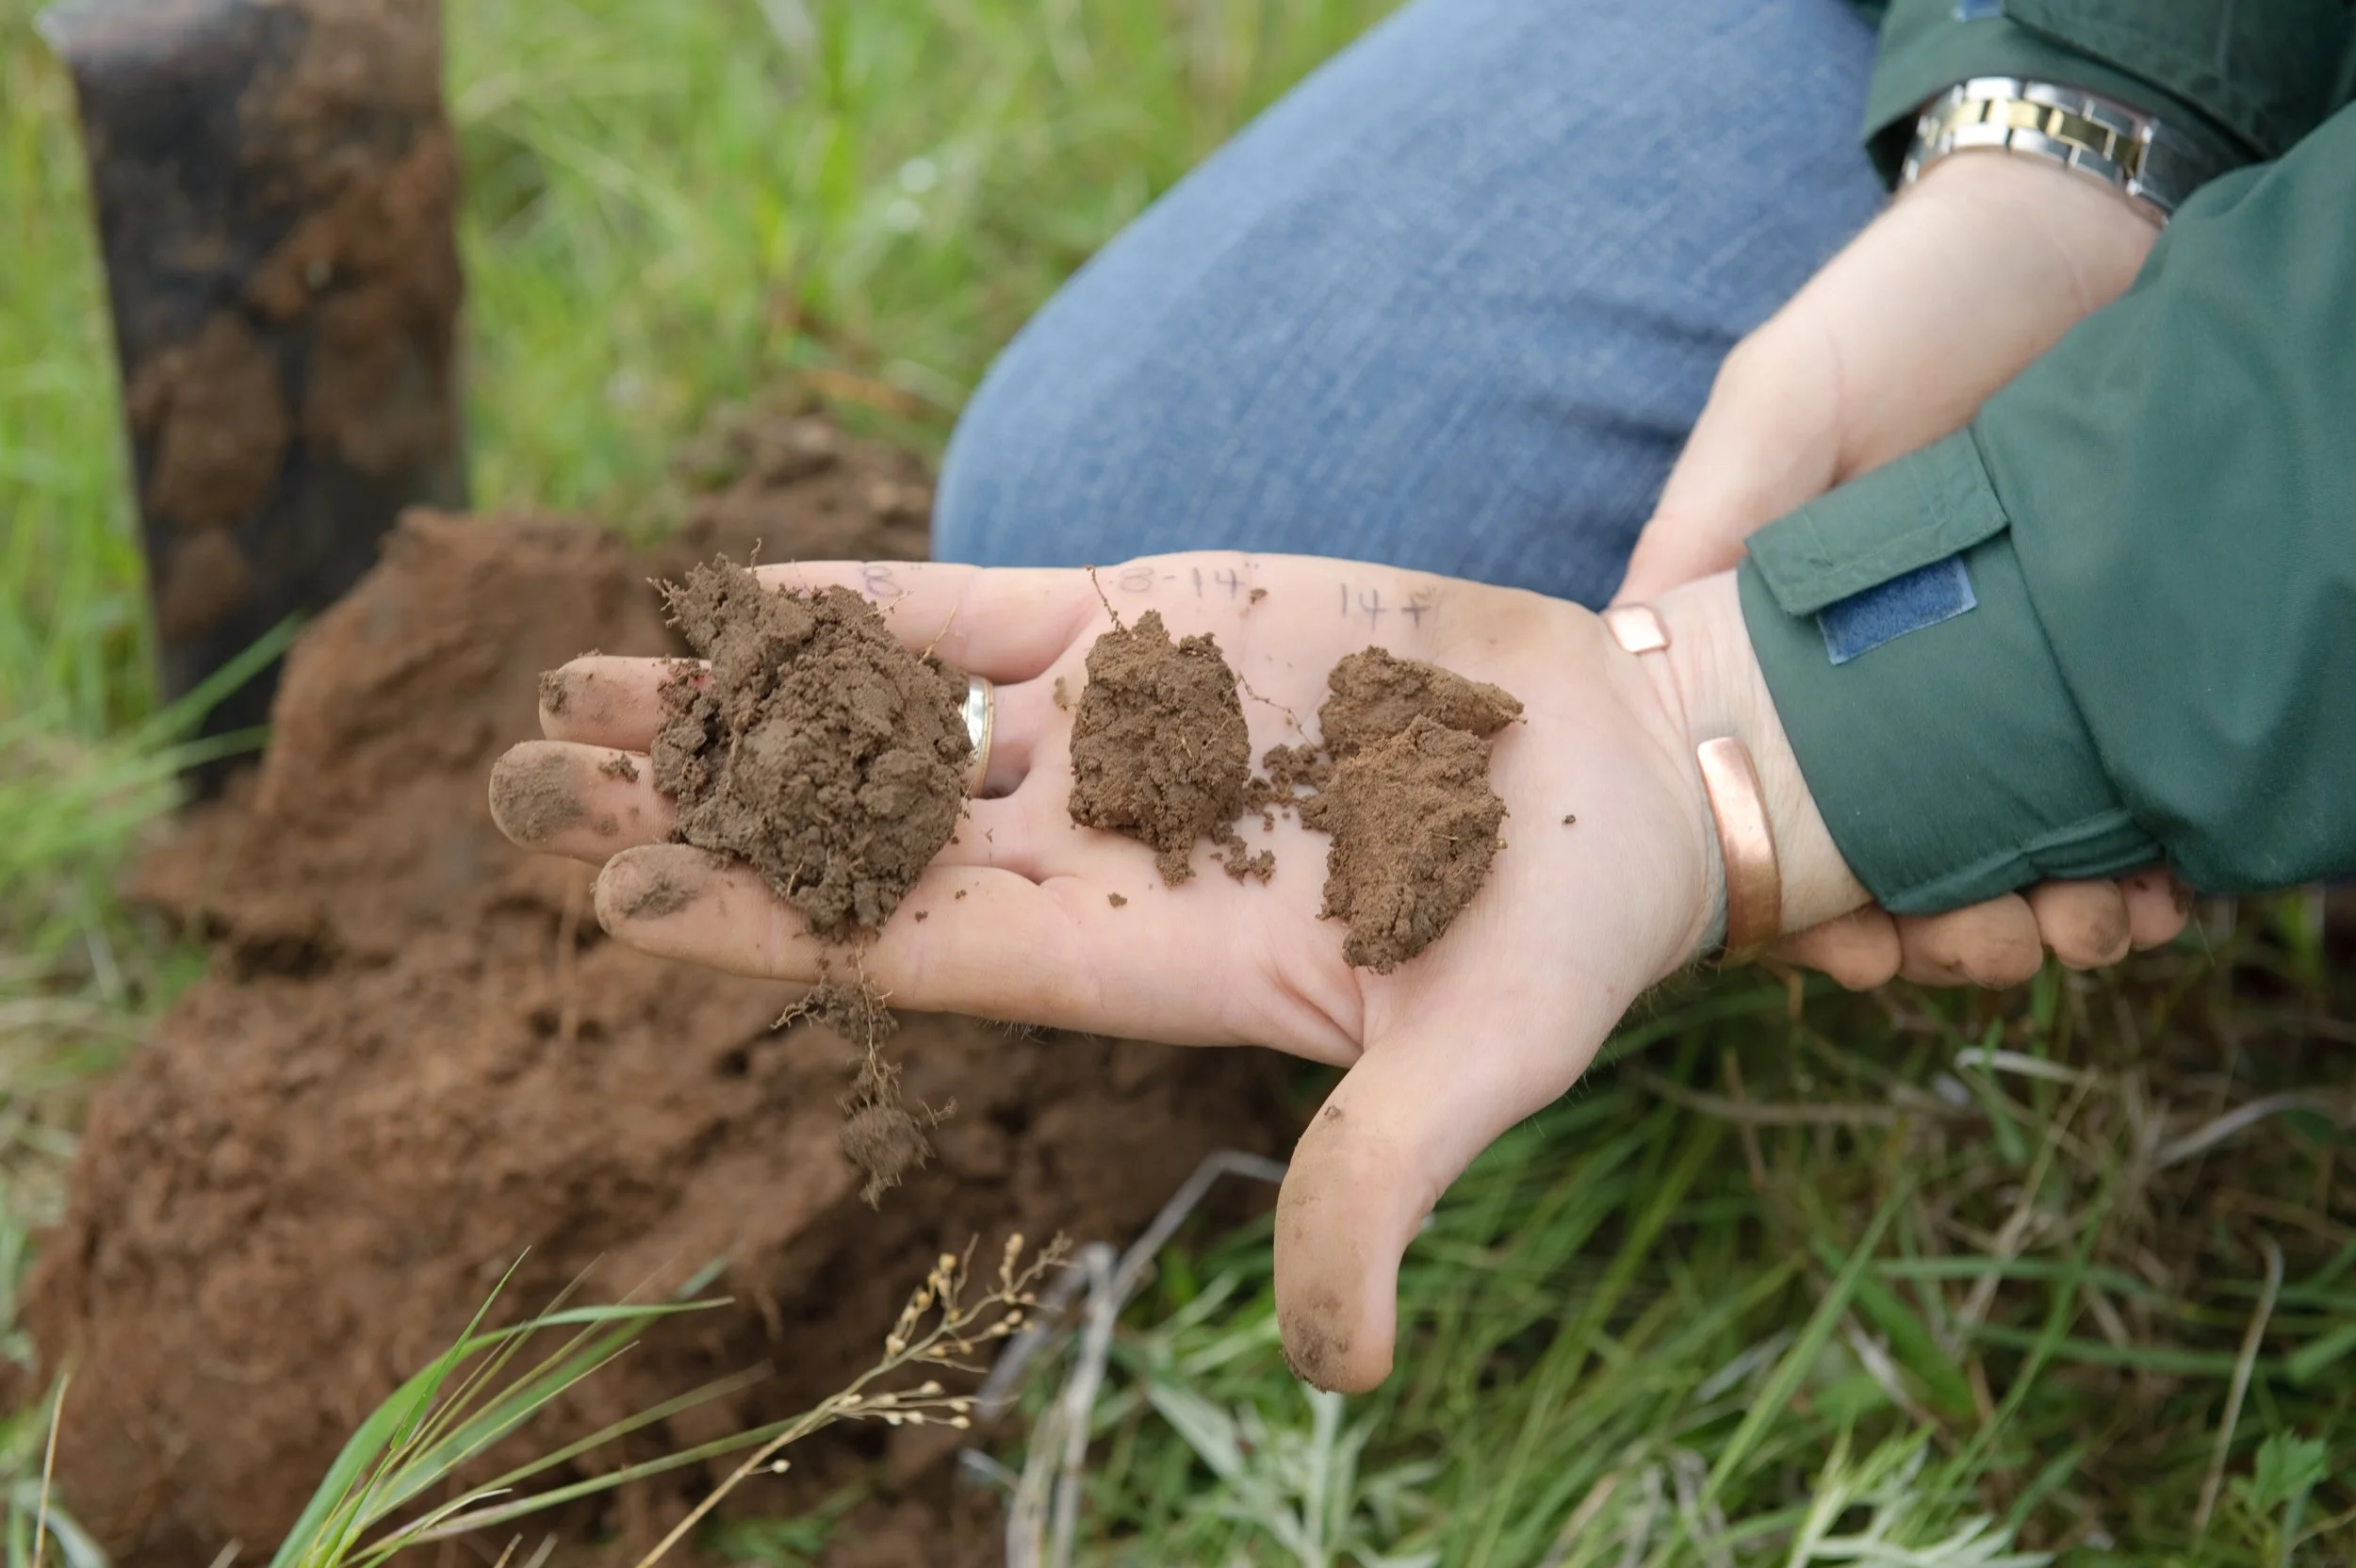
Reading soil by hand, as soil scientists still do it: samples from different depths laid in the palm, judged by feel before any laboratory sees them. Your ribbon test uses the same instrument. Honest limit: this photograph shows the hand examination, not a ribbon being pressed — the ribbon itself is yours to make.
Photograph by USDA NRCS Texas (U.S. Department of Agriculture employee, official duties). Public domain.
The ribbon test is the field gardener's quickest answer to the question "what kind of soil is this?" It estimates clay content by the oldest instrument available: your hands.
Here is how to do it.
Take a small handful of soil, about the size of a walnut. Pick out any stones, roots, or large bits of debris. If the soil is dry, add water drop by drop, kneading as you go, until it reaches the consistency of modeling clay or putty: moldable, not dripping, not crumbly.
Squeeze the moistened soil into a firm ball in your fist. Now place the ball between your thumb and forefinger and press gently, pushing the soil upward and outward into a flat ribbon. Let the ribbon extend over your forefinger until it breaks under its own weight. Measure the ribbon before it broke.
★ Here is how to read it:
- No ribbon at all. The ball crumbles or the soil will not hold together. Your soil is sandy. Sand cannot bind, so there is nothing to ribbon.
- A short ribbon, less than 1 inch (2.5 cm). Your soil is loamy. Now feel it: gritty means sandy loam, smooth like flour means silt loam, and neither gritty nor smooth means true loam.
- A medium ribbon, 1 to 2 inches (2.5 to 5 cm). Your soil has real clay in it, roughly 15 to 30 percent. Gritty means sandy clay loam, smooth means silty clay loam, neither means clay loam.
- A long ribbon, more than 2 inches (5 cm). Your soil is clay rich, over 40 percent clay. It will feel smooth and mold like stiff plastic.
Practice on your familiar's potting mix first, then try any garden soil you can get your hands on. You will be surprised how quickly your fingers learn.
Check in: Your ribbon breaks at just under an inch and feels gritty between your fingers. Which texture class does the reading name, and which of its three signs told you?
❦ In your workbook: record reading soil by touch: your ribbon's length, its feel, and the class your fingers named in your own way — copy, sketch, or note what matters.
In your packet: Assignment II — The Ribbon Test ⚒ begins here. Work it now, or mark the place and take it as homework — your choice.
The Jar-Settle Test
The ribbon test is quick. The jar-settle test is precise. Together they tell you nearly everything.
You will need a clear jar with a tight lid, water, a single drop of dish soap, a ruler, and a marker.
Fill the jar about one third full with soil. Dig your sample from a few inches below the surface, not just the top crust, and remove stones and debris. Add water until the jar is nearly full, then add one drop of dish soap. The soap breaks the surface tension and helps the particles separate instead of clumping. Seal the lid tightly and shake vigorously for two to three minutes, until the mixture looks like chocolate milk.
Set the jar on a level surface and watch. The particles settle in order of size, heaviest first:
- Sand settles within the first minute or two, forming the bottom layer.
- Silt settles over the next two to four hours, forming the middle layer.
- Clay stays suspended far longer, often clouding the water, and settles over the next 24 to 48 hours as the top layer.
Mark each layer's height with your marker as it forms, or measure with your ruler at the end. Divide each layer's height by the total height of settled soil and multiply by 100. Those are your approximate percentages of sand, silt, and clay. Compare them to the loam ideal: 40, 40, 20.
★ Be patient with the clay layer. It is always the slowest, and beginners often read the jar too early and conclude they have no clay at all. Give it the full day. Good science waits.
One caution, my dears: this test works on mineral garden soil. Bagged potting mix, which is mostly peat and bark rather than mineral grains, will give strange results. The floating bits are organic matter, which is useful information of its own, but do not try to read sand, silt, and clay from a soilless mix. Test garden soil for texture; observe potting mix for structure.
Check in: You read your jar after two hours and find almost no clay layer at all. Before you conclude your soil has no clay, what has this lesson already told you?
❦ In your workbook: record the jar-settle test: the order the layers settle in, and why the clay must be given its full day in your own way — copy, sketch, or note what matters.
In your packet: Assignment III — The Jar-Settle Test ⚒ begins here. Work it now, or mark the place and take it as homework — your choice.
Your Familiar's Soil Profile
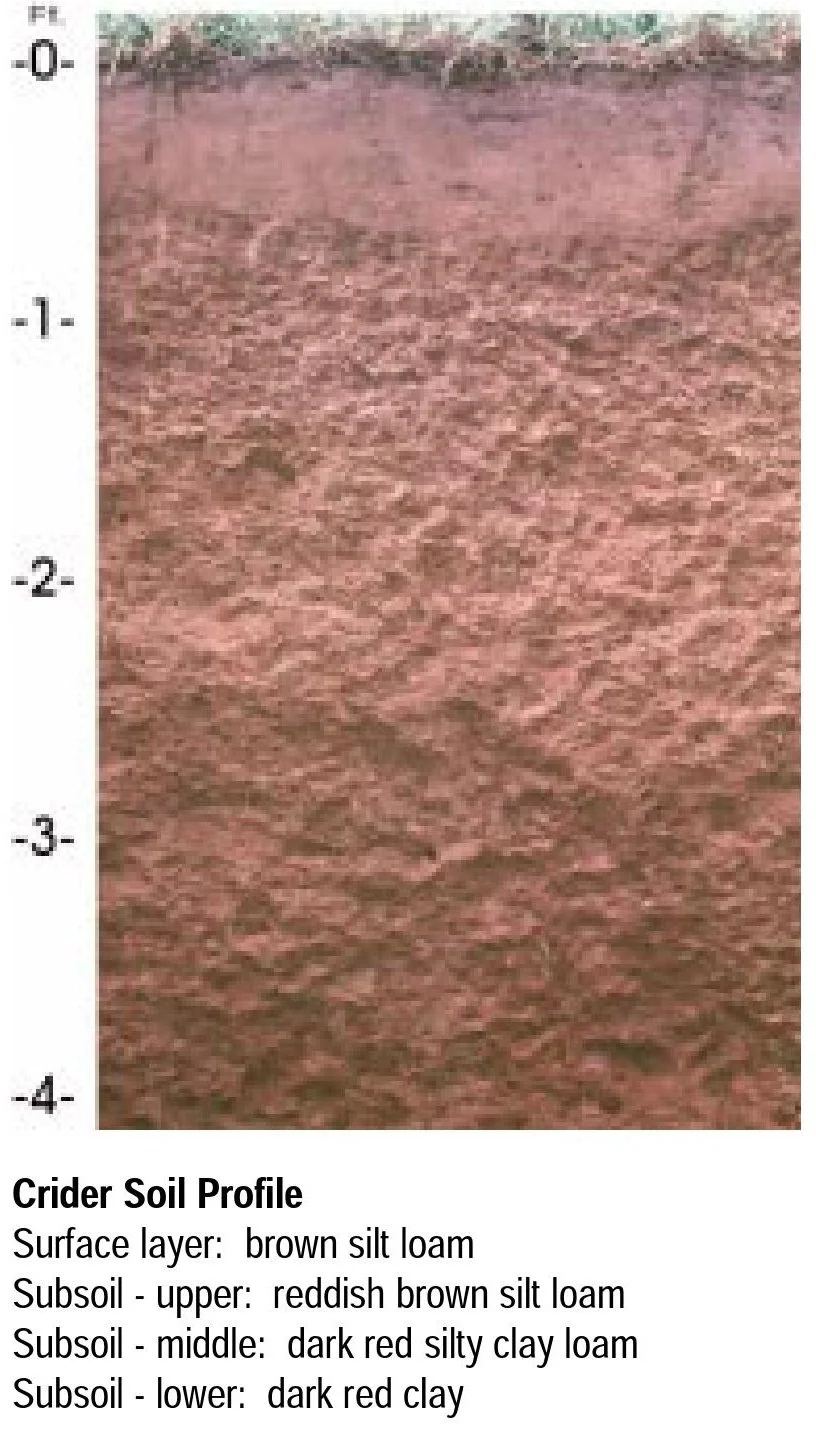
A substrate profile, kept by professionals: the Crider soil, Kentucky's state soil, read layer by layer down four feet — brown silt loam at the surface, dark red clay at the base. Your Familiar's profile does the same work at pot scale: texture class, drainage behavior, organic content, and the verdict on whether the plant is well placed.
USDA Natural Resources Conservation Service, Crider soil series profile. Public domain (U.S. federal work).
★ Now bring it all together. A substrate profile is a written record of a soil's character: its texture class, its drainage behavior, its organic content, and what all of that means for the plant growing in it. Gardeners and farmers have kept such records for centuries. Yours goes into your Scholar's Familiar journal.
Work through these questions and write your answers:
- Ribbon test result. What length of ribbon did your familiar's soil form? What texture class does that suggest?
- Jar test result. What percentages of sand, silt, and clay did you measure? How close is it to loam?
- Drainage observation. Water your familiar as usual and time how long the surface takes to drain. Does water vanish at once, sink steadily, or pool? (See Lesson 1 for the canonical meaning of drainage in this course.)
- The verdict. Is this soil suited to your plant? Mint tolerates heavy soil cheerfully. Basil wants steady moisture but hates wet feet. Spider plants forgive almost anything but sulk in soggy pots. Write one paragraph: what the soil is, and whether your familiar is well placed.
No living plant of your own yet? Adopt one you can visit: a park tree's bed, a neighbor's garden, a sturdy weed in a sidewalk crack. Profile its soil exactly the same way. The skills are identical; only the ownership differs.
Check in: Mint, basil, spider plant: which of the three tolerates heavy soil cheerfully, which wants steady moisture but hates wet feet, and which forgives almost anything but sulks in a soggy pot?
❦ In your workbook: record your familiar's soil profile: the evidence of both tests, and the verdict on whether your plant is well placed in your own way — copy, sketch, or note what matters.
In your packet: Assignment IV — The Familiar's Soil Profile ◐ begins here. Work it now, or mark the place and take it as homework — your choice.
Safety Notes
- ★ Wash your hands thoroughly after handling soil. Soil contains microbes; it is not for tasting, ever.
- Younger students should ask an adult for help when digging soil samples outdoors.
- If you have cuts or scrapes on your hands, cover them or wear gloves while handling soil.
- Wash jars and tools after the jar-settle test. Do not drink from a jar used for soil testing.
- When collecting soil outdoors, take small samples, fill your holes, and respect private property and park rules.
❦ In your workbook: record the safety notes: hands washed, cuts covered, jars washed — and soil never, ever tasted in your own way — copy, sketch, or note what matters.
Guided Observation: Two Tests, One Soil
Before the assignments, work both tests once through with your attention on the method itself: your hands first, then the jar. Everything in this observation is drawn from the two tests this lesson has just taught, and from the soil of your own familiar.
You will need:
- a walnut-sized handful of soil — your familiar's potting mix for the ribbon, garden soil for the jar
- a clear jar with a tight lid, water, and a single drop of dish soap
- a ruler and a marker
- your workbook and a pencil
Work the ribbon first. Moisten the handful drop by drop to putty consistency, squeeze the ball, and press the ribbon over your forefinger until it breaks under its own weight. Measure it before you judge it, and write down what your fingers tell you — gritty, smooth, or neither — before your eyes argue with them.
Then set the jar. Fill it one third full with garden soil from a few inches below the surface, add water nearly to the top and the drop of soap, seal, and shake until the mixture looks like chocolate milk. Set it where it will not be disturbed and mark the layers as they form: sand within minutes, silt within hours, clay across the full day.
Consider:
- Which test answered faster, and which answered more precisely? What does each kind of answer cost you — minutes, or a day of waiting?
- Your ribbon gave you a feel; your jar will give you numbers. Where the two disagree, which do you trust, and what would you check before deciding?
- Why does this lesson test garden soil for texture but only observe potting mix for structure?
Safety: wash your hands thoroughly after handling soil, and wash the jar and tools when the test is done. A jar used for soil testing is never drunk from again.
Materials
Required (Level One — household items)
- A clear jar with a tight-fitting lid: a jam jar or mason jar with straight sides works best.
- Water and one drop of dish soap: for the jar-settle test.
- A ruler and a marker or tape: for measuring and marking the settled layers.
- A spoon or small trowel: for collecting a soil sample from a few inches below the surface.
- A walnut-sized soil sample: garden soil for the ribbon test; your familiar's potting mix for comparison.
- Your Scholar's Familiar journal: for recording both tests and the final soil profile.
- A workbook: for the guided observation, the workbook paths, and the written work.
Suggested (Level Two — historically closer)
- A soil sampling probe or bulb planter: takes a clean core sample the way field surveyors do.
- A printed USDA soil texture triangle: plot your jar-test percentages by hand, as soil judges do.
- Multiple labeled jars: test soils from several sites at once and compare, like a proper survey.
Safety note: Wash your hands thoroughly after handling soil. Soil contains microbes; it is not for tasting, ever. Do not drink from a jar used for soil testing. Wash jars and tools after the jar-settle test.
Reflection Questions
Answer the following questions in your workbook.
- Why can a gardener improve how a soil behaves but not change its texture?
- A friend's potted basil wilts every afternoon even though she waters daily, and the pot feels very light. What does the texture suggest, and what would you advise?
- Why does clay soil stay wet longer than sandy soil, and why is that both an advantage and a danger?
- The lesson says bagged potting mix gives strange jar-test results. Why?
- How does the ribbon test connect to the idea that your hands are instruments?
Workbook Checklist — Lesson 8
In my workbook I have:
- ☐ named the three mineral particles — sand, silt, and clay — and described how each feels and behaves
- ☐ explained how soil texture controls drainage, water retention, and root growth
- ☐ read the USDA soil texture triangle and stated the loam ideal: 40 percent sand, 40 percent silt, 20 percent clay
- ☐ performed the ribbon test and estimated a soil's clay content by touch
- ☐ performed the jar-settle test and measured the proportions of sand, silt, and clay
- ☐ written a complete substrate profile for my Scholar's Familiar's soil
- ☐ kept the safety notes: hands washed after handling soil, cuts covered or gloves worn, and soil never tasted
☐ Lesson completed Date: ___ Signature: ___
The Professor's Closing Note
And so we close our first lesson of Unit II, my dears.
You began this course choosing a plant. Today you met the ground it stands on, grain by grain. Sand, silt, and clay are not just words now. They are grit between your fingers, a ribbon over your knuckle, layers settling in a jar on your windowsill. You have read the earth with your hands, the way gardeners have done since long before anyone wrote the word "soil."
Next lesson, we turn to the chemistry of that ground: the pH scale, and why it decides which nutrients your plant can actually taste. Until then, keep your jar where you can see it. Watch the clay settle. Good science waits, and so does a good gardener.
— Professor Beryl Fernfoot, Herbology Greenhouse • Master Herbalist • Head of House Oriens
Cross-Class Connections

Potions · Unit III, Lesson 20 — Salts, Clays & Mineral Materials
You met clay in this Greenhouse as a soil, and my lesson says so on its face: Herbology Lesson 8 holds the canonical definition, and the Laboratory takes those same flat plates into water to watch them suspend, cloud, and settle. Bring the patience your jar test taught you. Label everything, work slowly, and let the clay do the teaching.

Creative Arts · Unit V, Lesson 19 — Clay I: Pinch, Coil & Slab
Aprons on, scholars. The clay whose character you have just learned to read — sticky and plastic wet, hard as brick dry — is the clay my bench wedges and shapes, and the garden's flower pots, plant markers, and name tiles are this workshop's steady work, made for Professor Fernfoot's scholars and their plantings. Read the ground in the Greenhouse first; then come and build the pot its soil will live in.
Further Reading & Sources
- LSU AgCenter: Soil Texture Basics — Sand, silt, and clay sizes with the USDA texture triangle, written for home gardeners.
- Kansas State Extension: Texture Analysis of Soils — A home jar-test demonstration from Kansas State University Extension, right here in the Greenhouse's home state.
- GrowItBuildIt: The Mason Jar Soil Test — Step-by-step jar test with photos, including how to read the layers.
- Fraser Valley Rose Farm: Interactive Soil Texture Calculator — Drag your jar-test percentages onto a digital texture triangle to find your soil's class.
- Epic Gardening: How to Identify Your Soil Type — The ribbon test and squeeze test explained with clear photos.
- Wikipedia: Soil Texture — The full reference: particle sizes, the twelve texture classes, and how texture governs water and nutrients.
Browse the Herbology shelf in the school Library for readable editions of these works.
One plant from this lesson stands in the Materia Botanica, the school's shared archive — kept with its lessons, its keepings, and its cautions.
Spider Plant The whole Materia BotanicaPROFESSOR BERYL FERNFOOT · HERBOLOGY GREENHOUSE
Submit your work for this lesson using the form below.
CONTINUE IN THE HERBOLOGY GREENHOUSE
← Previous · Lesson 7: The Unit I Threshold Examination Next · Lesson 9: Soil Chemistry: The pH Scale →
Unit II — Soils, Sunlight & Growing Environments Herbology Greenhouse — All 37 Lessons
The rest of Unit II: Lesson 9 · Soil Chemistry: pH · Lesson 10 · The N-P-K Matrix · Lesson 11 · Compost Crucible · Lesson 12 · Photoperiod Dynamics · Lesson 13 · Watering Matrix · Lesson 14 · Microclimate Calibration · Lesson 15 · Seasonal Growing Cycles · Lesson 16 · The Growing Plan