

POTIONS
Unit IV · Lesson 31RESIN FUSION
Professor Crimblebrew Muddlenook
Master Apothecary • Potions
Head of House Meridies • School of Evershade

Mary the Jewess as Michael Maier's Symbola aureae mensae (1617) pictured her — an imagined portrait, not a likeness, of the Alexandrian alchemist traditionally credited with the bain-marie. Her name is still attached to the device in every kitchen: balneum Mariae, Mary's bath.
Engraving from Michael Maier, Symbola aureae mensae (1617), via Wikimedia Commons. Public domain.
Professor's Introduction

Sealed with the teal wax of Professor Crimblebrew Muddlenook, Master Apothecary of the Potions Laboratory, Head of House Meridies.
Order, scholars — we begin. You have spent this unit coaxing compounds out of plants with patience: steeping, simmering, and macerating. Today we work with materials that refuse all of that gentle persuasion. A lump of resin — a hardened plant secretion, sticky when fresh, that hardens on exposure to air — will sit in water for a year and never dissolve. It will sit in a cold mortar and never soften. It yields to exactly one argument, and that argument is heat.
But heat is a blunt instrument, and resins are easily ruined by it. Hold a flame directly under a lump of frankincense and you will not get a smooth melt. You will get scorching, bitter smoke, and a blackened mess that no archive wants. The apothecary's answer to this problem is very old and very elegant: never let the flame touch the work. Heat the water, let the water heat the vessel, and let the vessel heat the resin (a hardened plant secretion, sticky when fresh, that hardens on exposure to air). The flame does its shouting two rooms away, and the resin hears only a calm, even warmth.
This is the lesson of the double boiler, and it is one of the oldest lessons in the laboratory arts. An alchemist named Mary, working in Alexandria some seventeen centuries ago, is traditionally credited with its invention. Her name is still attached to it: the bain-marie (a water bath for gentle, indirect heating), Mary's bath. We will honor her by doing it properly.
Everything in its place, scholars. And today, everything away from the open flame.
— Professor Crimblebrew Muddlenook, Potions Laboratory • Master Apothecary • Head of House Meridies
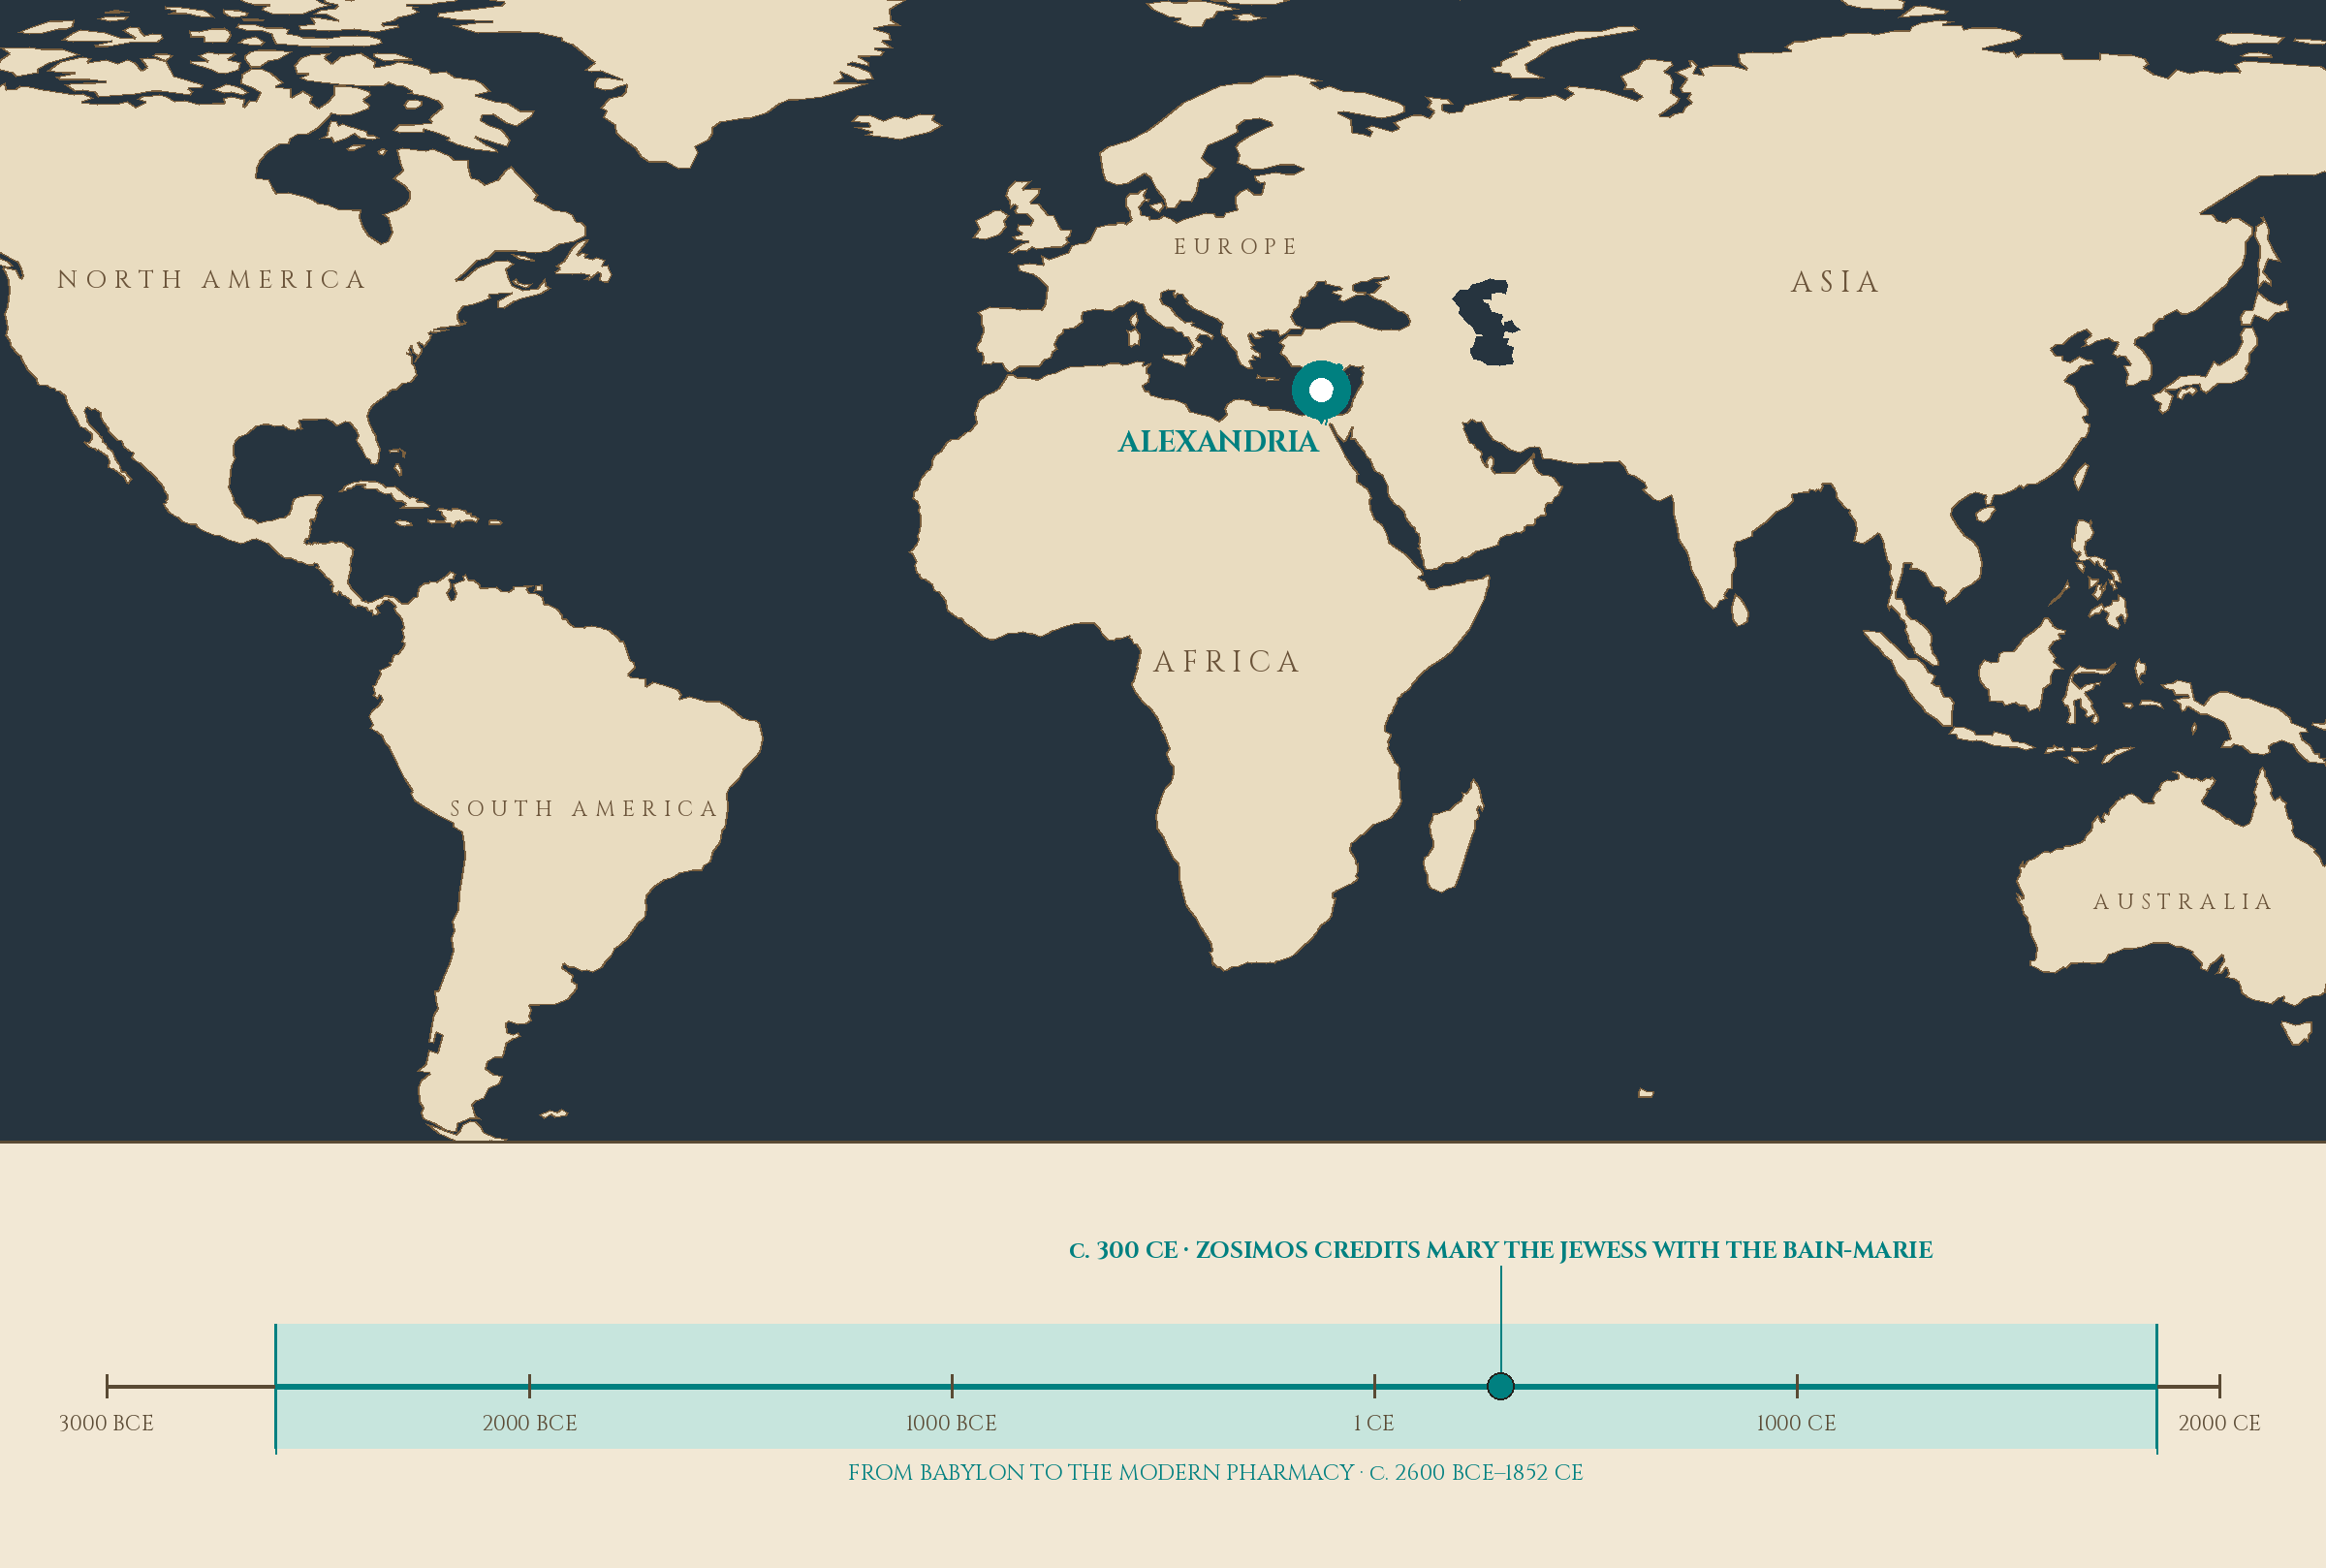
Pin: Alexandria. Timeline stop: c. 300 CE · ZOSIMOS CREDITS MARY THE JEWESS WITH THE BAIN-MARIE.
Lesson Objectives
By the end of this lesson, you will be able to:
- Explain why resins must be melted with indirect heat rather than a direct flame
- Set up and operate a double boiler safely for resin work
- Describe the stages of a resin melt: softening, flowing, blending, and setting
- Identify four historical resins and their traditional laboratory uses
- Fuse a simple resin-oil blend while keeping a complete temperature log
- Record a finished batch entry in your laboratory archive
Reading this lesson: ★ marks the passages to remember. They return on the unit quiz and the class test. Check in questions ask the material back as you go; answer them in your workbook when you meet them.
Working this lesson: Your assignment packet is the first download on this page. Work in it as the lesson moves along, answering each exercise as its subject is taught — or read the lesson through for your notes and take the exercises as homework afterward. Both are proper ways to sit this class. Signposts in the reading tell you where each exercise belongs. Written answers are short answers in your own words; a few honest lines are worth more than a filled page.
Your Assignment Packet
This lesson's exercises live in its packet: the Lexicon Handout (every term, course terms marked ◆), Materials, Guided Practice — the Procedure: The First Fusion, printed in full with its temperature log table, so you can work through the melt step by step at the stove — the Assignment Manual with its self-check, the Reflection Questions, and the Workbook Checklist. Download the packet before you begin and keep it beside you as you read.
Safety Briefing
Read this section completely before touching any materials. Professor Muddlenook's first rule of the laboratory is that no procedure begins until the safety briefing is understood. This lesson involves sustained heating, and its safety rules are not suggestions.
Indirect heat only. Resins and oils are melted over a double boiler in this lesson, never over a direct flame and never in a dry pan on a burner. Direct flame creates hot spots that scorch resins, and scorched resin produces acrid smoke and can ignite. If you do not have a double boiler insert, a heat-safe bowl set over a saucepan of simmering water serves the purpose. The principle is the same: the flame heats the water, and only the water heats your materials.
Fumes and ventilation. Warming resins release fumes, and some are strong. Work in a ventilated area: a kitchen with the fan running, or near an open window with air moving. If the fumes make your eyes water or your throat tickle, step away into fresh air and reduce the heat. Never lean directly over a vessel of melting resin to look inside it.
Burns. Melted resin, hot oil, and hot wax cause serious burns, and they cling to skin. Wear oven mitts or use a dry folded towel whenever you touch a heated vessel. Keep handles turned inward so nothing can be knocked. Assume every vessel on the stove is hot until you have confirmed otherwise.
Smoke means stop. Every oil and every resin has a smoke point, the temperature where it begins to break down and smoke, and a flash point, the temperature where its vapors can ignite. If your melt begins to smoke, remove it from the heat at once, turn off the burner, and let it cool. Do not try to rescue a smoking batch. Record what happened and begin again with lower heat.
Water and hot oil do not mix. Never add water to hot oil or a hot resin melt. Water sinks, flashes to steam instantly, and throws hot material upward. Keep the upper vessel dry, and wipe condensation from its underside before it can drip.
Fire readiness. Keep a lid that fits your saucepan within reach. A lid smothers a small pan fire by cutting off air. Never use water on a grease or resin fire. Know where your kitchen fire extinguisher is before you begin.
Adult supervision required. Every heating step in this lesson must be done by or with an adult. Never leave heating materials unattended, not even for a minute.
A standing rule for this class. Nothing in the Potions Laboratory is ever presented as medicine, and no lesson will ever give you amounts to take. The preparation you make today is a workshop demonstration of technique. It is marked display only: not for skin, not for tasting, not for any use on the body. We study how materials behave and how they were handled historically. That is the whole of it, and it is plenty.
Check in: Your melt begins to smoke at the flowing stage. What three things do you do at once — and what do you record before you begin again?
❦ In your workbook: record the safety briefing in your own way — indirect heat only, ventilation, mitts and the assume-hot rule, smoke means stop, no water in hot oil, the lid within reach, an adult for every heating step, and DISPLAY ONLY — copy, sketch, or note what matters. This briefing governs every heated step in the lesson; the workbook paths below route around the flame, never around these rules.
Mise en Place
A meticulous laboratory begins with everything gathered before work starts. Assemble the following.
Level One — household items:
- A saucepan and a heat-safe bowl that sits securely on top of it without touching the water below (a metal or thick glass mixing bowl). This is your double boiler.
- A lump of rosin (colophony): sold as violin bow rosin at music shops, or as pine resin. About a tablespoon of small pieces.
- A neutral oil: plain olive oil or sunflower oil, about a quarter cup.
- A small piece of beeswax (optional but recommended): about a tablespoon, grated or in small pieces.
- A kitchen or candy thermometer that reads up to at least 120°C (250°F).
- A wooden chopstick or wooden spoon for stirring. Never plastic near heat.
- A timer or clock.
- Oven mitts and a dry folded towel.
- A small heat-safe jar or tin for the finished blend, plus a label and pen.
- Your laboratory journal for the temperature log.
Level Two — historically closer:
- A proper double boiler insert or copper bain-marie pan.
- Gum mastic tears (from a Greek or Middle Eastern grocer) instead of rosin, for comparison.
- Refined beeswax pastilles rather than a raw chunk.
- An infrared thermometer for reading surface temperatures without touching the melt.
Check in: Which Level One item keeps the flame from ever touching your materials — and what must the bowl not touch, when it sits on the saucepan?
❦ In your workbook: record the mise en place in your own way — the Level One bench and the Level Two bench, gathered before any heat is lit — copy, sketch, or note what matters.
Why Resin Must Be Coaxed
You learned in Lesson 18 that a resin is a hardened plant secretion: sticky when it flows, glassy or brittle when it hardens in air. ★ Here is the fact that governs this entire lesson: resins are built from compounds that do not mix with water. Drop a tear of mastic into a cup of water and it will sit there unchanged until the cup itself decays. No amount of stirring, soaking, or simmering in water will dissolve it.
This is why maceration, the patient soaking you studied in Lesson 23, cannot touch a resin. Maceration moves compounds from a material into a liquid menstruum, and water is the menstruum that fails here completely. The resin's compounds will move into alcohol, into oil, and into heat itself, but never into water. So the apothecary who wants to work resin into a preparation has two honest choices: dissolve it in a suitable solvent, or melt it.
Melting is the older choice, and it is the subject of this lesson. But melting has its own treachery. A resin held over a direct flame does not melt evenly. The spot above the flame overheats while the edges stay solid; the overheated portion scorches, and scorched resin is ruined beyond recovery. It darkens, it smokes, it turns bitter and acrid, and the batch must be discarded. The old varnish makers knew this well: their craft was heating resins with drying oils to make protective coatings, and the whole art lay in controlling the fire. Too little heat and nothing flows. Too much and the work is ash.
The solution is to put a governor on the heat. That governor is water.
Check in: A tear of mastic sits in a cup of water for a year. What has happened to it — and what are the apothecary's two honest choices for working a resin into a preparation?
❦ In your workbook: record why resin must be coaxed in your own way — water refused, maceration defeated, the direct flame's scorch, and water as the governor — copy, sketch, or note what matters.
Mary's Bath
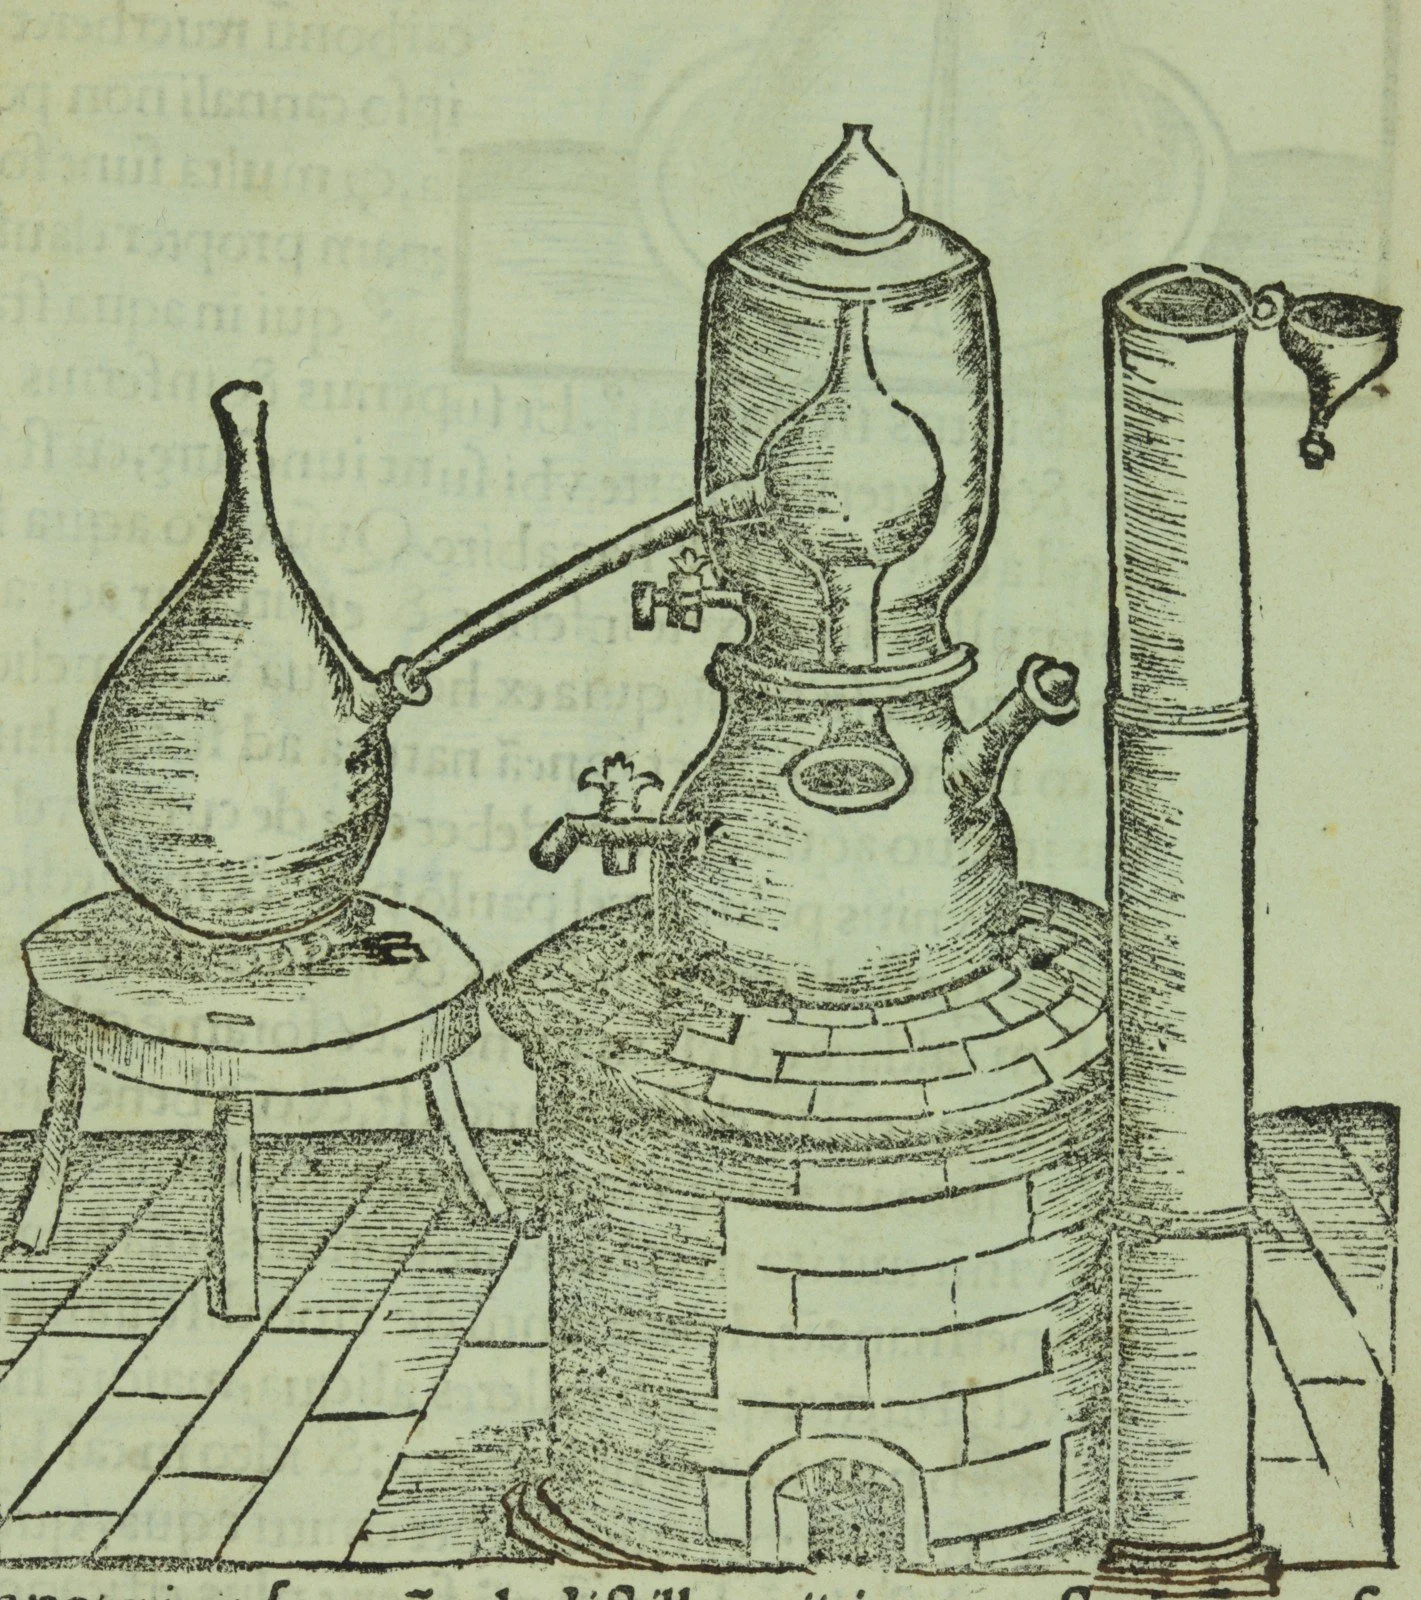
Mary's bath as the sixteenth century printed it: the alchemical water-bath apparatus from Philipp Ulstad's Coelum philosophorum (1528) — furnace, governed vessel, and receiver. The device is Mary's; the woodcut is the laboratory's memory of it, twelve centuries after Zosimos credited her.
Woodcut from Philipp Ulstad, Coelum philosophorum (1528), Science History Institute, via Wikimedia Commons. Public domain.
The double boiler has a proper name with a long history: the bain-marie, French for "Mary's bath," from the medieval Latin balneum Mariae. The alchemist Zosimos of Panopolis, writing around 300 CE, credits its invention to Mary the Jewess, an Alexandrian alchemist regarded as one of the founders of the art. Whether she truly invented it or perfected what others began, her name has ridden on the device for seventeen centuries, which tells you how highly the laboratory has always valued it.
The device is simple: a vessel holding your materials sits over or inside a larger vessel of water, and the heat source warms the water, not your materials. ★ Here is why it works so beautifully. At sea level, liquid water cannot exceed 100°C (212°F). It boils, it turns to steam, it carries the extra energy away, but the water itself stays at the boiling point. So the inner vessel, bathed in that water or its steam, can never be driven hotter than boiling water no matter how enthusiastic the flame below. The water is a ceiling on the temperature and a leveler of hot spots. The heat arrives from all sides, evenly, gently, and with a hard upper limit.
This is exactly what resins need. Most resins soften well below 100°C and flow freely not far above it. The bain-marie holds them in the safe middle: hot enough to work, cool enough to forgive. Mary understood something that every careful worker since has confirmed. The flame is powerful but stupid. Water is weaker but wise. Put the wise one in charge.
Check in: Why can the inner vessel of a bain-marie never be driven hotter than boiling water, however strong the flame below — and who does Zosimos credit with the device, writing around 300 CE?
❦ In your workbook: record Mary's bath in your own way — balneum Mariae, Zosimos and Mary the Jewess, the 100°C ceiling, and the wise governor put in charge of the flame — copy, sketch, or note what matters.
The Stages of the Melt
Watch a lump of rosin in a double boiler and you will see it pass through four recognizable stages. Learn to read them, because each one tells you what to do next.
Softening. First the sharp edges of the lump lose their definition. The surface grows glossy. If you press it with the wooden stirrer it dents instead of cracking. Every resin has a softening point, the temperature range where it stops behaving like glass and starts behaving like very stiff dough. For rosin this begins around 70 to 80°C. Do not rush this stage. Let the heat soak through the whole lump.
Flowing. Then, quite suddenly, the lump slumps and spreads. It becomes a thick, slow liquid, the color of dark honey. Stir it gently and it moves like cooling syrup. This is the working state. Everything you mean to blend into the resin must be added now, while it flows.
Blending. Oil stirred into flowing resin does not fight it the way water would. The two are chemically companionable, and with steady stirring they combine into a uniform melt. Wax added now melts into the mixture and gives it body: this is stabilization, the wax holding the finished preparation in a firmer, more even state as it cools. ★ Add your additions warm, never cold. A cold pour of oil into a hot melt causes thermal shock, and the resin seizes into hard lumps that must be melted all over again.
Setting. Removed from the heat and poured into its jar, the blend cools and firms. It will not return to the glassy hardness of the raw resin; the oil and wax keep it softer, which is the point. Within the hour it should be a smooth, uniform solid or semi-solid. If it separates into layers, the blending was incomplete. If it is grainy, something seized. Both are honest results. Record them.
Check in: Name the four stages in order. At which stage must everything you mean to blend in be added — and what single rule about additions prevents thermal shock?
❦ In your workbook: record the four stages in your own way — softening at 70 to 80°C for rosin, flowing as the working state, blending with warm additions only, and setting judged honestly — copy, sketch, or note what matters.
The Resin Cabinet
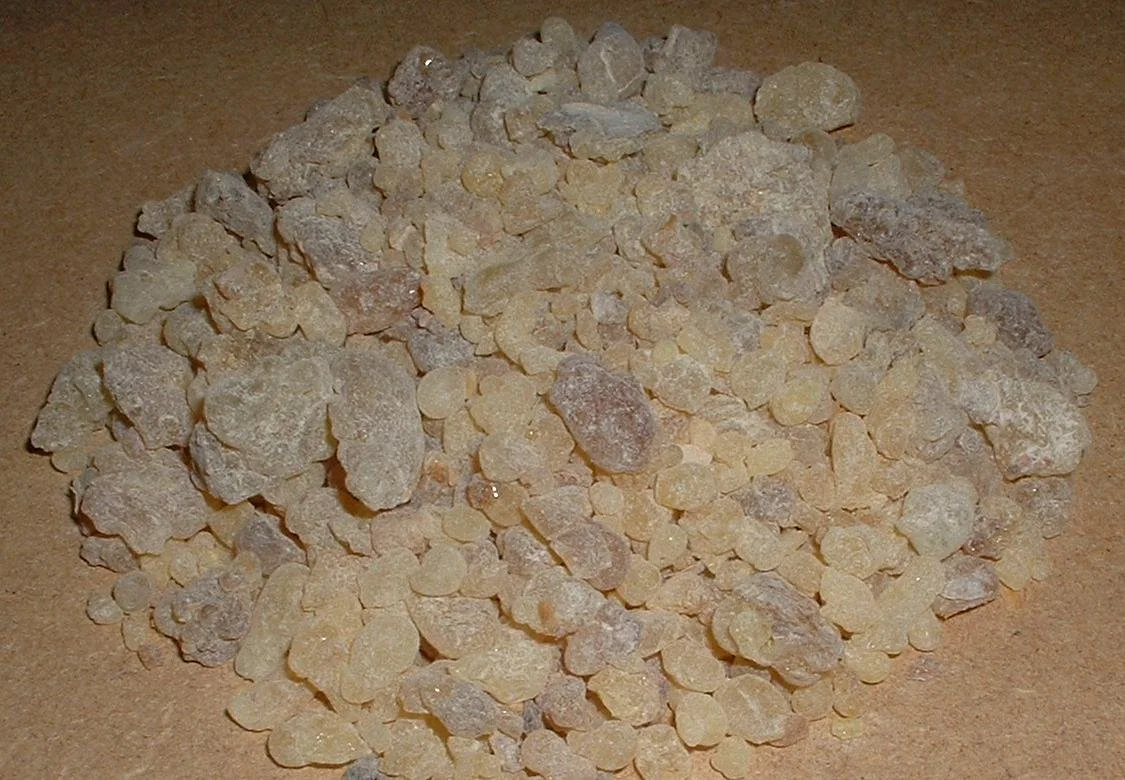
Frankincense tears as the cabinet keeps them: pale, translucent, matte-surfaced lumps, the fragrant oleoresin of desert trees gathered by wounding the bark. In the melt they soften readily and blend smoothly with warm oil — which is why the lesson says your cabinet is complete with them, and why you will not melt anything precious today.
Photograph of frankincense from Yemen, via Wikimedia Commons. Public domain.
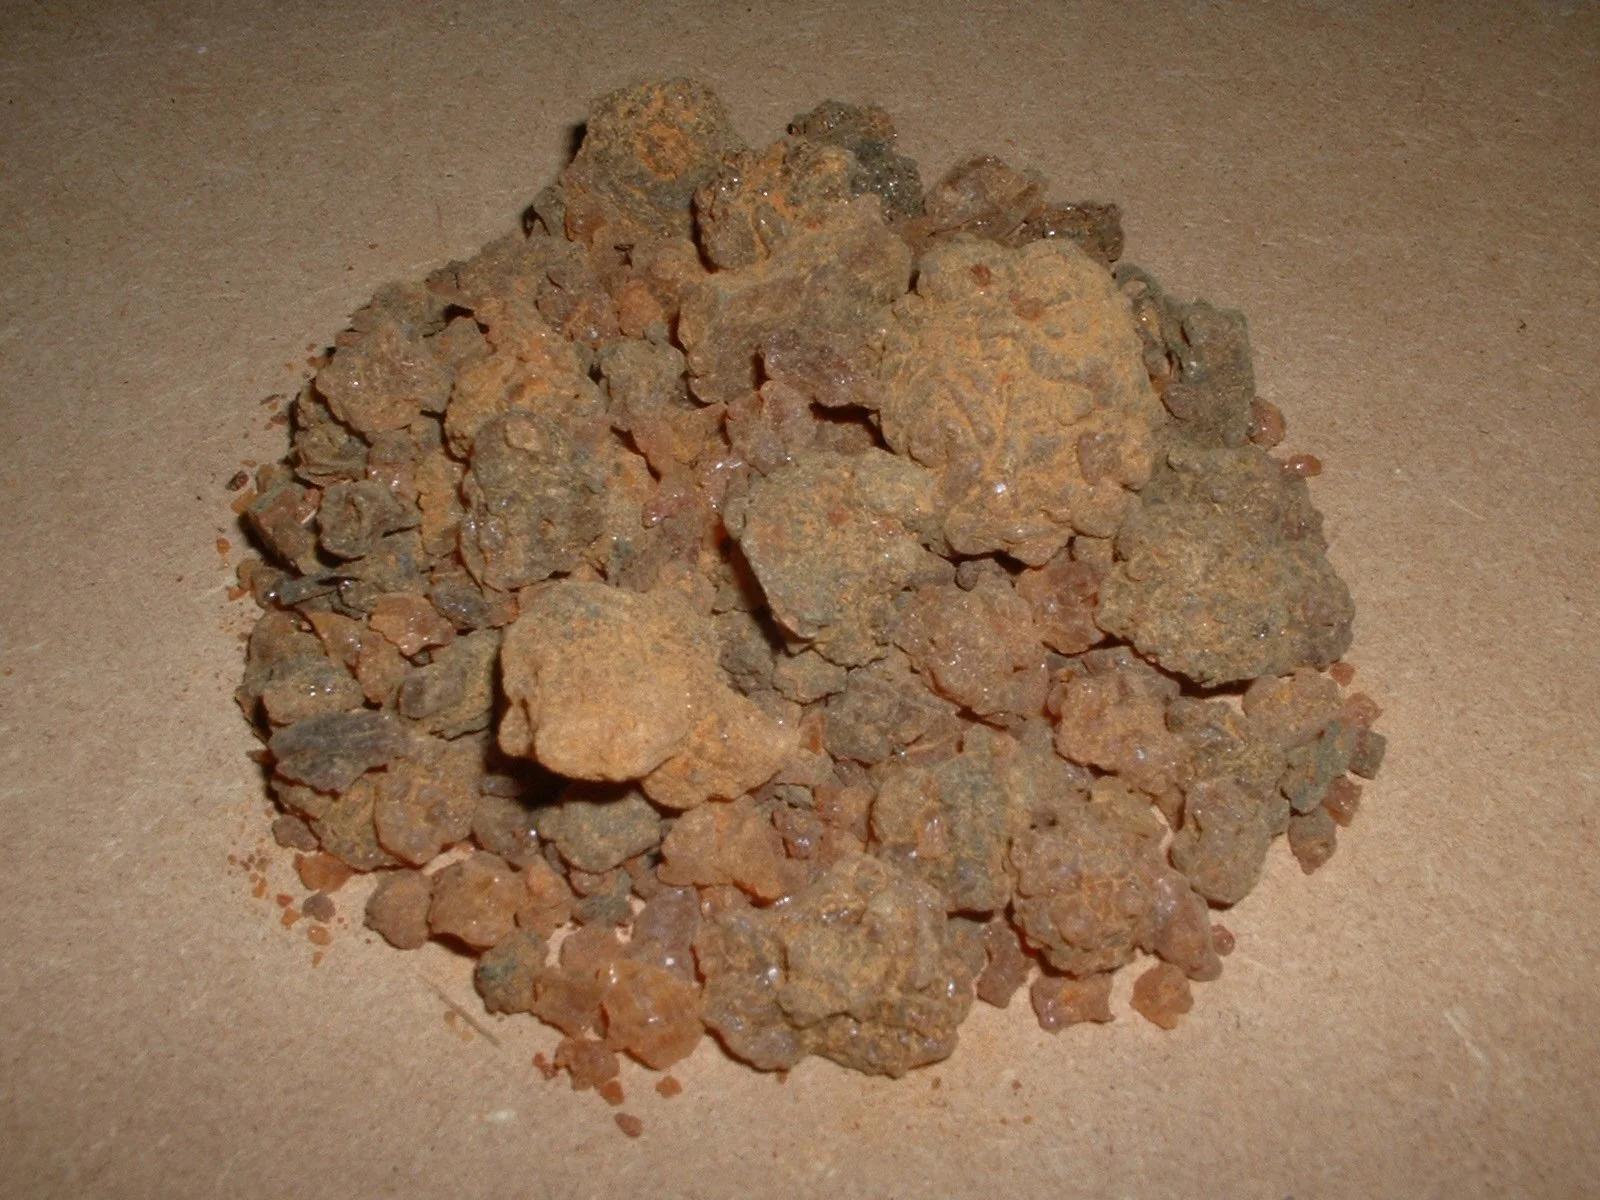
Myrrh, frankincense's darker partner: rough, rust-brown oleoresin lumps, glassy where they break. Both tears come from wounded bark; both soften readily in the melt. Judge resins the way Lesson 18 taught you — by clarity, aroma, and cleanliness — before any of them meets the bain-marie.
Photograph of myrrh, via Wikimedia Commons. Public domain.
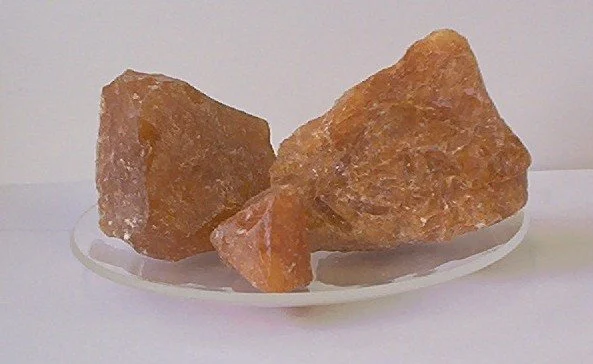
Colophony in the hand: glassy, amber, brittle chunks — the solid resin left behind when turpentine is distilled from pine oleoresin. This is the lump that will soften at 70 to 80°C in your double boiler, slump to dark honey, and teach you the four stages. Small file: place at half column width.
Photograph of rosin, via Wikimedia Commons. Public domain.
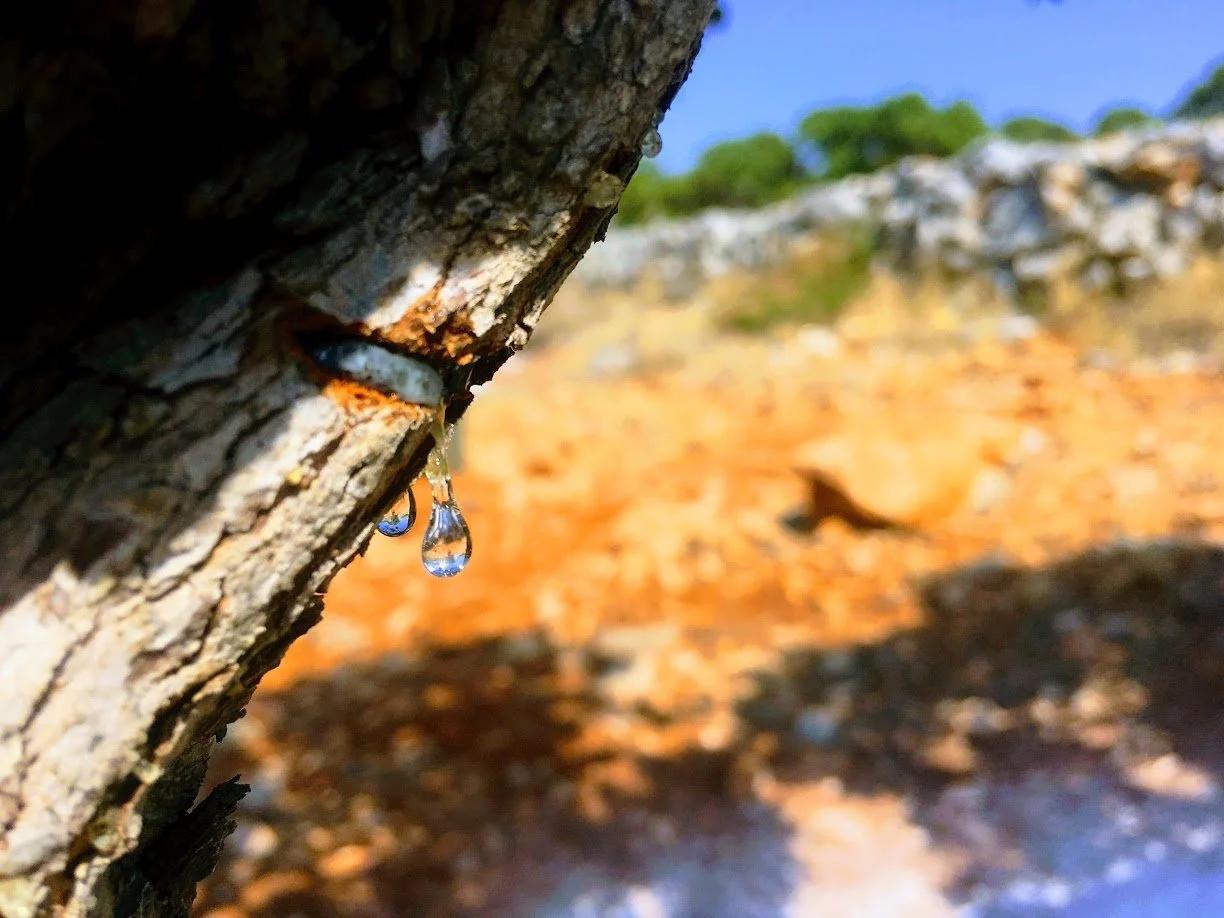
The tears of Chios, still on the tree: clear mastic drops hanging from a cut in the bark of Pistacia lentiscus, gathered this way for centuries on one Greek island. Mastic softens at a lower temperature than rosin and smells faintly of pine and citrus — melt a single tear beside your rosin, the lesson says, and the comparison will teach itself.
Photograph of mastic resin on the tree, via Wikimedia Commons. CC0.
Four resins have earned permanent places in the apothecary's cabinet. You have met two of them before.
Frankincense and myrrh you studied in Lesson 18 as harvested materials: the fragrant tears of desert trees, gathered by wounding the bark. In the melt they behave as you would expect of oleoresins, softening readily and blending smoothly with warm oil. They are included here so your cabinet is complete, not so you will melt anything precious today.
★ Colophony, also called rosin, is the workhorse of this lesson. It is the solid resin left behind when turpentine is distilled from pine oleoresin: the volatile oil goes up as vapor, and the colophony stays behind, brittle and amber. Its name is a geography lesson. It comes from the Latin colophonia resina, the resin of Colophon, an ancient Ionian city in Asia Minor whose pine resin was famous in antiquity. Violinists still rub it on their bow hairs to grip the strings. Varnish makers cooked it with oils for centuries. It is cheap, honest, and ideal for learning.
Mastic is the aristocrat of the cabinet. It is the resin of the mastic tree, Pistacia lentiscus, grown almost entirely on the Greek island of Chios, where it has been harvested for centuries by cutting the bark and gathering the weeping tears. It softens at a lower temperature than rosin, smells faintly of pine and citrus, and was chewed as a breath sweetener as well as worked into varnishes and confections. If you can find it, melt a single tear beside your rosin and compare the two. The lesson will teach itself.
Copal is a family of hard resins from tropical trees, prized by varnish makers for the tough, clear films it forms. It needs more heat than rosin and rewards patience. You will meet it again when we study inks and coatings.
Check in: Colophony is what remains after one process, and its name remembers one place. Name the process and the place — and which cabinet resin softens at a lower temperature than rosin, from which island?
❦ In your workbook: record the resin cabinet in your own way — frankincense and myrrh the oleoresins, colophony the workhorse, mastic of Chios the aristocrat, copal the patient one — copy, sketch, or note what matters.
In your packet: Exercise II — The Resin Cabinet ✎ begins here. Work it now, or mark the place and take it as homework — your choice.
Reading the Batch
A fusion is not finished when the jar cools. It is finished when the record is written. Apothecaries kept batch books for the same reason you keep your archive: memory is a poor vessel, and it leaks.
A complete batch entry names the resin and its source, the oil and the wax with their amounts, the time the melt began and the time it was poured, the temperature at each stage you observed, and the behavior of the finished preparation after cooling. It notes anything unusual: a wisp of smoke, a stubborn lump, a separation. It ends with a verdict in plain words. Smooth and uniform. Grainy. Separated. Each verdict teaches the next batch.
Write your entries as if a stranger will read them in fifty years and try to repeat your work. That stranger is the whole point of the archive.
Check in: A batch has cooled smooth and level, but no entry was ever written. In this lesson's terms, is the fusion finished — and what seven things does a complete batch entry carry?
❦ In your workbook: record reading the batch in your own way — the entry's contents, the plain-words verdict, and the stranger in fifty years who must be able to repeat your work — copy, sketch, or note what matters.
The Procedure: The First Fusion
You will now fuse a small batch of rosin and oil, with wax if you have it, keeping a temperature log throughout. An adult must be present for every heating step.
Step 1 — Build the bath. Fill the saucepan one third full of water. Set the bowl on top. The bottom of the bowl must not touch the water; there should be a finger's width of air between them. Put the pan on the burner but do not light it yet.
Step 2 — Load the upper vessel. Place the rosin pieces in the bowl. Add the oil. If you are using wax, add it now. Put the thermometer in the bowl so its tip sits in the materials, not touching the bowl's side.
Step 3 — Begin heating. An adult lights the burner to medium. Start your timer. Record the starting temperature and the time in your log.
Step 4 — Watch and log. Every two minutes, record the temperature and one line of observation: still solid, edges glossing, slumping, flowing, and so on. Stir gently with the wooden stirrer once the resin begins to soften. Do not stir constantly; let the heat do the work and observe.
Step 5 — Blend. When the resin flows freely, stir slowly and steadily until the mixture is uniform. If you held back the wax, add it now in small pieces and stir until it disappears. The temperature should hold below 100°C. If it climbs toward boiling, reduce the heat.
Step 6 — Pour. An adult helps you lift the bowl with oven mitts. Wipe the underside dry. Pour the melt into your jar or tin in one smooth motion. If the stream stutters and lumps form, note it: that is thermal shock, and it is data.
Step 7 — Cool and label. Let the jar cool completely before touching it. Then label it: contents, date, and the words DISPLAY ONLY. This is a workshop demonstration, not a preparation for use.
Your temperature log should look like this:
| Time | Temperature | Observation |
|---|---|---|
| 0:00 | ___ °C | Materials loaded, heat on |
| 2:00 | ___ °C | |
| 4:00 | ___ °C | |
| 6:00 | ___ °C | |
| 8:00 | ___ °C | |
| 10:00 | ___ °C | |
| 12:00 | ___ °C |
Continue rows as needed until the pour.
Check in: In Step 1, what two distances does the bath depend on — how full the saucepan is, and the gap between bowl and water? And in Step 6, what do you wipe dry, and why does a stuttering stream get written down rather than apologized for?
❦ In your workbook: record the procedure in your own way — the seven steps, the two-minute log, the adult present at every heating step, and the DISPLAY ONLY label at the end — copy, sketch, or note what matters.
In your packet: Exercise I — The First Fusion ⚒ begins here. Work it now, or mark the place and take it as homework — your choice.
Observation: What the Melt Teaches
When your batch has cooled, study it before you write the verdict.
Look at the surface. Is it smooth and level, or wrinkled, or pocked? A smooth surface means the melt was uniform and cooled evenly. Wrinkles can mean the top cooled much faster than the depths, or that stirring trapped air.
Tip the jar gently. Does the preparation hold its shape, flow slowly, or run? The wax governs this. More wax means a firmer set; oil alone means a softer one. There is no single correct firmness for a demonstration batch. There is only the firmness you achieved and the record of how you achieved it.
Smell it cautiously, with a waft of the hand, never a deep breath over the jar. Rosin keeps a faint pine note even in the blend. Note whether the finished preparation smells of anything scorched. Scorched means the heat ran too high at some point, and your temperature log will show you exactly when.
Finally, compare your log to the four stages. Mark where softening began, where flowing took over, and where you poured. Next time you fuse, those marks are your map.
Check in: Your cooled batch is wrinkled on top and smells faintly scorched. What two explanations does the lesson offer for the wrinkles — and where exactly will you find when the heat ran too high?
❦ In your workbook: record the observation in your own way — surface, tilt, the wafted smell, and the log marked against the four stages — copy, sketch, or note what matters.
In your packet: Exercise III — The Fault Diagnosis ✎ begins here. Work it now, or mark the place and take it as homework — your choice.
Cleanup
Cooling discipline. Everything stays where it is until it is cool to the touch. Melted resin looks solid long before it is safe to handle. Test with the back of your hand held near, never touching, then touch briefly.
Vessels. While the bowl is still warm, wipe it out with paper towels and discard them. Resin does not wash out with water; it must be wiped while soft. Follow with hot soapy water. Never pour resinous wash water down a drain that matters to you without flushing well; better to wipe first and wash second.
The burner and the area. Turn off the burner and confirm it is off. Wipe any drips. Resin drips harden into stubborn spots, so catch them warm.
Storage. Seal the finished jar, confirm the DISPLAY ONLY label, and shelve it with your other preparations, away from heat and sunlight. File the temperature log in your archive beside the batch entry.
Check in: The bowl is still warm and coated inside with resin. Why is now the moment to wipe it — and what is the safe order of cleaning, first and second?
❦ In your workbook: record the cleanup in your own way — cooling discipline, wipe while soft then wash, the burner confirmed off, and the labeled jar shelved away from heat and sunlight — copy, sketch, or note what matters.
A Note on Fumes and Fire
Scholars, a word from behind the seal, because this lesson asks more of your caution than most. The old workshops that melted resins — hardened plant secretions, sticky when fresh, that harden on exposure to air — at scale were ventilated by necessity: high windows, wide doors, and a healthy respect for what a vat of hot resin — a hardened plant secretion, sticky when fresh, that hardens on exposure to air — can do. They knew what you now know, that resin fumes thicken the air and that a moment's inattention near heat is never repaid.
Your kitchen is not a manufactory, and your batch is the size of a teacup. But the habits are the same at every scale, and I would rather you learn them over a teacup than over a vat. Ventilation on. Eyes on the work. Hands in mitts. An adult beside you. These are not decorations on the lesson. They are the lesson, as much as the melt itself.
— Professor Crimblebrew Muddlenook, Potions Laboratory • Master Apothecary • Head of House Meridies
Check in: The sealed note names four habits and calls them the lesson itself. Name them — and what does the note say a moment's inattention near heat is never?
❦ In your workbook: record the sealed note in your own way — ventilated workshops, the teacup and the vat, and the four habits that are the lesson — copy, sketch, or note what matters.
Guided Observation: Reading the Melt and the Cooled Batch
This lesson's observation is the melt itself, watched and logged as it happens, and then read again cold: you keep the temperature log through the four stages while the work is warm, and you study the cooled batch before you write the verdict — because the log tells you what the heat did, and the jar tells you whether the blending held.
Work through it in order.
Watch and log. Every two minutes, record the temperature and one line of observation: still solid, edges glossing, slumping, flowing, and so on. Stir gently with the wooden stirrer once the resin begins to soften. Do not stir constantly; let the heat do the work and observe.
Read the surface. Look at the surface. Is it smooth and level, or wrinkled, or pocked? A smooth surface means the melt was uniform and cooled evenly. Wrinkles can mean the top cooled much faster than the depths, or that stirring trapped air.
Tip the jar. Tip the jar gently. Does the preparation hold its shape, flow slowly, or run? The wax governs this. More wax means a firmer set; oil alone means a softer one.
Waft the smell. Smell it cautiously, with a waft of the hand, never a deep breath over the jar. Rosin keeps a faint pine note even in the blend. Note whether the finished preparation smells of anything scorched. Scorched means the heat ran too high at some point, and your temperature log will show you exactly when.
Mark the stages. Finally, compare your log to the four stages. Mark where softening began, where flowing took over, and where you poured. Next time you fuse, those marks are your map.
Consider:
- At what logged minute did your lump stop behaving like glass — and what did you see, not just measure, at that moment?
- Your verdict must be plain words: smooth and uniform, grainy, or separated. Which is yours, and which single log entry best explains it?
- If the stream stuttered at the pour, your notes call it thermal shock, and it is data. What would you warm, next time, before the pour?
❦ In your workbook: record the guided observation in your own way — the two-minute log, the cooled surface read, the tilt and the waft, and the stages marked on the log — copy, sketch, or note what matters.
Materials
Everything in its place, before we begin. For this lesson you will need:
Required (Level One — household items)
- A saucepan and a heat-safe bowl that sits securely on top of it without touching the water below (a metal or thick glass mixing bowl). This is your double boiler.
- A lump of rosin (colophony): sold as violin bow rosin at music shops, or as pine resin. About a tablespoon of small pieces.
- A neutral oil: plain olive oil or sunflower oil, about a quarter cup.
- A small piece of beeswax (optional but recommended): about a tablespoon, grated or in small pieces.
- A kitchen or candy thermometer that reads up to at least 120°C (250°F).
- A wooden chopstick or wooden spoon for stirring. Never plastic near heat.
- A timer or clock.
- Oven mitts and a dry folded towel.
- A small heat-safe jar or tin for the finished blend, plus a label and pen.
- Your laboratory journal for the temperature log.
Suggested (Level Two — historically closer)
- A proper double boiler insert or copper bain-marie pan.
- Gum mastic tears (from a Greek or Middle Eastern grocer) instead of rosin, for comparison.
- Refined beeswax pastilles rather than a raw chunk.
- An infrared thermometer for reading surface temperatures without touching the melt.
- A brass stirrer: the traditional laboratory stirring tool.
Safety Notes
The lesson's own Safety Briefing, above, governs this lesson in full. The original packet's safety notes, restored verbatim, stand here as its summary:
- Indirect heat only: resins and oils are melted over a double boiler, never over a direct flame or in a dry pan. Direct flame scorches resins and can ignite them.
- Work in a ventilated area. Warming resins release fumes; if your eyes water or your throat tickles, step into fresh air and reduce the heat. Never lean over a vessel of melting resin.
- Melted resin, hot oil, and hot wax cause serious burns and cling to skin. Wear oven mitts, keep handles turned inward, and assume every vessel is hot until confirmed otherwise.
- If the melt begins to smoke, remove it from the heat at once, turn off the burner, and let it cool. Do not try to rescue a smoking batch.
- Never add water to hot oil or a hot resin melt; it flashes to steam and throws hot material upward. Keep the upper vessel dry.
- Keep a lid that fits your saucepan within reach to smother any small pan fire. Never use water on a grease or resin fire.
- Every heating step must be done by or with an adult. Never leave heating materials unattended.
- The finished preparation is display only: not for skin, not for tasting, not for any bodily use. Nothing in the Potions Laboratory is medicine, and no lesson gives amounts to take.
Reflection Questions
Answer the following questions in your workbook.
- Why does water make a good "governor" of heat in a double boiler?
- What is the difference between maceration (Lesson 23) and fusion as ways of combining materials?
- Why would an apothecary add wax to a resin-oil melt? What does the wax change in the finished preparation?
- A student pours cold oil into a hot resin melt, and the batch seizes into lumps. What happened, and how could it have been prevented?
- Why does this lesson mark every fused preparation "display only"?
Workbook Checklist — Lesson 31
In my workbook I have:
- ☐ explained why resins must be melted with indirect heat rather than a direct flame, and how the bain-marie's water caps the melt at 100°C at sea level
- ☐ recorded the Safety Briefing in full — indirect heat only, ventilation, mitts, smoke means stop, no water in hot oil, fire readiness, an adult for every heating step, and DISPLAY ONLY
- ☐ named the four stages of the melt — softening, flowing, blending, setting — and the rule that additions go in warm, never cold
- ☐ documented the resin cabinet: colophony from Colophon, mastic of Chios, copal, and frankincense and myrrh the oleoresins, with source, appearance, scent, uses, and one historical fact for my three
- ☐ carried out the First Fusion under adult supervision — or worked its workbook path — keeping the temperature log at two-minute intervals through every stage
- ☐ written the full batch entry: materials with amounts, start and pour times, the temperature log, observations at each stage, and a verdict in plain words
- ☐ diagnosed the three fault reports — the scorched, smoking melt; the lumps of thermal shock; the separated layers — each with its cause and its prevention
- ☐ labeled my jar DISPLAY ONLY, shelved it away from heat and sunlight, and filed the log and the entry in my archive
☐ Lesson completed Date: ___ Signature: ___
The Professor's Closing Note
Sealed with the teal wax of Professor Crimblebrew Muddlenook, Master Apothecary of the Potions Laboratory, Head of House Meridies.
You have now done something that connects you directly to seventeen centuries of laboratory workers. The vessel changes: copper, iron, glass, steel. The resin — a hardened plant secretion, sticky when fresh, that hardens on exposure to air — changes: frankincense, rosin, mastic, copal. The principle does not change. Heat the water, let the water set the limit, and give the material the patience it asks for.
Keep your temperature log. It is a better teacher than I am, because it was there and I was not. When your second fusion — melting resins, waxes, and oils together into one uniform preparation with indirect heat — behaves differently, and it will, the log will tell you why: a different resin (a hardened plant secretion, sticky when fresh, that hardens on exposure to air), a different ratio, a draft across the stove, two minutes longer at the flowing stage. The archive grows one honest batch at a time.
Next we turn from heat to its opposite arts, but the discipline travels with you. Measure twice, pour once, and write everything down.
— Professor Crimblebrew Muddlenook, Potions Laboratory • Master Apothecary • Head of House Meridies
PROFESSOR CRIMBLEBREW MUDDLENOOK
Potions Laboratory
Master Apothecary • Head of House Meridies
Cross-Class Connections

Herbology · Unit V, Lesson 36 — The Materia Botanica: Building Your Herbal
Come up to the Greenhouse, fusion-keepers, and build the book your Exercise II entries are bound for. In our shared Materia Botanica every plant gets one entry: my growing notes beside Professor Muddlenook's keeping notes, eight fields in a fixed order, so the resin you melted at his bench is the same tear whose tree I teach you to know. Bring your batch entry with its verdict in plain words — an entry is not complete, as he tells you, until it records what the material does when worked.
PROFESSOR BERYL FERNFOOT
Herbology Greenhouse • Master Herbalist • Head of House Oriens

Scrollwork · Unit VI, Lesson 22 — Wax Seals & Authentication
You have melted resin into oil at Muddlenook's bench. Now come and press it into wax in my Scriptorium. Here the seal's material is your lesson in miniature: beeswax softened with resin to take the matrix's impression, shellac compounds after. The matrix is the mother, scholars, but the wax is the servant — and you, of all my visitors, already know how the servant behaves when the heat is governed, and how it ruins when it is not.
PROFESSOR QUILLBERRY NOCTURNE
Scrollwork Library

Creative Arts · Unit VI, Lesson 23 — Wood, Grain & Safe Hand Tools
Your varnish makers cooked resin with oil over governed heat, scholars, and my bench is where that cooking comes home. In my workshop you will meet the finishes as working materials: wax rubbed thin, oil wiped and judged, shellac — a resin itself — dissolved and laid in thin coats, each finish a decision and not an afterthought. Work the practice piece first, as always. Then you will know what your fusion was for, every time you seal a piece of wood against the weather.
PROFESSOR COGBRANCH TIMBERCLANK
Creative Arts Workshop
Further Reading & Sources
- Bain-marie: history of the water bath, from balneum Mariae to the modern double boiler
- The Secrets of Alchemy: Zosimos, Mary the Jewess, and the apparatus of the ancient laboratory
- Resin: plant resins, their chemistry, and their historical uses
- Colophon (city): the Ionian city that gave colophony its name)
- Varnish: the early natural-resin varnishes, made by heating resins with oils
Browse the Potions shelf in the school Library for readable editions of these works.
Submit your work for this lesson using the form below.
CONTINUE IN THE POTIONS LABORATORY
← Previous · Lesson 30: Herbal Acetums Next · Lesson 32: Tinctures & Spirit Macerations →
Unit IV — Botanical Extractions Potions Laboratory — All 52 Lessons
The rest of Unit IV: Lesson 26 · Infused Lipids · Lesson 27 · Hydro-Infusions · Lesson 28 · Glycerites & Syrups · Lesson 29 · Decoctions · Lesson 30 · Herbal Acetums · Lesson 32 · Tinctures · Lesson 33 · Distillation · Lesson 34 · Extraction Ledger