

POTIONS
Unit I · Lesson 3VESSELS, JARS & BLOWN GLASSWORK
Professor Crimblebrew Muddlenook
Master Apothecary • Potions
Head of House Meridies • School of Evershade
Professor's Introduction

Scholars, welcome to Lesson 3. In Lesson 1 you met the laboratory. In Lesson 2 you gave it order. Today you meet the vessels, the jars and bottles and blown glass that hold everything this course will ever make. A preparation is only as trustworthy as the vessel that keeps it, and a laboratory is only as orderly as its shelves. So today we do not make anything. We choose, we inspect, we wash, and we file. The unglamorous work, scholars, and the most important kind.
Before we begin, one matter of safety, because glass breaks and this lesson handles glass. If anything shatters today, you will not touch it with your hands. You will fetch the dustpan. That rule is not negotiable, and the full protocol waits in your Safety Briefing. Read it before your hands go near a single jar.
Everything in its place, scholars. Let us meet the vessels.
— Professor Crimblebrew Muddlenook, Potions Laboratory • Master Apothecary • Head of House Meridies
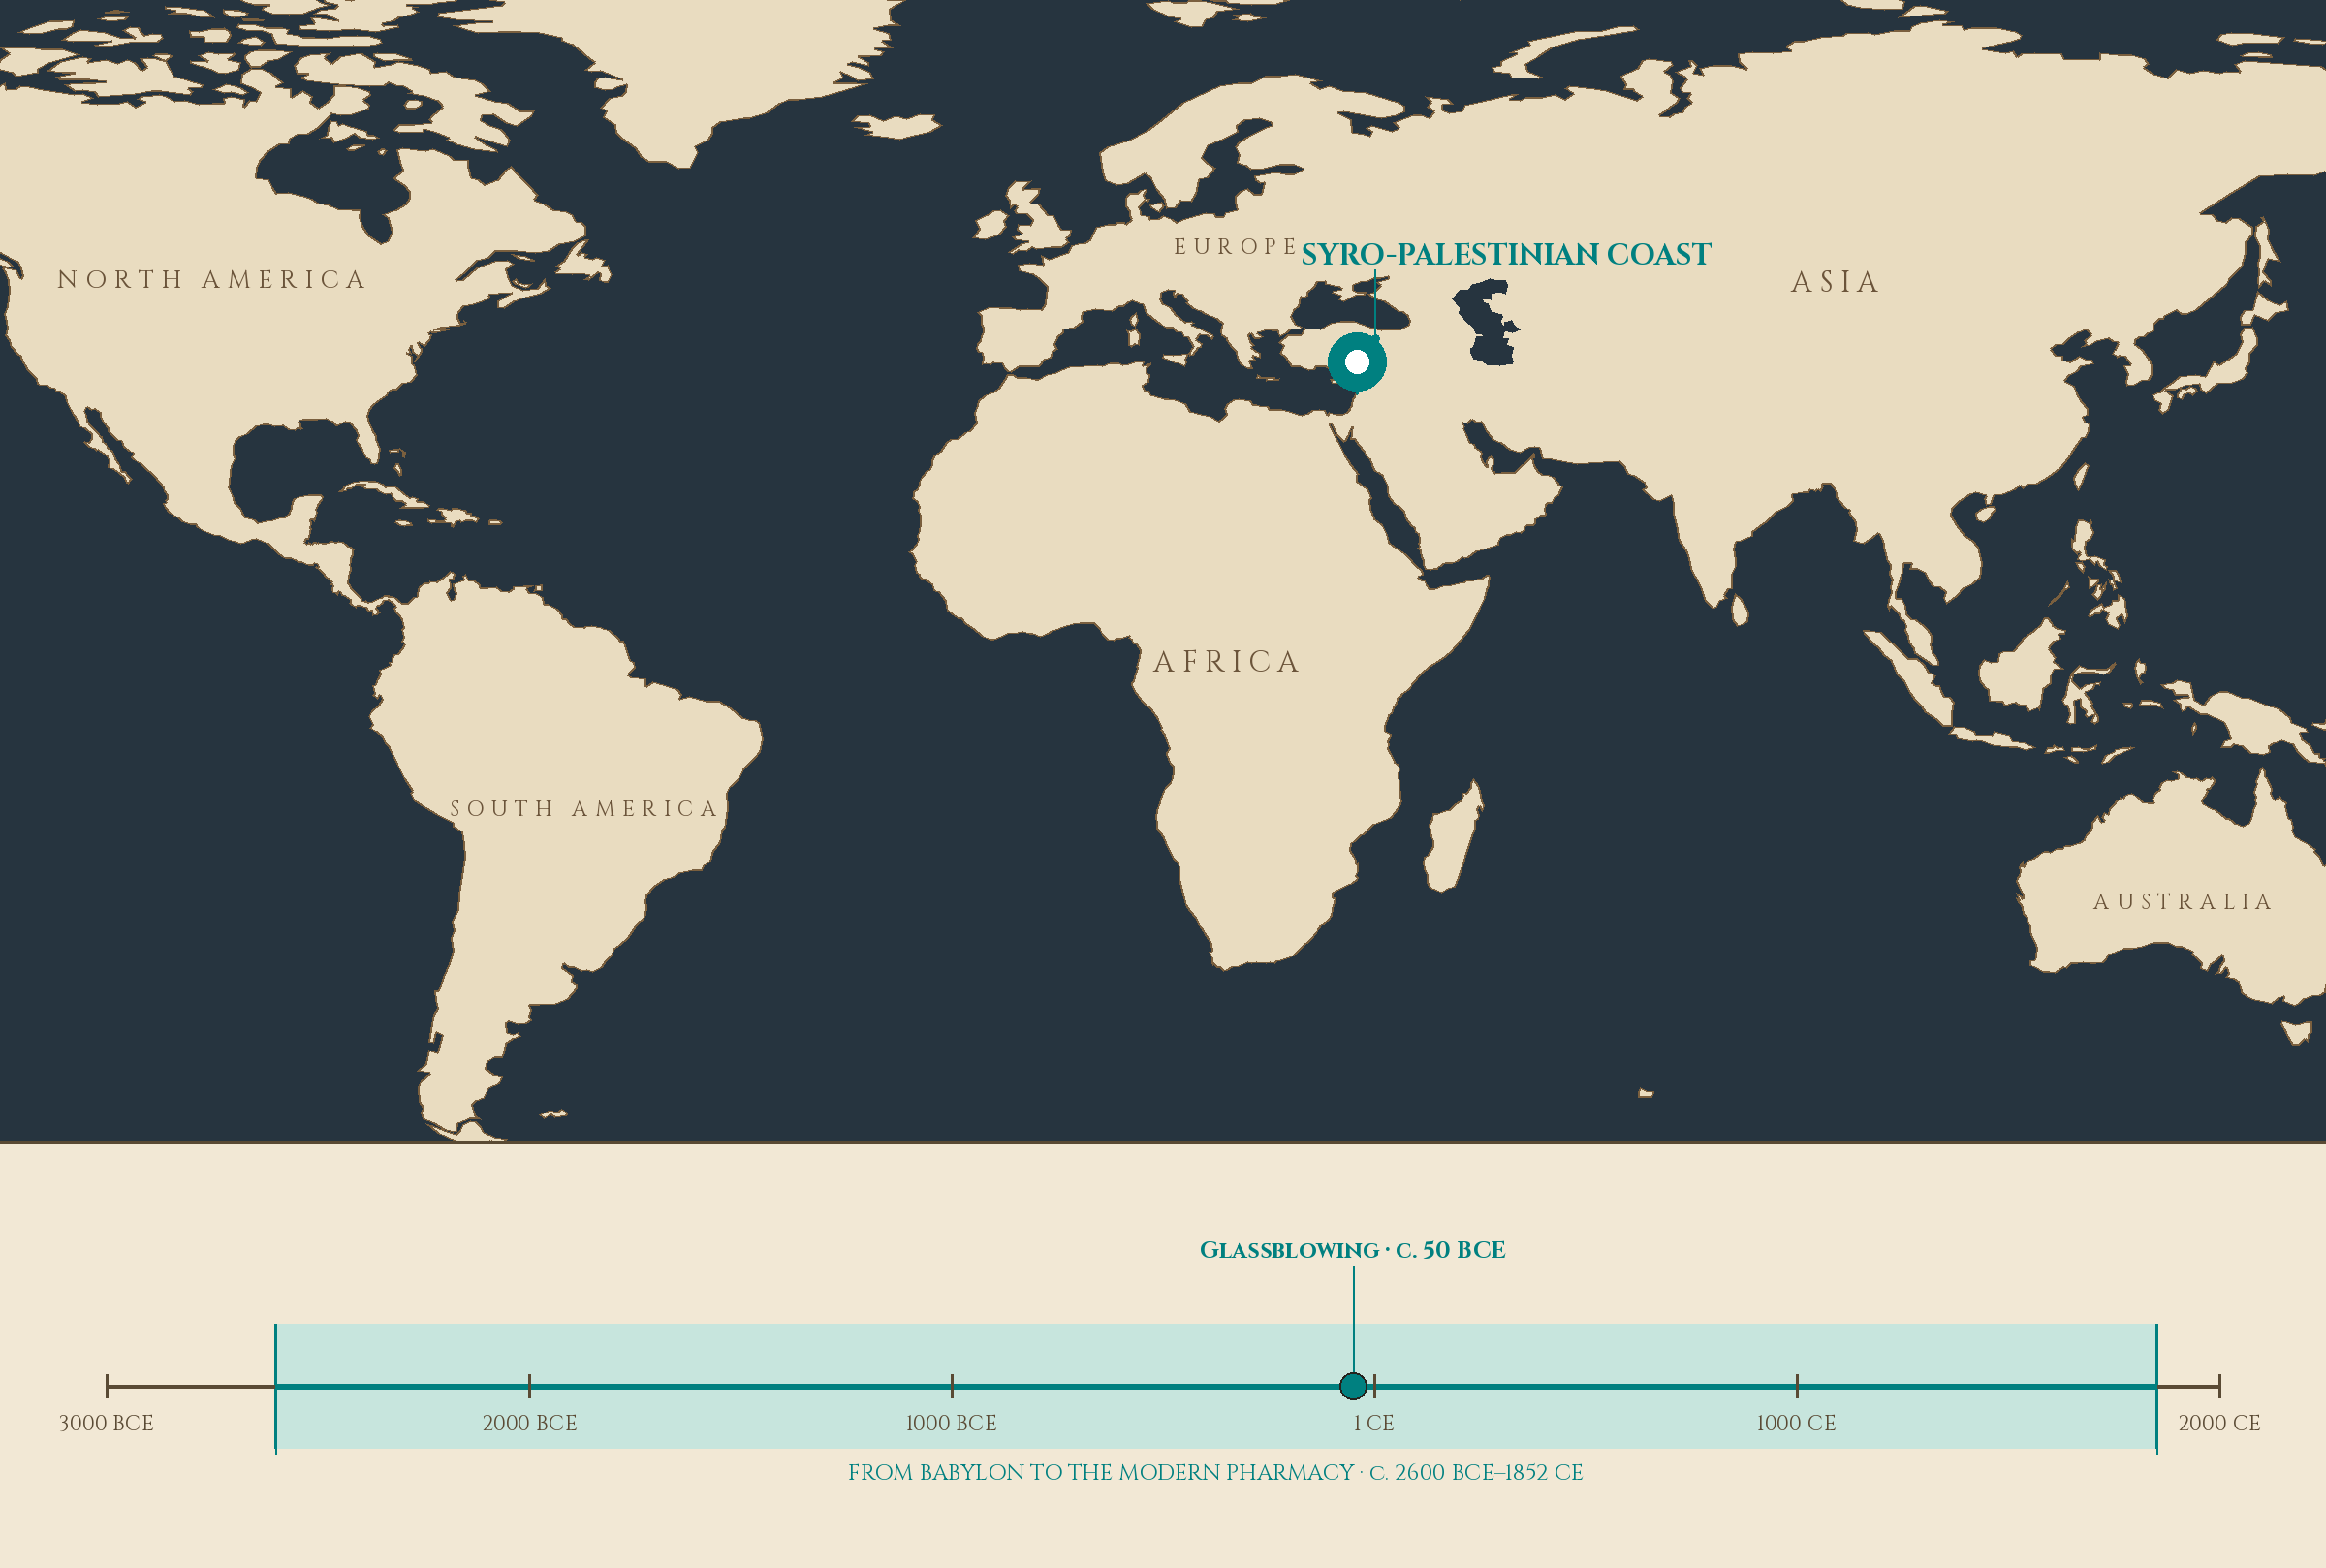
Pin: SYRO-PALESTINIAN COAST. Timeline stop: Glassblowing · c. 50 BCE.
Lesson Objectives
By completing this lesson, you will be able to:
- Name three milestones in the history of laboratory glassmaking: Roman blown glass, Venetian cristallo, and Bohemian cut glass.
- Distinguish jars, bottles, beakers, and flasks by shape, and match each to its proper task.
- Explain why glass is the laboratory's favored vessel material, giving its two chief virtues and one important limit.
- Inspect any vessel for chips, cracks, and heat damage, and retire unsafe vessels from laboratory work.
- Wash, dry, label, and register a set of working jars to the archive standard.
Reading this lesson: ★ marks the passages to remember. They return on the unit quiz and the class test. Check in questions ask the material back as you go; answer them in your workbook when you meet them.
Working this lesson: Your assignment packet is the first download on this page. Work in it as the lesson moves along, answering each exercise as its subject is taught — or read the lesson through for your notes and take the exercises as homework afterward. Both are proper ways to sit this class. Signposts in the reading tell you where each exercise belongs. Written answers are short answers in your own words; a few honest lines are worth more than a filled page.
Your Assignment Packet
This lesson's exercises live in its packet: the Lexicon Handout (every term, course terms marked ◆), Materials, Guided Practice, the Assignment Manual with its answer key for self-checking, the Reflection Questions, and the Workbook Checklist. Download the packet before you begin and keep it beside you as you read.
Safety Briefing
Read this entire section before you touch a single vessel. Glass is honest, but it is not forgiving.
The broken-glass protocol. If a vessel breaks, stop what you are doing. Do not pick up the pieces with your bare hands, not even the large ones, not even for a second. Edges you cannot see will cut you. Fetch a dustpan and brush and sweep every visible piece into it. For slivers and sparkling dust, press a damp folded paper towel over the area and lift them away. An adult must be present for the cleanup of any broken glass.
Cuts. If glass breaks skin, rinse the cut under clean running water, press it with a clean cloth, and get an adult at once. A cut that is deep, that will not stop bleeding, or that may hold a sliver of glass needs proper medical attention. Do not dig for glass in a wound. Tell an adult and let them decide.
Disposal. Broken glass never goes loose into a trash bag, where it can cut the next person who handles the bag. Collect it in a rigid container, a cardboard box or a sturdy jar, tape the container shut, and label it "broken glass" before it goes out.
Heat. Only heat-safe glass goes near heat, and in this laboratory that means borosilicate, which you will meet below. Never heat a sealed vessel: trapped steam or expanding air will burst it. Never set any glass directly on a flame unless the lesson explicitly says so. And remember the oldest rule of the hot bench: hot glass looks exactly like cold glass. Assume every vessel near heat is hot, and handle it with mitts or tongs.
Supervision. An adult must be present for any heating in this lesson's extensions, and for any broken-glass cleanup. Washing and inspecting jars is safe student work. Everything else in this lesson follows the same rule as every Potions lesson: when in doubt, ask the adult first.
❦ In your workbook: record the safety briefing in your own way — the broken-glass protocol, the disposal rule, and the heat rules — copy, sketch, or note what matters.
The Vessel as Technology
Every preparation you will make in this course lives inside something. Oils rest in bottles. Dried botanicals wait in jars. Mixtures are stirred in beakers and swirled in flasks. The vessel is not the background of the work. It is the work's first tool and its last guardian, and the history of the apothecary is in large part the history of getting better vessels.
Before glass was common, the apothecary kept materials in clay, in wood, in metal, in skin and bladder. Each had its failings. Clay is porous and can hold old smells. Wood stains and rots. Metal reacts with acids and can taint what it holds. None of them lets you see what is happening inside. A preparation sealed in an opaque pot is a preparation you must open to check, and every opening is an invitation to dust, moisture, and decay.
Glass solved all of this at once, and that is why this lesson exists. But glass was not always the humble jar on your shelf. For most of human history it was a luxury, and its journey from treasure to tool is worth knowing, because every vessel you will ever wash carries that history in its making.
❦ In your workbook: record the vessel as technology in your own way — what the older materials failed at, and what glass solved — copy, sketch, or note what matters.
Rome's Gift: The Blown Bottle
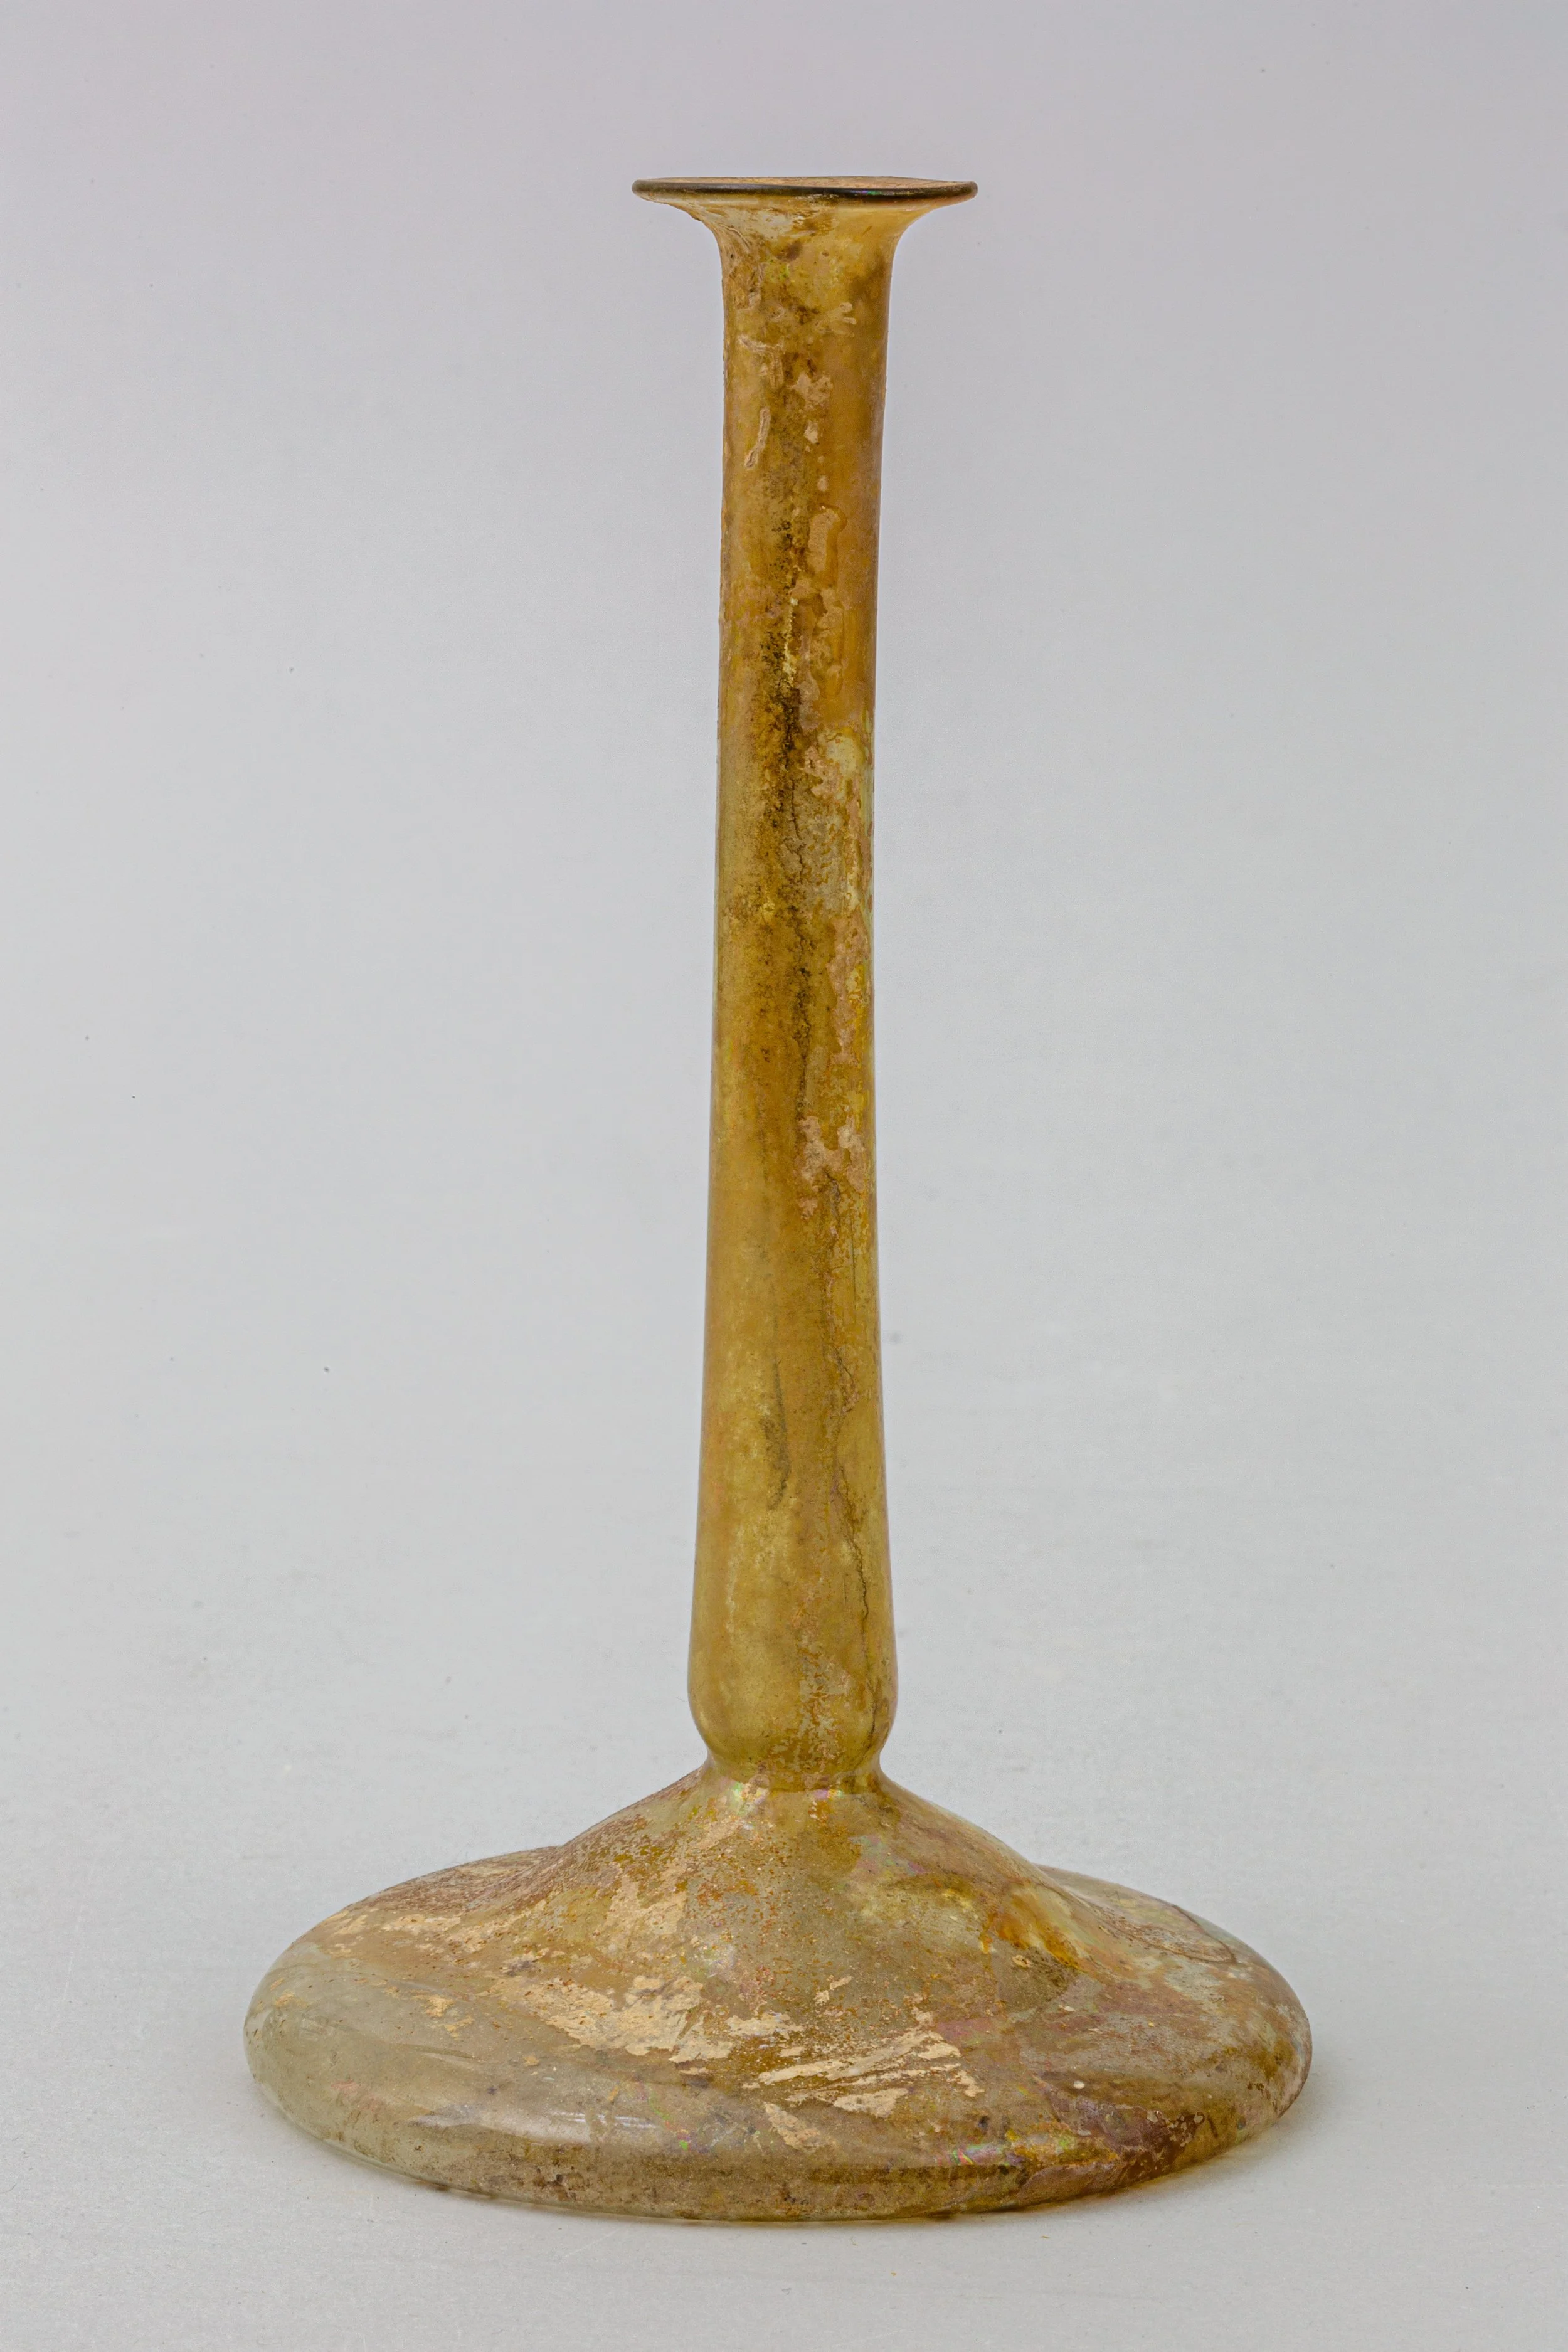
A candlestick unguentarium, Roman, 2nd–3rd century CE: a tall neck over a broad flat body, blown to carry precious liquids — oils, perfumes, and medicines — safely in glass.
Glass perfume bottle (candlestick unguentarium), Roman, 2nd–3rd century CE, Edward C. Moore Collection, Bequest of Edward C. Moore, 1891 (91.1.1363), The Metropolitan Museum of Art. CC0 (Open Access).
For centuries, glass vessels were made by winding hot glass around a clay core or by casting it in molds. Both methods were slow, and both made glass expensive. Then, in the early first century BCE, craftsmen on the Syro-Palestinian coast of the eastern Mediterranean discovered that a gather of molten glass on the end of a pipe could be inflated like a bubble. Glassblowing was born.
★ Rome carried the new technique across its empire, and the effect was a revolution. A blower could shape a vessel in minutes that had taken a caster hours. Glass went from luxury to everyday ware within a few generations. Drinking cups, storage jars, and above all small bottles spread through Roman life, and the apothecary's trade rode that wave directly: small blown bottles called unguentaria held the oils, perfumes, and medicines of the Roman world. The Metropolitan Museum of Art's Roman glass collection shows these vessels by the hundred, delicate little bottles made to carry precious liquids safely.
★ The Romans also noticed what made glass precious to the laboratory. It is nonporous, so it holds no old smells. It is translucent, so you can see the contents. It is odorless itself, so it lends nothing to what it keeps. Two thousand years later, those are still the three reasons your working jars are glass.
Check in: Why did small blown bottles matter specifically to the apothecary's trade — what did the unguentarium carry, and what did glass give it that clay, wood, and metal could not?
❦ In your workbook: record Rome's gift in your own way — where and when glassblowing began, what it changed about speed and price, and the three reasons glass still wins — copy, sketch, or note what matters.
The Island of Glass: Venice and Cristallo
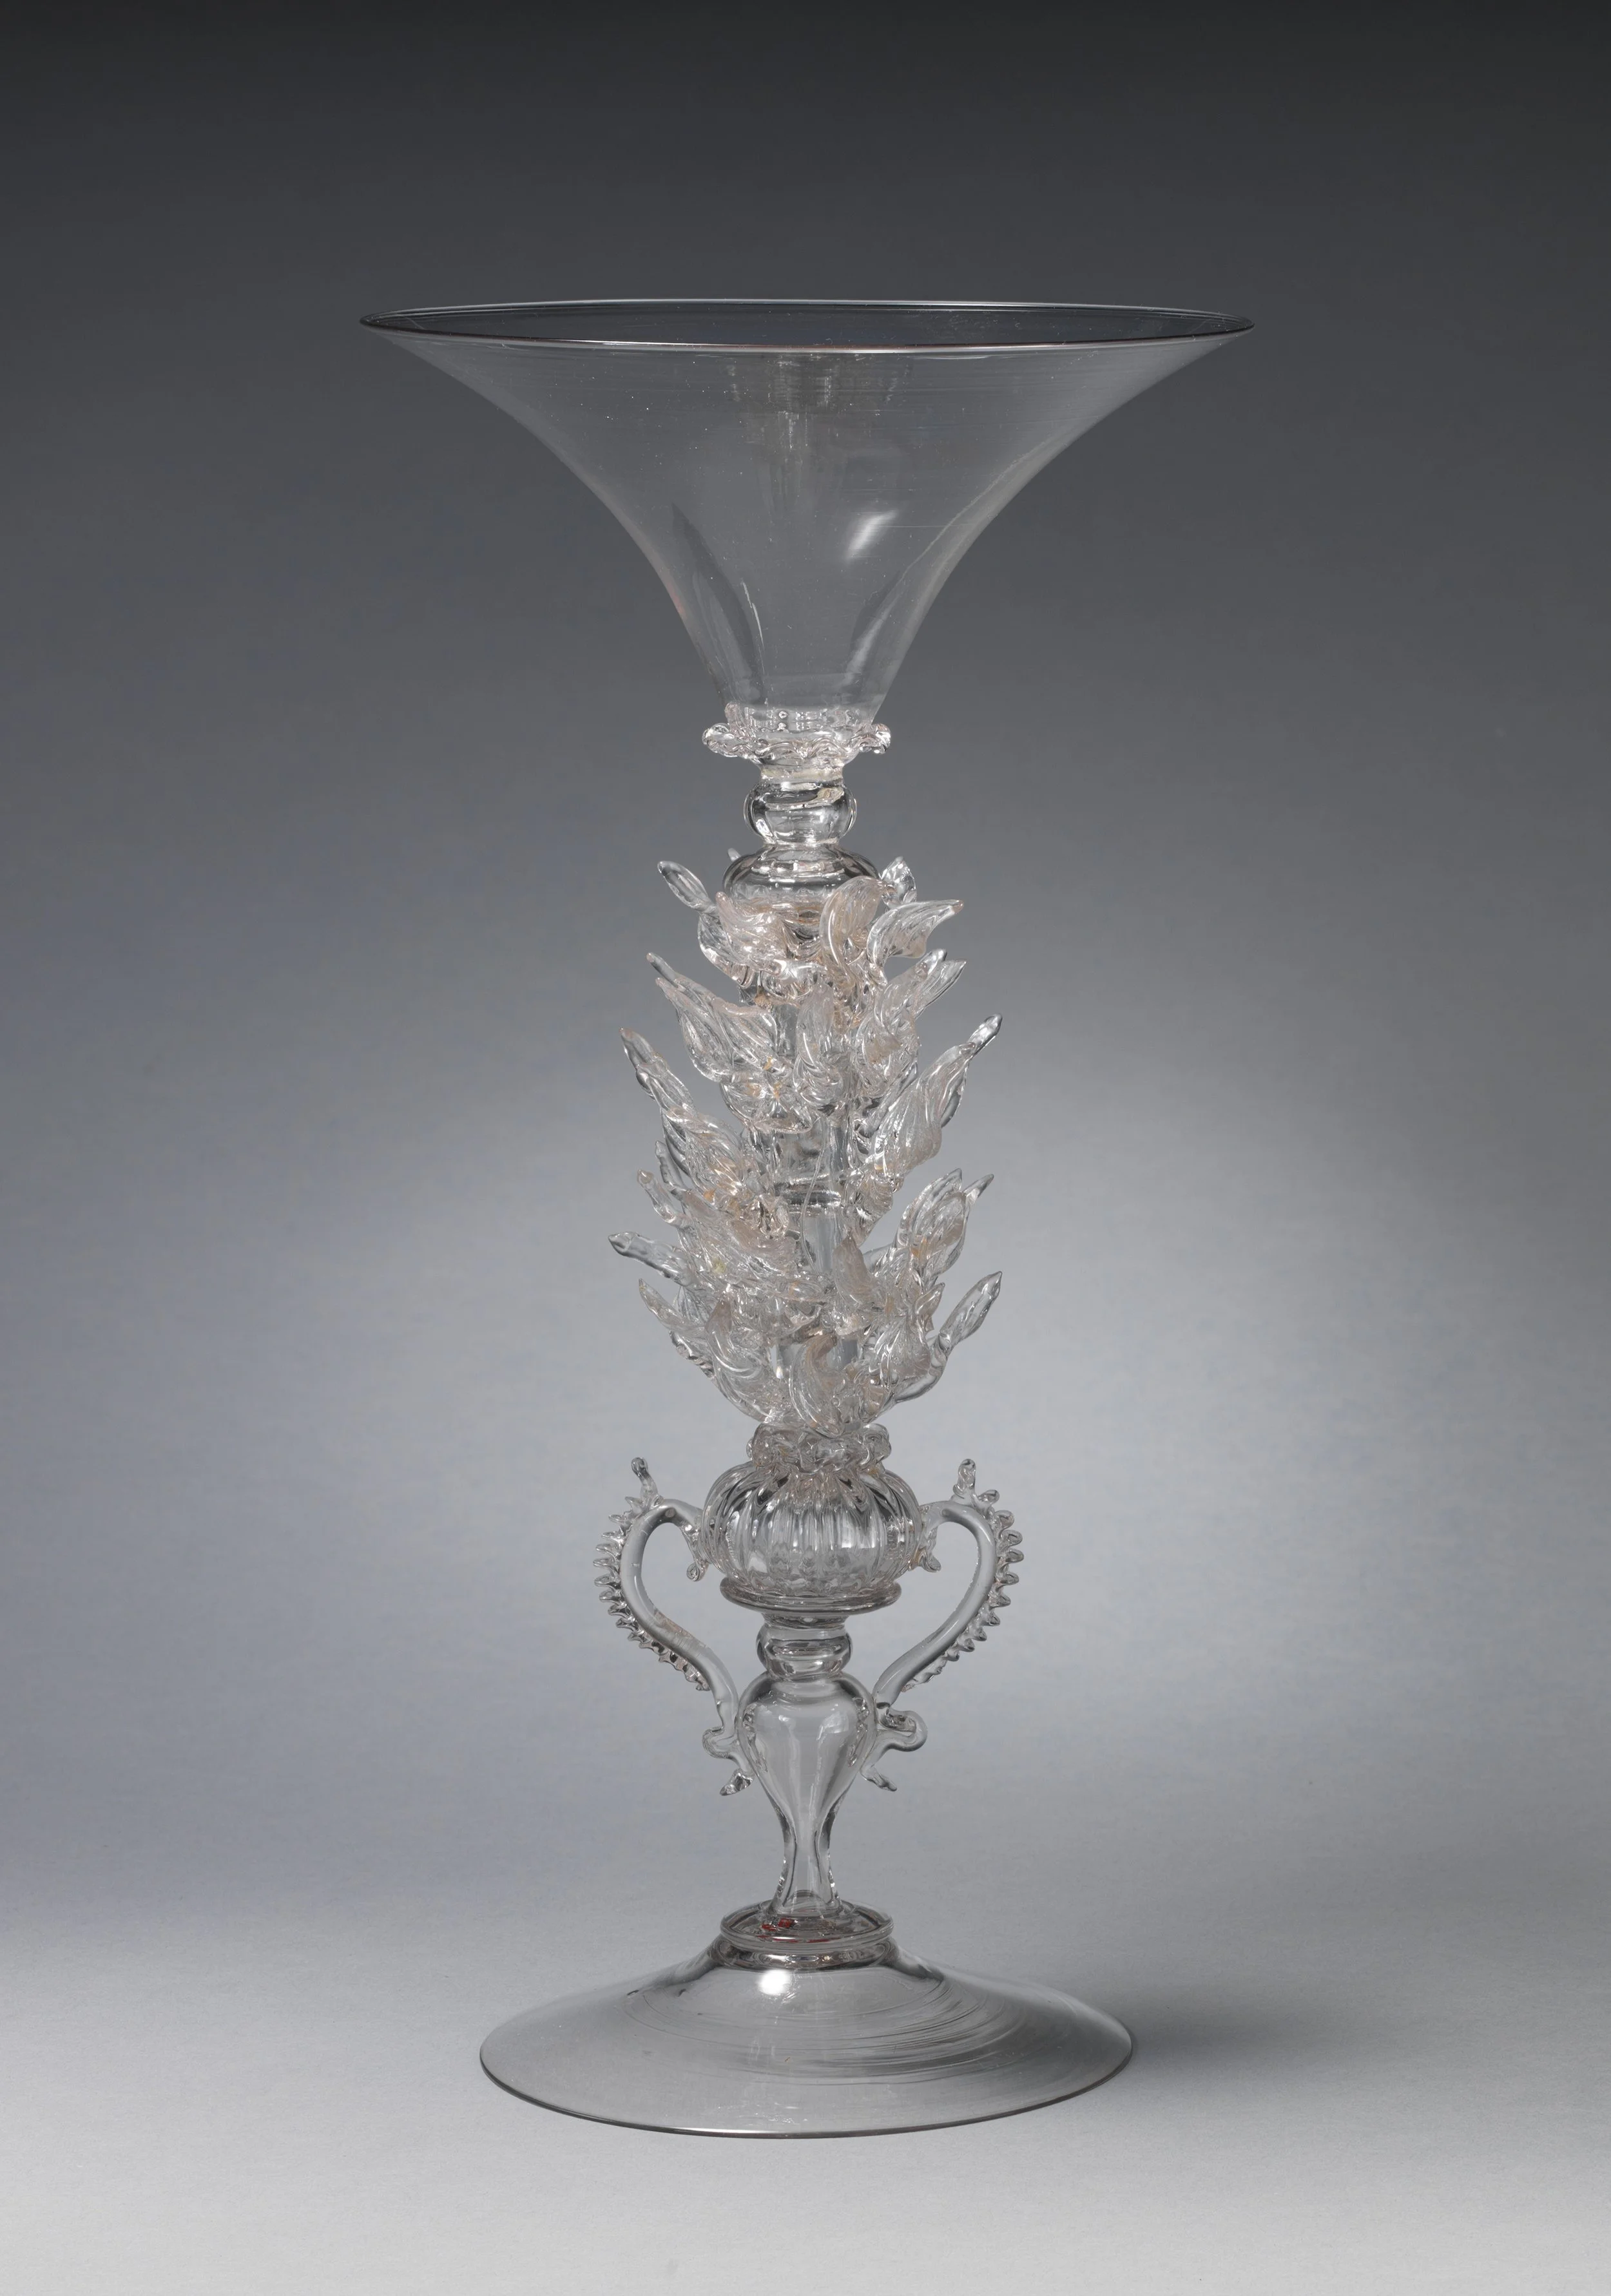
A Murano goblet with a decorative stem, 17th–18th century: cristallo's promise kept — glass so clear the worker (and the drinker) sees everything through it.
Goblet with decorative stem, Italian, Venice (Murano), 17th–18th century, Gift of Henry G. Marquand, 1883 (83.7.63), The Metropolitan Museum of Art. CC0 (Open Access).
By the Middle Ages, the finest glass in Europe came from Venice. The furnaces burned so hot and so constantly that in 1291 the city ordered them moved to the island of Murano, out in the lagoon, to protect wooden Venice from fire. On Murano, glassmaking became a guarded art, its secrets kept by law and its masters granted rare privileges.
★ Around the 1450s, a Murano glassmaker named Angelo Barovier perfected cristallo, a glass so clear and colorless it was named for rock crystal. He achieved it by purifying his materials and adding manganese to cancel the greenish tint that ordinary glass carries. Cristallo was still a luxury, far beyond an apothecary's purse, but it proved something the laboratory never forgot: glass could be made truly clear, and a truly clear vessel lets the worker see everything, color, clarity, separation, spoilage, without ever opening the jar.
Check in: Venice moved its furnaces to Murano for safety, but what did cristallo prove that matters every time you judge a preparation through a jar wall?
❦ In your workbook: record Venice and cristallo in your own way — the 1291 move, Barovier's clear glass, and why clarity is a laboratory virtue — copy, sketch, or note what matters.
The Northern Answer: Bohemian Glass
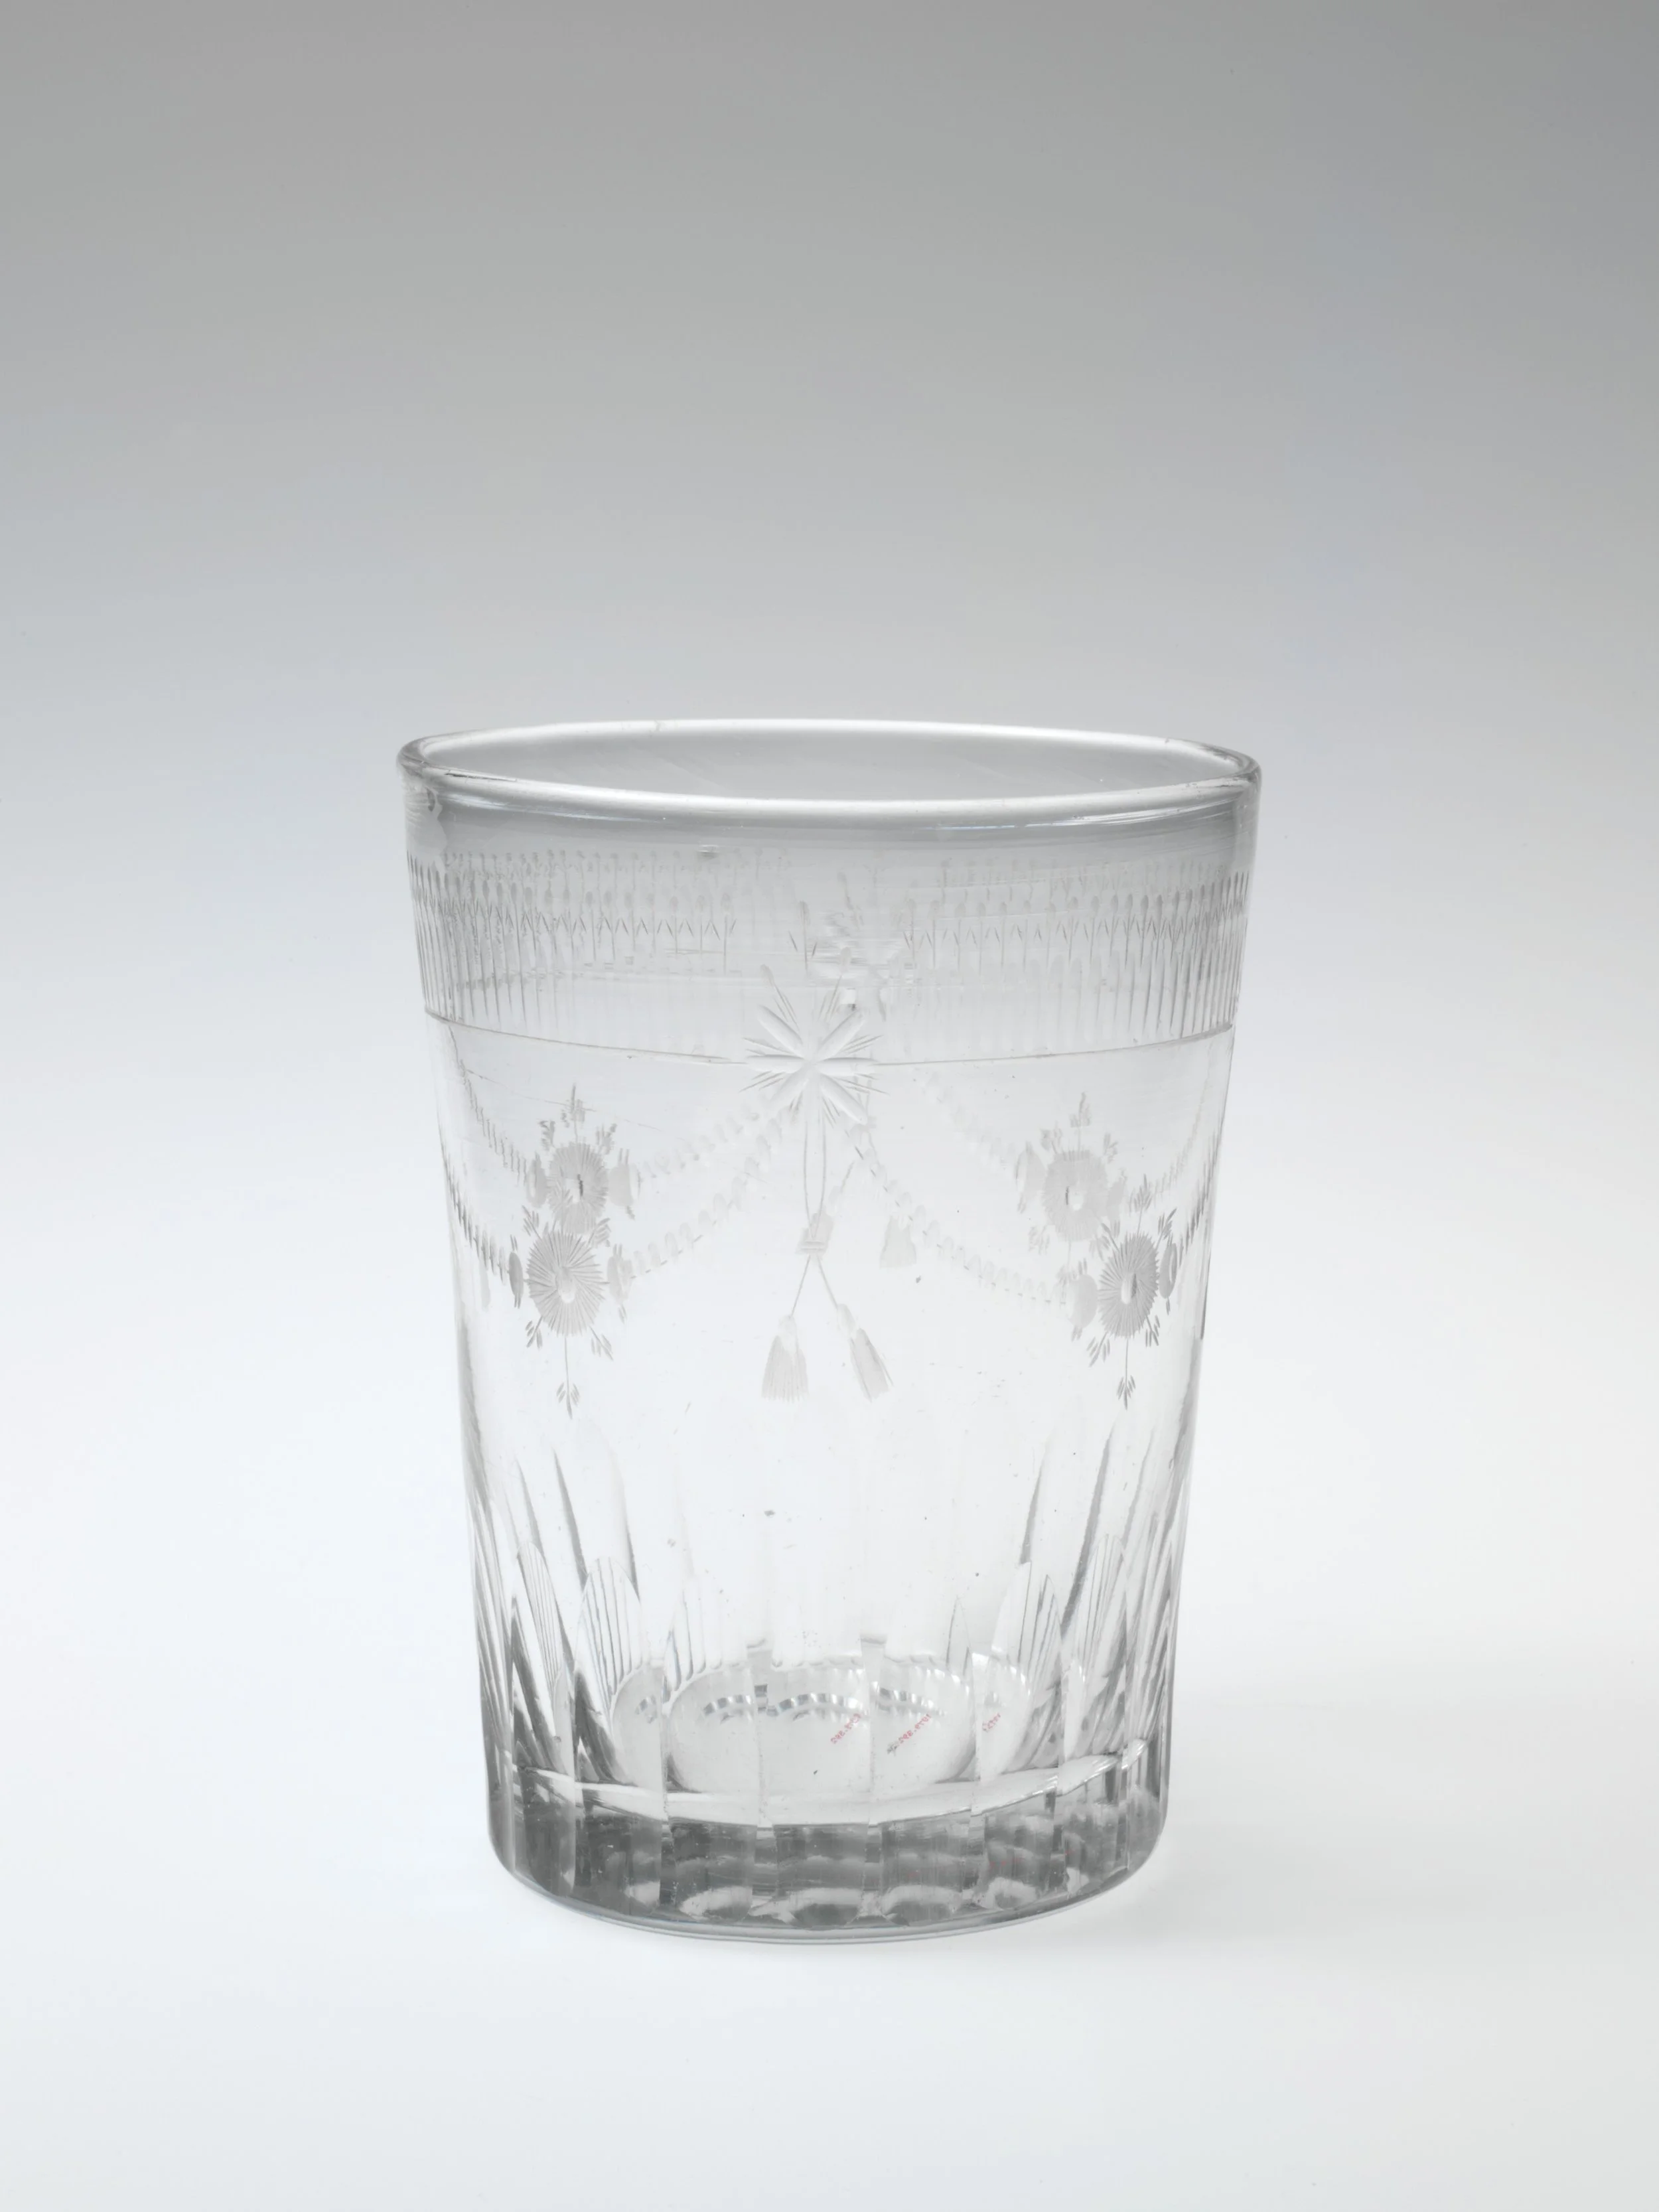
A Bohemian tumbler, 1790–1810, blown, cut, and engraved: thick, hard potash glass worked with wheels like a gemstone — sturdy glass, made to be used.
Tumbler, Bohemian, 1790–1810, Gift of Robertson & Thornton, 1979 (1979.392), The Metropolitan Museum of Art. CC0 (Open Access).
Venice prized thin, delicate glass. Central Europe answered with the opposite. In the 1600s, glassmakers in Bohemia, in what is now the Czech Republic, learned to make glass with potash from wood ash and chalk instead of soda. The result was a thick, hard, brilliant glass that could be cut and engraved with wheels like a gemstone. A gem cutter named Caspar Lehmann, working in Prague in the early 1600s, adapted his engraving wheels to glass, and Bohemian cut glass became famous across Europe through the 1700s.
★ Bohemian glass matters to our story for a practical reason. Thin Venetian-style glass is beautiful and fragile. Thick Bohemian-style glass is sturdy, and sturdiness is a laboratory virtue. The heavy, honest vessels of the working laboratory, the jars that survive years of washing and the beakers that survive years of stirring, descend from this northern tradition of glass made to be used, not merely admired.
❦ In your workbook: record Bohemian glass in your own way — potash and chalk, thick walls, wheel-cutting, and why sturdiness serves the laboratory — copy, sketch, or note what matters.
A Sealed Note on the Honest Vessel
Scholars, you have now met two thousand years of glassmaking, and I want you to carry one idea out of all that history. The vessel is honest. Glass does not flatter its contents. It shows you the cloudiness, the separation, the speck of mold, exactly as they are, and it asks you to deal with what you see. That is why the apothecary trusts it.
Plastic hides. Metal hides. Tinted glass hides. Your working vessels will be clear glass, clean glass, labeled glass, because a laboratory that cannot see its materials cannot judge them. A laboratory that cannot judge its materials is only a kitchen with ambitions.
Choose honest vessels, scholars. Wash them well. You will spend this course looking through them at the truth of your own work.
— Professor Crimblebrew Muddlenook, Potions Laboratory • Master Apothecary • Head of House Meridies
❦ In your workbook: record the honest vessel in your own way — what clear glass shows you, and what hiding materials cost a laboratory — copy, sketch, or note what matters.
The Laboratory's Shelf: Jars, Bottles, Beakers, and Flasks
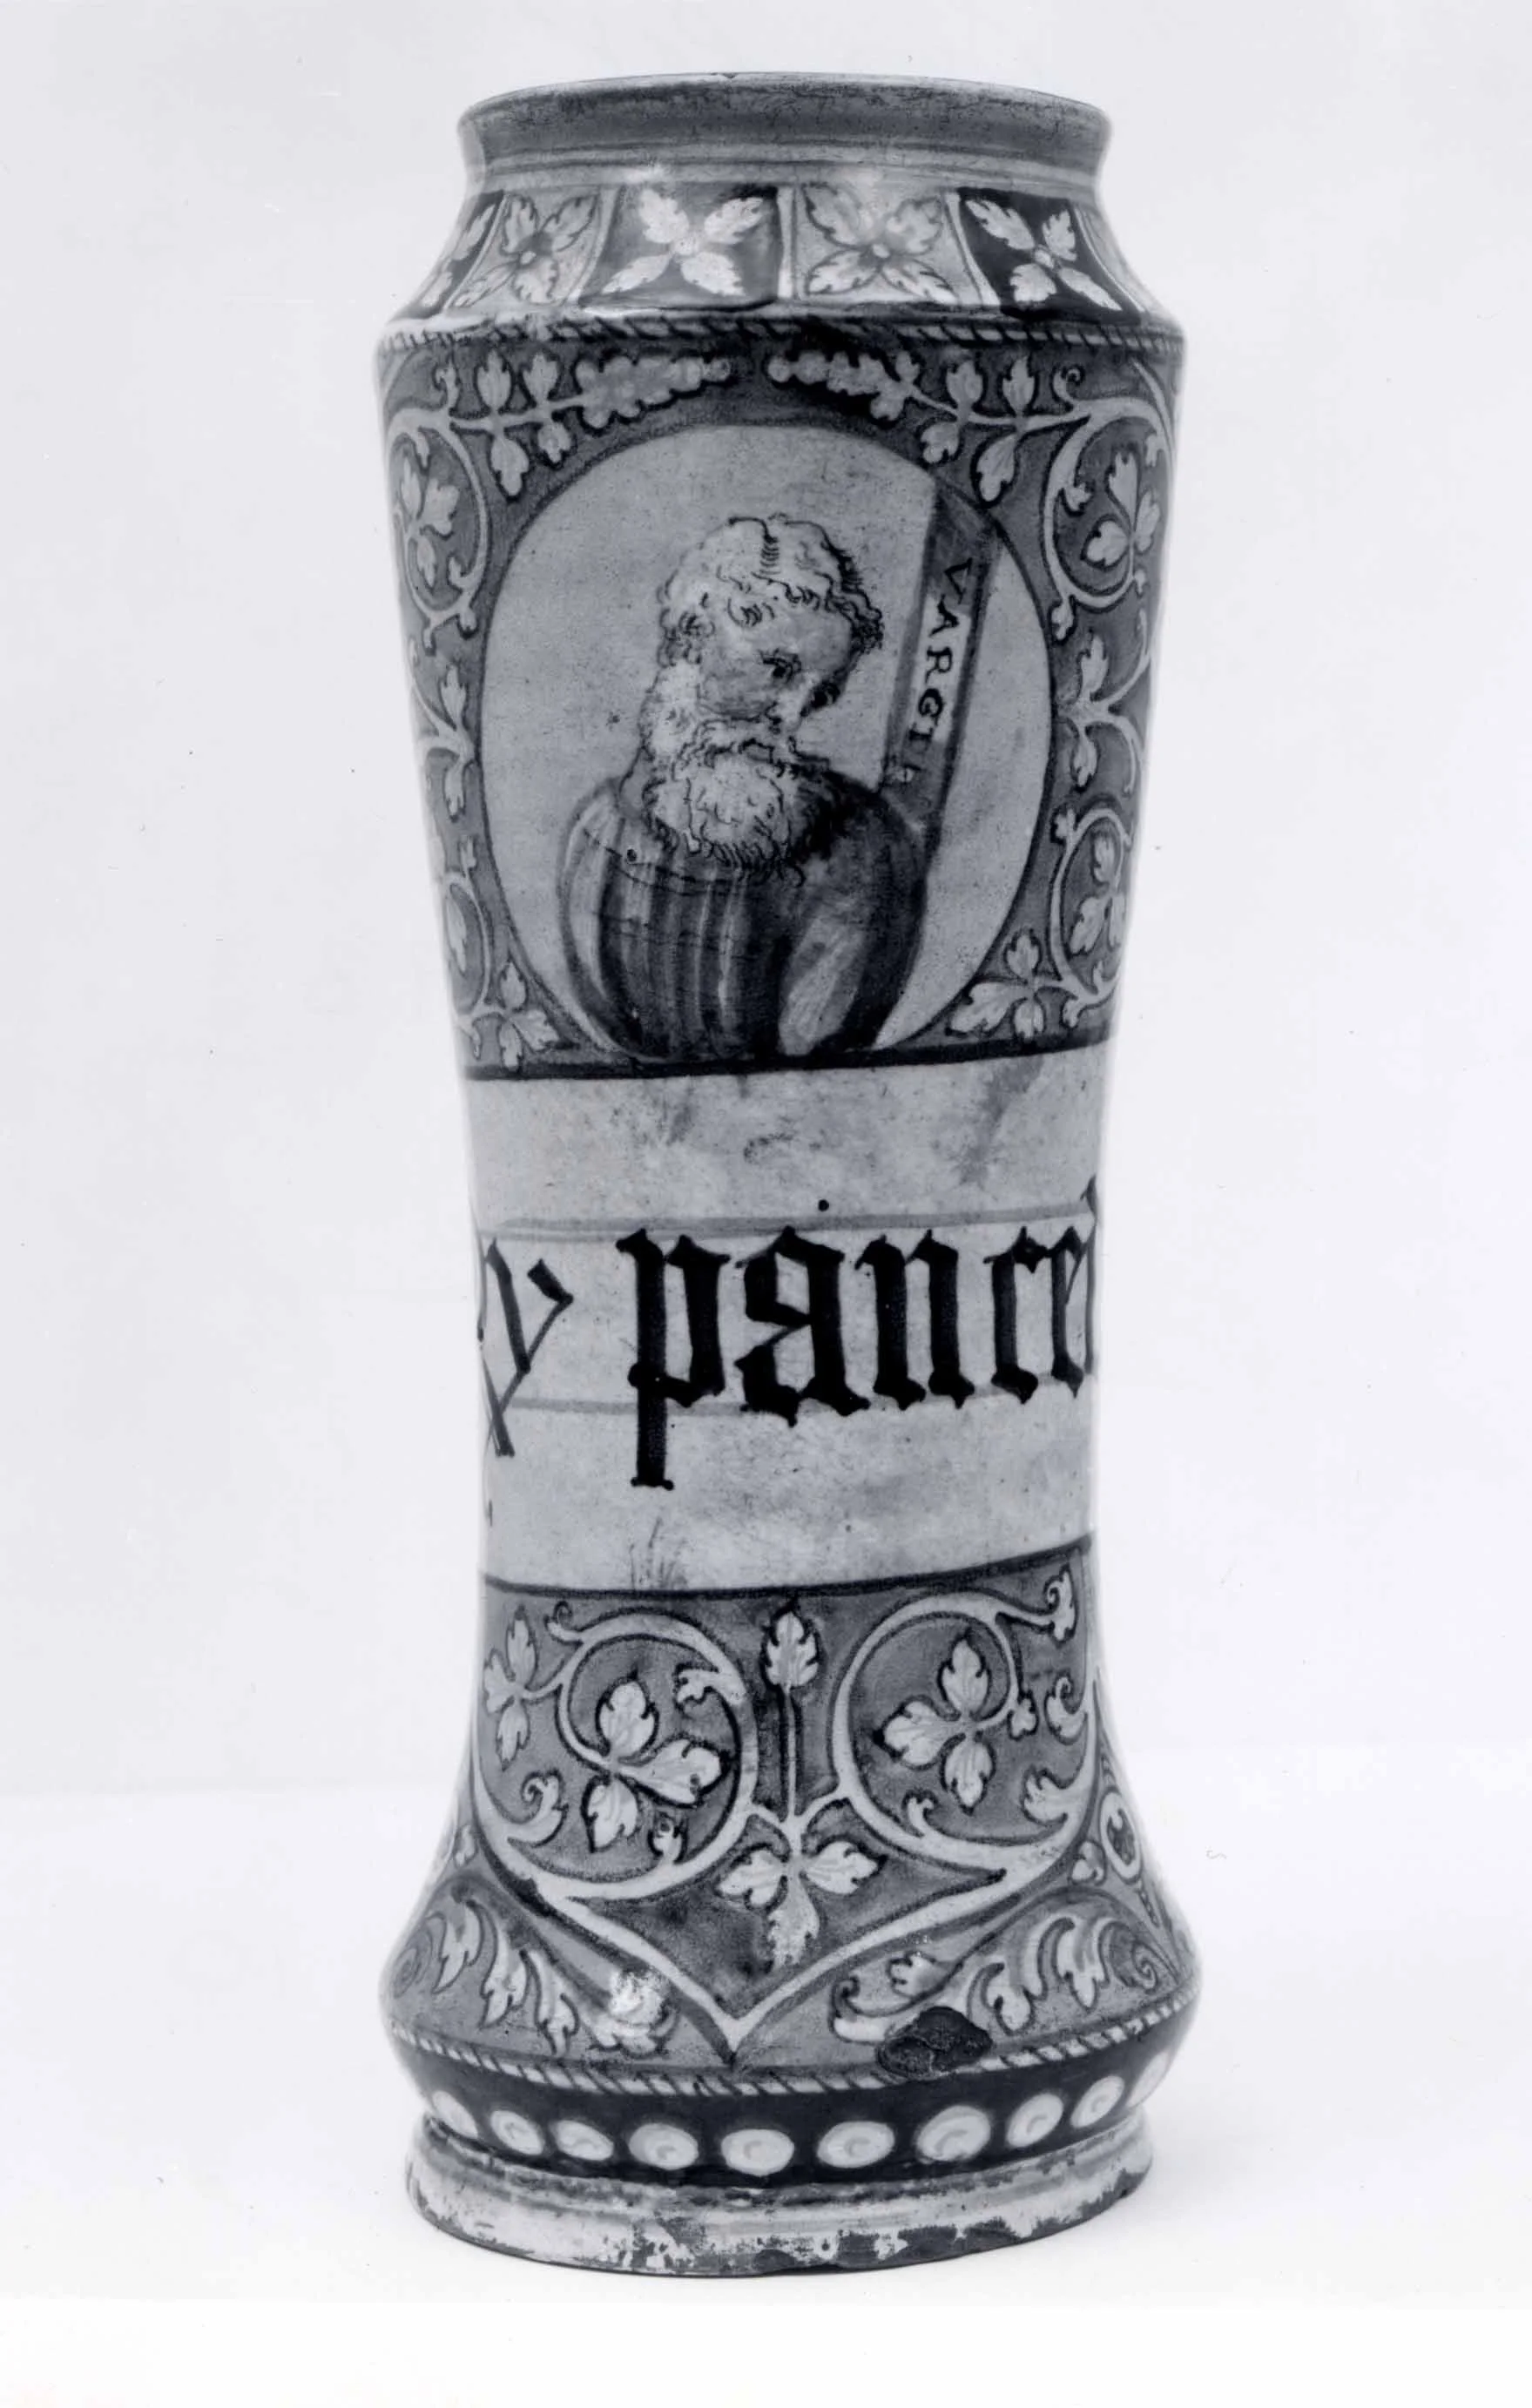
An albarello, the classic waisted pharmacy jar of tin-glazed earthenware (Faenza, ca. 1550) — photographed here in black and white; its painted label band named its contents across the shop. Ceramic blocks light, but hides its contents: in this course glass does the working.
Apothecary jar (albarello), Italian, Faenza, ca. 1550, Robert Lehman Collection, 1975 (1975.1.993), The Metropolitan Museum of Art. CC0 (Open Access).
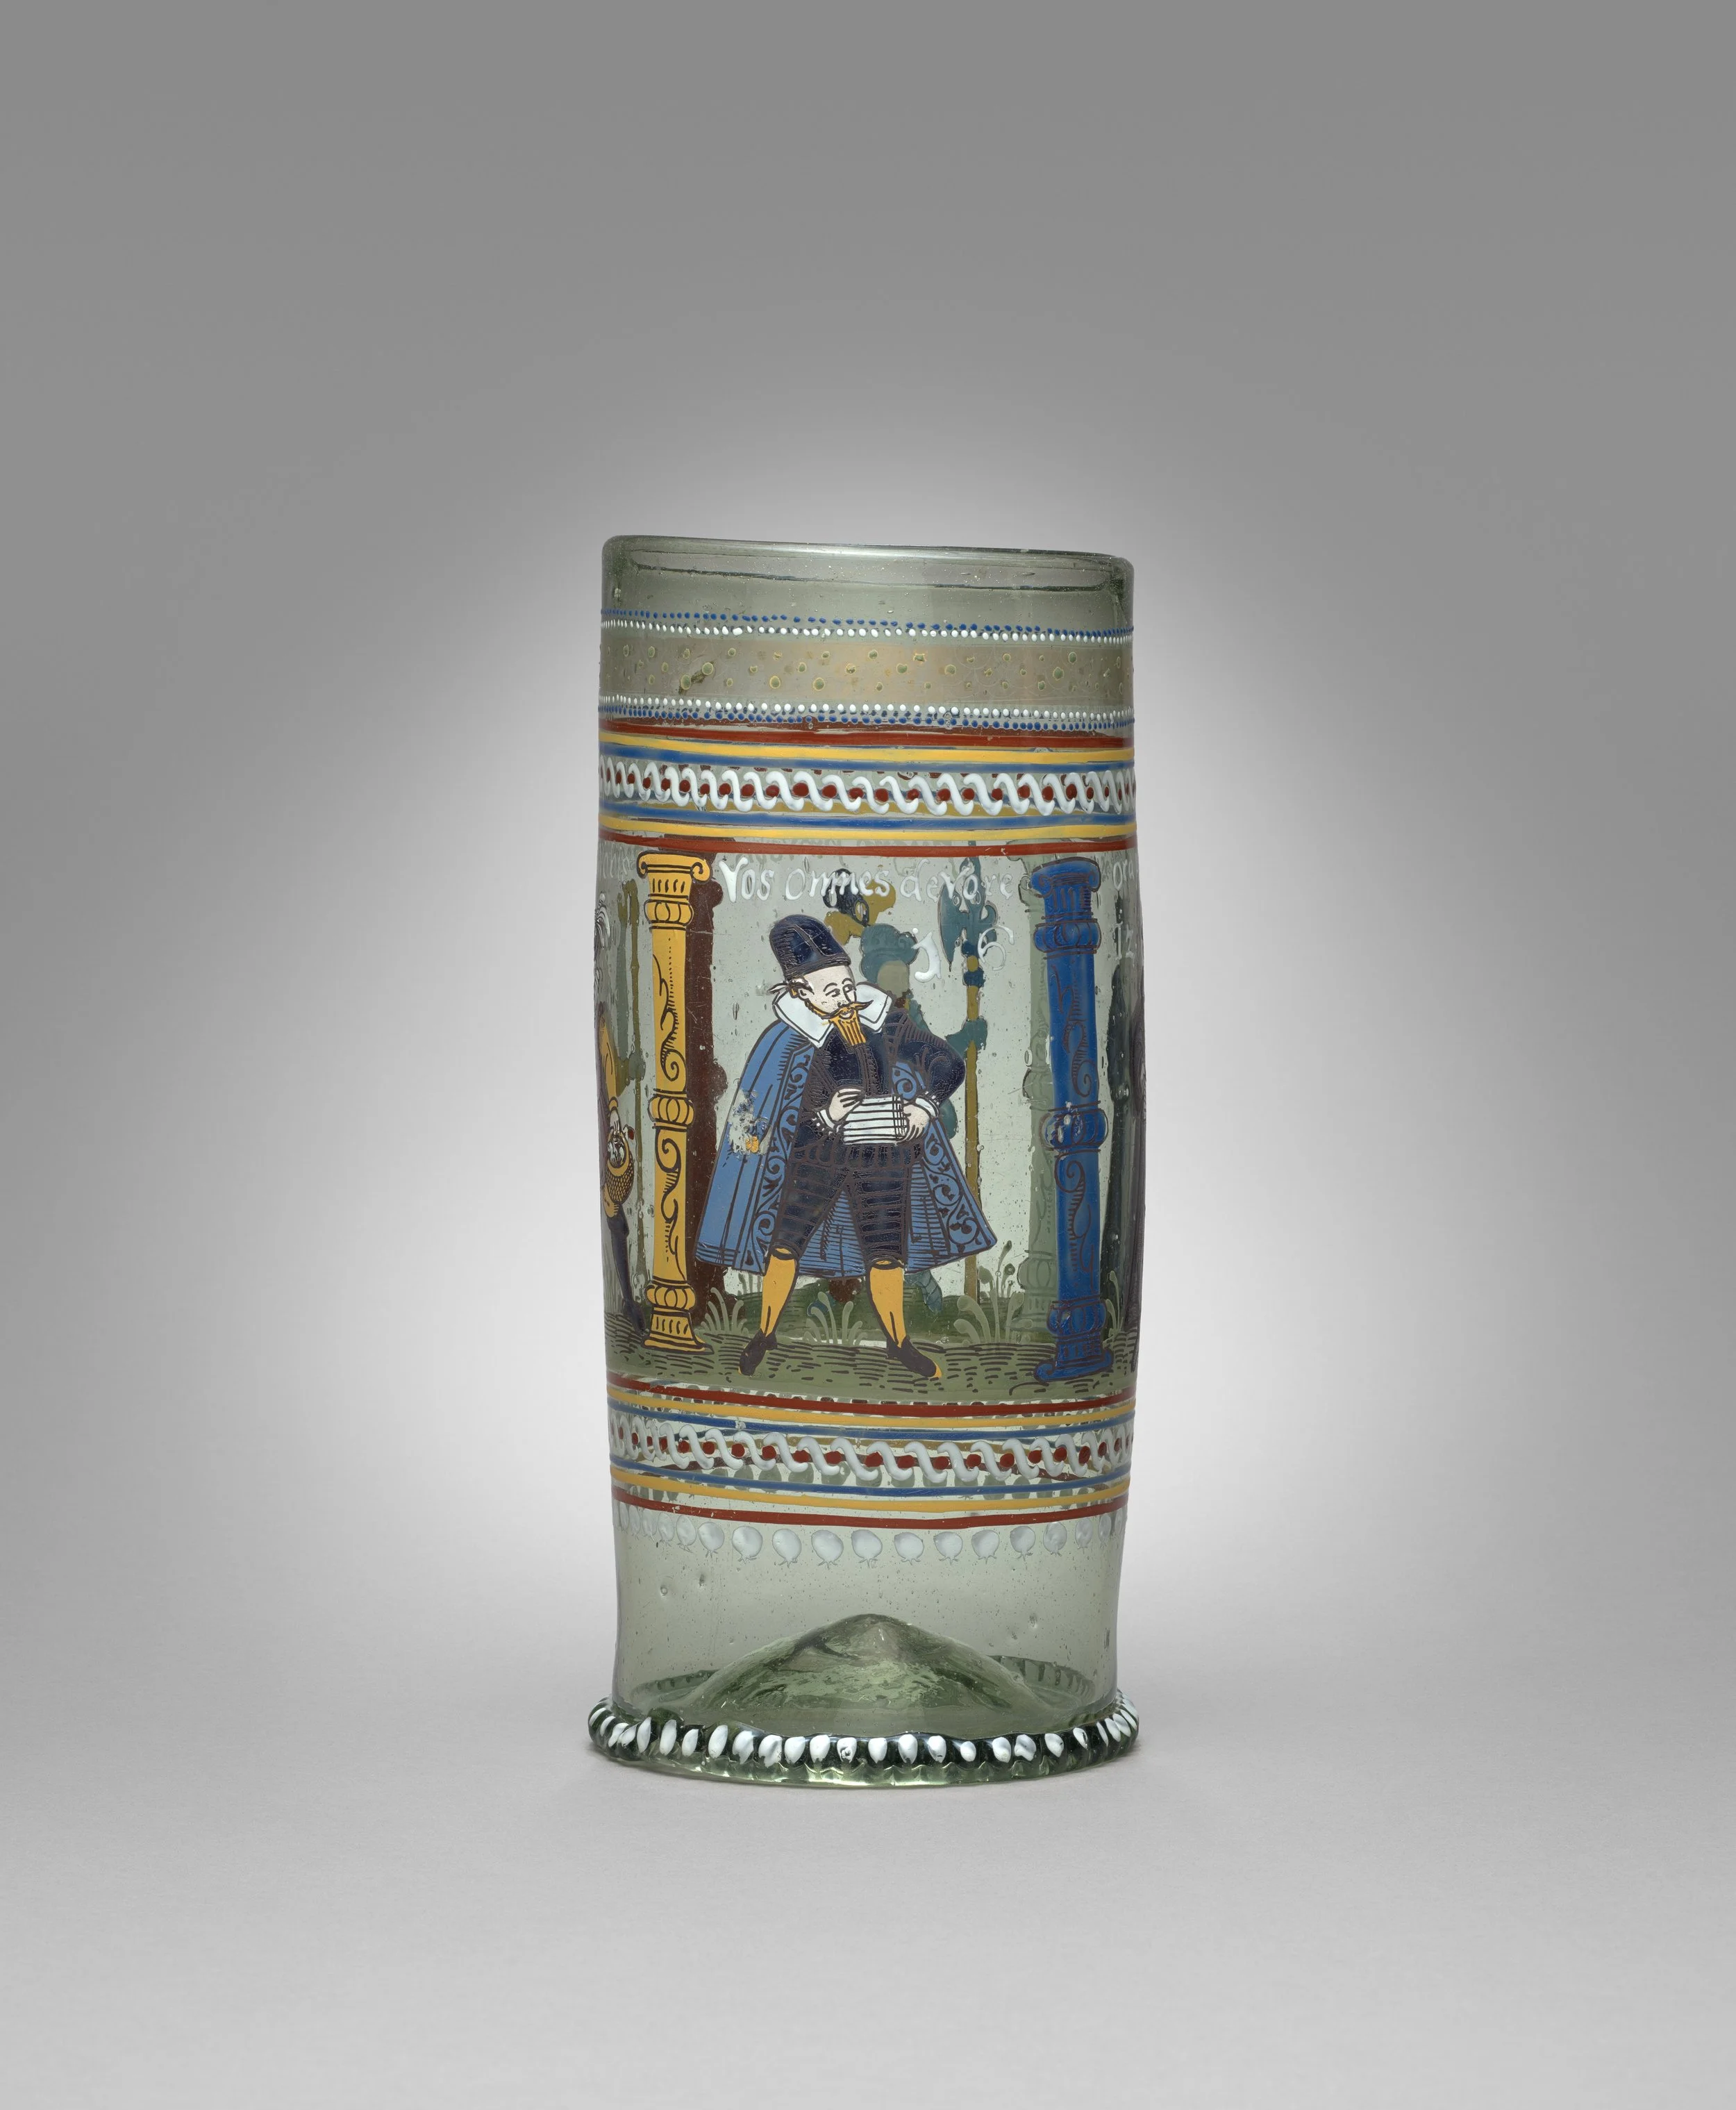
A beaker's shape before it was a laboratory shape: a tall cylindrical Humpen, Bohemian, 1612, enameled with figures and inscriptions — the straight-sided worker, made to hold a quantity while you stir.
Beaker (Humpen), Bohemian, 1612, Munsey Fund, 1927 (27.185.15), The Metropolitan Museum of Art. CC0 (Open Access).
Walk the shelves of any working laboratory and you will see the same family of shapes, because shape follows task. Learn them now; you will reach for them without thinking by Unit III.
The jar is the wide-mouthed keeper. Its mouth is broad enough for a hand or a spoon to enter, which makes it the vessel for dry goods: dried botanicals, salts, clays, waxes. A jar does not pour elegantly. It does not need to. It opens, it receives, it closes, it keeps.
The bottle is the narrow-necked keeper. Its neck constricts the flow, so liquids pour in a controlled stream instead of a splash. Bottles hold oils, vinegars, tinctures, and every finished liquid preparation in this course. A bottle with a proper stopper or cap is the only vessel that should hold a liquid on your shelf.
The beaker is the worker. Cylindrical, with a spout for pouring and graduations marked up its side, it is made for mixing, stirring, and rough measuring. Beakers are not precision instruments; their graduations are approximate. But for combining, for holding a working quantity while you stir, there is no better shape.
The flask is the swirler. Its narrow neck sits above a wide body, conical or round, so liquids can be swirled vigorously without sloshing out. Flasks are the vessels of mixing and heating: the narrow neck slows evaporation and keeps splashes inside.
Smaller members of the family have their places too. Vials hold small quantities of precious material. Ampoules are small glass vessels sealed at the neck for a single portion; they are opened by snapping the neck, which leaves a sharp edge, so they are adult-handled vessels in this laboratory. For bulk, the old laboratory used carboys and demijohns, great narrow-necked bottles for storing large quantities of liquid; you will likely never need one, but you should recognize the names when you meet them in old recipes.
Not every apothecary vessel was glass. The classic pharmacy jar, the albarello, is a waisted cylinder of tin-glazed earthenware, often decorated, made for the apothecary's shelf when glass was dear. Ceramic still has its uses: it blocks light completely, which some materials prefer. But ceramic hides its contents, so in this course glass does the working and ceramic does the storing of light-shy materials only.
Check in: A dried botanical needs a home, a finished oil needs a home, and a mixture needs stirring. Which shape takes each, and what about the shape decides it?
❦ In your workbook: record the laboratory's shelf in your own way — jar, bottle, beaker, and flask by shape and task, with the smaller members of the family — copy, sketch, or note what matters.
Why Glass: Inert and Honest
Two virtues make glass the laboratory's favored material, and one limit keeps the worker humble.
★ The first virtue is that glass is inert. It does not react with what it holds. Acids do not pit it, oils do not soak into it, and it lends no flavor or smell of its own. A preparation kept in glass is kept in nothing else; what you put in is what you find later.
★ The second virtue is that glass is honest, the quality from my sealed note above. Clear glass shows you everything: the true color of an infusion, the first cloudiness of spoilage, the separation of a mixture, the dust on a dried leaf. The worker who can see can judge, and the worker who can judge can keep an archive worth keeping.
★ The limit is that glass breaks, and not all glass is equal. Ordinary soda-lime glass, the glass of jam jars and sauce bottles, handles storage beautifully and heating badly. Sudden temperature change can crack it, the failure called thermal shock. Only heat-safe glass, in the modern laboratory borosilicate, with its low thermal expansion, goes near heat. The rule is simple and absolute: storage glass stores, heat-safe glass heats, and never the reverse.
Check in: Glass is inert and glass is honest — which virtue protects a preparation's contents, and which protects the worker's judgment?
❦ In your workbook: record why glass in your own way — the two virtues, the one limit, and the rule about storage glass and heat-safe glass — copy, sketch, or note what matters.
Choosing the Right Vessel
Match the vessel to the task, and most laboratory accidents of the embarrassing kind never happen.
Dry goods go in jars: wide mouths, easy spoons, easy inspection. Liquids go in bottles: narrow necks, controlled pours, proper stoppers. Mixing happens in beakers and flasks, never in storage jars, because a jar's wide mouth invites spills and a beaker's spout exists for a reason. Heating happens only in heat-safe vessels, only with an adult present, and never in a sealed container.
★ Keep two classes of vessels in your mind from today onward: working vessels and decorative vessels. Working vessels are clear, clean, undamaged, and labeled. They touch your preparations. Decorative vessels are the chipped, the clouded, the beautiful-but-flawed. They hold dried flowers on a shelf and never touch a preparation. A vessel with a chip on its rim, a star crack in its wall, or a stopper that no longer seals has retired from laboratory work. It may still be lovely. It is no longer trustworthy.
❦ In your workbook: record choosing the right vessel in your own way — dry goods, liquids, mixing, and heating each in their proper shape, and the working/decorative line — copy, sketch, or note what matters.
Inspection: Reading a Vessel's Scars
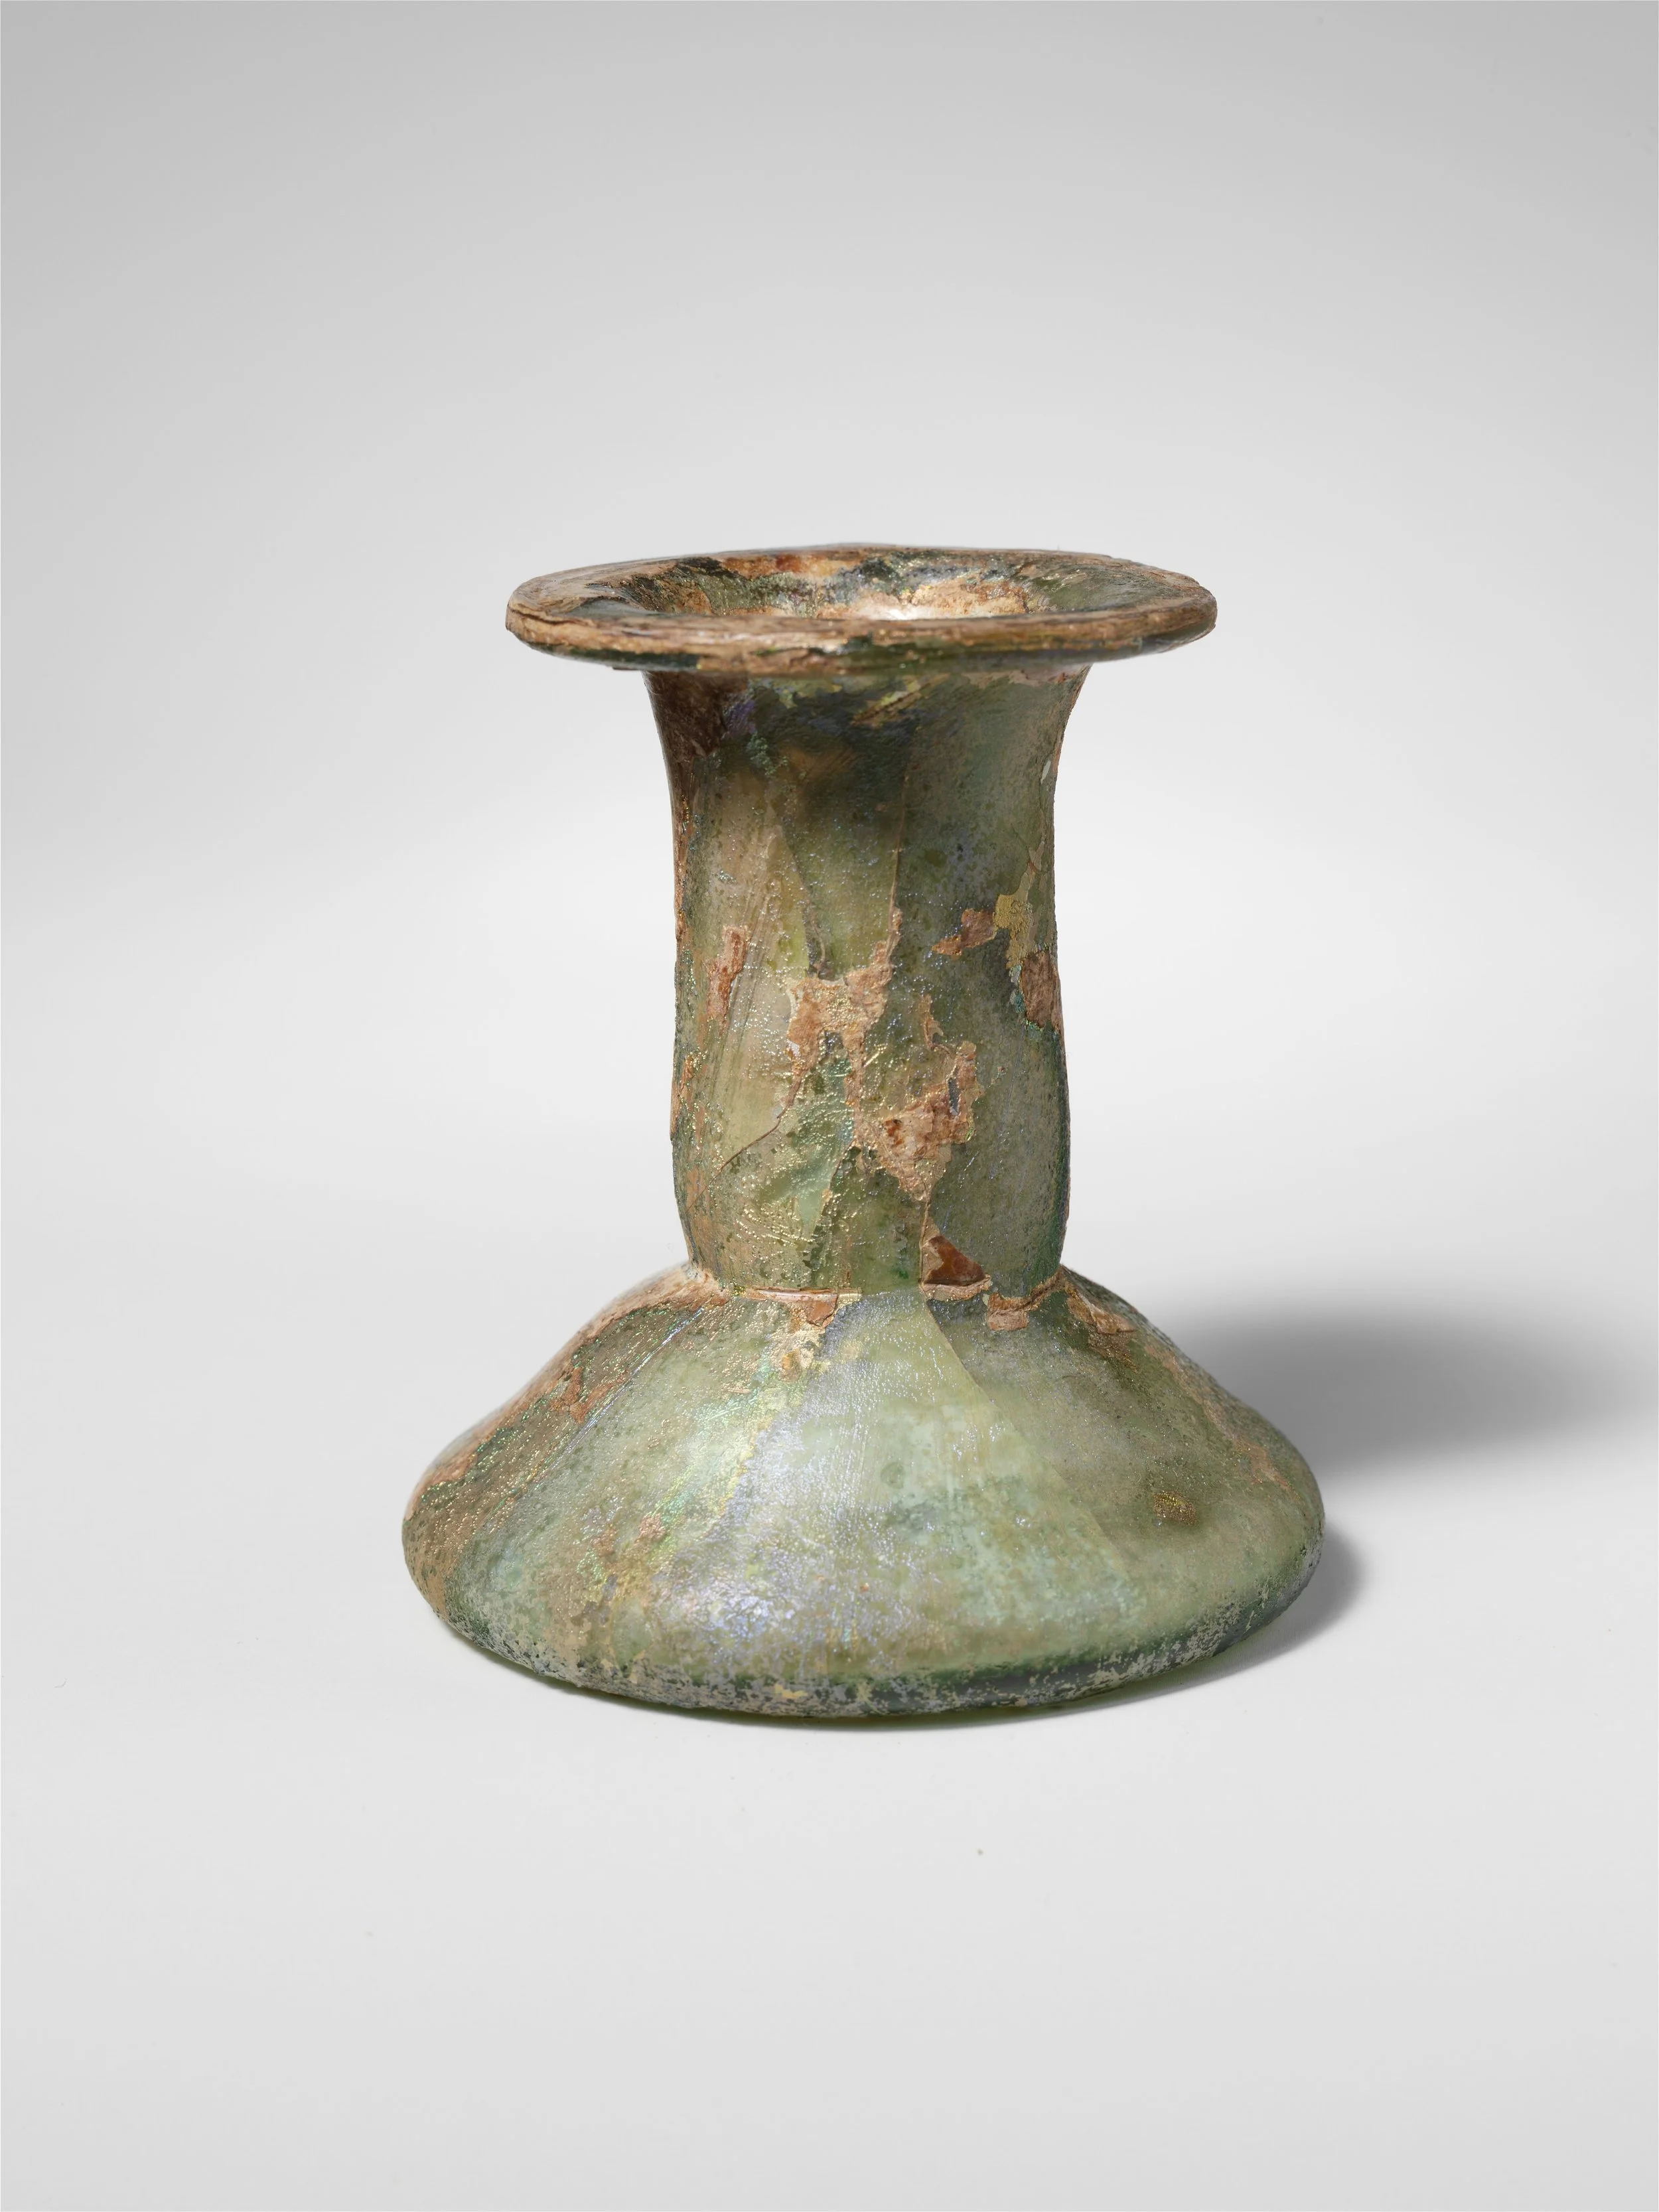
Inspection practice: this Roman bottle's glass is dulled, pitted, and weathered, and a crack runs from its rim to its body — beautiful, ancient, and, by this lesson's rule, retired from working service. A cracked vessel is a retired vessel, no exceptions.
Glass perfume bottle, Roman, Mid Imperial, 2nd–3rd century CE, The Cesnola Collection, Purchased by subscription, 1874–76 (74.51.5839), The Metropolitan Museum of Art. CC0 (Open Access).
Before any vessel enters service, inspect it. Hold it to the light and turn it slowly. This is the inspection you will perform in today's procedure, and it is a habit you will keep for the whole course.
Check the rim for chips and flakes; a damaged rim will not seal and can shed slivers into contents. Check the walls for cracks, especially star cracks that radiate from a point of impact; a cracked vessel is a retired vessel, no exceptions. Check the base for deep scratches and unevenness; a vessel that does not sit flat is a vessel waiting to tip. Look through the glass for cloudiness that does not wash out, which suggests etching or chemical damage. Test every stopper, lid, and cap: it must close firmly and seal. A jar that will not seal is a jar that will not keep.
Record what you find. The archive entry below gives you the vessel register, and from today every working vessel you own has a line in it, with its condition honestly noted.
Check in: A jar still holds water without leaking, but its wall carries a star crack. Working vessel or retired — and what makes the answer absolute rather than a judgment call?
❦ In your workbook: record inspection in your own way — rim, walls, base, clarity, and closure, and what each check is looking for — copy, sketch, or note what matters.
Washing and Drying: The Clean Jar Standard
★ A working jar must meet the clean jar standard: no residue you can see, no film you can feel, no moisture you can find. Residue contaminates the next preparation. Moisture, trapped in a sealed jar of dried botanicals, invites mold and spoilage. Clean and dry are both required, and dry is the one students forget.
Wash in hot soapy water with a bottle brush, reaching every curve and shoulder. Rinse until the water sheets off the glass instead of beading; beading means a film of grease remains, so wash again. Stand vessels upside down on a clean towel to air dry completely, then finish with a dry cloth if any droplets cling. Remove old labels and every trace of glue: a working jar wears only its current label.
Never rush drying with a hot oven unless an adult supervises and the glass is heat-safe; thermal shock from a hot oven to a cool bench cracks ordinary glass. Air and patience, scholars. The laboratory has both in abundance.
❦ In your workbook: record the clean jar standard in your own way — wash, rinse until the water sheets, air dry completely, and why dryness matters as much as cleanliness — copy, sketch, or note what matters.
Guided Observation: The Vessel Procedure
Work at a clear table with your dustpan and brush within reach. An adult should be nearby for the lesson.
Part A — The Inventory
Gather every glass jar and bottle you collected. Sort them by type: jars in one group, bottles in another, beakers and flasks if you have them, vials and small vessels in a fourth. Count each group and write the counts in your notes. Note the material where you can tell it: ordinary glass for most kitchen jars, borosilicate for measuring jugs and laboratory ware. This is your laboratory's starting population. Every vessel you will ever use in this course begins as a line in the register you file today.
In your packet: Exercise I — The Vessel Inventory ◐ begins here. Work it now, or mark the place and take it as homework — your choice.
Part B — The Inspection
Take each vessel in turn. Hold it to the light, turn it slowly, and check rim, walls, base, clarity, and closure exactly as the inspection section teaches. Sort into three groups as you go: sound working vessels, vessels with minor flaws to note, and retired vessels, cracked, chipped, or unsealable, which leave laboratory service for decorative duty. Write every flaw in your notes beside the vessel's description. Be strict. The laboratory rewards strictness here and punishes sentimentality.
In your packet: Exercise II — The Inspection Log ◐ begins here. Work it now, or mark the place and take it as homework — your choice.
Part C — Wash, Dry, Label
Choose your working set: the sound vessels you will actually use. Wash each to the clean jar standard, rinse until water sheets clean, and air dry completely. While they dry, prepare labels: vessel number, contents (to be filled when used), and the date it entered service. Label each dry vessel, and you have a working shelf.
In your packet: Exercise III — Wash, Dry, Label, and Register ⚒ begins here. Work it now, or mark the place and take it as homework — your choice.
Observation
Record what the inventory taught you. Which type of vessel do you own most of, and why do you think that is? Did any vessel surprise you, a shape whose purpose became clear only when you sorted it with its family? What was the most common flaw you found, and what does that tell you about how vessels fail in ordinary kitchens?
Note your drying time honestly: how long did the vessels take to air dry completely, and were any still damp when you grew impatient? That impatience is the exact force the clean jar standard exists to defeat. Write it down.
Cleanup
Wash your brush and stand it to dry. Fold the towels. Return every vessel to its place: working vessels to the working shelf, retired vessels to decorative duty, and any vessel still damp left upside down on the towel until it is truly dry. If any glass broke during the lesson, follow the broken-glass protocol now, with an adult, before anything else. Leave the table clear, the floor swept, and the dustpan back in its place. A laboratory is cleaned as it is used, not afterward.
Archive Entry
Today you open a permanent page in your archive: the vessel register. Rule it as a table with these columns: number, type, material, approximate capacity, condition, and current contents. Give every working vessel its number, V-1, V-2, onward, and write that number on its label. Enter each vessel honestly, flaws and all. When a vessel retires, do not erase its line; write "retired" and the date in the contents column. The register is a history, not a snapshot.
File the register at the front of your archive, before any preparation entries. Every preparation you will ever record names the vessel it lived in, by register number. That is how the archive stays retrievable, and how a stranger, years from now, could follow your work shelf by shelf.
❦ In your workbook: record the vessel procedure in your own way — your counts by type, your commonest flaw, and your honest drying time — copy, sketch, or note what matters.
Materials
Required (Level One — household items)
- Every glass jar and bottle you can gather from your kitchen and recycling: mason jars, jam jars, sauce bottles, small spice jars, any clean glass with a lid
- Dish soap, a bottle brush or an old toothbrush, and clean towels
- Paper and pen for the inventory
- Adhesive labels, masking tape, and a marker
- A dustpan and brush, kept within reach for the whole lesson
Suggested (Level Two — historically closer)
- A borosilicate measuring jug, the modern descendant of the laboratory beaker
- A glass stirring rod
- Proper apothecary-style labels for your working jars
- A rigid cardboard box, taped and labeled, ready as your broken-glass container
Reflection Questions
Answer the following questions in your workbook.
- Glass is the laboratory's favored vessel material for two chief reasons, and it has one important limit. Name all three.
- A classmate plans to heat a preparation in a decorative glass bottle over a flame, with the stopper in place. Identify the errors in this plan and explain the danger of each.
- Why did the Roman adoption of glassblowing matter specifically to the apothecary's trade? Name the vessel and what it carried.
- During inspection you find a jar with a star crack radiating across one wall, but the jar still holds water without leaking. Do you keep it in laboratory service? Explain your decision.
- The clean jar standard requires a jar to be both clean AND dry before it receives dried botanicals. Why is dryness as important as cleanliness? What happens if a sealed jar holds hidden moisture?
Workbook Checklist — Lesson 3
In my workbook I have:
- ☐ named the three milestones of laboratory glassmaking — Roman blown glass, Venetian cristallo, and Bohemian cut glass — in my own words
- ☐ told jar, bottle, beaker, and flask apart by shape and matched each to its proper task
- ☐ stated glass's two chief virtues and its one important limit, and the rule that storage glass stores and heat-safe glass heats
- ☐ completed the vessel inventory: every vessel sorted by type, counted, and described
- ☐ completed the inspection log: every vessel checked at rim, walls, base, clarity, and closure, with retired vessels listed separately and their reasons
- ☐ washed, dried, labeled, and registered my working set to the clean jar standard, numbered V-1 onward in the vessel register at the front of my archive
☐ Lesson completed Date: ___ Signature: ___
The Professor's Closing Note
In good order, scholars: the laboratory now has vessels it can trust, and you have the register to prove it. Three lessons in, and look what you have built: a space, an order, and now the honest glass to hold it all. Keep the register current. Every new jar gets a number before it gets a job, every retirement gets its date, and no vessel works unlabeled. Do this, and your archive will never lie to you about what it holds.
In the next lesson, you will learn to mark and seal what those vessels contain. Until then, keep your shelves honest and your dustpan handy.
— Professor Crimblebrew Muddlenook, Potions Laboratory • Master Apothecary • Head of House Meridies
Cross-Class Connections

Herbology · Unit IV, Lesson 28 — Drying Herbs the Traditional Way
Come up to the Greenhouse when your bundles are crisp, scholars. We dry the harvest here — hang bundles correctly, screen-dry the delicate leaves, and know by crispness when drying is done — and then the harvest needs a home that will not undo the drying. That home is Professor Muddlenook's washed, registered jar: dried herbs sealed into hidden moisture mold in the jar, however well they were dried on the string. Dry them here; keep them there; the two lessons are one habit.

Scrollwork · Unit VI, Lesson 23 — Archive Labels & Library Systems
Your vessel register is a catalog, scholars, and catalogs are my trade. In the Scriptorium we design the tituli, shelfmarks, and colophons by which a collection stays findable — bring your register numbers and your jar labels, and learn to letter and order them so a stranger could find V-7 in the dark. Professor Muddlenook asks that they be accurate. I ask that they also be beautiful. Both asks can be met.

Creative Arts · Unit V, Lesson 20 — Clay II: Vessels, Tiles, Relief & Molds
Back to the clay bench when you are ready, scholars. Professor Muddlenook's shelves hold a jar his glass cannot replace: the albarello, waisted, wide-mouthed, made to be tied down with parchment and cord and painted with the name of what it holds. Here you build one to its true proportions, by coil and slab — and you label it honestly for what it is, air-dried or oven-cured or kiln-fired, because a jar that lies about itself helps nobody.
Creative Arts · Unit VI, Lesson 26 — Shelves, Boxes & Storage That Lasts
And when the register outgrows the shelf it stands on, come and build the shelf. In the Workshop we size a potion shelf to the vessels it must hold — spacing at the jars' height plus a finger's clearance, depth at the jars' depth and no more, the front row the only row — because a hidden second row is where mislabeled things breed. Bring your vessel register; it tells us exactly what to build.
Further Reading & Sources
- Corning Museum of Glass — the world's foremost glass museum: 3,500 years of glassmaking history, collections, and live glassblowing demonstrations.
- Roman Glass — The Metropolitan Museum of Art — the Heilbrunn essay on Rome's glass revolution: glassblowing's invention, unguentaria, and glass in daily Roman life.
- Murano Glass Museum — the history of Venice's island of glass, from Roman finds to the golden age of cristallo.
- Bohemian Glass — the potash-glass tradition of Central Europe: cut crystal, wheel engraving, and three centuries of dominance.
- Science History Institute — the history of laboratory science and its instruments, including the glassware of the working laboratory.
Browse the Potions shelf in the school Library for readable editions of these works.
Submit your work for this lesson using the form below.
CONTINUE IN THE POTIONS LABORATORY
← Previous · Lesson 2: The Scriptorium & Workspace Zoning Next · Lesson 4: Labels, Wax Seals & Ingredient Markings →
Unit I — Foundations of the Laboratory Potions Laboratory — All 52 Lessons
The rest of Unit I: Lesson 1 · Welcome to the Laboratory · Lesson 2 · Scriptorium & Zoning · Lesson 4 · Labels & Seals · Lesson 5 · Recipe Journals · Lesson 6 · Weights & Measures · Lesson 7 · Grinding · Lesson 8 · Simples Census · Lesson 9 · Hearth Clearance