

HERBOLOGY
Unit III · Lesson 21Vegetative Propagation: Layering & Runners
PROFESSOR BERYL FERNFOOT
Herbology Greenhouse
Master Herbalist
Unit III · Lesson 21 · Propagation, Pruning & Plant Stewardship
Professor's Introduction

Rest here a moment, scholars. Settle in somewhere comfortable, because today we are in no hurry at all.
In our last lessons, you learned to wake seeds and to root cuttings, two ways of making new plants. Both are fine skills. But today I want to show you the gentlest method of all, the one where the new plant never has to face the world alone, not even for a day.
Watch a strawberry plant in summer. It sends out long, questing stems that run along the ground, and wherever one touches the soil, a new little plant appears, roots and all, still joined to its mother by that living cord. The young plant drinks from the soil with its own new roots while the mother plant keeps feeding it through the stem. Only when the youngster is strong enough does the cord wither and let go.
That is layering. Nature invented it long before gardeners gave it a name, and it remains one of the most dependable ways to multiply a plant. Today you will learn to read it, to assist it, and in time, to perform it yourself.
Slowly, scholars. The plants are not rushing. Neither should we.
— Professor Beryl Fernfoot, Herbology Greenhouse • Master Herbalist • Head of House Oriens

The line beneath the map is our road: every stop a place where the knowledge of plants changed, every lesson a step along it.
Lesson Objectives
By the end of this lesson, you will be able to:
- Define vegetative propagation and explain why it produces plants genetically identical to the parent.
- Describe how runners (stolons) work and name plants that use them.
- Perform simple layering on a suitable plant, from selecting a stem to pinning it down.
- Name and describe tip layering, compound layering, mound layering, and air layering.
- Explain why staying connected to the parent plant makes layering so dependable.
- Decide when a layered stem is ready to be severed from its parent.
Reading this lesson: ★ marks the passages to remember. They return on the unit quiz and the class test. Check in questions ask the material back as you go; answer them in your workbook when you meet them.
Working this lesson: Your assignment packet is the first download on this page. Work in it as the lesson moves along, answering each assignment as its subject is taught — or read the lesson through for your notes and take the assignments as homework afterward. Both are proper ways to sit this class. Signposts in the reading tell you where each assignment belongs. Written answers are short answers in your own words; a few honest lines are worth more than a filled page.
Your Assignment Packet
This lesson's assignments live in its packet: the Lexicon Handout (every term, course terms marked ◆), Materials, Guided Practice, the Assignment Manual with its answer key for self-checking, the Reflection Questions, and the Workbook Checklist. Download the packet before you begin and keep it beside you as you read.
The Plant That Never Lets Go
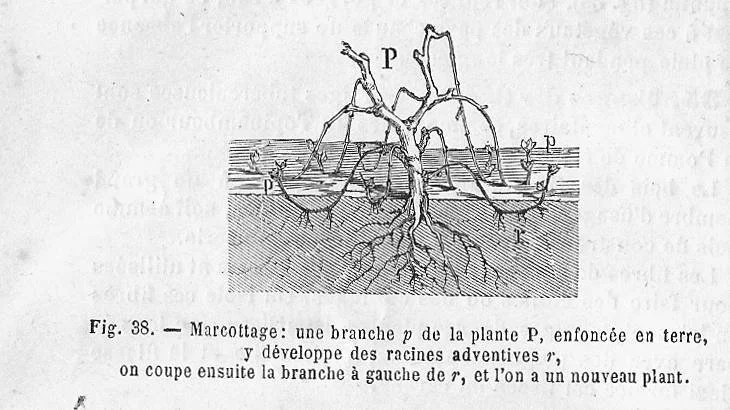
Layering, in one figure (Gaston Bonnier, Fig. 38): a branch of the parent plant P is pressed into the soil, where — still attached, still fed by the parent — it develops adventitious roots r. Only then is the branch cut, on the parent side of the new roots, and the rooted piece stands as a new plant. Root first, sever last: the order is the whole method.
Gaston Bonnier (1853–1922), Fig. 38, via Wikimedia Commons.
Most of the propagation you have studied so far involves separation. A seed leaves its parent entirely. A cutting is severed first and must survive on its own resources while it grows new roots, which is why cuttings need such careful attention to moisture and why some of them fail.
★ Layering turns this around. In layering, the new plant forms its roots while it is still attached to the parent. The stem is bent to the soil, or wrapped in a moist medium, and coaxed into rooting at a chosen point. Throughout the whole process, the parent plant keeps supplying water, carbohydrates, and mineral nutrients through the living stem. The young plant is never cut off, never stressed, never alone.
★ This is why layering is generally successful. Water stress is minimized because the stem still drinks through the parent's established root system. Carbohydrate and mineral nutrient levels stay high because the leaves keep photosynthesizing and the parent keeps sharing. The developing roots grow in a sheltered, supported state that a severed cutting can only dream of.
Check in: A cutting must survive on its own resources while it roots. What three things does the parent plant keep supplying to a layer, all the way through rooting?
The tradeoff is patience. Layering is usually slower than rooting cuttings. A simple layer may take a full growing season before it is ready to be separated. An air layer on a woody branch may take months. But what layering lacks in speed, it repays in dependability. Gardeners who have watched too many cuttings wilt have a saying: cuttings are a gamble, layers are a promise.
★ The rooted stem, once it is finally separated from the parent, is called a layer. And because it grew from the parent's own tissue, it is a clone: genetically identical to the plant it came from. Every desirable trait, the flavor of the strawberry, the fragrance of the rose, the vigor of the shrub, is preserved exactly.
❦ In your workbook: record the plant that never lets go in your own way — layering against the cutting, and what the parent keeps supplying — copy, sketch, or note what matters.
Runners: Nature's Own Layering
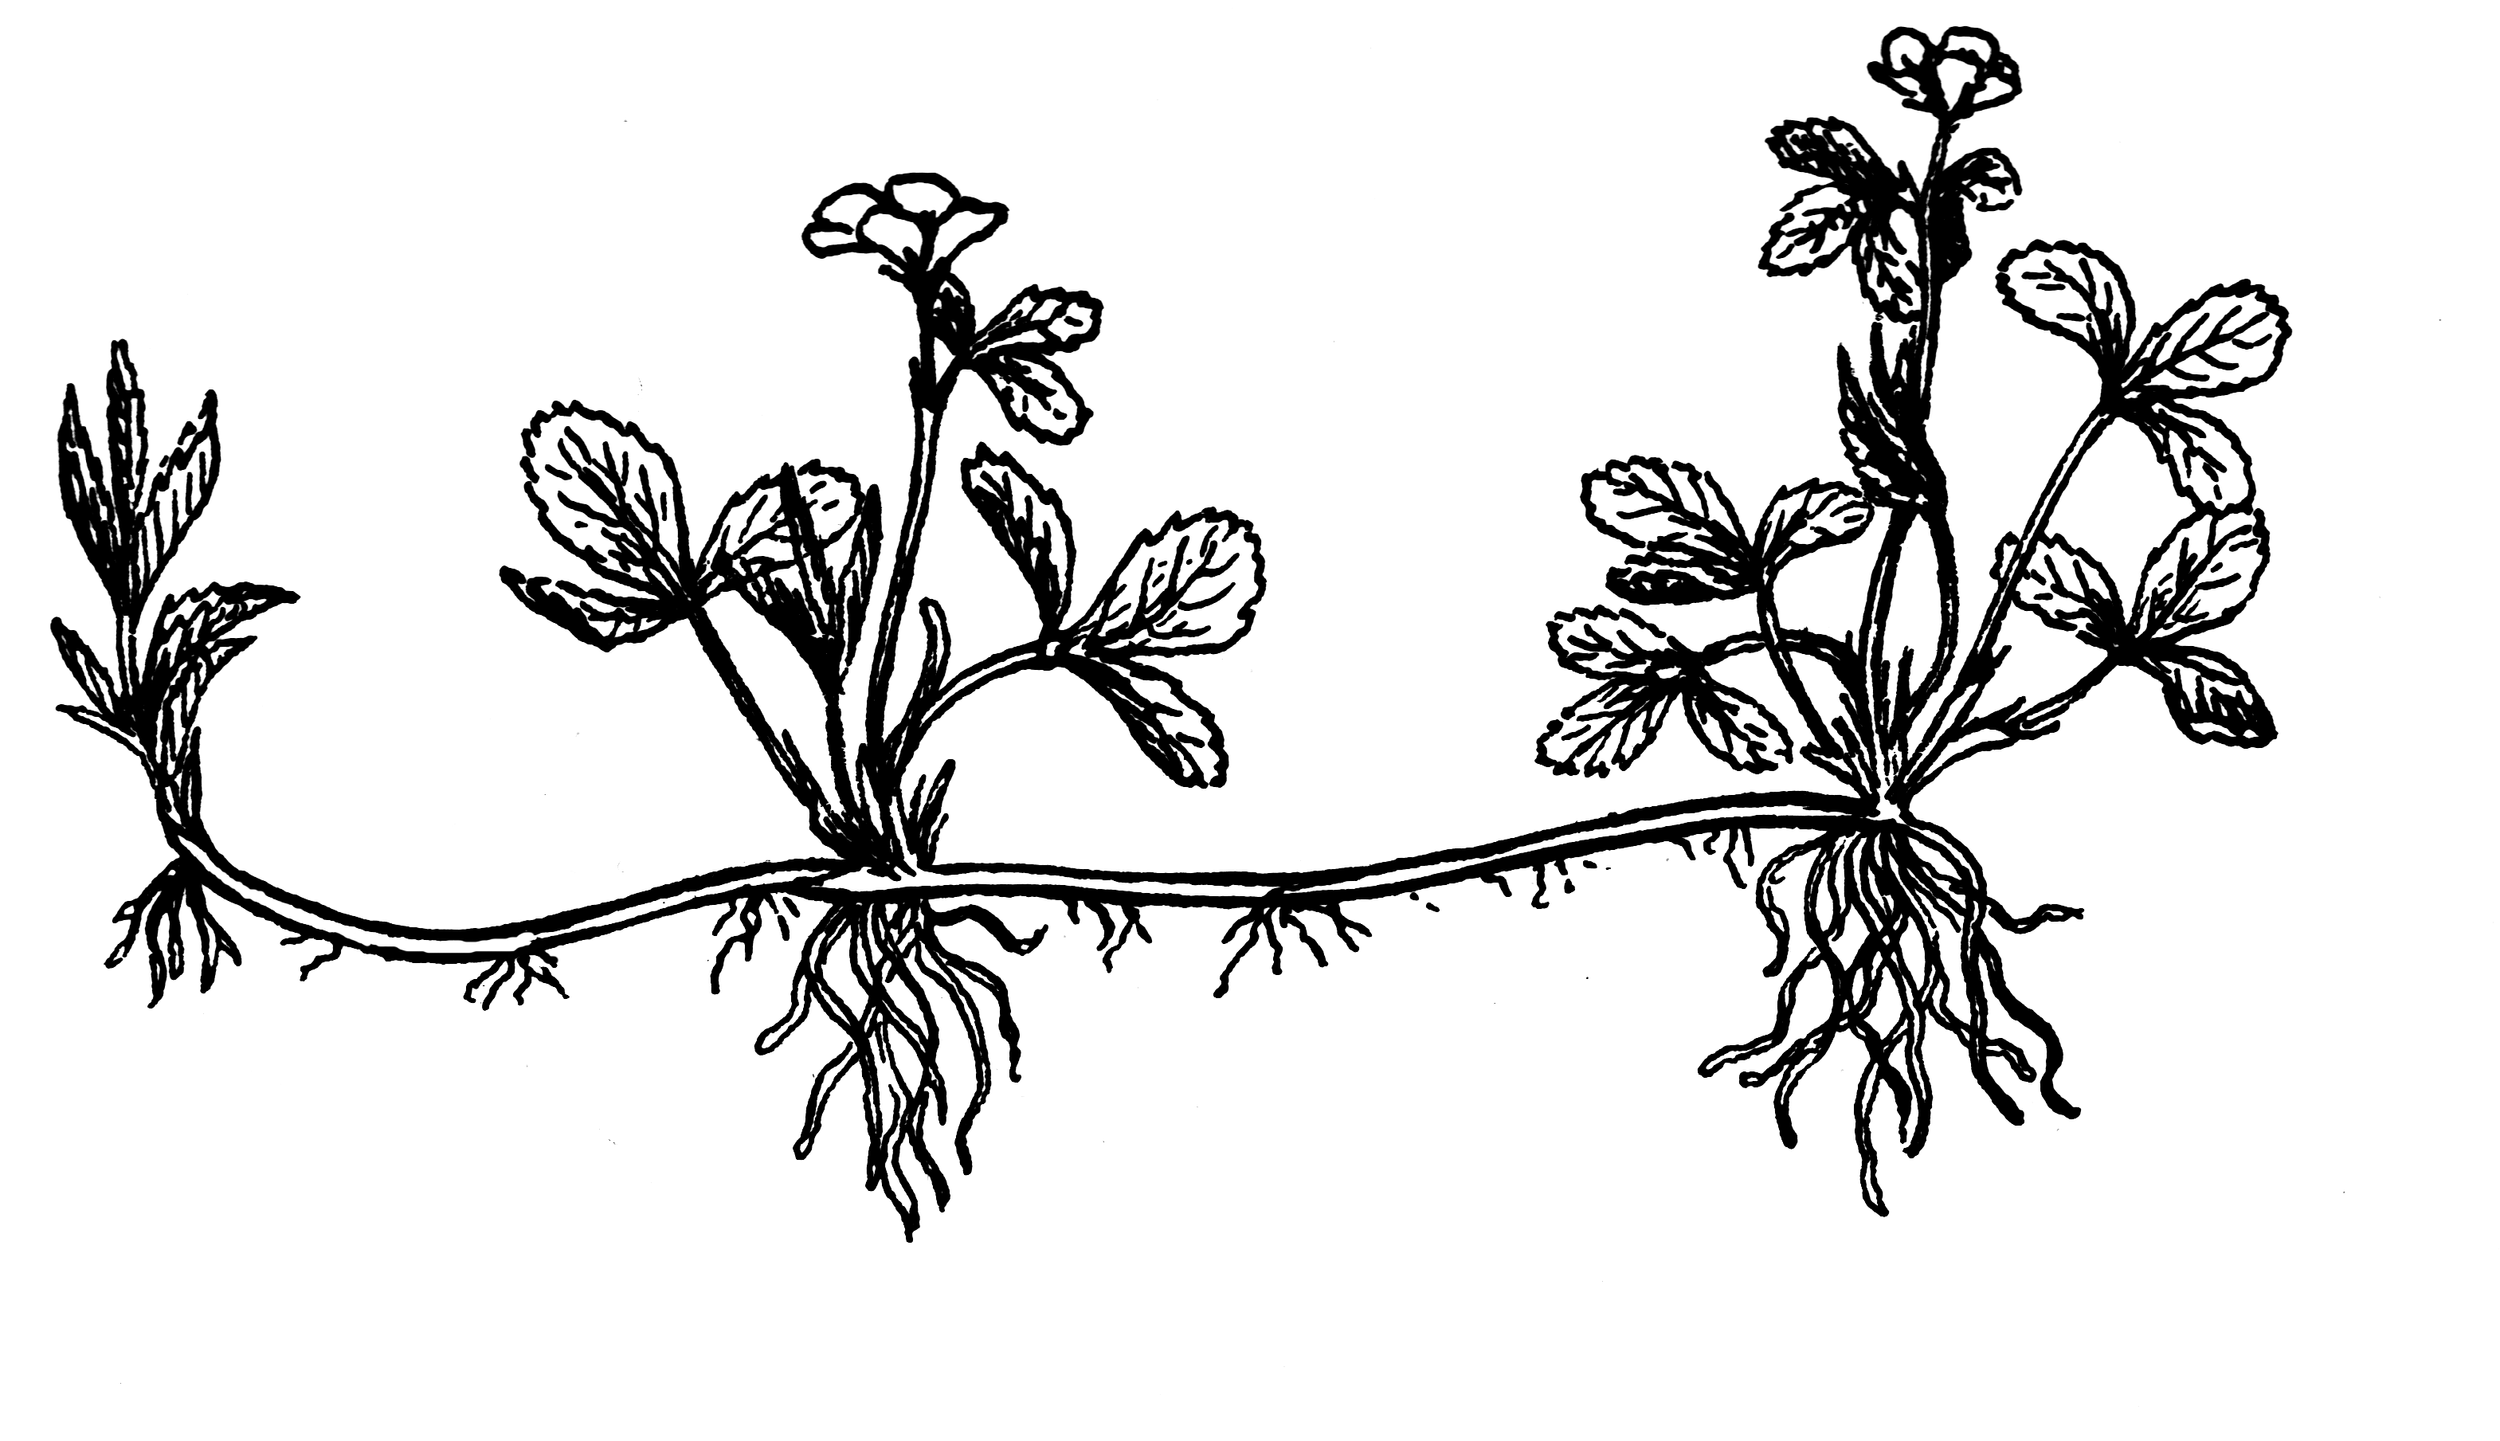
A strawberry runner, drawn as this lesson asks you to read one: from the mother plant (right) a horizontal stem — a runner, a stolon — runs along the ground; at its node a daughter plant has rooted and is already flowering, and the runner's tip (left) is striking roots of its own. A runner is a stem, not a root: it carries leaves, flowers, and plantlets at its nodes, and every plantlet sends down adventitious roots where it touches soil.
Pearson Scott Foresman, donated to Wikimedia Commons.
Before gardeners learned to layer, plants were already doing it themselves. The most familiar example runs across many a summer garden.
★ A runner, also called a stolon, is a horizontal stem that grows along the soil surface (or just beneath it) from the parent plant. At intervals along its length, at the nodes, it produces a small new plant, a plantlet, complete with its own tiny leaves. Where the plantlet touches soil, it sends down adventitious roots, roots growing from stem tissue rather than from the seed's first root. (You met adventitious roots in Lesson 3. Here they are the entire mechanism of the story.)
The plantlet remains connected to the mother plant by the runner while it establishes itself. The mother feeds it. The plantlet roots. In time, the connecting runner withers or is severed, and the daughter plant stands on its own. No gardener lifted a finger. The plant did all of it.
Strawberries are the classic example. A single strawberry mother plant can send out runners in every direction, each one founding a new daughter plant, until a whole bed is colonized from one original. Spider plants (Chlorophytum comosum) dangle their runners in the air, each tipped with a plantlet, which is why a hanging spider plant looks like a green fountain frozen mid-splash. Mint spreads so vigorously by underground runners that experienced gardeners give it a pot of its own, lest it claim the entire bed. Bermuda grass and creeping buttercup use the same strategy.
★ Notice what all these plants gain. Seeds are a gamble: they may land badly, dry out, or be eaten. A runner-born plantlet starts life already touching good soil, already fed by its mother, already a proven survivor of local conditions. It is the plant kingdom's version of giving your children a good start.
Check in: A runner is a stem, not a root. What does it carry at its nodes that proves it — and what root kind does the plantlet send down where it touches soil?
Reading a Runner
If you have access to a strawberry patch, a spider plant, or a pot of mint, go and look at the runners this week. You will learn more in ten minutes of looking than in an hour of reading.
Follow one runner from the mother plant to its tip. Count the nodes. Find the plantlets. Look for the tiny roots reaching down wherever a plantlet touches soil or even humid air. In spider plants, you may see plantlets dangling with little root nubs already formed, waiting only for soil.
Ask yourself: at which node is the plantlet strongest? Can you see where an older runner has withered after its plantlet established? You are reading the plant's own propagation diary, written in stems and roots.
❦ In your workbook: record nature's own layering in your own way — the runner, its nodes and plantlets, and the start a seed never gets — copy, sketch, or note what matters.
In your packet: Exercise I — The Runner Survey ◐ begins here. Work it now, or mark the place and take it as homework — your choice.
Simple Layering: The Gardener's Helping Hand
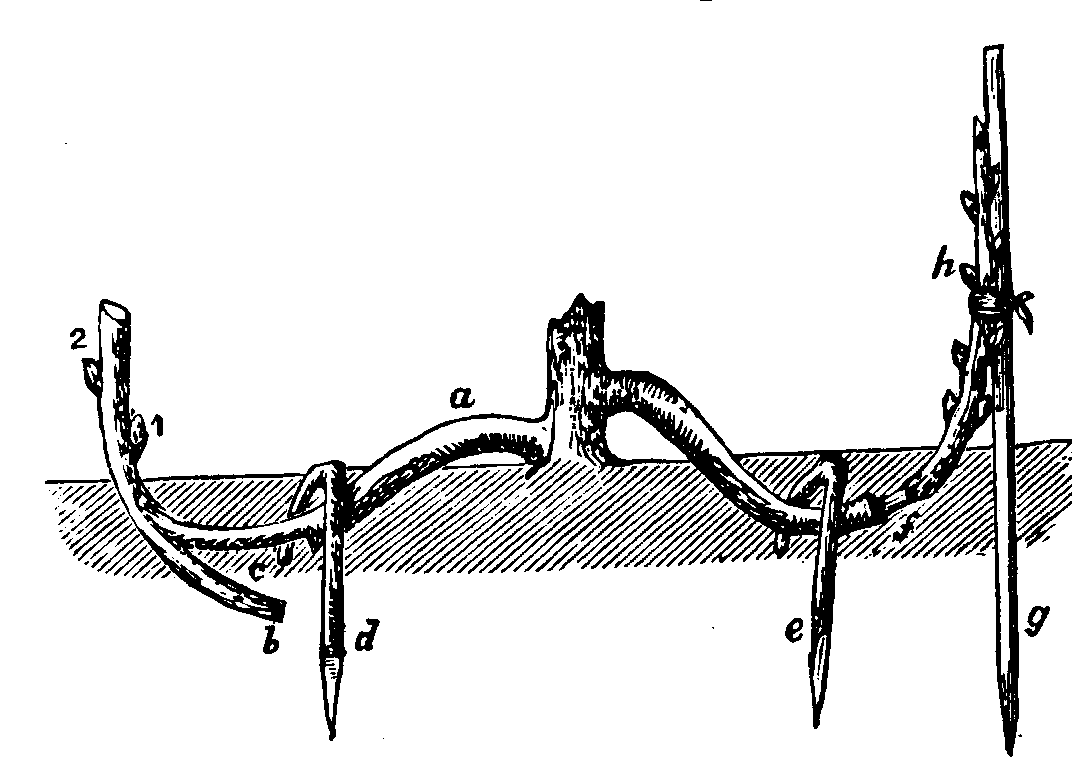
Simple layering as an 1883 settler's guide drew it: branches from one stool are bent down and pegged beneath the soil (pegs d and e), and at right the layered branch rises again and its leafy tip is tied upright to a stake (g, h) — that exposed tip, 6 to 12 inches of it, becomes the new plant's top. Bend, pin, stake: the figure and this lesson's method agree step for step.
Brett's Colonists' Guide (1883), p. 339, Figs. 1–2, via Wikimedia Commons.
Simple layering is the gardener's imitation of the runner, performed on plants that do not layer themselves, or not as readily as we would like. It works on most plants with low-growing, flexible branches: climbing roses, forsythia, honeysuckle, boxwood, rhododendron, azalea, and herbs like rosemary, thyme, and lavender.
Here is the method, step by patient step.
Choose your stem. In early spring, select a low, flexible branch from the previous season's growth, long enough that a section of it can reach the ground while 6 to 12 inches of leafy tip remain above the soil. The stem must bend without breaking. If it snaps, choose another.
★ Prepare the stem. Strip the leaves from the section that will lie buried. Then wound the underside of the stem at the point where it will touch the soil. Wounding sounds harsh, but it is the key that unlocks rooting. You can scrape away a narrow band of bark, cut a shallow notch partway through the stem, or make a slanting cut and wedge it open with a small pebble. The wound interrupts the downward flow of carbohydrates and hormones from the leaves, causing them to accumulate above the wound, and that accumulation stimulates root formation. A dusting of rooting hormone powder on the wound helps, though for soft herbaceous stems it is often unnecessary.
Check in: Wounding sounds destructive. In terms of what happens to the flow of carbohydrates and hormones, why does it actually promote new life?
Bend and pin. Dig a shallow depression, about 3 inches deep, where the stem will rest. Bend the wounded section down into it, bury it under a few inches of soil, and hold it in place with a U-shaped wire pin, a bent forked twig, or a stone. The pin must hold firmly without crushing the stem. Stake the exposed tip upright so it grows vertically; this will become the top of your new plant.
Wait, and keep it moist. This is the whole remaining technique: keep the buried section moist, never waterlogged, and wait. Check periodically by gently uncovering a little soil. Perennials often root in about eight weeks. Woody shrubs may take a full season. Simple layers started in spring are often ready to separate by late summer, though some gardeners prefer to wait until the following spring.
Sever. When the layer has a strong set of its own roots, cut the stem connecting it to the parent, dig it up gently, and transplant it. Do this work in the cool of the day, water the new plant well, and treat it like the youngster it is.
★ That is the whole art. Choose, wound, pin, wait, sever. Five verbs, one new plant, and the parent never missed a meal.
❦ In your workbook: record the gardener's helping hand in your own way — choose, wound, pin, wait, sever — copy, sketch, or note what matters.
In your packet: Exercise II — The Simple Layer ⚒ begins here. Work it now, or mark the place and take it as homework — your choice.
A Note from Professor Fernfoot
You are learning beautifully, scholars. I can tell because you have stopped asking when it will be finished.
Layering teaches something no fast technique can teach: that some things cannot be hurried, only tended. The gardener who layers a rose in spring and checks it in autumn has practiced a whole season of patience, and patience, unlike rooting hormone, never runs out.
If your first layer fails, and some do, do not be discouraged. Even the strawberry loses plantlets. Try again with another stem, in another season. The greenhouse rewards those who return.
— Professor Beryl Fernfoot, Herbology Greenhouse • Master Herbalist • Head of House Oriens
The Layering Family
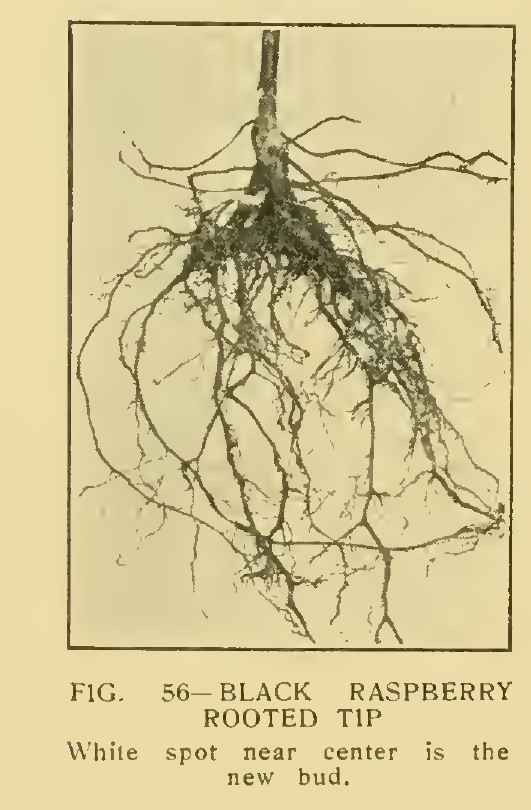
Tip layering, at the moment of truth (Kains, 1916, Fig. 56): a black raspberry cane tip that was buried a few inches deep has been lifted for the camera. The buried tip rooted along its whole length — that dense fan of roots — and the white spot near the center is the new bud, already formed, that will turn upward and grow away. This is what a layer ready to sever looks like: roots in abundance, and confident new growth begun. (The figure shows the result, lifted; no qualifying picture of a tip still buried in situ was found — see Gaps.)
M. G. Kains, Plant Propagation: Greenhouse and Nursery Practice (1916), Fig. 56 (p. 66) — figure and its printed caption cropped from the public-domain Commons scan of the book.
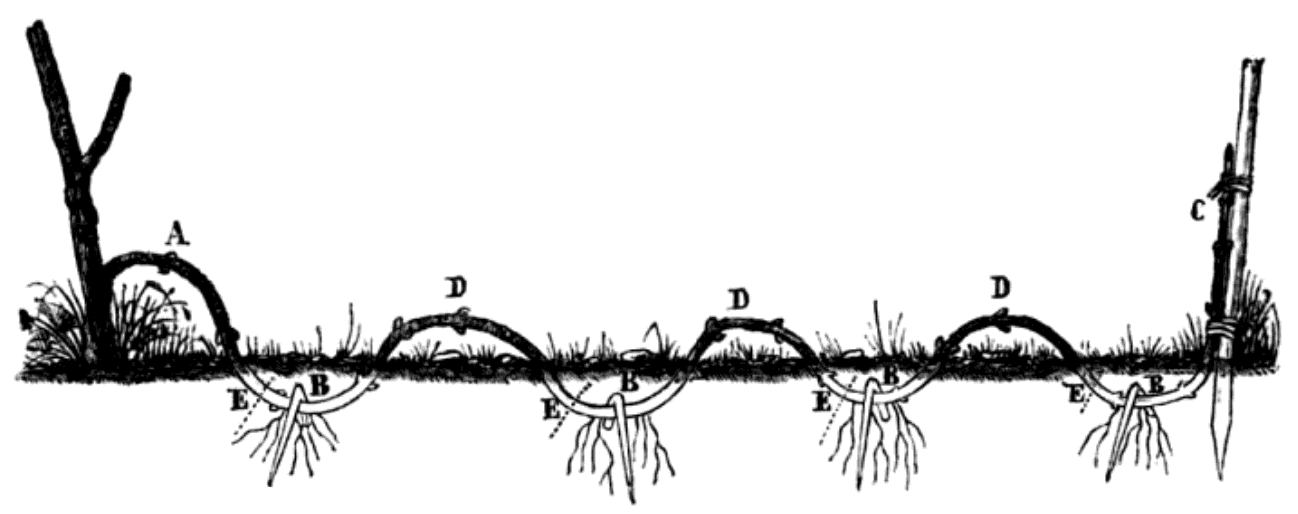
Compound layering — serpentine layering — drawn by Alphonse du Breuil: one long, flexible stem is woven in and out of the soil like a serpent, pinned at four successive nodes (B), and left exposed in arches (D) between them. Roots have formed at every pinned node, and the dotted lines (E) mark where each rooted section will be severed — several new plants from a single branch, its tip tied up at the stake (C) to grow on.
Alphonse du Breuil (1811–1885), via Wikimedia Commons.
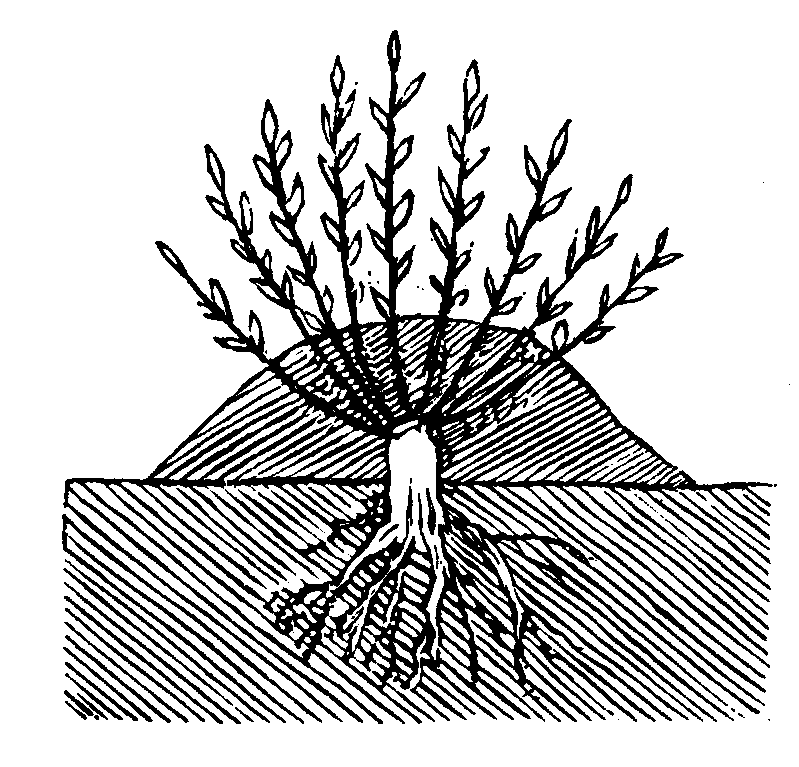
Mound layering, also called stool layering, in cross-section (1883): the plant was cut back hard, and when its vigorous new shoots rose, soil was mounded up around their bases. Each buried base sits in darkness and moisture — the conditions that persuade a stem to make roots — while the leafy top grows on above the mound. When the mound is later taken away, every rooted shoot is cut from the stool as a new plant: the nurseryman's way of multiplying rootstocks and shrubs that will not bend to the ground.
Brett's Colonists' Guide (1883), p. 360, via Wikimedia Commons.
Simple layering is only the beginning. Gardeners have developed a whole family of variations, each suited to different plant habits. You should know them all by name, even if you only practice one or two this year.
★ Tip layering is for plants with long, trailing canes: blackberries, raspberries, currants, gooseberries. The growing tip of a cane is bent down and buried a few inches deep in soil or in a pot of compost. The buried tip, thinking itself underground, forms roots within a few weeks, then turns upward and sends up a new shoot. Sever it from the parent and you have a new cane fruit plant. Nature does this unassisted wherever bramble tips touch the ground, which is one reason blackberry patches expand with such determination.
Compound layering, also called serpentine layering, is simple layering performed several times along one long stem. The stem is woven in and out of the soil like a serpent, buried at each node and exposed between, so that a single branch yields several new plants at once. It suits long, flexible vines.
Mound layering, also called stool layering, works differently. In late winter, the plant is cut back nearly to the ground, forcing it to send up a flush of vigorous new shoots. When those shoots are several inches tall, soil or compost is mounded up around their bases. The buried bases, sensing darkness and moisture, form roots. The mound is later removed and the rooted shoots are cut away as new plants. Nurseries use mound layering to multiply fruit tree rootstocks and shrubs that will not bend obligingly to the ground.
★ Each method follows the same principle you already know: keep the stem attached, give it darkness and moisture where you want roots, and let the parent do the feeding while the work happens.
Check in: Name the four variations in this family, and the plant habit each one suits — trailing canes, one long vine, a shrub that will not bend, and (from the next section) a stem too high to reach the ground.
❦ In your workbook: record the layering family in your own way — tip, compound, and mound, and the habit each one answers — copy, sketch, or note what matters.
Air Layering: Rooting in Midair
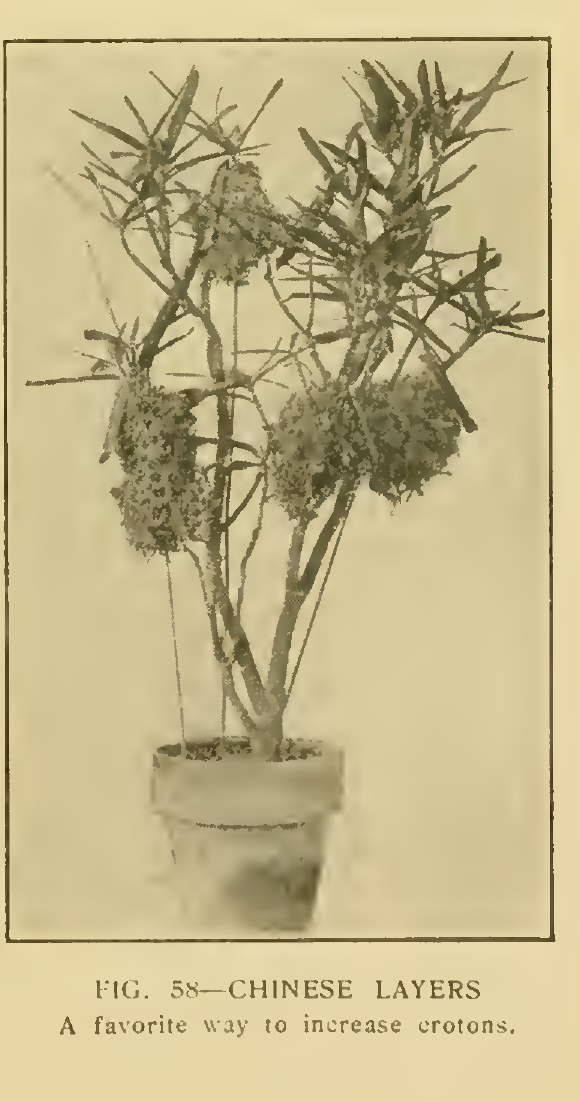
Air layering before plastic film (Kains, 1916, Fig. 58, "Chinese layers"): a potted croton carries four balls of moss bound onto its upright stems, each ball packed around a wounded section of a stem that could not be bent to the ground. The stems stay attached to the parent and keep growing while roots form inside the moss; when a ball is well filled with roots, the stem is severed below it and the rooted top is potted — one leggy plant made into several. This lesson's version wraps the same moss ball in clear plastic, so the roots can be watched as they come.
M. G. Kains, Plant Propagation: Greenhouse and Nursery Practice (1916), Fig. 58 (p. 67) — figure and its printed caption cropped from the public-domain Commons scan of the book.
But what about the plant with no low branches at all? The leggy rubber plant, the tall ficus, the magnolia whose lowest limb is far overhead? For these, gardeners layer in the air itself.
★ Air layering induces roots to form on a stem high above the ground, while the stem is still attached to the parent. It is the method of choice for woody plants that are difficult to root from cuttings, and for rescuing tall, bare-stemmed houseplants by turning one leggy specimen into two shorter, stockier ones.
The technique, in brief:
Select and wound. Choose a healthy stem, ideally about pencil thickness and a year old, on a well-watered plant. About a foot from the tip, remove the leaves from a short section. Then wound the stem: for most plants, cut two parallel rings around the stem an inch or two apart and remove the band of bark between them, scraping away the green cambium beneath until only pale wood shows. For thin-barked plants like ficus, a single upward slanting cut partway through the stem, wedged open with a sliver of wood or a pebble, suffices. The wound interrupts the downward flow of sugars, which accumulate above it and trigger rooting.
Wrap in moss. Soak a generous handful of sphagnum moss in water and squeeze it until it is moist but not dripping. Pack it around the wound in a ball. Wrap the whole thing in clear plastic and seal both ends snugly with twist ties or twine. The plastic holds in moisture; its transparency lets you watch for roots without disturbing anything. A little rooting hormone dusted on the wound before wrapping improves success, especially with stubborn species.
Wait and watch. Keep the moss moist. If it dries, inject water with a syringe or mist through a small opening, then reseal. Roots typically appear in one to three months, white threads spreading through the moss, visible through the plastic like veins in amber. When the ball is well filled with roots several inches long, cut the stem just below the moss, unwrap gently, and pot the new plant.
The parent plant, meanwhile, usually responds to the loss of its top by sprouting fresh growth below the cut. One air layer often yields two improved plants: a rooted top and a rejuvenated base.
★ A note of honesty: air layering asks for a sharp blade and a steady hand, so younger students should attempt it only with an adult's help. Simple layering and runner observation teach the same principles with no blade at all.
Check in: Air layering was developed for plants that cannot be bent to the ground. What problem does it solve, and what does the moss ball replace?
❦ In your workbook: record rooting in midair in your own way — wound, moss, plastic, and the patience to watch through it — copy, sketch, or note what matters.
In your packet: Exercise III — The Layering Journal ◐ begins here. Work it now, or mark the place and take it as homework — your choice.
When to Sever
Every layering method ends with the same question: is it ready to be cut free? Sever too early and the young plant, with too few roots to support itself, falters. Wait too long and no great harm is done, but you have waited longer than needed.
These are the signs of readiness:
- Resistance. Give the layered stem a gentle tug. If it holds firm against the soil, roots have anchored it. If it lifts easily, it needs more time.
- Visible roots. In air layering, white roots should fill the moss ball and reach several inches in length. For buried layers, carefully brush soil away from one spot and look.
- New growth. A layer pushing out fresh leaves or extending its tip is feeding itself confidently, a good sign its roots are working.
- Season. When in doubt, wait for the plant's dormant season or early spring, when transplant shock is mildest.
★ Sever with a clean, sharp cut. Pot or plant the new layer promptly, water it in, and shade it for a few days while it adjusts to independence. It has never been alone before. A little kindness at the start is never wasted.
Workshop Note: Tool handling, cleaning, and sterilizing for this work are taught in Creative Arts Lesson 18, 'Outdoor & Garden Tools: Handling, Cleaning & Care.' When and where to cut stays with Professor Fernfoot.
❦ In your workbook: record when to sever in your own way — resistance, visible roots, new growth, and season — copy, sketch, or note what matters.
Your Scholar's Familiar This Week
This week's work with your Familiar is observational. Examine your plant for any sign of natural layering behavior.
- Does it produce runners or low stems that touch the soil? (Mint and spider plants often do.)
- Are there stems flexible enough to bend to the soil surface without breaking?
- Can you find nodes along the stems where roots might form if buried?
Record your findings in your grow ledger with a sketch. If your plant is a willing candidate and you feel ready, you may attempt a simple layer following the steps in this lesson. If it is not a candidate, that is also a finding: note which of the layering methods would suit it, if any, and why.
If you do not have a Scholar's Familiar, adopt any plant you can visit regularly, a garden shrub, a park planting, even a neighbor's rose, and make the same observations there.
❦ In your workbook: record your Familiar this week in your own way — its runners, its bendable stems, and the method that would suit it — copy, sketch, or note what matters.
Guided Observation: Reading a Runner
This lesson's observation is the one the lesson itself sets: ten minutes of looking at a real runner, which Fernfoot promises will teach more than an hour of reading. Work it on a strawberry patch, a spider plant, or a pot of mint — the Guided Practice in your packet carries the same observation.
You will need:
- a plant that produces runners: a strawberry patch, a spider plant, or a pot of mint (or a runner-forming plant you can visit — see the alternative path below)
- your grow ledger and a pencil
Follow one runner. Follow one runner from the mother plant to its tip. Count the nodes. Find the plantlets. Look for the tiny roots reaching down wherever a plantlet touches soil or even humid air. In spider plants, you may see plantlets dangling with little root nubs already formed, waiting only for soil.
Read the diary. Ask yourself: at which node is the plantlet strongest? Can you see where an older runner has withered after its plantlet established? You are reading the plant's own propagation diary, written in stems and roots.
Consider:
- At which node is the plantlet strongest, and what tells you so?
- Where a plantlet touches soil, what kind of roots is it sending down?
- Can you find an older runner that has withered after its plantlet established — and how does the daughter plant look, standing alone?
No runner-forming plant of your own? Use any runner-forming plant you can visit, such as strawberries at a pick-your-own farm, a spider plant in a shop window, or mint in a community garden — the alternative path Exercise I itself gives. The observation is identical; only the ownership differs.
Materials
Required (Level One — household items)
- A plant with a low, flexible stem: forsythia, honeysuckle, rosemary, thyme, lavender, or a willing stem of your Scholar's Familiar. A runner-forming plant (strawberry, spider plant, mint) works for the survey.
- A small trowel or sturdy spoon: for digging the shallow pinning depression.
- A U-shaped pin: a bent piece of wire, a forked twig, or a landscape staple. A smooth stone works to hold the stem down.
- A plant label and pencil: mark the date you pinned the layer; you will be watching it for weeks.
- Water: for settling the soil and keeping the buried section moist.
- Your grow ledger: for the runner survey sketches and the layering journal.
Suggested (Level Two — historically closer)
- Rooting hormone powder: dusted on the wound before pinning, as nursery propagators have long done.
- Sphagnum moss and clear plastic wrap: for attempting air layering on a woody houseplant, with twist ties to seal the wrap.
- Garden staples: the traditional nurseryman's pin for holding layered stems.
Safety notes: Handle stems gently: bend slowly and never force a stem that resists. A snapped stem teaches nothing. Younger students: ask an adult for help with any knife work (wounding stems, air layering cuts). Keep the buried section moist but never waterlogged; soggy soil rots stems instead of rooting them. Wash your hands after handling soil, moss, or rooting hormone powder.
Reflection Questions
Answer the following questions in your workbook.
- Why is layering more dependable than rooting a severed cutting, even though it is slower? What exactly does the parent plant provide during the process?
- A runner is a stem, not a root. What evidence from this lesson supports that classification?
- Wounding a stem seems destructive. Explain why it actually promotes new life, in terms of what happens to the flow of carbohydrates and hormones.
- Air layering was developed for plants that cannot be bent to the ground. What problem does it solve, and what does the moss ball replace?
- Fernfoot says cuttings are a gamble and layers are a promise. Do you agree? When might a gardener still choose cuttings over layering?
Workbook Checklist — Lesson 21
In my workbook I have:
- ☐ defined vegetative propagation, and explained why a layered plant is its parent's clone
- ☐ described how a runner works — nodes, plantlets, and adventitious roots — and named plants that spread by runners
- ☐ stated the five verbs of simple layering (choose, wound, pin, wait, sever) and what each one does
- ☐ explained why wounding promotes rooting, in terms of carbohydrates and hormones accumulating above the wound
- ☐ named tip, compound, mound, and air layering, and the plant habit each one suits
- ☐ listed the signs a layer is ready to sever: resistance, visible roots, confident new growth, and season
- ☐ kept the safety framing: no forcing a resisting stem, adult help with any blade work, the buried section moist but never waterlogged, hands washed after soil, moss, or hormone powder
- ☐ completed the Runner Survey, the Simple Layer (or its indoor, container, or workbook path), and opened the Layering Journal
☐ Lesson completed Date: ___ Signature: ___
The Professor's Closing Note
Well done, scholars. You have learned the most patient art in the propagator's repertoire.
Carry this thought out of the greenhouse with you. The layer never leaves home until it is ready, and it is ready precisely because it was never forced to leave before its time. There is a kindness in that method that I hope you will remember whenever you are tempted to rush something living, whether it is a plant, a project, or yourself.
Next lesson, we turn from the stem that roots while attached to the geometry of the cut itself: pruning, and the tall tip's quiet command over every bud below it.
The greenhouse doors stand open.
— Professor Beryl Fernfoot, Herbology Greenhouse • Master Herbalist • Head of House Oriens
Cross-Class Connections

Creative Arts · Unit V, Lesson 18 — Outdoor & Garden Tools: Handling, Cleaning & Care
Boots by the door, scholars. Fernfoot teaches you when and where to wound and sever; I teach the blade itself — carry it closed and point-down, clean it, disinfect it between plants so sickness does not ride it from stem to stem, oil it, and put it away dry. Do her layering with a cared-for tool, and the work will go the way careful work goes.
Further Reading & Sources
- Plant Propagation by Layering — NC State Extension — The definitive home-gardener guide: simple layering step by step with diagrams, from a university extension service.
- Propagating by Cutting or Layering — Penn State Extension — A concise Master Gardener brochure covering layering alongside cuttings for comparison.
- Layering Is an Easy Way to Propagate Plants — LSU AgCenter — A friendly walkthrough of simple layering with plant examples.
- What Is Air Layering Propagation? — Homes and Gardens — Expert advice on air layering technique, timing, and aftercare.
- Layering Propagation with 6 Types — Garden Chains — An illustrated overview of all major layering methods in one place.
Browse the Herbology shelf in the school Library for readable editions of these works.
Plants from this lesson stand in the Materia Botanica, the school's shared archive — each kept with its lessons, its keepings, and its cautions. This lesson's company:
RoseRosemarySphagnum MossSpider PlantThyme The whole Materia BotanicaPROFESSOR BERYL FERNFOOT · HERBOLOGY GREENHOUSE
Submit your work for this lesson using the form below.
CONTINUE IN THE HERBOLOGY GREENHOUSE
← Previous · Lesson 20: Vegetative Propagation: Root Division Next · Lesson 22: Pruning Geometry: Apical Dominance →
Unit III — Propagation, Pruning & Plant Stewardship Herbology Greenhouse — All 37 Lessons
The rest of Unit III: Lesson 17 · Seed Starting · Lesson 18 · Seed Scarification · Lesson 19 · Stem Cuttings · Lesson 20 · Root Division · Lesson 22 · Pruning Geometry · Lesson 23 · Selective Pruning · Lesson 24 · Pests & Disease · Lesson 25 · Repotting & Root Bound · Lesson 26 · Stewardship Project