

HERBOLOGY
Unit III · Lesson 24PESTS & DISEASE: THE GARDEN WATCH
PROFESSOR BERYL FERNFOOT
Herbology Greenhouse
Master Herbalist
UNIT III • LESSON 24
Propagation, Pruning & Plant Stewardship
Professor's Introduction

Welcome in, gardeners,
Something in your greenhouse is not quite right. A leaf that was green last week has gone pale and stippled. There is a stickiness on the stems that was not there before. A seedling you were so proud of has folded over at the soil line overnight, as though it simply gave up.
Take a breath. This happens to every gardener who has ever lived, including me, including the growers who wrote the books on your shelf. A problem in the greenhouse is not a failure. It is information, arriving in the form of a symptom, and symptoms can be read.
Today you will learn to read them. You will learn the faces of the most common small invaders and the most common ailments, and more importantly, you will learn the order of operations: observe first, identify second, and act third, gently. The gardener's job was never to wage war. It is to keep conditions so good that most problems never get a foothold, and to meet the ones that do with a steady hand.
Healthy plants resist most problems. Remember that. It is the whole lesson in one sentence, and everything else today is the explanation.
— Professor Beryl Fernfoot, Herbology Greenhouse • Master Herbalist • Head of House Oriens

The line beneath the map is our road: every stop a place where the knowledge of plants changed, every lesson a step along it.
Lesson Objectives
By the end of this lesson, you will be able to:
- Identify four common plant pests by their signs: aphids, spider mites, fungus gnats, and mealybugs.
- Recognize the signs of three common plant diseases: powdery mildew, damping off, and root rot.
- Explain the observation-first approach: identify the problem before choosing a response.
- Describe cultural controls (airflow, watering, spacing, removing affected parts) and why they come before any product.
- Describe least-toxic interventions, including water spray, insecticidal soap, and sticky traps, with their safety rules.
- Explain when to isolate a plant and when the kindest choice is to discard it.
- Connect pest and disease prevention to the stewardship practices of earlier lessons, especially pruning for airflow.
- Conduct a pest-and-disease inspection of your Scholar's Familiar and record your findings.
Reading this lesson: ★ marks the passages to remember. They return on the unit quiz and the class test. Check in questions ask the material back as you go; answer them in your workbook when you meet them.
Working this lesson: Your assignment packet is the first download on this page. Work in it as the lesson moves along, answering each assignment as its subject is taught — or read the lesson through for your notes and take the assignments as homework afterward. Both are proper ways to sit this class. Signposts in the reading tell you where each assignment belongs. Written answers are short answers in your own words; a few honest lines are worth more than a filled page.
Your Assignment Packet
This lesson's assignments live in its packet: the Lexicon Handout (every term, course terms marked ◆), Materials, Guided Practice, the Assignment Manual with its answer key for self-checking, the Reflection Questions, and the Workbook Checklist. Download the packet before you begin and keep it beside you as you read.
The Watchful Gardener
Every garden has uninvited guests. They arrive on new plants, drift in through open windows, ride in on a bag of potting mix, or simply emerge from the soil when conditions suit them. This is not a sign that you have done something wrong. It is a sign that your plants are alive and therefore interesting to other living things.
The watchful gardener does not panic at the first spotted leaf. She inspects. Most problems, caught early, are small problems. A few aphids wiped from a stem tip are an afternoon's work. The same colony, ignored for a month, is a crisis. The difference between those two outcomes is almost never knowledge of products. It is the habit of looking.
Build the habit now. Each time you water, spend one extra minute looking closely: the undersides of leaves, the joints where leaf meets stem, the soil surface, the newest growth. Pests and diseases nearly always announce themselves first in the places you rarely examine. The top of the leaf is the advertisement. The underside is the truth.
★ And keep this principle at the front of your mind through the whole lesson: you are treating conditions first and creatures second. A plant in the right light, with the right water, good airflow, and soil that drains is a plant most pests will pass over. Prevention is not the boring part of pest management. It is nearly all of it.
Check in: In your own words: what are you treating first, and what second — and why is prevention "nearly all" of pest management?
❦ In your workbook: record the watchful gardener in your own way — the inspection habit, the places pests announce themselves, and conditions before creatures — copy, sketch, or note what matters.
In your packet: Assignment II — The Garden Watch Inspection ◐ begins here. Work it now, or mark the place and take it as homework — your choice.
The Common Pests
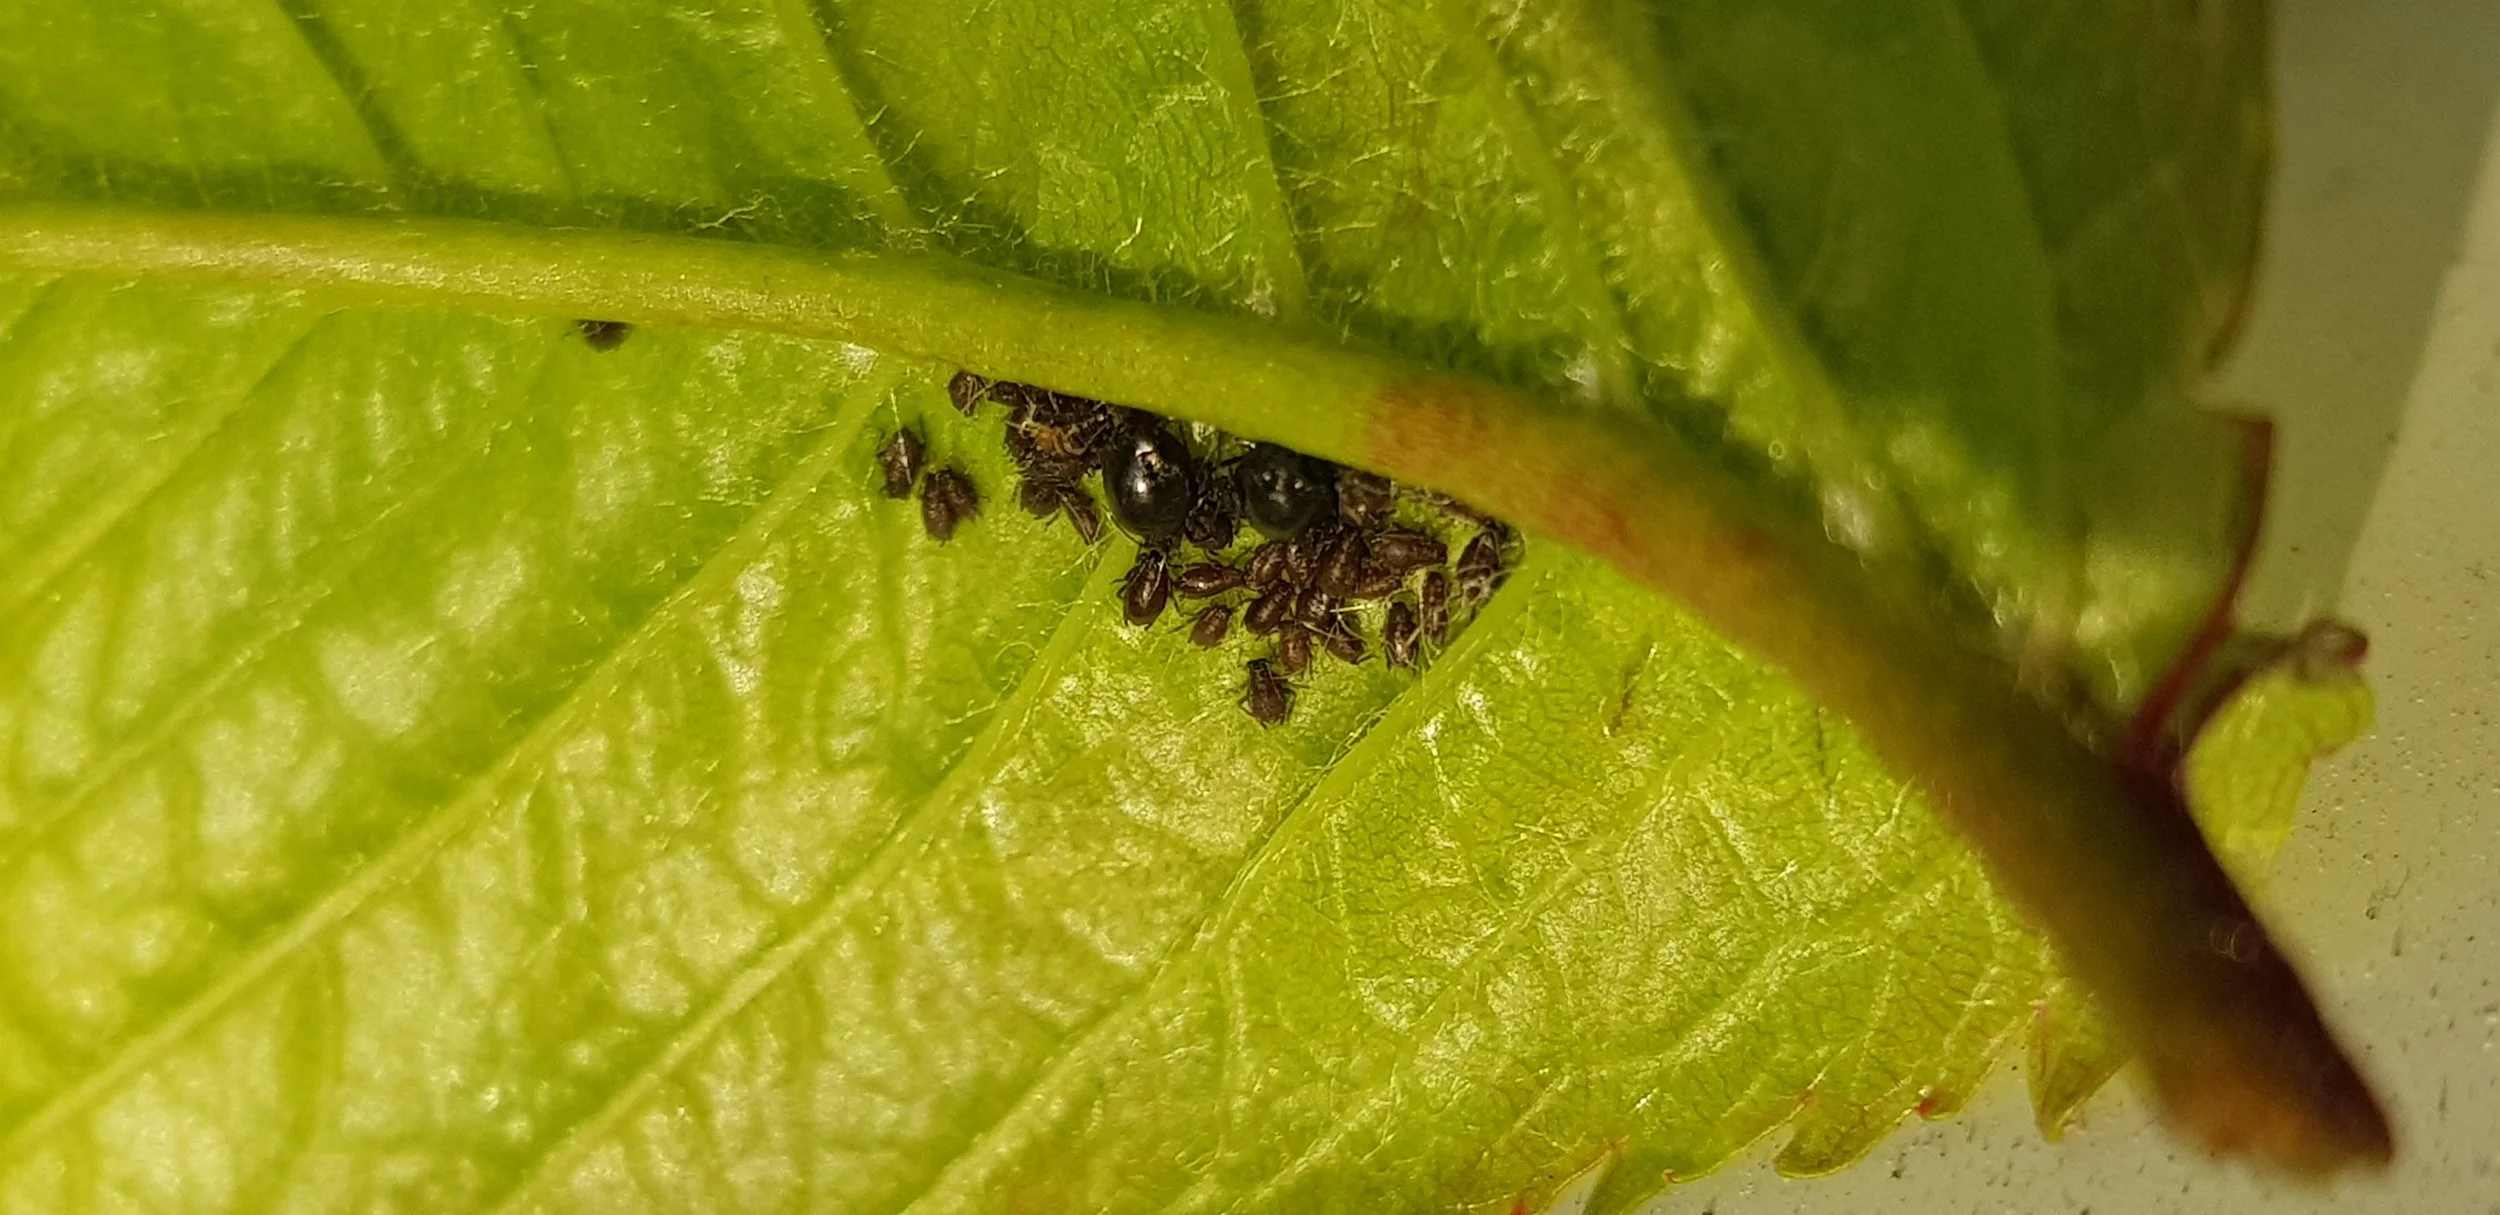
Where the truth is kept: a colony of black cherry aphids clustered on a leaf's underside, adults shiny black among their smaller brown young. Aphids gather on new growth and leaf undersides and feed on sap — which is why the garden watch looks underneath first. The top of the leaf is the advertisement; the underside is the truth. Found early, a colony like this is met gently: a strong spray of plain water dislodges most aphids, and hands are washed after the inspection.
Photograph by ML5, dedicated to the public domain (CC0).
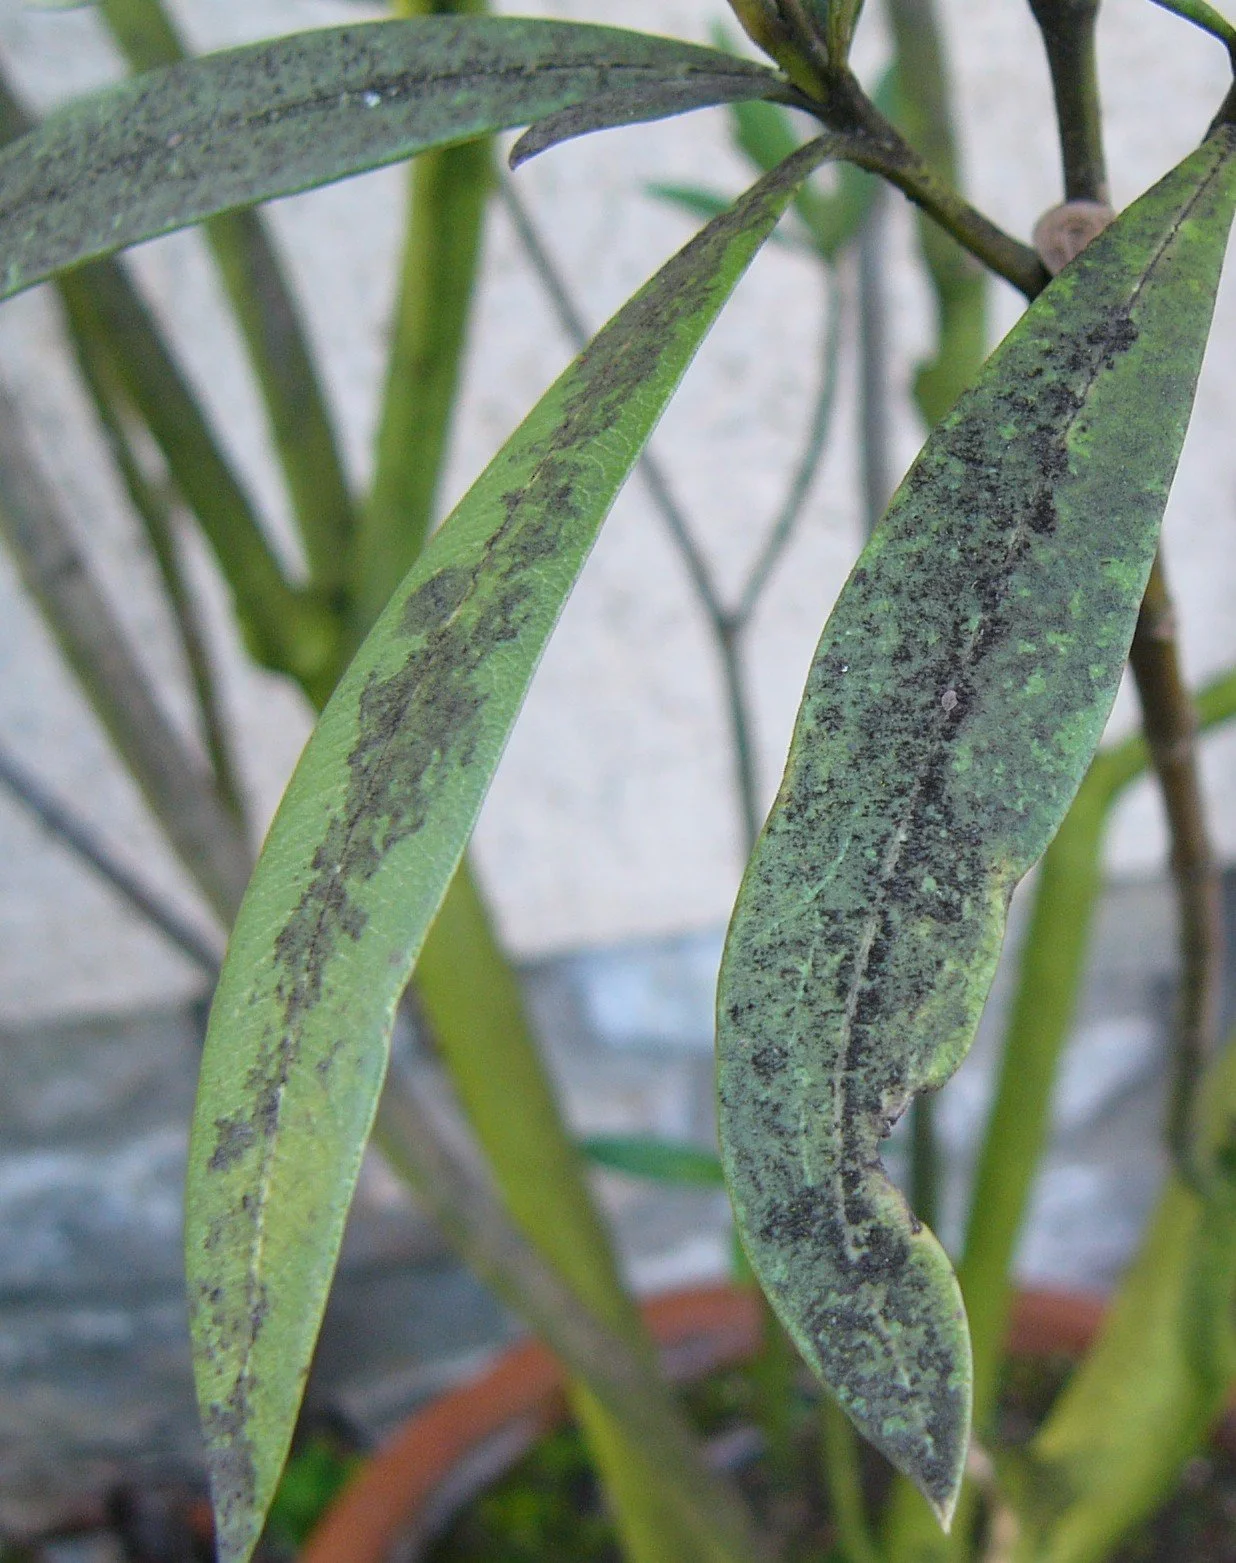
The second calling card: sooty mold on oleander leaves — a dark, powdery film that grows not in the plant but on it, feeding on the honeydew sap-feeding insects leave behind. It does not infect the leaf; it shades it, weakening the plant by blocking light. Read it as a signpost, not the problem itself: sooty mold means aphids or their cousins are feeding above. Control the insects and the mold washes away; isolate the plant while you work, and wash your hands after handling it.
Photograph by Rv (French Wikipedia), released to the public domain.
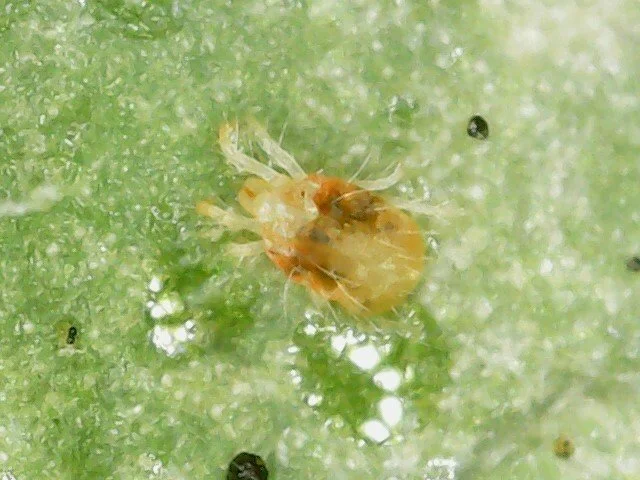
The pest itself, at magnification: a two-spotted spider mite, an eight-legged arachnid — not an insect — barely visible to the naked eye on the leaf it feeds from. In the greenhouse you will almost never see this view. You will see its work instead: fine stippling, gray or bronze discoloration, and, in heavy infestations, webbing. The confirmation is the tap test: white paper under a suspect leaf, a sharp tap, and specks that move.
Photograph by Tomas Pocius (via iNaturalist), dedicated to the public domain (CC0).
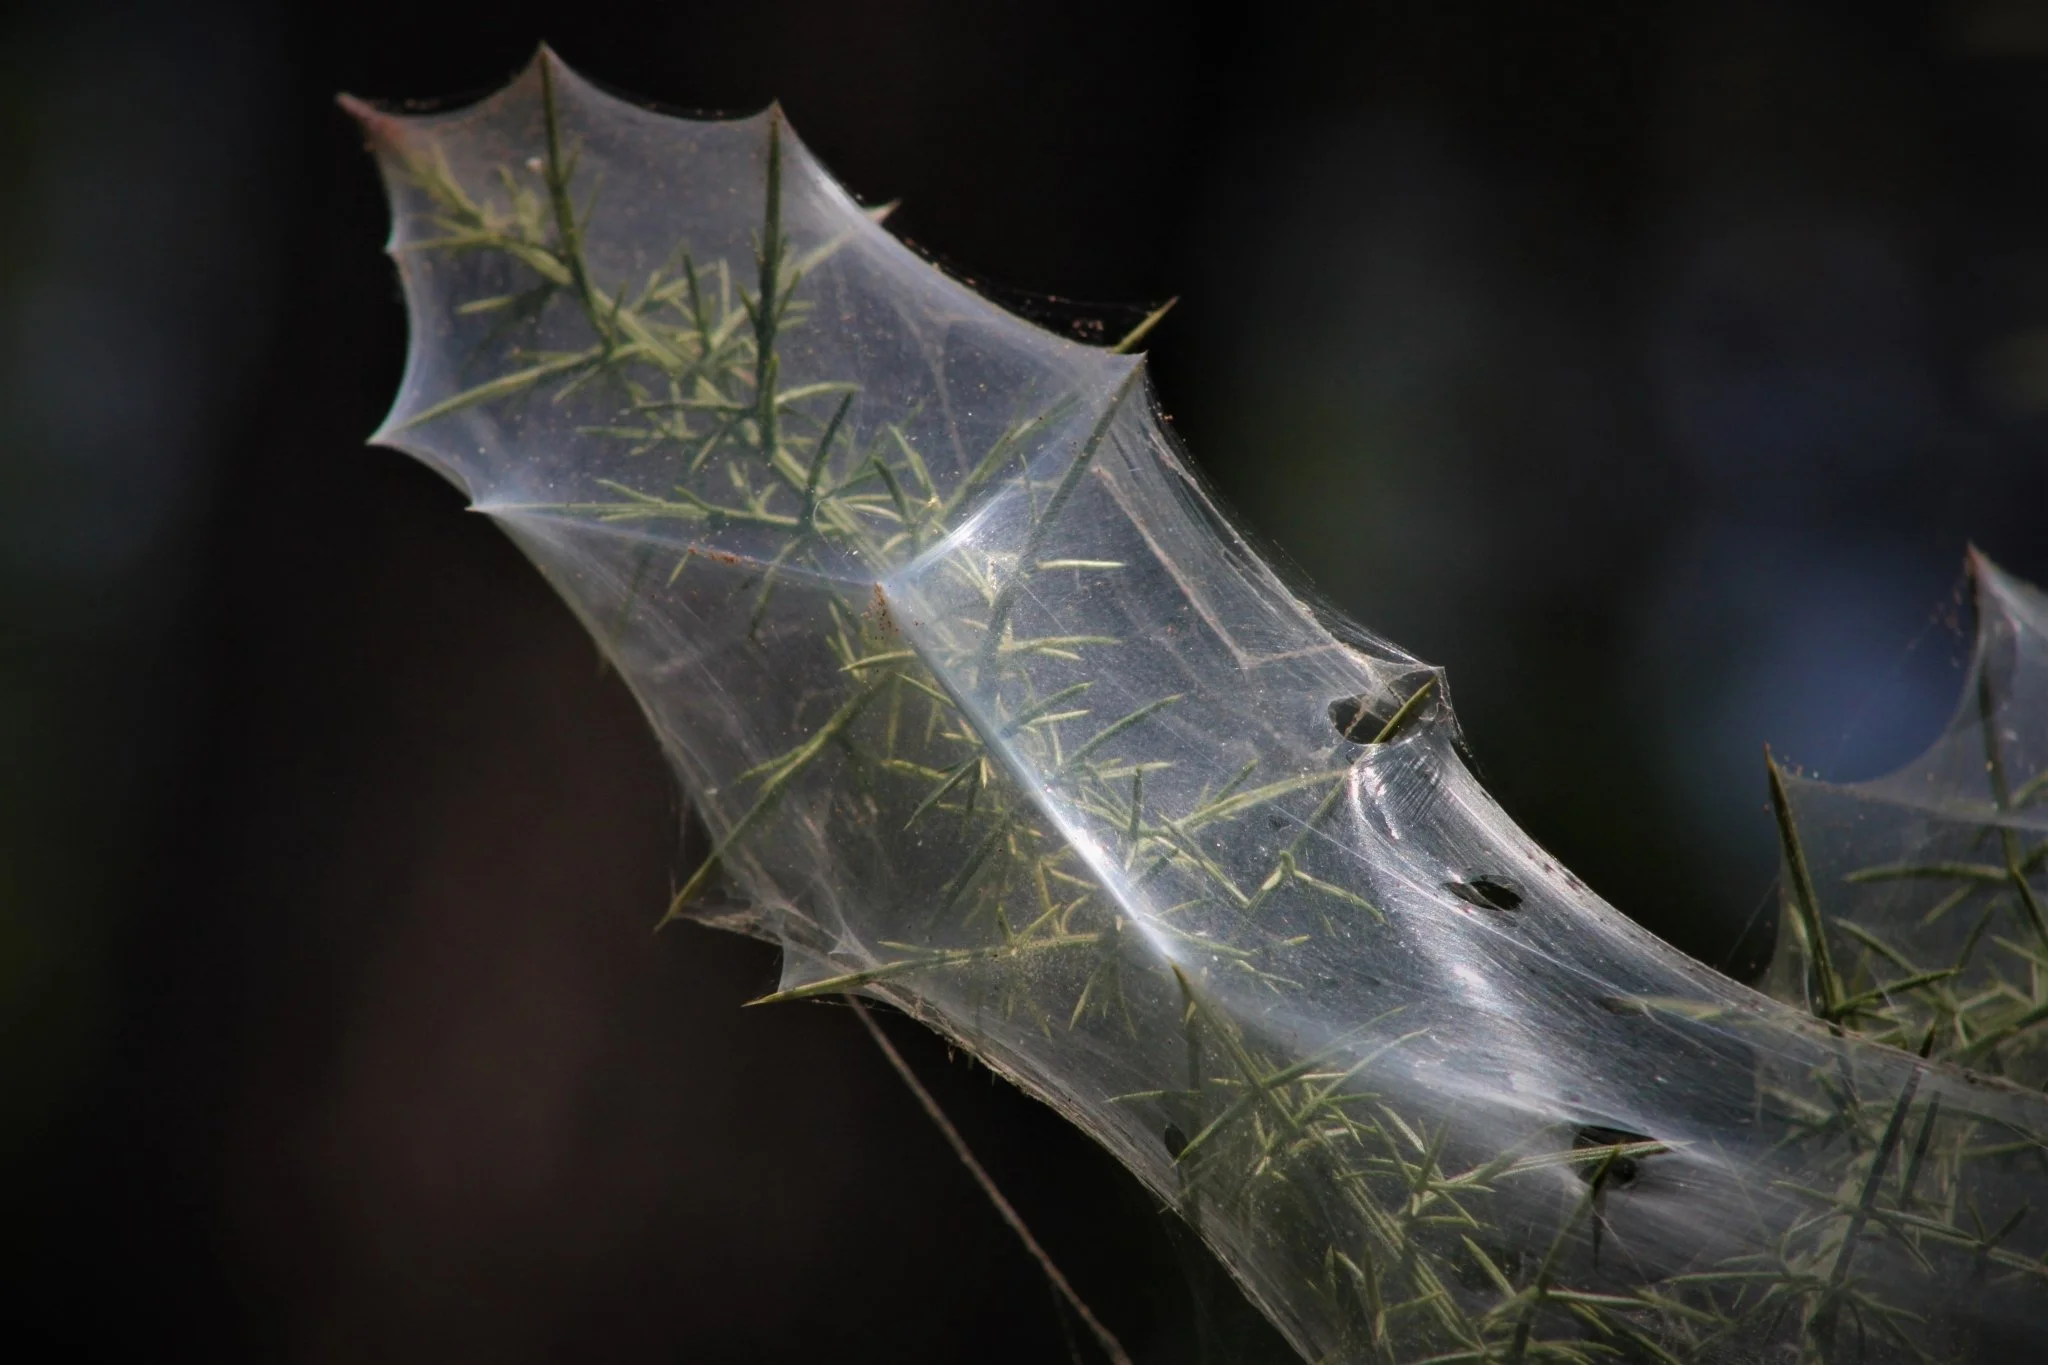
The late sign: spider-mite webbing at its heaviest, a silk sheet thrown over the stems, the mites themselves only reddish specks inside it. Webbing this dense means the infestation is well established — the stippled, bronzed leaves below it will already have told the story to a gardener who was watching. Mites thrive in hot, dry air and hate humidity and clean, dust-free leaves: change the conditions and you change the outcome. Isolate a plant webbed like this before you treat it.
Photograph by Murielle Desrois (via iNaturalist), dedicated to the public domain (CC0); the file record identifies the species as the two-spotted spider mite, Tetranychus urticae.
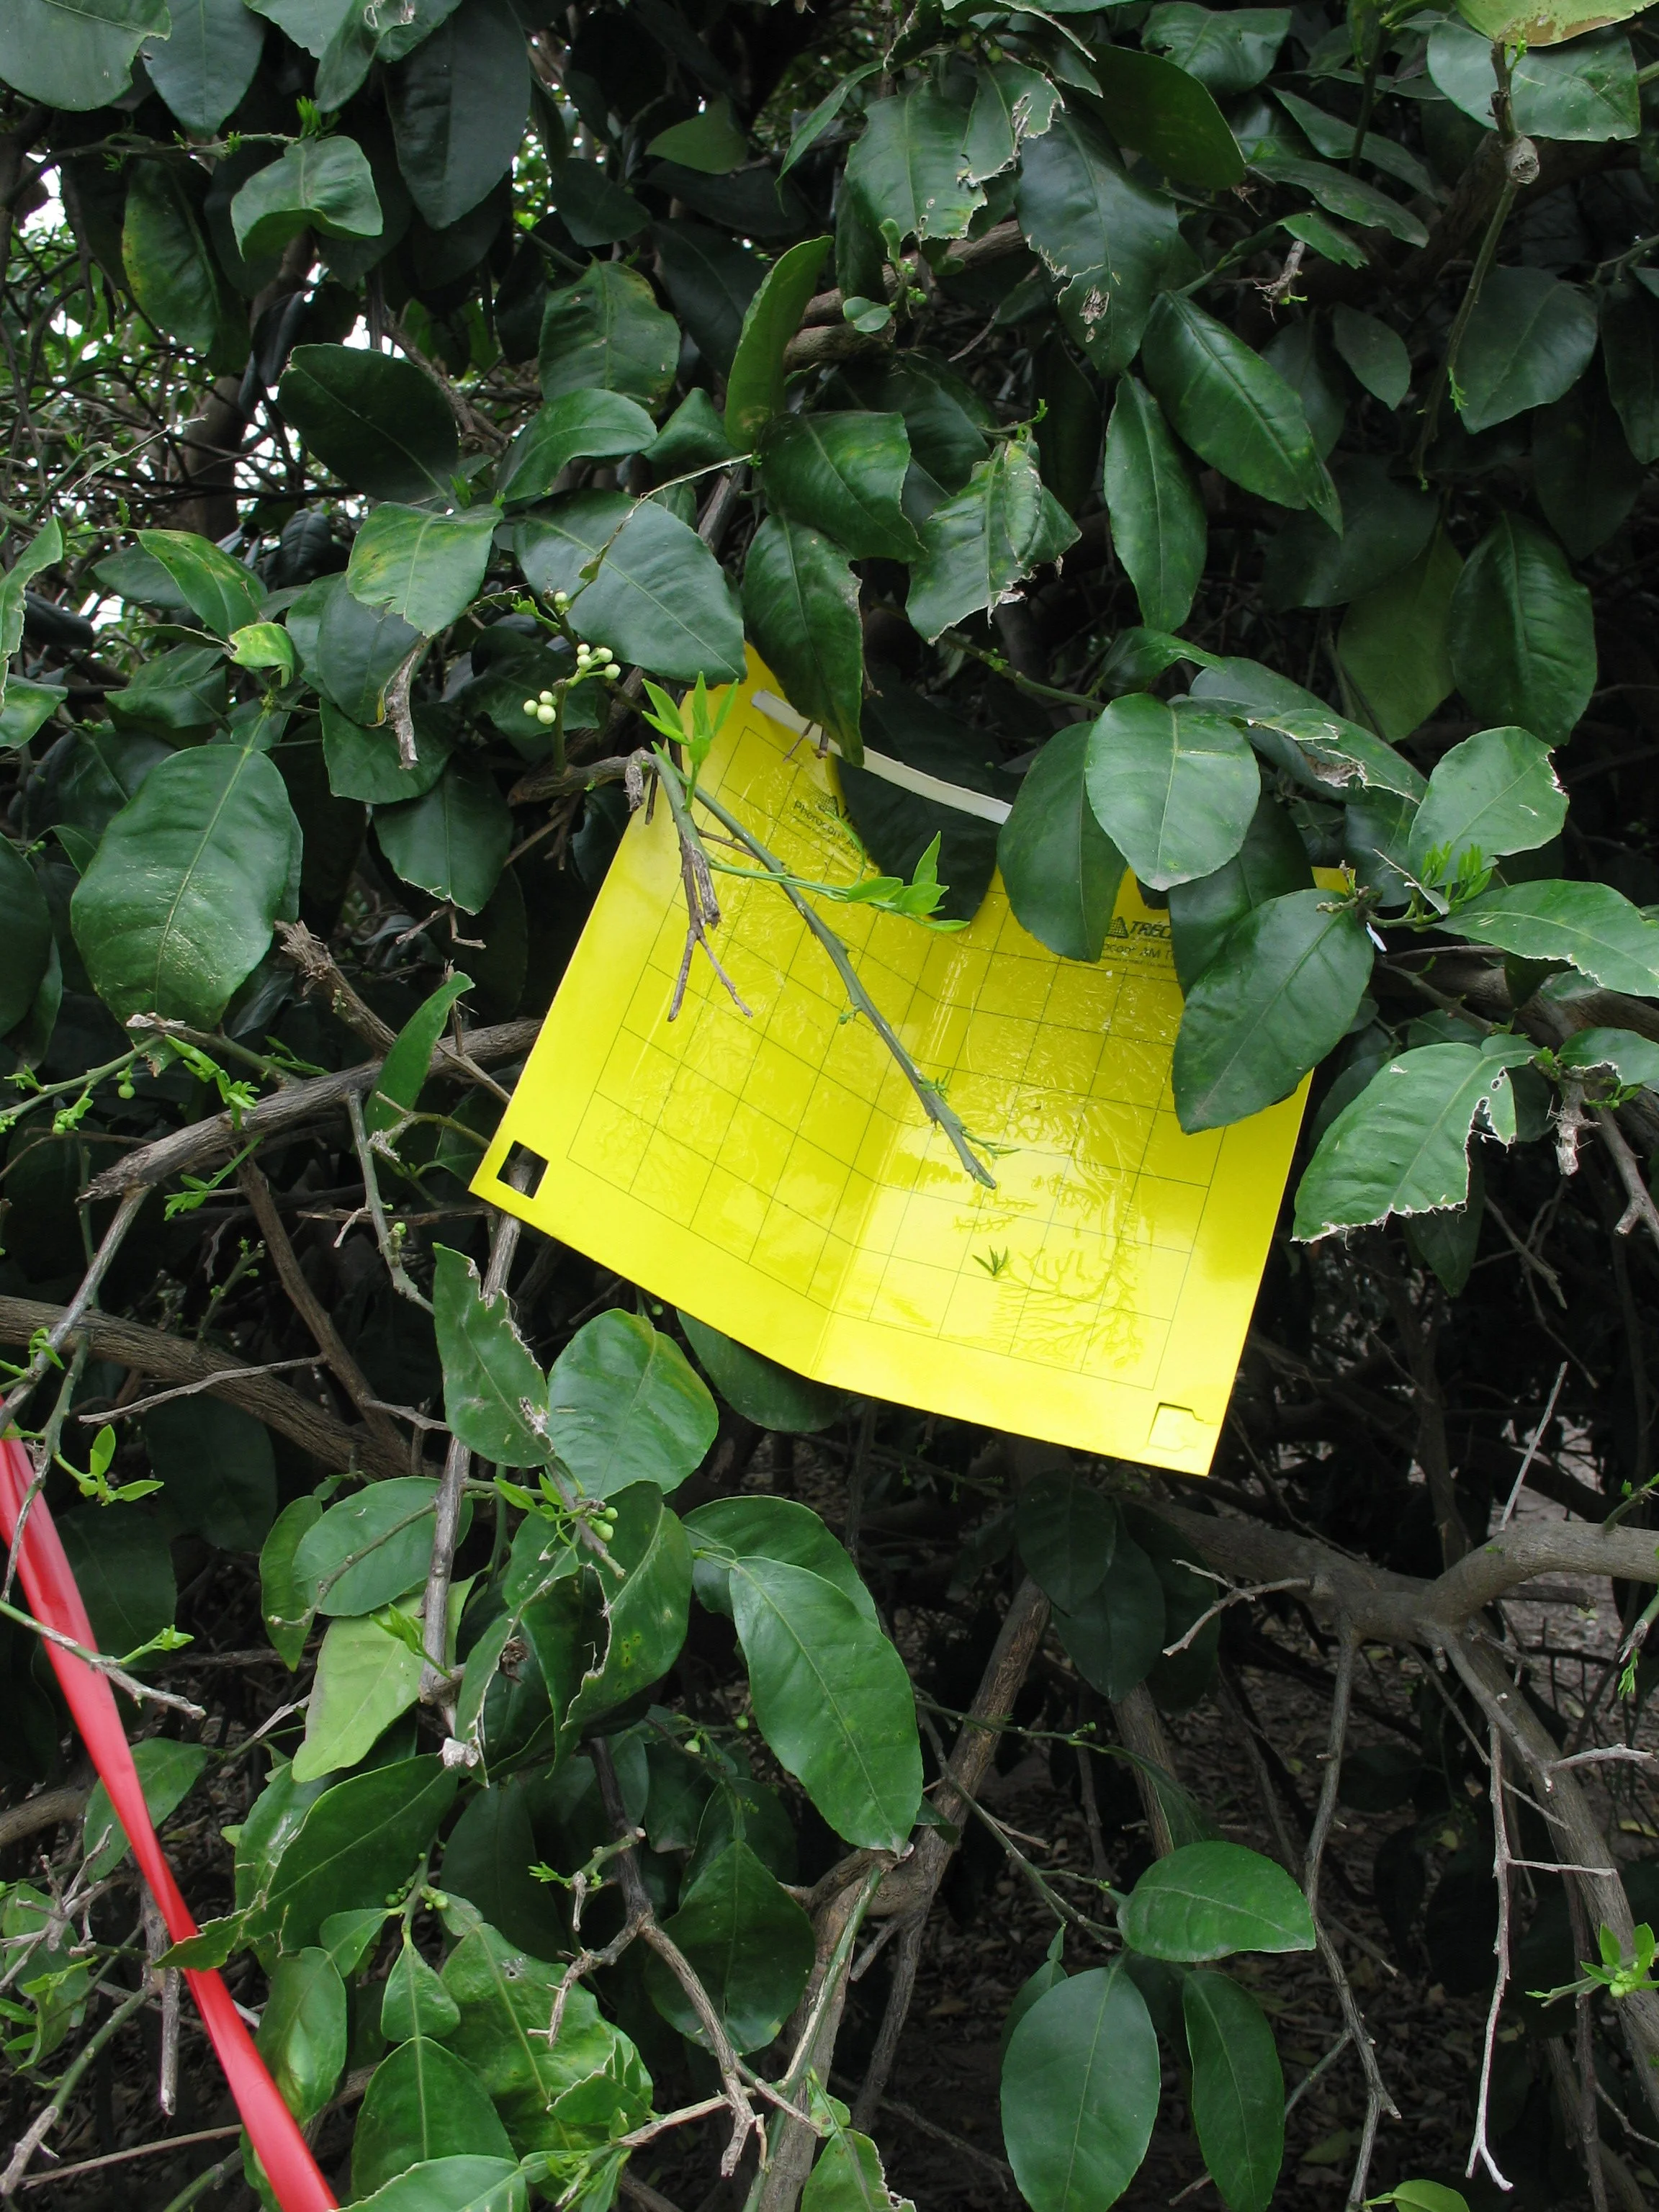
The monitoring tool, at work: a yellow sticky trap hung in a citrus canopy by USDA APHIS samplers, its grid made for counting what it catches. In this lesson the same card stands near a pot, where it monitors fungus gnat adults — a shrinking catch over successive weeks shows the population falling. A trap is a measuring instrument before it is a control: it tells you whether the gentle response — letting the soil surface dry between waterings — is working. Place traps out of reach of children and pets.
USDA APHIS photograph (Citrus Sampling, Lower Rio Grande Valley, Texas; image 20089222-APHIS-DB-0018). Public domain.
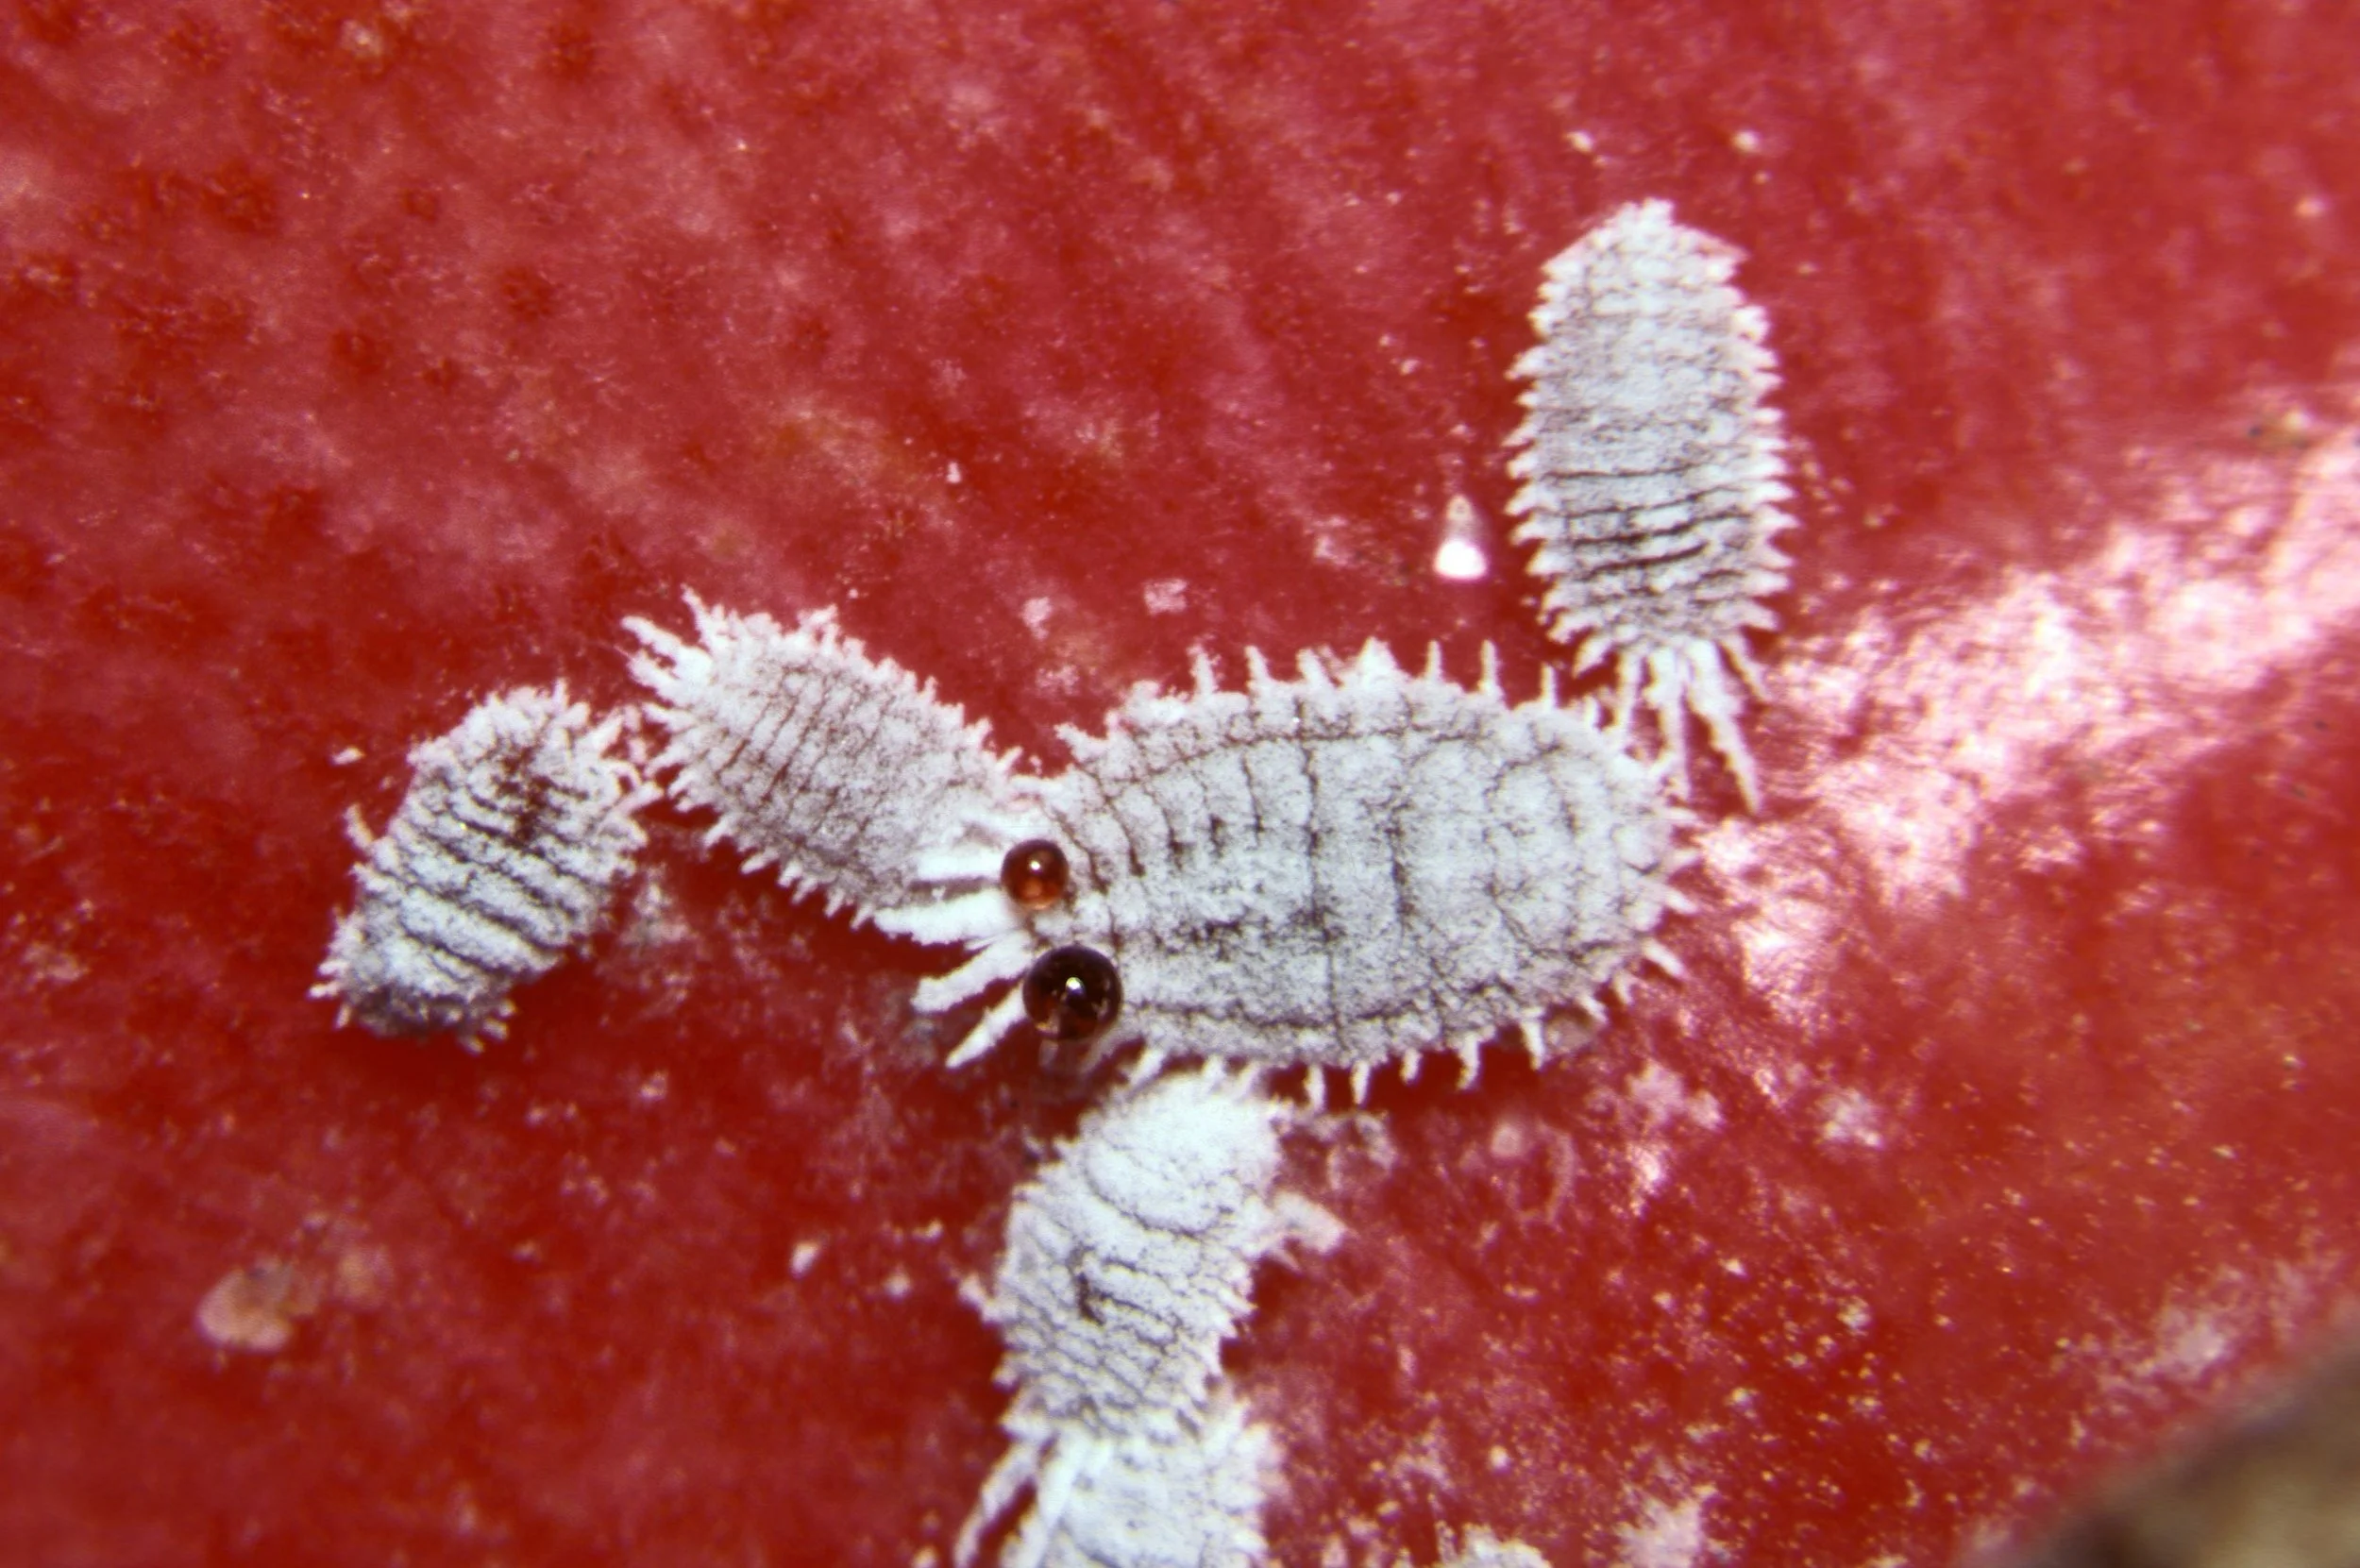
Mealybugs under magnification: oval bodies under a white, waxy, cottony coat — the armor that makes water sprays fail on them. On the plant they appear as white cottony tufts tucked into leaf joints and along stems, and like aphids they produce honeydew; the two amber droplets beside the largest insect are that sticky excretion, caught in the act. First response is mechanical — a cotton swab dipped in rubbing alcohol, dabbed on each insect — and any plant where you find them is isolated at once, with its neighbors inspected.
Photograph by Q. Holdman, USDA Agricultural Research Service (image K10880-1). Public domain.
We will study four pests in detail. They are the ones you are most likely to meet on indoor plants and in the home greenhouse, and each one teaches a different lesson about how plant pests work.
Aphids
Aphids are small, soft-bodied insects, often green, black, brown, or pink, that cluster on new growth: the tender tips of stems and the undersides of young leaves. They feed by piercing the plant and drinking its sap, and a heavy infestation distorts new growth, curling and stunting the leaves.
★ Aphids leave two calling cards. The first is honeydew, a clear, sticky excretion they leave on leaves and stems. If your plant feels tacky to the touch, aphids or their sap-feeding cousins are likely at work. The second is sooty mold, a dark fungus that grows on honeydew and coats the leaves in a dull black film, blocking light. The mold itself does not infect the plant, but it weakens it by shading the leaf surface.
Check in: Name aphids' two calling cards — and say what the second one does to the leaf, and what it does not do.
Aphids reproduce with startling speed, and in warm indoor conditions they can produce new generations without mating. This is why early action matters so much. A small cluster found on Tuesday is a large colony by the following week.
The good news: aphids are among the easiest pests to manage. A strong spray of plain water dislodges most of them, and because they are soft-bodied and slow, they rarely climb back. For stubborn cases, insecticidal soap applied to the insects themselves (it works on contact, not as a residue) is effective. We will discuss safety rules for all sprays later in this lesson.
❦ In your workbook: record the aphids in your own way — where they cluster, their two calling cards, and the water-first response — copy, sketch, or note what matters.
Spider Mites
Spider mites are not insects at all. They are tiny arachnids, related to spiders and ticks, barely visible to the naked eye. They thrive in hot, dry conditions, which makes heated indoor air in winter their favorite season.
You will rarely see the mites themselves. You will see their damage: fine stippling on the leaves, tiny pale dots where they have pierced individual cells to feed, progressing to a gray or bronze discoloration. In heavy infestations they spin fine, wispy webbing along leaf joints and stem tips. Leaves yellow, then drop.
★ The diagnostic test is simple and worth memorizing. Hold a sheet of white paper under a suspect leaf and tap the leaf sharply. The mites fall onto the paper as specks that move. If the specks move, you have your answer.
Check in: Describe the white-paper tap test — and what result confirms spider mites.
Spider mites hate humidity and love dust. The cultural controls are therefore straightforward: raise the humidity around susceptible plants, wipe dusty leaves regularly, and keep air moving. These creatures are a perfect illustration of the lesson's central principle. Change the conditions and you change the outcome.
❦ In your workbook: record the spider mites in your own way — stippling, webbing, the tap test, and the humidity-and-dust answer — copy, sketch, or note what matters.
Fungus Gnats
Fungus gnats are the small black flies that rise in a cloud when you nudge an overwatered pot. The adults themselves are harmless to plants; they are a nuisance to people. The damage comes from their larvae: tiny white worms that live in the top layer of damp soil, feeding on organic matter and, when numerous, on fine root hairs and seedlings.
★ Fungus gnats are therefore a symptom with a very specific meaning. They tell you the soil is staying too wet. The primary control is not a product at all. It is letting the top inch or two of soil dry between waterings, which breaks the larvae's life cycle. Yellow sticky traps placed near the pot catch the adults and, usefully, tell you whether the population is shrinking.
Check in: Fungus gnats are messengers. What are they telling you — and what is the primary control?
If you see fungus gnats, do not reach for a spray first. Reach for your watering can and ask whether it has been too generous. The gnats are messengers. Listen to them.
❦ In your workbook: record the fungus gnats in your own way — harmless adults, soil-dwelling larvae, and drying soil as the control — copy, sketch, or note what matters.
Mealybugs
Mealybugs look like tiny tufts of white cotton tucked into leaf joints, along stems, and sometimes at the roots. They are sap-feeders, and like aphids they produce honeydew. Heavy infestations cause stunted growth, yellowing, and premature leaf drop.
Their cottony coating repels water-based sprays, which is why they persist where aphids would wash away. The first response is mechanical: dab individual mealybugs with a cotton swab dipped in rubbing alcohol, which dissolves their waxy armor. For larger infestations, insecticidal soap works, but it must contact the insects directly, which means thorough coverage, including the hidden joints where they cluster.
★ Mealybugs spread easily between plants, often hitching a ride on hands, tools, or new purchases. Isolate any plant where you find them, and inspect its neighbors. New plants should always spend two weeks in quarantine, apart from your collection, before joining it. This single habit prevents more infestations than any product ever has.
Check in: Why do water sprays fail on mealybugs — and what two habits answer their spread?
❦ In your workbook: record the mealybugs in your own way — cottony tufts, the alcohol swab, and the two-week quarantine — copy, sketch, or note what matters.
Professor's Mid-Lesson Note
My scholars,
I want to pause here and say something plainly, because it matters.
You will notice that every pest in this lesson is met first with water, with drying soil, with airflow, with a cotton swab, with isolation. Not one has yet required you to buy anything. This is deliberate, and it is not stinginess.
A gardener who reaches for a product first has skipped the two most important steps: understanding what is wrong and asking why the plant was vulnerable. Products treat symptoms. Conditions prevent them. And every product, even the gentle ones, carries some risk to the plant, to you, and to the small beneficial creatures that share your greenhouse.
Learn the gentle responses so well that they become reflex. The strong responses will then be what they should be: rare, considered, and final.
— Professor Beryl Fernfoot, Herbology Greenhouse • Master Herbalist • Head of House Oriens
The Common Diseases
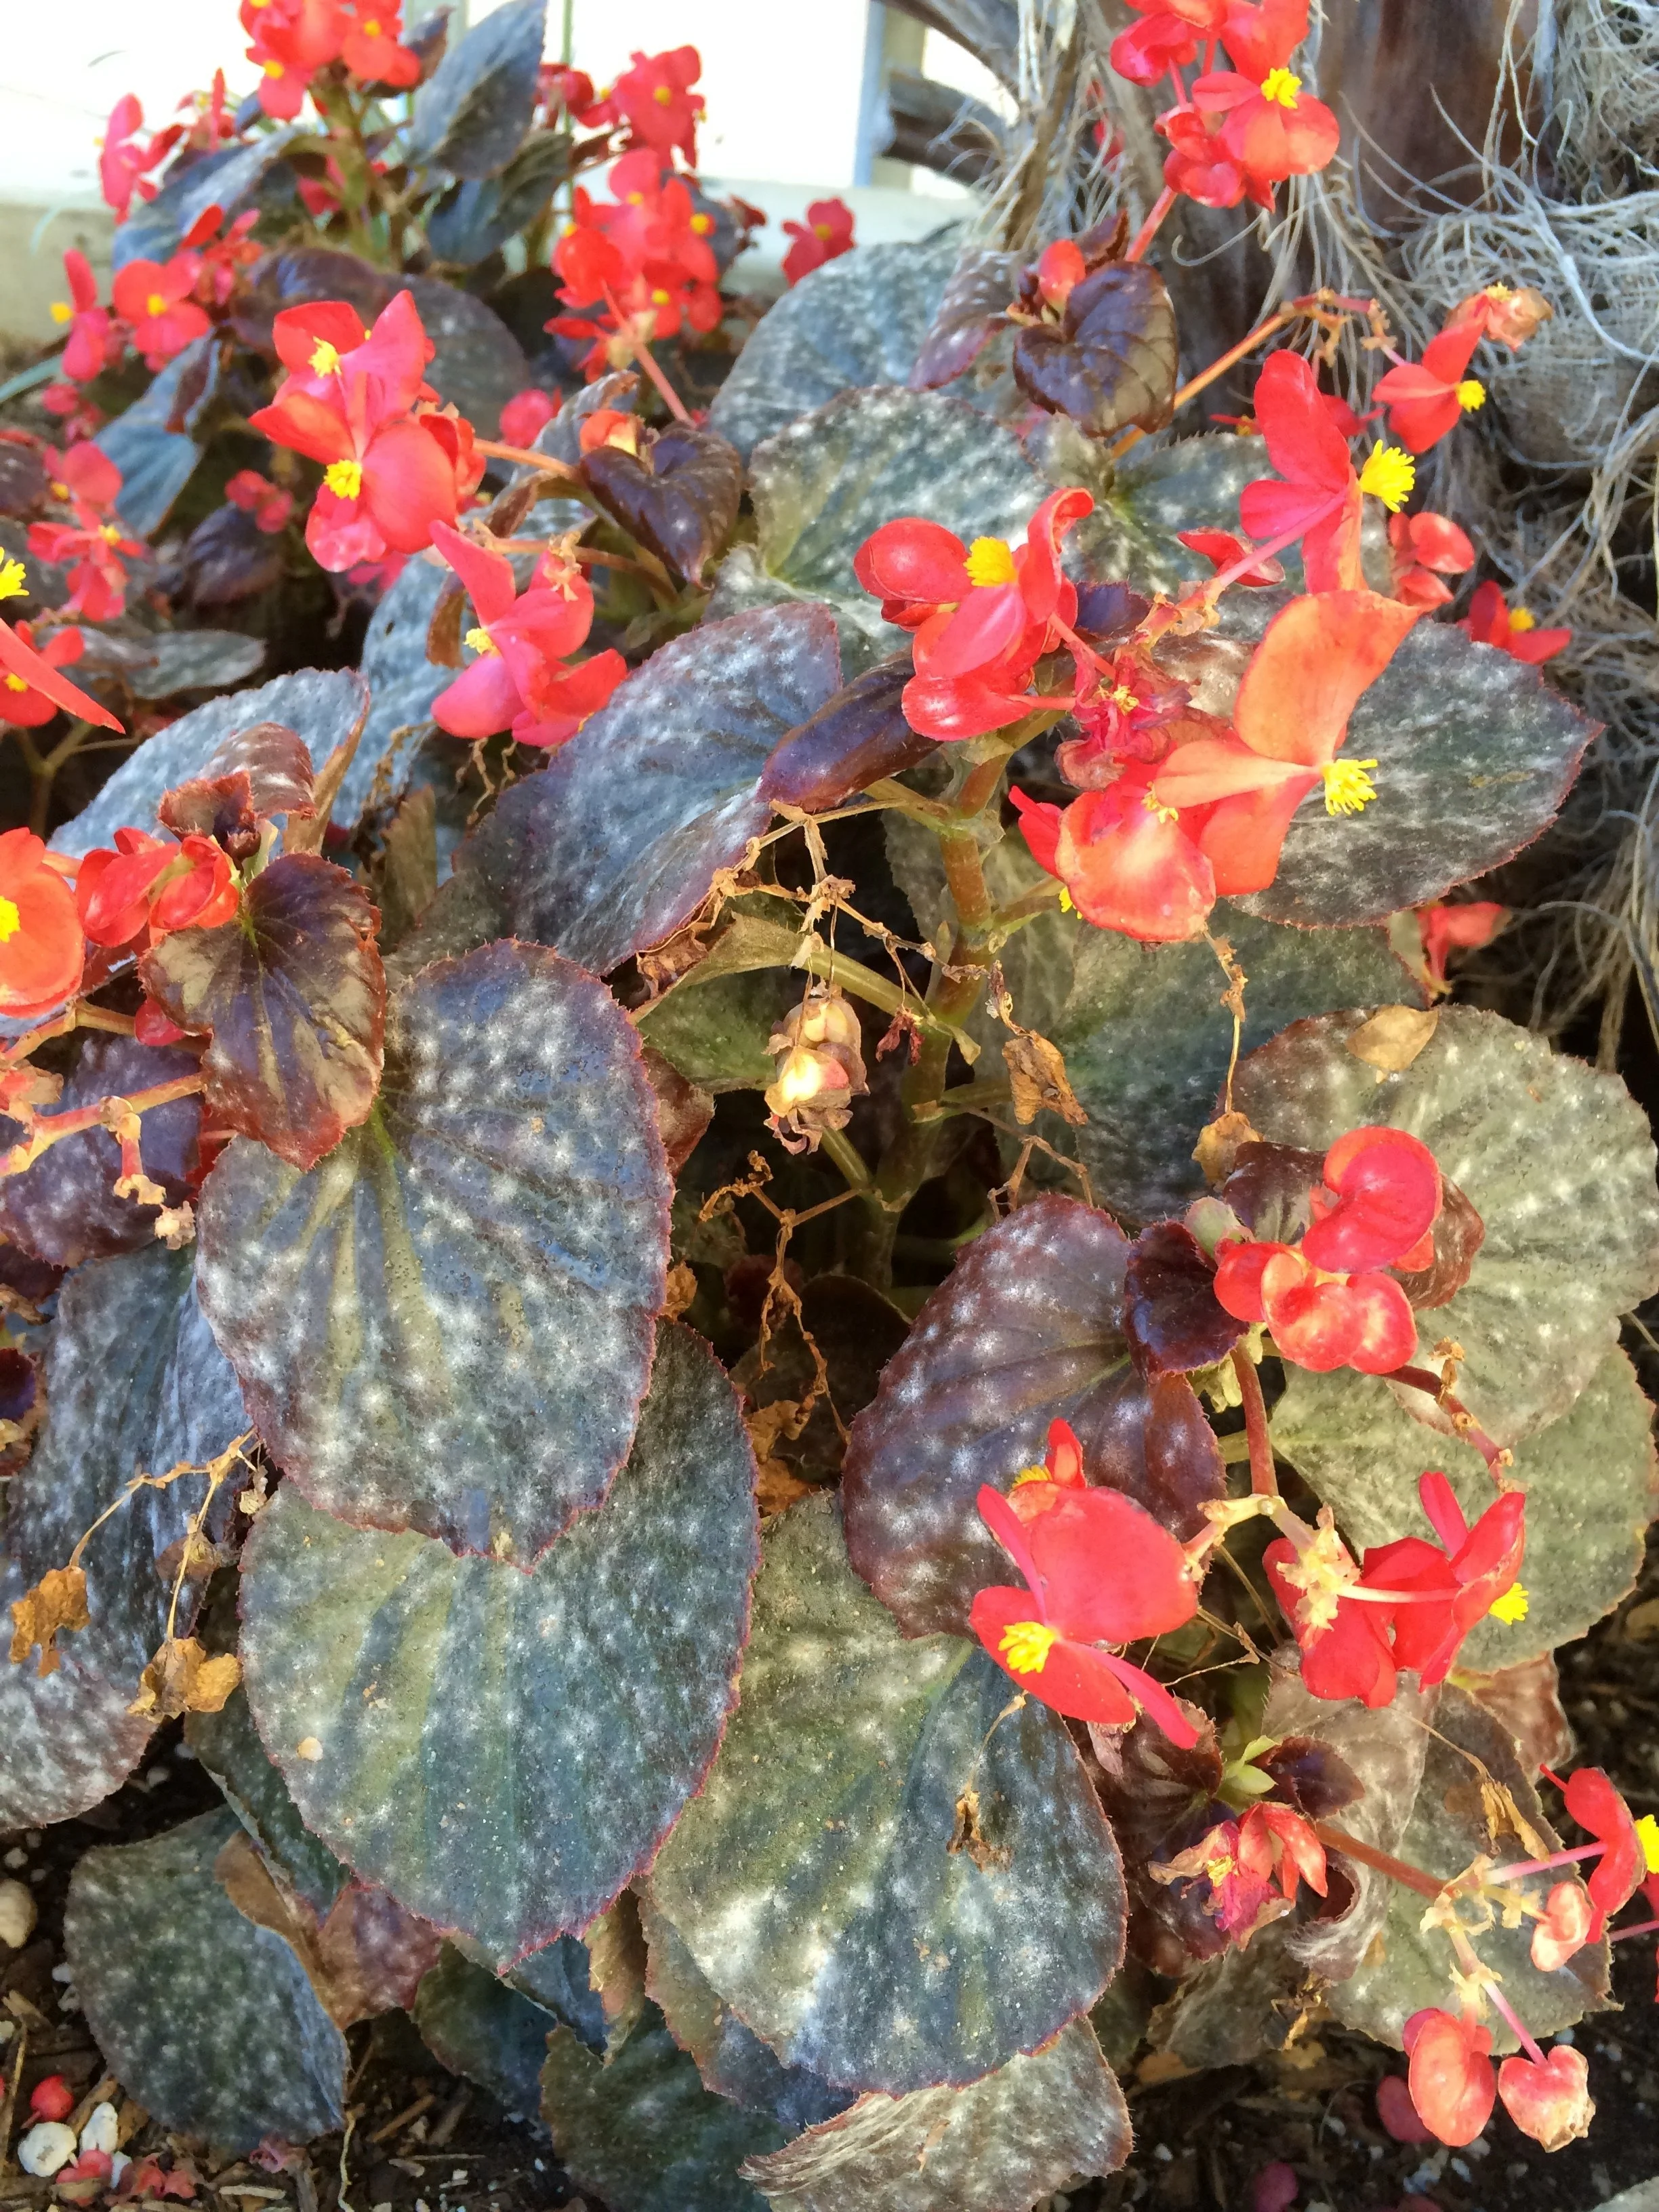
Powdery mildew, exactly as named: white, flour-like patches spreading across a begonia's leaves (the pathogen recorded for this plant is Oidium begoniae). It favors crowded, still, humid air — which is why the response is conditions, not panic: space the plants so air moves, water at soil level in the morning, and remove badly affected leaves promptly, bagging them rather than composting them. The mildews are largely host-specific, so the plants standing beside this one are not automatically doomed — but this one is isolated while it is treated, and hands are washed afterward.
Photograph by Scot Nelson, dedicated to the public domain (CC0).
Pests are visible creatures. Diseases are quieter: patterns on leaves, failures at the soil line, collapses that seem to come from nowhere. Three are worth knowing by name.
Powdery Mildew
Powdery mildew is exactly what it sounds like: white, flour-like patches on leaves, flowers, and young shoots, spreading until they can cover whole surfaces. Infected leaves may stay smaller than healthy ones, curl upward, and turn brittle.
★ Two facts make powdery mildew less frightening than it looks. First, the fungi that cause it are largely host-specific: the mildew on your roses will not spread to your herbs. Second, it favors a particular set of conditions: high humidity with poor air circulation, and temperatures roughly between 60 and 80 degrees Fahrenheit. Crowded, still, damp air is its invitation.
Check in: Powdery mildew is largely host-specific. What does that mean for the plants standing beside an infected one — and what conditions invited it?
The response follows the conditions. Space plants so air moves between them. Water at the soil level in the morning so leaves dry during the day. Remove badly affected leaves promptly. Pruning for airflow, which you learned in Lesson 23, is powdery mildew prevention wearing a different hat. Everything connects. That is the quiet pleasure of this course: nothing you have learned stands alone.
❦ In your workbook: record the powdery mildew in your own way — flour-like patches, the conditions it favors, and the airflow response — copy, sketch, or note what matters.
Damping Off
Garden-watch note. See Lesson 17 for the canonical definition. Damping off is the heartbreak disease of seed starting: seeds rot before germinating, or seedlings emerge and then collapse at the soil line, the stem pinched and browned where it meets the mix, caused by soil fungi, most often species of Pythium.
❦ In your workbook: record the damping off in your own way — collapse at the soil line, and where its canonical definition lives — copy, sketch, or note what matters.
Root Rot
Root rot is the disease behind the most common houseplant death in the world, and its cause is almost always the watering can. Soil fungi invade roots that have been sitting in waterlogged conditions; the roots turn dark, soft, and mushy, and the outer covering may slip off the inner core when pulled. Above ground, the plant wilts and its leaves brown, which looks exactly like underwatering. This is the cruelest trick in the greenhouse: the plant is drowning, and it looks thirsty, and the well-meaning gardener waters it again.
★ Learn the distinction. A plant that wilts in dry soil perks up within hours of watering. A plant with root rot does not recover after watering, because its roots can no longer take water up. If you unpot a suspect plant and find brown, mushy roots with a sour smell, you have your diagnosis.
Check in: A wilting plant perks up within hours of watering, or it does not. What does each outcome tell you?
Treatment is honest work: remove the plant from its pot, trim away all rotted roots with clean scissors, repot in fresh, fast-draining mix, and water sparingly until new growth appears. Severely affected plants may not recover, and that is not your failure. It is information for the next plant.
Prevention, as always, is the real lesson: pots with drainage holes, soil that drains, and the finger test before every watering. Lesson 13 was root rot prevention, though we did not call it that at the time.
❦ In your workbook: record the root rot in your own way — the wilting distinction, the honest treatment, and the watering-can prevention — copy, sketch, or note what matters.
The Order of Operations
When you find a problem, follow this order. Do not skip steps.
Step 1: Observe. Look closely before you touch anything. Where exactly is the damage? Which leaves, which parts of the plant? Are there visible creatures, webbing, stickiness, spots, or mold? Photograph what you see. A photograph taken today is worth more than a perfect memory tomorrow.
★ Step 2: Identify. Match what you observe to a known pest or disease. Use at least two independent signs before you decide, the same discipline as the three-sign rule from Lesson 6. "Small white cottony tufts in the leaf joints plus sticky leaves" is mealybugs. "Fine webbing plus stippled pale leaves in dry indoor air" is spider mites. If you cannot identify it, say so. An unidentified problem gets cultural care and close watching, not a product.
Check in: Why does identification demand at least two independent signs — and what does an unidentified problem get, and not get?
Step 3: Isolate. Move the affected plant away from its neighbors before you treat it. Pests travel on contact, on air currents, on your hands and sleeves. Isolation is the cheapest and most effective control ever devised, and beginners skip it more than any other step.
Step 4: Respond gently first. Water spray for aphids. Drying the soil for fungus gnats. Humidity and wiped leaves for spider mites. Alcohol swabs for mealybugs. Pruning away badly affected growth for mildew. Most problems end here.
★ Step 5: Consider products only if gentle measures fail. Insecticidal soap is the standard next step for soft-bodied insects. It works on contact and has no residual action, which means it must touch the insects and means it does not linger in the environment. Neem oil is sometimes used, but treat it with respect: it can harm beneficial insects including pollinators, it can burn leaves in sunlight or heat, and "natural" is not a synonym for "safe." Whatever you use, read the entire label first, apply exactly as directed, keep products away from children and pets, ensure ventilation, and wash your hands afterward. Never mix homemade chemical concoctions from internet recipes. A product you cannot identify is no better than a plant you cannot identify.
Check in: Before any product touches a plant, what must you have done first — in the greenhouse, and with the label?
Step 6: Know when to let go. A plant that is mostly infested, with pests in every joint and the whole structure weakened, may cost more in effort and risk to your other plants than it is worth. Discarding a badly infested plant is not defeat. It is stewardship of the collection. Compost only healthy material; bag and discard infested plants with household waste so pests do not spread through the compost.
❦ In your workbook: record the order of operations in your own way — observe, identify, isolate, respond gently, consider products, know when to let go — copy, sketch, or note what matters.
In your packet: Assignment III — The Symptom Detective ✎ begins here. Work it now, or mark the place and take it as homework — your choice.
Prevention: The Real Curriculum
★ If this lesson had a single examination question, it would be this: what conditions make problems unlikely? Everything else is detail. Here is the prevention checklist, and you will notice that every item is something you have already learned:
- Right plant, right place. A plant suited to its light and space is a resilient plant. (Lessons 12 and 14.)
- Water wisely. The finger test, drainage holes, no standing water. Most indoor plant problems begin at the watering can. (Lesson 13.)
- Air moves. Space between plants, pruned interiors, no crowding. Stagnant air invites mildew and mites alike. (Lesson 23.)
- Inspect new arrivals. Two weeks of quarantine for every new plant, with a close inspection before it joins the collection.
- Clean tools. Wipe pruners and scissors between plants, especially after cutting away diseased material. (Lesson 23.)
- Remove the struggling. Fallen leaves, spent flowers, and badly damaged growth harbor problems. Tidy them away promptly.
- Feed, do not force. A well-nourished plant resists; an overfed, soft, leggy plant invites. (Lesson 10.)
None of this requires products. All of it requires attention, which is the one tool you have been sharpening since Lesson 1.
❦ In your workbook: record the prevention curriculum in your own way — the seven checklist items and the earlier lesson each one came from — copy, sketch, or note what matters.
In your packet: Assignment IV — The Prevention Plan ✎ begins here. Work it now, or mark the place and take it as homework — your choice.
Guided Observation: The Garden Watch Inspection
This lesson's observation is the watchful gardener's habit, worked in full: a close inspection of your Scholar's Familiar in the order this lesson teaches — look first, identify by two signs, and record everything before you act on anything.
You will need:
- your Scholar's Familiar (or a plant you can visit regularly — see the alternative paths below)
- a sheet of white paper (for the tap test)
- your journal
- a phone camera
- a hand lens or magnifying glass, if you have one (optional)
Look where problems announce themselves. Each time you water, spend one extra minute looking closely: the undersides of leaves, the joints where leaf meets stem, the soil surface, the newest growth. The top of the leaf is the advertisement. The underside is the truth.
Run the tap test. Hold a sheet of white paper under a suspect leaf and tap the leaf sharply. The mites fall onto the paper as specks that move. If the specks move, you have your answer.
Photograph what you see. Look closely before you touch anything. Where exactly is the damage? Which leaves, which parts of the plant? Are there visible creatures, webbing, stickiness, spots, or mold? A photograph taken today is worth more than a perfect memory tomorrow.
Identify by two signs. Match what you observe to a known pest or disease. Use at least two independent signs before you decide. If you cannot identify it, say so: an unidentified problem gets cultural care and close watching, not a product.
Consider:
- What did the undersides and the leaf joints show that the tops of the leaves did not?
- Did the tap test's specks move — and what does that settle?
- Which of your findings is a message about conditions, and what condition is it naming?
No-plant alternative: adopt any plant you can visit regularly (a park shrub, a neighbor's garden plant, a store display) and inspect it the same way.
Workbook / photo-study path: if no living plant is within your reach this week, work the same inspection on clear photographs of the lesson's four pests and three diseases instead — name the signs in each photograph, run the two-sign discipline on paper, and record what you would check first on the living plant. The reading of signs is the skill; the plant is its next occasion.
Materials
Required (Level One — household items)
- Your eyes: the first instrument of the garden watch; the inspection habit is looking closely, every watering.
- A sheet of white paper: for the tap test that confirms spider mites.
- Your journal: for the dated inspection record of Assignment II.
- A phone camera: to photograph what you see — a photograph taken today is worth more than a perfect memory tomorrow.
- Paper and pen: for the Symptom Detective cases and the Prevention Plan.
Suggested (Level Two — historically closer)
- A hand lens or magnifying glass: for reading the smallest signs at leaf joints and along stems.
- A bound inspection log: the garden watch kept as a bound record, in the naturalist's manner.
- Yellow sticky traps: for monitoring fungus gnat adults and watching whether the population is shrinking.
- A bound naturalist's notebook and ink pen: for the Symptom Detective.
- A bound garden planner: for the Prevention Plan and its monthly revisit.
Safety notes: Wash your hands after handling any plant you suspect of carrying pests. Do not bring suspect cuttings indoors near other plants. If your audit involves moving heavy pots or reaching high shelves, ask for help. No prevention plan is worth a strained back. Whatever product you use, read the entire label first, apply exactly as directed, keep products away from children and pets, ensure ventilation, and wash your hands afterward. Never mix homemade chemical concoctions from internet recipes.
Reflection Questions
Answer the following questions in your workbook.
- The lesson says "healthy plants resist most problems" and calls it the whole lesson in one sentence. Do you agree? What does this claim imply about where a gardener's effort should go?
- Why does the order of operations put identification before action? Describe a situation in which acting first could make a problem worse.
- Fungus gnats are described as "messengers" rather than enemies. What other problems in gardening (or beyond it) might be better understood as messages about conditions rather than attacks to fight?
- When is discarding a plant an act of stewardship rather than defeat? Where would you draw the line?
- Professor Fernfoot admits she has lost plants to pests and damping off. How does that admission change the way you read her advice?
Workbook Checklist — Lesson 24
In my workbook I have:
- ☐ named the four common pests by their signs — aphids, spider mites, fungus gnats, and mealybugs — and the tap test that confirms mites
- ☐ read honeydew and sooty mold as the calling cards of sap-feeding insects
- ☐ recognized the three common diseases — powdery mildew, damping off, and root rot — and told root rot from thirst by the watering response
- ☐ stated the order of operations in full: observe, identify, isolate, respond gently first, consider products only if gentle measures fail, know when to let go
- ☐ kept the product safety rules: read the entire label first, apply exactly as directed, keep away from children and pets, ensure ventilation, wash hands afterward, never mix homemade chemical concoctions
- ☐ written the prevention checklist for my own growing space, dated it, and set its one-month revisit
- ☐ completed the Garden Watch Inspection, the Symptom Detective, and the Prevention Plan — or their adopted-plant, paper, and photo-study paths
☐ Lesson completed Date: ___ Signature: ___
The Professor's Closing Note
Dear scholars,
I will tell you something the other professors might not. In my many years in the Greenhouse, I have lost plants. I have found aphids on a favorite mint the morning of a demonstration. I have watched a tray of seedlings damp off overnight because I watered them with too much love and too little patience. It happens to everyone who grows things, because growing things means sharing your space with the rest of the living world.
What separates the experienced gardener from the beginner is not immunity to problems. It is the calm that comes from having met them before and knowing the order of operations. Observe. Identify. Isolate. Respond gently. That is the whole craft, and you know it now.
Go and inspect your Familiar. Look under the leaves. Check the soil surface. You are not looking for trouble. You are practicing attention, and attention is the beginning of every good thing in the greenhouse.
— Professor Beryl Fernfoot, Herbology Greenhouse • Master Herbalist • Head of House Oriens
Cross-Class Connections

Creative Arts · Unit V, Lesson 18 — Outdoor & Garden Tools: Handling, Cleaning & Care
Boots by the door, scholars. Fernfoot has taught you to wipe your pruners between plants, and she is right — a blade can carry sickness from one plant to the next the way a shared cup carries a cold through a household. In my workshop you will learn the tool's side of that promise: clean first, then disinfect, dry, oil, and store, and never let a blade that has cut a sick plant touch another until the bucket and the cloth have had their say.

Potions · Unit II, Lesson 15 — Receiving & Judging Dried Botanicals
Welcome to the receiving bench, scholars. You have learned in the Greenhouse to hold a new plant apart for two weeks before it joins your collection; at my bench the same discipline judges what arrives dried. A doubtful batch is quarantined, sealed and set apart, and a moldy one is bagged and gone — the whole batch, every time. Come and practice the watch with your eyes, your nose, and your fingers.
Further Reading & Sources
- Pest and Disease Problems of Indoor Plants — Penn State Extension — identification of aphids, mealybugs, scales, whiteflies, thrips, spider mites, and fungus gnats, with honeydew and sooty mold explained.
- Houseplants: Simple Solutions to Plant Pests — University of Nebraska-Lincoln Extension — isolate-first guidance, soapy water and insecticidal soap use, and fungus gnat control through drying soil and sticky traps.
- Houseplants Under Attack — Iowa State University Extension — mite, scale, mealybug, aphid, and whitefly damage patterns, plus root rot symptoms and how the fungi spread.
- Damping Off — Penn State Extension — the Pythium/Fusarium/Rhizoctonia causes, favoring conditions, and greenhouse controls including pasteurized mix and soil warmth.
- Powdery Mildew — West Virginia University Extension — host specificity, the 60–80°F favoring range, and cultural controls like morning watering and air circulation.
Browse the Herbology shelf in the school Library for readable editions of these works.
The greenhouse doors stand open. Observe first, act gently, and trust the conditions. — Professor Beryl Fernfoot, Herbology Greenhouse • Master Herbalist • Head of House Oriens
One plant from this lesson stands in the Materia Botanica, the school's shared archive — kept with its lessons, its keepings, and its cautions.
Rose The whole Materia BotanicaPROFESSOR BERYL FERNFOOT · HERBOLOGY GREENHOUSE
Submit your work for this lesson using the form below.
CONTINUE IN THE HERBOLOGY GREENHOUSE
← Previous · Lesson 23: Selective Pruning for Plant Health & Growth Next · Lesson 25: Repotting & Root Bound Mechanics →
Unit III — Propagation, Pruning & Plant Stewardship Herbology Greenhouse — All 37 Lessons
The rest of Unit III: Lesson 17 · Seed Starting · Lesson 18 · Seed Scarification · Lesson 19 · Stem Cuttings · Lesson 20 · Root Division · Lesson 21 · Layering & Runners · Lesson 22 · Pruning Geometry · Lesson 23 · Selective Pruning · Lesson 25 · Repotting & Root Bound · Lesson 26 · Stewardship Project