
HERBOLOGY
Unit III · Lesson 22PRUNING GEOMETRY: APICAL DOMINANCE
PROFESSOR BERYL FERNFOOT
Herbology Greenhouse
Master Herbalist
Why does a plant grow tall instead of wide? This lesson introduces apical dominance, the quiet rule that gives the highest bud command of the stem, and the gardener's gentle art of overruling it: the pinch.
Professor's Introduction

Sit a while, scholars.
Look at any young plant growing undisturbed and you will notice something curious. One shoot rises above the rest. One tip leads, and the buds below it wait. This is not accident and it is not laziness on the part of the waiting buds. It is government. The plant has a ruler, and the ruler sits at the very top.
Today you will learn the name of that government, the messenger that carries its orders, and the small, kind rebellion by which gardeners have shaped plants for centuries. It is called pinching, and it is one of the gentlest interventions in all of horticulture. Two fingers, one growing tip, and the whole future of the plant changes.
There is no hurry. Watch first, understand second, and pinch third.
— Professor Beryl Fernfoot, Herbology Greenhouse • Master Herbalist • Head of House Oriens
The line beneath the map is our road: every stop a place where the knowledge of plants changed, every lesson a step along it.
Lesson Objectives
By the end of this lesson, you will be able to:
- Define apical dominance and explain how it shapes a plant's growth habit.
- Describe the role of auxin in suppressing lateral buds, at an accessible level.
- Demonstrate the pinching technique on a suitable herb, cutting just above a leaf pair.
- Explain the difference between pinching and pruning.
- Decide when pinching is appropriate and when a plant should be left alone.
- Observe and record your plant's branching response over several days.
Reading this lesson: ★ marks the passages to remember. They return on the unit quiz and the class test. Check in questions ask the material back as you go; answer them in your workbook when you meet them.
Working this lesson: Your assignment packet is the first download on this page. Work in it as the lesson moves along, answering each assignment as its subject is taught — or read the lesson through for your notes and take the assignments as homework afterward. Both are proper ways to sit this class. Signposts in the reading tell you where each assignment belongs. Written answers are short answers in your own words; a few honest lines are worth more than a filled page.
Your Assignment Packet
This lesson's assignments live in its packet: the Lexicon Handout (every term, course terms marked ◆), Materials, Guided Practice, the Assignment Manual with its answer key for self-checking, the Reflection Questions, and the Workbook Checklist. Download the packet before you begin and keep it beside you as you read.
The Tallest Tip Wins
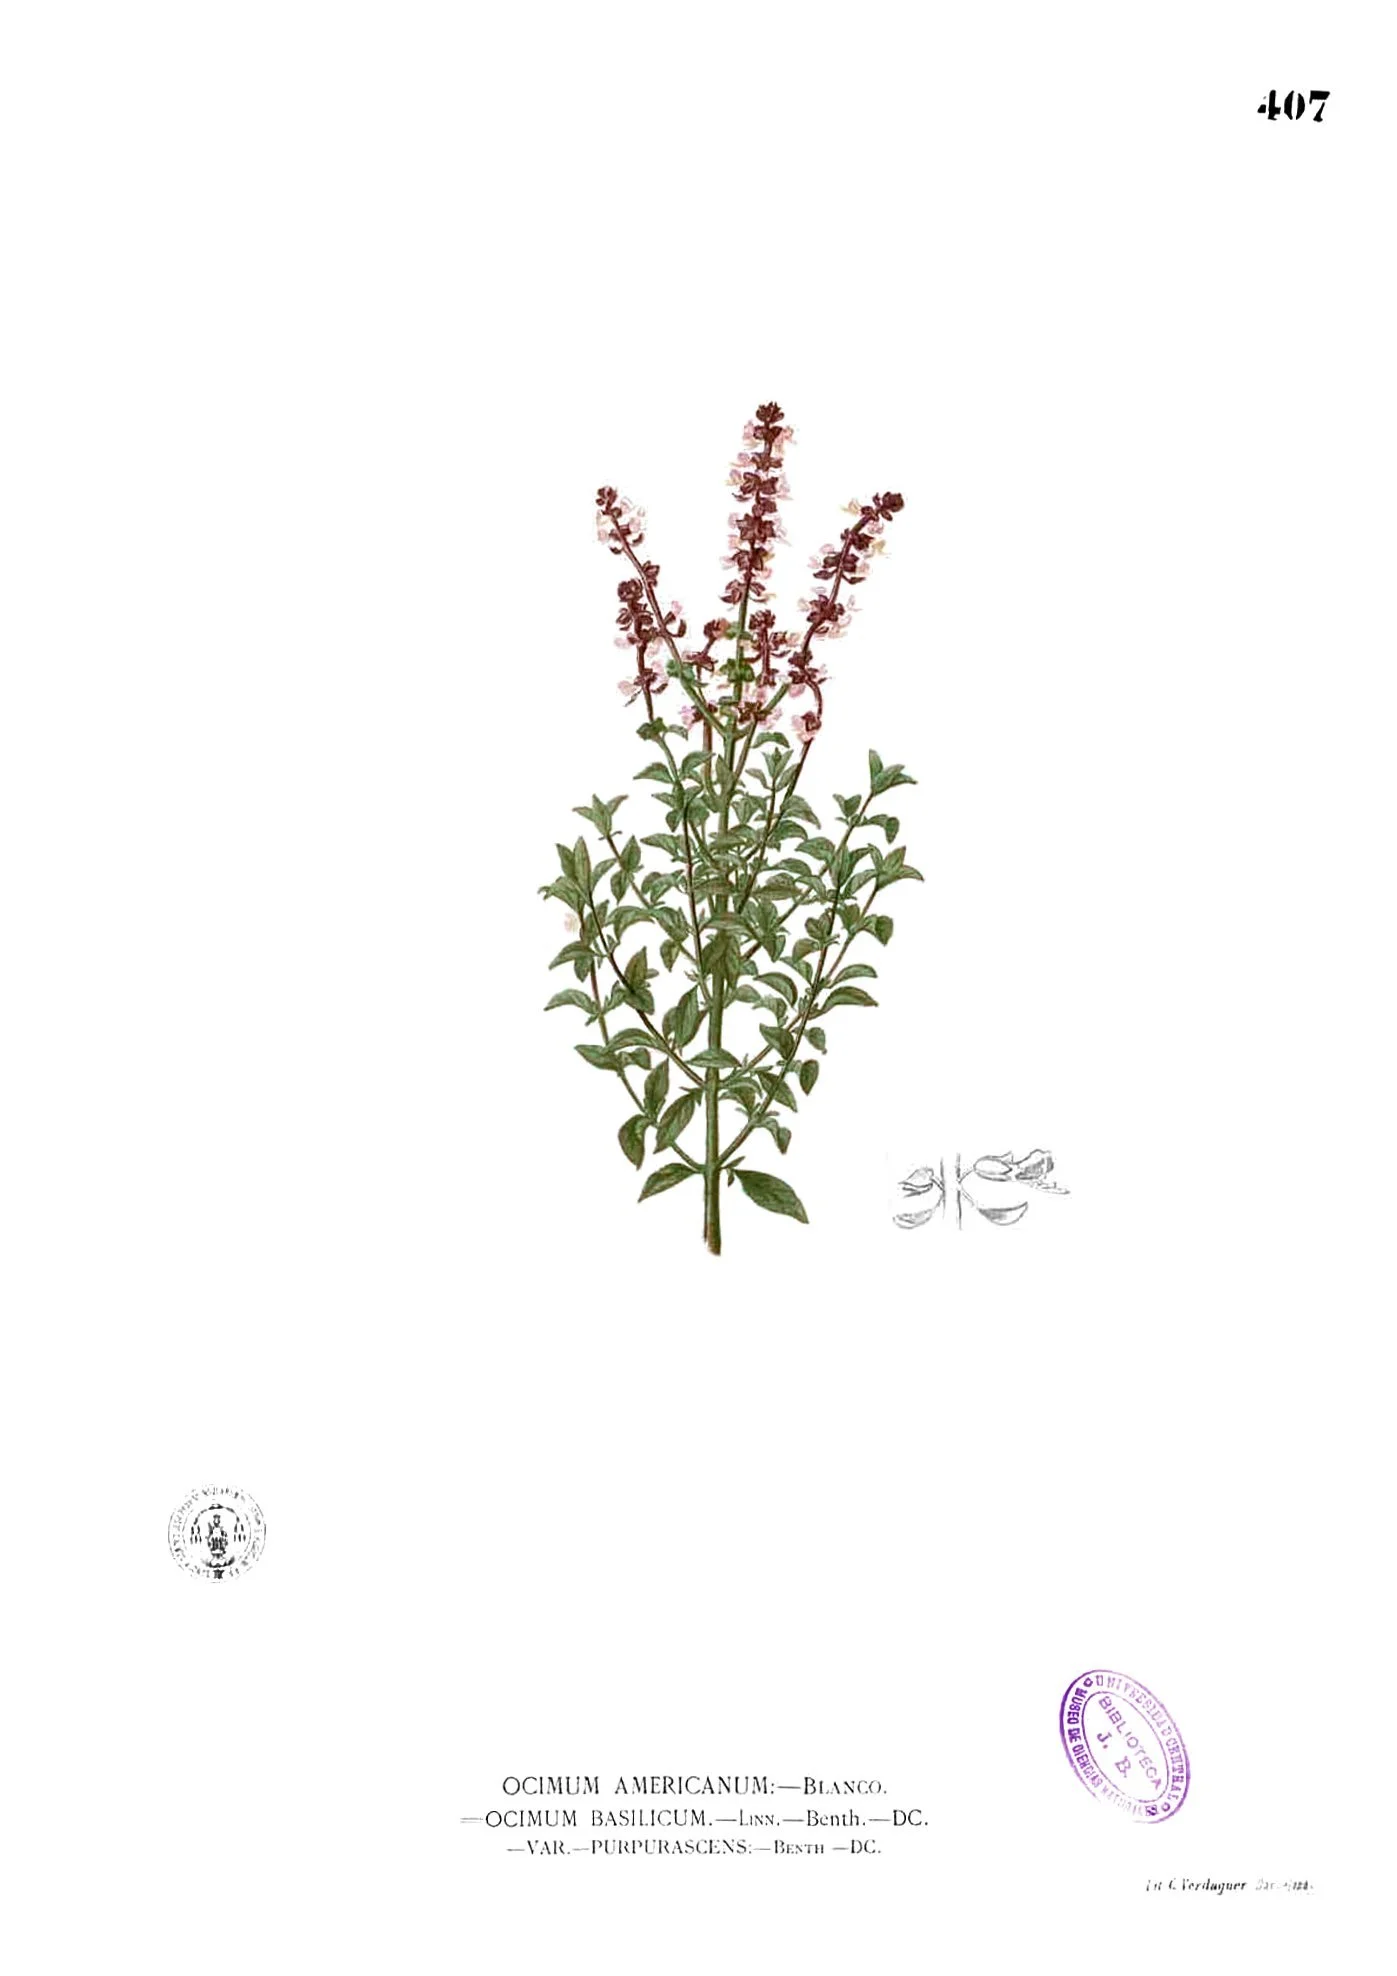
Basil under apical dominance (Blanco, Flora de Filipinas, plate 407): one upright main stem carries the plant's height, its leaves in opposite pairs, its side branches still short beneath it — and the main stem has run up into flower spikes. Left to itself this is the shape the lesson opens with: a single stalk, tall, with most of its ambition at the top. (The plate's original caption gives the name as Ocimum americanum, a synonym of O. basilicum var. purpurascens.)
Francisco Manuel Blanco, Flora de Filipinas, plate 407, via Wikimedia Commons.
Stand a young basil plant beside an unpinched one of the same age, both grown from the same packet of seed, and the difference is plain. The untouched plant is a single stalk, tall and a little lonely, with most of its leaves near the top. The pinched plant is a bush: shorter, fuller, leaves everywhere. Same seed, same soil, same sun. The only difference is that someone once removed its leading tip.
★ The untouched plant is showing you apical dominance. In botany, apical dominance is the phenomenon whereby the main, central stem grows more strongly than the side stems, because the apical bud, the growing tip at the very top, holds the lateral buds beneath it in check. The tip leads. The rest wait.
Check in: What is apical dominance — which bud does the commanding, and which buds wait?
This is a sensible strategy for a plant in the wild. Light is the great prize of the plant world, and the surest way to win it is to grow taller than your neighbors. A plant that spends its energy branching sideways while its competitors race upward will find itself in shade, and shade is hunger. Apical dominance concentrates the plant's effort on the vertical race. Energy goes up. Branches can wait.
But the waiting buds are not dead. Tucked into the axil of every leaf, where the leaf stalk meets the stem, sits a lateral bud, sometimes called an axillary bud. Each one is a complete shoot in miniature, ready to become a branch. Under apical dominance they simply hold their position, suppressed but alive, sometimes for the entire life of the plant. Remove the tip, and they wake.
❦ In your workbook: record the tallest tip in your own way — the leading stalk, the waiting buds, and the race for light — copy, sketch, or note what matters.
The Messenger: Auxin
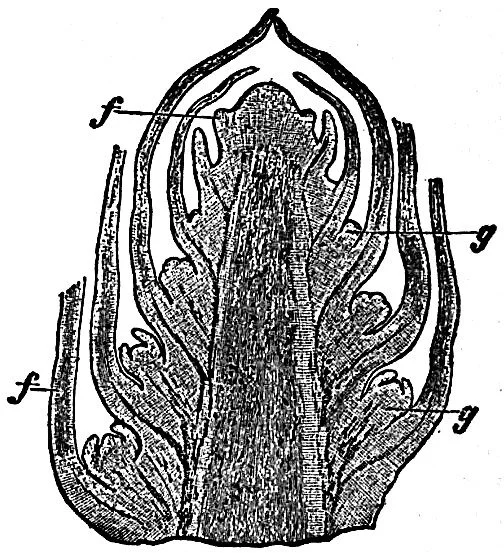
The ruler, in section: a lengthwise slice through the tip of a shoot (Encyclopædia Britannica, 1911, after Strasburger's Lehrbuch der Botanik). At the very top sits the growing point — the apical bud, the stem's auxin factory. Down both sides, in the axil of every young leaf (f, a leaf rudiment), waits the rudiment of an axillary bud (g): a complete shoot in miniature, present from the start, held in check by the messenger flowing down from the tip. Pinching removes the dome; the g's are what answer.
Encyclopædia Britannica, 11th edition (1911), "Leaf," Fig. 1, after Strasburger, via Wikimedia Commons.
How does one small bud command all the buds below it? By chemistry.
★ The apical bud produces a plant hormone called auxin, the best known being indole-3-acetic acid. Auxin is made in the growing shoot tip and travels downward through the stem. Where it flows in high concentration, lateral buds are inhibited. They do not die. They are simply told, in the plant's chemical language, to wait.
Check in: Where is auxin made, which way does it travel, and what does it tell the lateral buds?
Plant physiologists traced this relationship in the 1930s. When researchers removed the shoot tip of a plant, the lateral buds below began to grow. When they placed a tiny block of agar containing auxin onto the cut stump, the lateral buds stayed suppressed, as though the tip were still there. The messenger, not the tip itself, was doing the commanding.
★ There is a counterweight in this system, and it comes from below. The roots produce a different hormone, cytokinin, which encourages lateral buds to grow. Apical dominance is really a balance between these two messengers: auxin from the top saying wait, cytokinin from the roots saying grow. As long as the tip is intact and producing auxin strongly, wait wins. Remove the tip, auxin falls, and grow takes over.
Check in: Name the two messengers and what each one says — and say what changes when the tip is removed.
You do not need to memorize these names to be a good gardener, but knowing them changes how you see. The plant is not being stubborn when it grows one tall stalk. It is following orders. And when you pinch, you are not wounding it. You are changing the orders.
The plant is always listening to its chemistry. The gardener's hand is simply another voice in the conversation.
❦ In your workbook: record the messenger in your own way — auxin saying wait, cytokinin saying grow, and the balance between them — copy, sketch, or note what matters.
One Stem Becomes Two
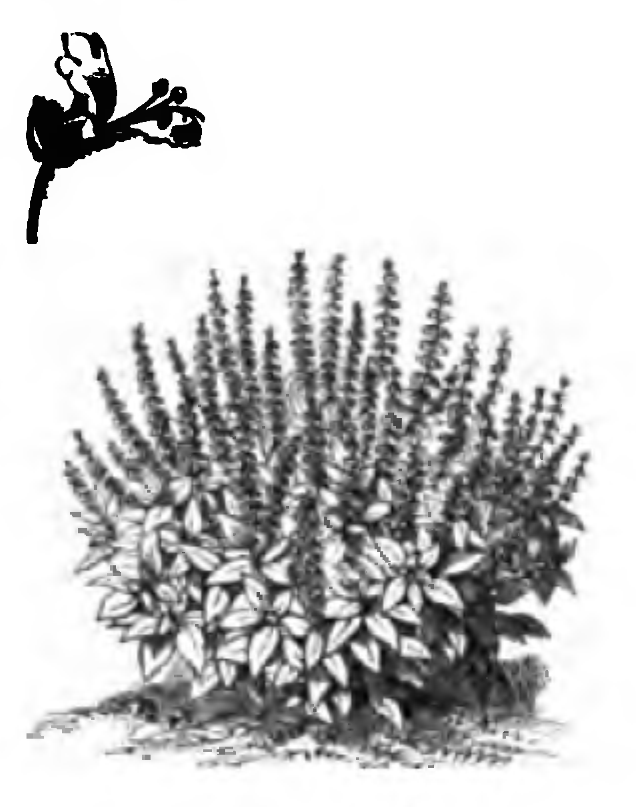
The branched end-state (Vilmorin-Andrieux, 1883): a basil grown out on every stem becomes a dense bush of leafy branches — and every one of those stems has finished in a flower spike. Pinching works toward the first half of this picture and against the second: many stems, made by releasing the lateral buds pair by pair, and no flowers, because each spike is pinched out the moment it forms. A basil allowed to flower has decided its season is over; a pinched basil keeps making leaves.
Vilmorin-Andrieux, Les plantes potagères (1883), via Wikimedia Commons.
Here is the geometry of the pinch, and it is beautifully simple.
★ Find a stem with a growing tip. Look down the stem to the first pair of leaves below the tip. In basil and mint, leaves grow in opposite pairs, and at the base of each leaf sits a lateral bud. Pinch or snip the stem just above that leaf pair, removing the tip with its auxin factory.
Check in: Where exactly do you make the pinch — and what sits at the base of each leaf at that spot?
Within days, the two lateral buds at that leaf pair begin to grow. One stem becomes two. Let those two grow a few weeks, pinch each of them above their own leaf pairs, and two become four. Repeat through the season and a single stalk becomes a bush, with far more leaves than the unpinched plant could ever have produced. Gardeners who measure such things report that correct pinching can multiply a basil plant's leaf yield several times over compared with leaving it alone.
Notice what you have done. You have not added anything to the plant. You have removed a few millimeters of stem. Everything that follows, all that bushy abundance, was already waiting inside the plant, held in reserve by one small bud's chemistry. The gardener's work is often like this: not forcing, but releasing.
❦ In your workbook: record one stem becoming two in your own way — the pinch above the leaf pair, and two becoming four — copy, sketch, or note what matters.
In your packet: Exercise I — The Geometry Sketch ⚒ begins here. Work it now, or mark the place and take it as homework — your choice.
Pinching and Pruning Are Not the Same
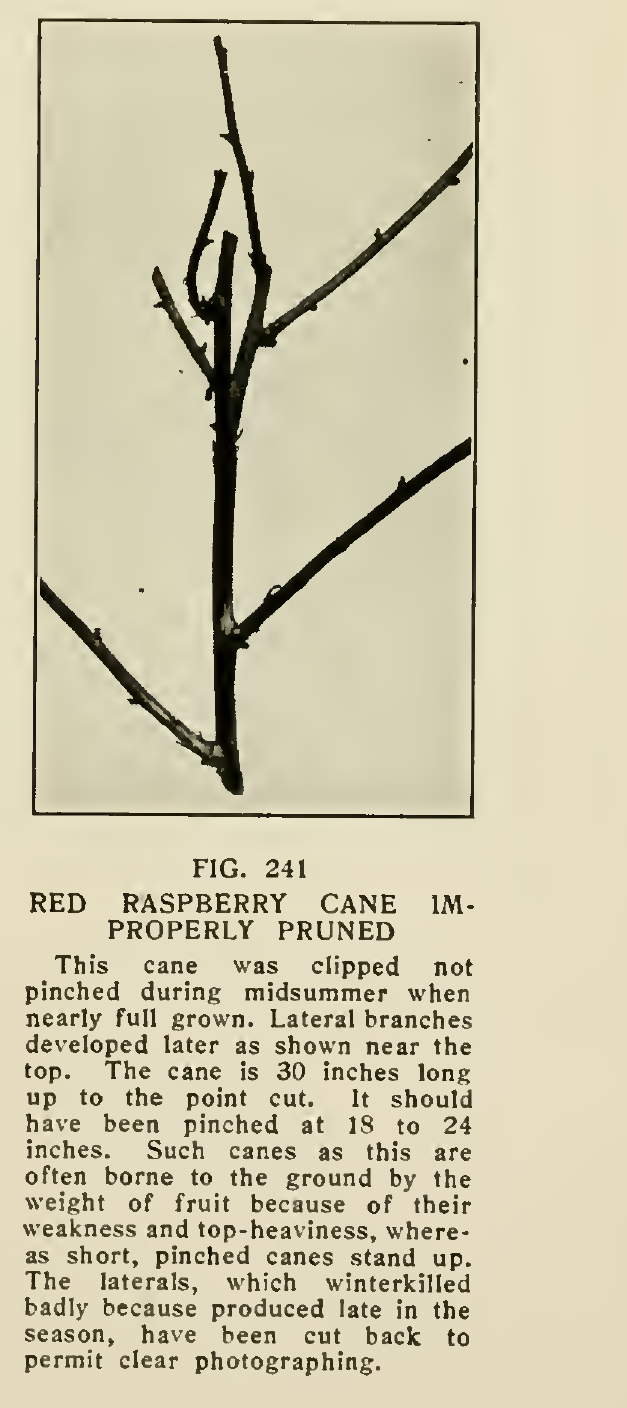
Pruning's side of the line — and a warning about timing (Kains, The Principles and Practice of Pruning, Fig. 241, printed caption kept with the photograph). This woody raspberry cane was clipped late, when nearly full-grown, instead of pinched in midsummer: the laterals it then pushed out crowded weakly near the top, and the cane could not stand under its own fruit. The cut is small, but when and where it is made decides whether a plant is strengthened or weakened — the rule that covers both arts in this lesson: clean cuts, clean tools, and never more than a third of the plant at once. On woody growth like this cane the work is pruning, done with tools, and it belongs to the next lesson; on a soft herb tip it is this lesson's pinch, a clean squeeze of the fingers or a clean snip — never a tear, because torn tissue heals slowly and invites infection.
M. G. Kains, The Principles and Practice of Pruning, Fig. 241 (p. 283) — figure and its printed caption cropped from the public-domain Commons scan of the book.
Students sometimes use the two words interchangeably, and Professor Fernfoot gently corrects them, because the distinction teaches something about scale and intention.
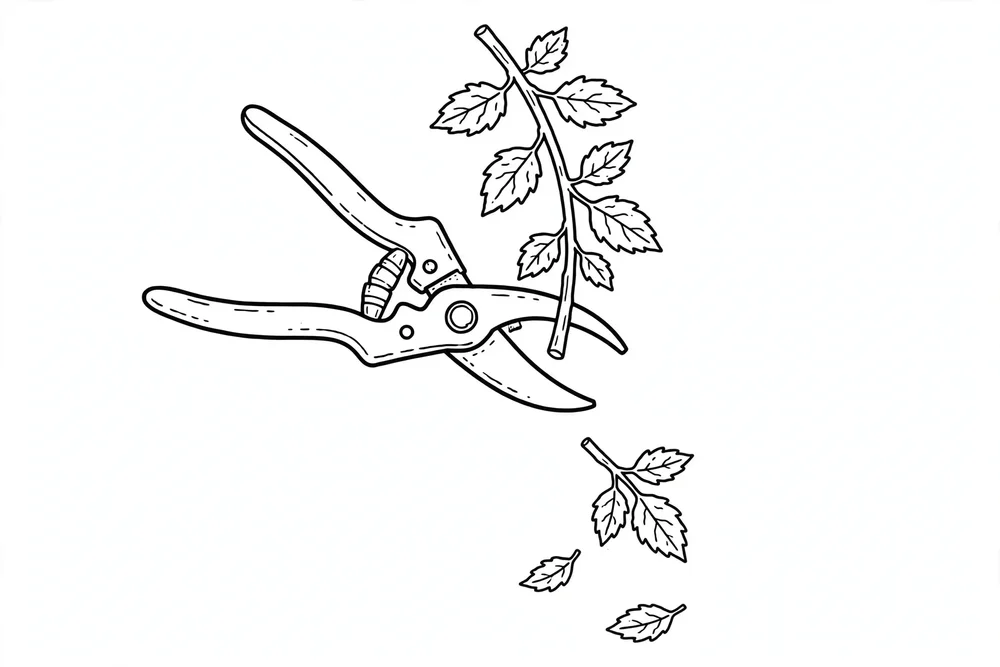
Pinching is the removal of soft, young, actively growing tips, usually done with the thumb and forefinger, sometimes with small snips. It is done during the growing season, on herbaceous growth, to shape and to encourage branching. It is light, frequent, and almost conversational: you visit the plant, you take the tips, you move on.
Pruning is the removal of older, woodier growth, done with tools, usually in the dormant season or at defined times, to shape structure, remove dead or damaged wood, or control size. You will study pruning proper in our next lesson. Pinching is this lesson's subject because it is the gentlest possible introduction to the idea that a gardener may direct a plant's shape.
★ The rule that covers both: clean cuts, clean tools, and never remove more than a third of the plant at once. The plant can recover from a third. More than that is not shaping. It is shock.
Check in: How do pinching and pruning differ — in what is removed, with what, and when? And what is the one rule that covers both?
❦ In your workbook: record pinching and pruning in your own way — soft tips against woody growth, and the one-third rule over both — copy, sketch, or note what matters.
Basil, the Willing Student
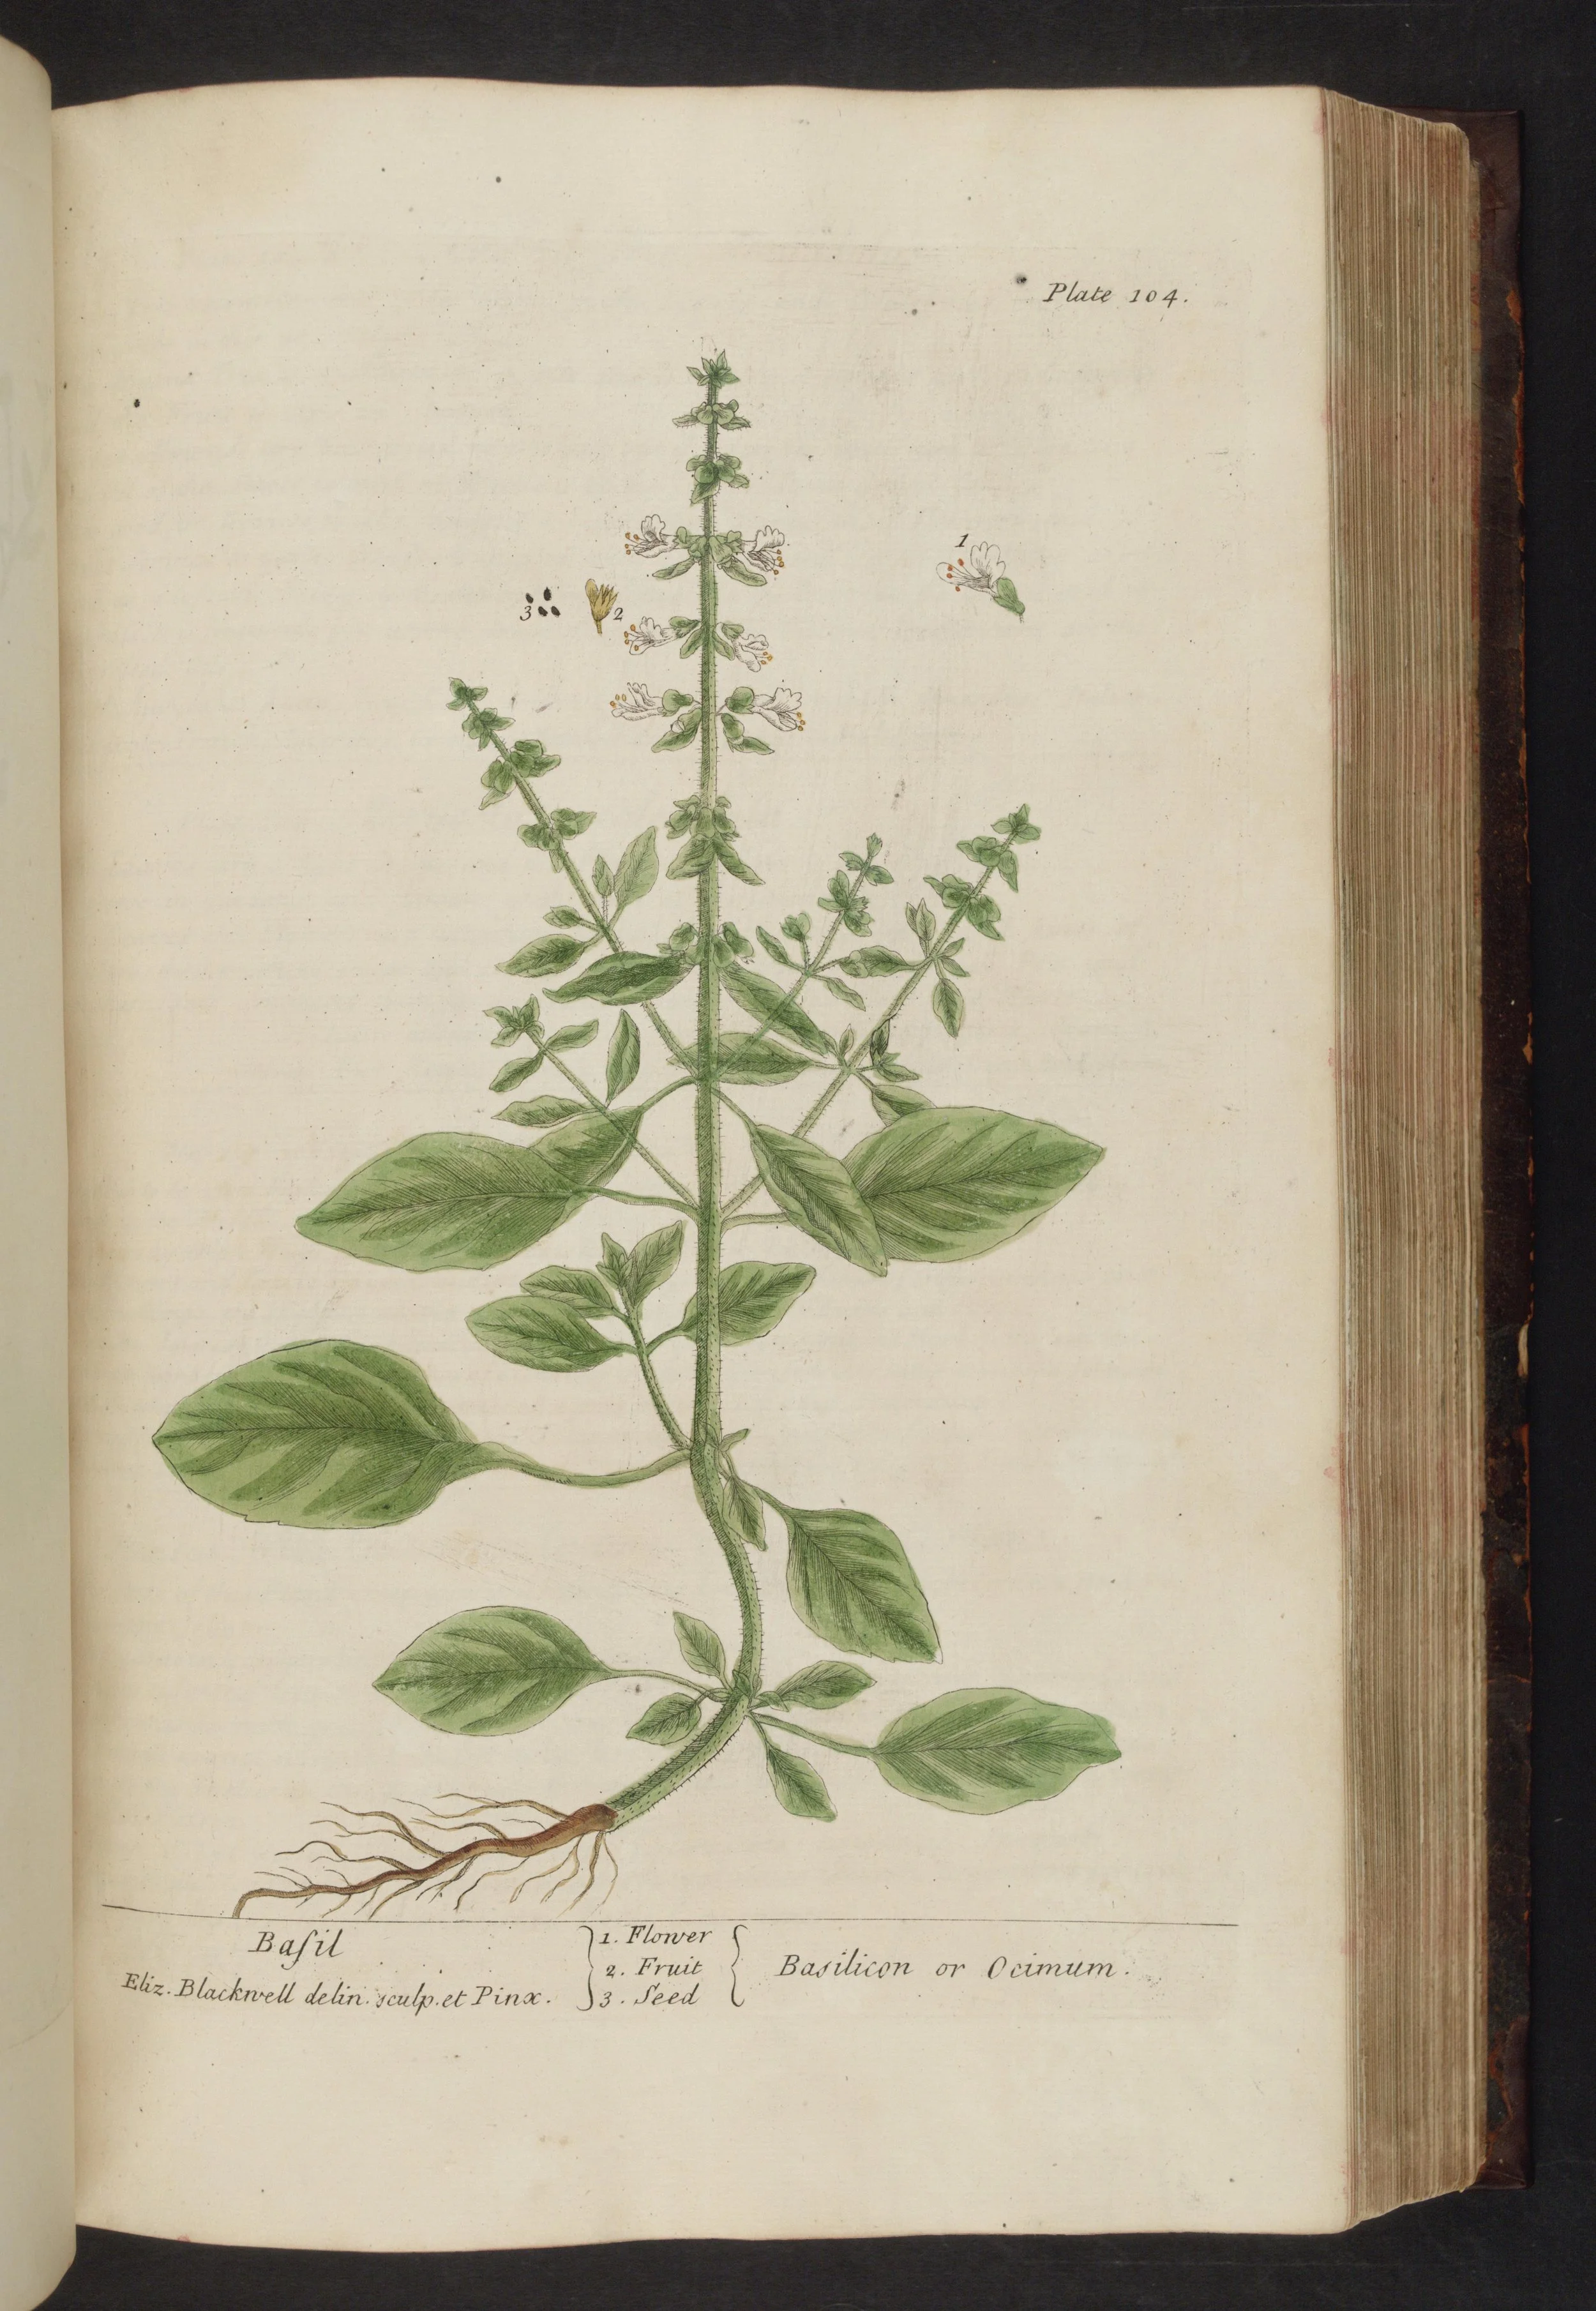
The demonstration plant, drawn from life (Elizabeth Blackwell, A Curious Herbal, 1737, Plate 104 — "Basil, Basilicon or Ocimum"): one main stem, leaves in clear opposite pairs, and in the axils of those leaves the small side shoots that pinching releases — already lengthening on the upper stem while the leading spike runs to flower at the top. Find this same geometry on your own basil before you touch it: the tip, the first strong pair of leaves below it, and the two buds waiting in that pair's axils. That is where the pinch goes — about a quarter inch above the pair.
Elizabeth Blackwell, A Curious Herbal (1737), Plate 104, via the Biodiversity Heritage Library / Wikimedia Commons.
If apical dominance had a demonstration plant, it would be basil.
★ Basil grows fast, shows its structure plainly, and responds to pinching within days, which makes it the ideal teacher for this lesson. Begin when the plant is about six to eight inches tall with three or four pairs of true leaves. Find the central stem's tip. Look down to the first strong pair of leaves below it. Pinch or snip the stem about a quarter inch above that pair.
Then watch. The two buds at that leaf pair will swell and push outward, and within a week you will see two new stems where one stood. Continue through the summer, pinching each new shoot above its own leaf pair, and pinch off any flower spikes the moment they appear. Flowering changes the plant's chemistry and its flavor along with it; a basil allowed to flower has decided its season is over, while a pinched basil keeps producing tender leaves.
Mint responds the same way and forgives even clumsy pinches. Coleus, grown for its leaves, branches eagerly when pinched. Oregano and thyme can be sheared lightly with the same principle at work. Once you understand the geometry, you will see it everywhere in the garden.
❦ In your workbook: record basil, the willing student in your own way — when to begin, where to pinch, and what to watch for — copy, sketch, or note what matters.
When to Pinch and When to Leave Alone
Not every plant wants this treatment, and part of stewardship is knowing the difference.
Pinch freely: basil, mint, coleus, and other leafy herbs grown for foliage, especially when young and growing vigorously.
Pinch with purpose: peppers, when young, if you want a bushier plant with more fruiting branches later. Many gardeners remove the first flower buds of young pepper plants to redirect energy into branching first.
Leave alone: plants being trained to a single stem, such as a standard rose or a young tree where you want one strong leader. Plants under stress from drought, disease, or recent transplanting need all their energy for recovery, not redirection. Woody plants in dormancy are pruned, not pinched; pinching is a growing-season art.
And never strip a plant bare. Always leave plenty of leaf below your pinch so the plant can feed itself while it regrows. The gardener takes the tip and leaves the factory.
❦ In your workbook: record when to pinch and when to leave alone in your own way — pinch freely, pinch with purpose, and leave alone — copy, sketch, or note what matters.
In your packet: Exercise III — Pinch or Leave Alone ✎ begins here. Work it now, or mark the place and take it as homework — your choice.
Your Familiar's Experiment
Choose a suitable stem on your Scholar's Familiar, or on another herb if your familiar is not a good candidate for pinching (a slow-growing succulent, for instance, would rather be admired than pinched). Record the stem's current state in your grow ledger: height, number of leaf pairs, a quick sketch.
Pinch the tip just above a strong leaf pair, using clean fingers or clean snips. Then observe. Check daily. Note the day the lateral buds first visibly swell, the day they show green tips, the day they are unmistakably new stems. Sketch or photograph the change. Write down what you see, not what you expect to see.
Adopt-a-plant path: choose a plant you can visit regularly, such as a neighbor's basil, a community garden herb bed, or a mint patch at the park's edge (with permission where needed), and conduct the same pinching observation. Record the branching response as you would for your own plant.
This is the heart of the lesson, and it cannot be rushed. Auxin chemistry works on the plant's schedule, not yours. Give it a week. The buds will answer.
❦ In your workbook: record your familiar's experiment in your own way — the stem before the pinch, and the buds' answer day by day — copy, sketch, or note what matters.
In your packet: Exercise II — The Pinch and the Watch ◐ begins here. Work it now, or mark the place and take it as homework — your choice.
Safety Notes
Pinching is among the safest of all garden interventions, but good habits begin with small things.
Wash your hands before and after handling plants. Clean your snips with soap and water or rubbing alcohol between plants, because plant diseases travel on tools the way colds travel on doorknobs. Pinch with a clean squeeze of the fingers or a clean cut; do not tear, because torn tissue heals slowly and invites infection. Never remove more than a third of any plant in one session. Younger students should have an adult nearby when using any bladed tool, even small snips.
If you are working with a plant you have not identified with certainty, observe only. This lesson's pinching is for plants you know.
❦ In your workbook: record the safety notes in your own way — clean hands, clean snips, a clean squeeze, never a tear — copy, sketch, or note what matters.
Guided Observation: The Pinch, Step by Step
This lesson's observation is the pinch itself, worked slowly on one suitable stem, in the order the lesson teaches it. Everything here is taught in the lesson above; this page gathers it into one walk to the plant.
You will need:
- a suitable herb (basil, mint, or coleus are ideal; your Scholar's Familiar if appropriate)
- clean fingers, or small clean snips
- soap and water or rubbing alcohol, for cleaning tools between plants
- your grow ledger and a pencil
Choose the stem. Choose a suitable stem on your Scholar's Familiar, or on another herb if your familiar is not a good candidate for pinching (a slow-growing succulent, for instance, would rather be admired than pinched).
Record before you touch. Record the stem's current state in your grow ledger: height, number of leaf pairs, a quick sketch.
Find the geometry. Find a stem with a growing tip. Look down the stem to the first pair of leaves below the tip. Pinch or snip the stem just above that leaf pair, removing the tip with its auxin factory.
Make the pinch. Pinch the tip just above a strong leaf pair, using clean fingers or clean snips. Pinch with a clean squeeze of the fingers or a clean cut; do not tear, because torn tissue heals slowly and invites infection.
Then observe. Check daily. Note the day the lateral buds first visibly swell, the day they show green tips, the day they are unmistakably new stems. Sketch or photograph the change. Write down what you see, not what you expect to see.
Consider:
- On which day did the buds first visibly swell — and how long after that did green tips show?
- Did both buds at the leaf pair grow, or did one lead?
- What did you see that you did not expect to see?
Adopt-a-plant path: choose a plant you can visit regularly, such as a neighbor's basil, a community garden herb bed, or a mint patch at the park's edge (with permission where needed), and conduct the same pinching observation. Record the branching response as you would for your own plant. No shrub and no garden of your own is needed for this lesson at any point: a single herb stem, visited daily, carries the whole geometry.
Materials
Required (Level One — household items)
- Your fingers: the original pinching tool. Clean hands, short nails.
- Small clean scissors or nail scissors: for stems too tough to pinch cleanly.
- Soap and water or rubbing alcohol: for cleaning tools between plants.
- Your grow ledger and pencil: for the geometry sketch and the seven-day observation log.
- A suitable herb: basil, mint, or coleus are ideal; your Scholar's Familiar if appropriate.
Suggested (Level Two — historically closer)
- Bypass hand pruners or horticultural snips: for clean cuts on tougher stems.
- A dedicated garden journal: for the branching observations, kept with the grow ledger.
- A hand lens: for examining the swelling lateral buds up close.
Safety notes: Wash your hands before and after handling plants. Clean snips with soap and water or rubbing alcohol between plants; plant diseases travel on tools. Pinch with a clean squeeze or a clean cut. Do not tear stems; torn tissue heals slowly and invites infection. Never remove more than a third of any plant in one session. Younger students: an adult should be nearby when using any bladed tool, even small snips. Pinch only plants you have identified with certainty. Unknown plants are observation only.
Reflection Questions
Answer the following questions in your workbook.
- What is apical dominance, and why is it an advantage for a plant growing in the wild?
- Explain the roles of auxin and cytokinin in controlling lateral bud growth. What happens to the balance when the apical bud is removed?
- Describe the pinching technique step by step. Where exactly do you make the pinch, and why there?
- How does pinching differ from pruning? Give one situation suited to each.
- A gardener pinches her basil but tears the stem instead of making a clean pinch. What two problems might this cause, and what should she have done?
Workbook Checklist — Lesson 22
In my workbook I have:
- ☐ defined apical dominance and explained why the upward race wins light in the wild
- ☐ explained auxin from the tip saying wait and cytokinin from the roots saying grow, and what changes when the tip is removed
- ☐ stated the geometry of the pinch: just above a leaf pair, where the two lateral buds sit
- ☐ told pinching from pruning, and stated the rule that covers both: clean cuts, clean tools, never more than a third at once
- ☐ judged when to pinch freely, when to pinch with purpose, and when to leave a plant alone
- ☐ kept the safety notes: hands washed, snips cleaned between plants, a clean squeeze or cut — never a tear — and an adult nearby for any bladed tool
- ☐ completed the Geometry Sketch, the Pinch and the Watch, and Pinch or Leave Alone — or their adopted-plant and workbook paths
☐ Lesson completed Date: ___ Signature: ___
The Professor's Closing Note
You have learned one of the garden's great secrets today, and it is a small one, which is often how the great secrets go.
The plant was never trying to be a single stalk. It was following orders from its tip, and you have learned how to change those orders with two fingers. One stem becomes two, two become four, and the plant you shape is fuller and more generous than the plant you found.
This is stewardship in miniature. You did not force the plant. You listened to its chemistry, understood its government, and offered it a different future. The buds were waiting all along. They only needed the messenger to fall silent.
Record what you see in the coming days. The plant will show you the rest.
— Professor Beryl Fernfoot, Herbology Greenhouse • Master Herbalist • Head of House Oriens
Cross-Class Connections

Creative Arts · Unit V, Lesson 18 — Outdoor & Garden Tools: Handling, Cleaning & Care
Fernfoot tells you where a plant should be cut, and her word governs every living thing out there — my bench teaches the tool that does the cutting. Come and learn why a bypass blade's clean slice heals where a crushed cut cannot, how to scrub, disinfect, dry, and oil the pruners you will graduate to, and why a blade cleaned between plants carries no sickness from one stem to the next. Bring your careful hands; leave them careful.
Further Reading & Sources
- Apical Dominance — Wikipedia — the core mechanism: auxin from the apical bud suppressing lateral buds, and what happens when the tip is removed.
- Stop Letting Your Basil Flower: Pinch Above a Leaf Pair — Happy Valley Seeds — a clear illustrated walkthrough of the pinch-above-a-leaf-pair technique and the weekly rhythm of pinching through summer.
- How to Prune Basil — Homes & Gardens — when to start pinching, how much to take, and why regular pinching keeps basil productive.
- How to Prune Plants to Promote Growth — Farm Flavor — pinching across basil, tomatoes, peppers, mint, sage, and oregano, showing the same geometry at work in many plants.
- How to Cut Basil From a Plant — Livingetc — pinching versus cutting, harvesting without harming the plant, and aftercare.
Browse the Herbology shelf in the school Library for readable editions of these works.
Plants from this lesson stand in the Materia Botanica, the school's shared archive — each kept with its lessons, its keepings, and its cautions. This lesson's company:
ChiliRoseSageThymeColeus The whole Materia BotanicaPROFESSOR BERYL FERNFOOT · HERBOLOGY GREENHOUSE
Submit your work for this lesson using the form below.
CONTINUE IN THE HERBOLOGY GREENHOUSE
← Previous · Lesson 21: Vegetative Propagation: Layering & Runners Next · Lesson 23: Selective Pruning for Plant Health & Growth →
Unit III — Propagation, Pruning & Plant Stewardship Herbology Greenhouse — All 37 Lessons
The rest of Unit III: Lesson 17 · Seed Starting · Lesson 18 · Seed Scarification · Lesson 19 · Stem Cuttings · Lesson 20 · Root Division · Lesson 21 · Layering & Runners · Lesson 23 · Selective Pruning · Lesson 24 · Pests & Disease · Lesson 25 · Repotting & Root Bound · Lesson 26 · Stewardship Project