

HERBOLOGY
Unit III · Lesson 17SEED STARTING BASICS
PROFESSOR BERYL FERNFOOT
Herbology Greenhouse
Master Herbalist
Herbology Greenhouse • Unit III: Propagation, Pruning & Plant Stewardship • Lesson 17
Professor's Introduction

Come in out of the weather, scholars,
Every plant you will ever meet began as a seed, and every seed is a small, patient miracle. Inside that hard little case sleeps a whole plant, folded up and waiting, carrying its own packed lunch. All it asks of you is three simple things, and it will do the rest itself.
This lesson is the foundation of everything we will do in this unit. Before we wake stubborn seeds with scarification, before we coax roots from cuttings, we learn the gentle, ordinary art of sowing. It is the first skill every gardener learns, and the one you will use for the rest of your life.
Take your time with it. Seeds are never in a hurry, and neither should you be.
— Professor Beryl Fernfoot, Herbology Greenhouse • Master Herbalist • Head of House Oriens

The line beneath the map is our road: every stop a place where the knowledge of plants changed, every lesson a step along it.
Lesson Objectives
By the end of this lesson, you will be able to:
- Name the three conditions every seed needs to germinate, and explain why each one matters.
- Sow seeds at the correct depth using the two-times rule.
- Prepare a proper seed-starting container with mix, moisture, and drainage.
- Recognize germination, cotyledons, and true leaves, and know what each stage needs from you.
- Thin seedlings without harming the ones that remain.
- Identify damping off and take steps to prevent it.
Reading this lesson: ★ marks the passages to remember. They return on the unit quiz and the class test. Check in questions ask the material back as you go; answer them in your workbook when you meet them.
Working this lesson: Your assignment packet is the first download on this page. Work in it as the lesson moves along, answering each assignment as its subject is taught — or read the lesson through for your notes and take the assignments as homework afterward. Both are proper ways to sit this class. Signposts in the reading tell you where each assignment belongs. Written answers are short answers in your own words; a few honest lines are worth more than a filled page.
Your Assignment Packet
This lesson's assignments live in its packet: the Lexicon Handout (every term, course terms marked ◆), Materials, Guided Practice, the Assignment Manual with its answer key for self-checking, the Reflection Questions, and the Workbook Checklist. Download the packet before you begin and keep it beside you as you read.
What a Seed Is Waiting For
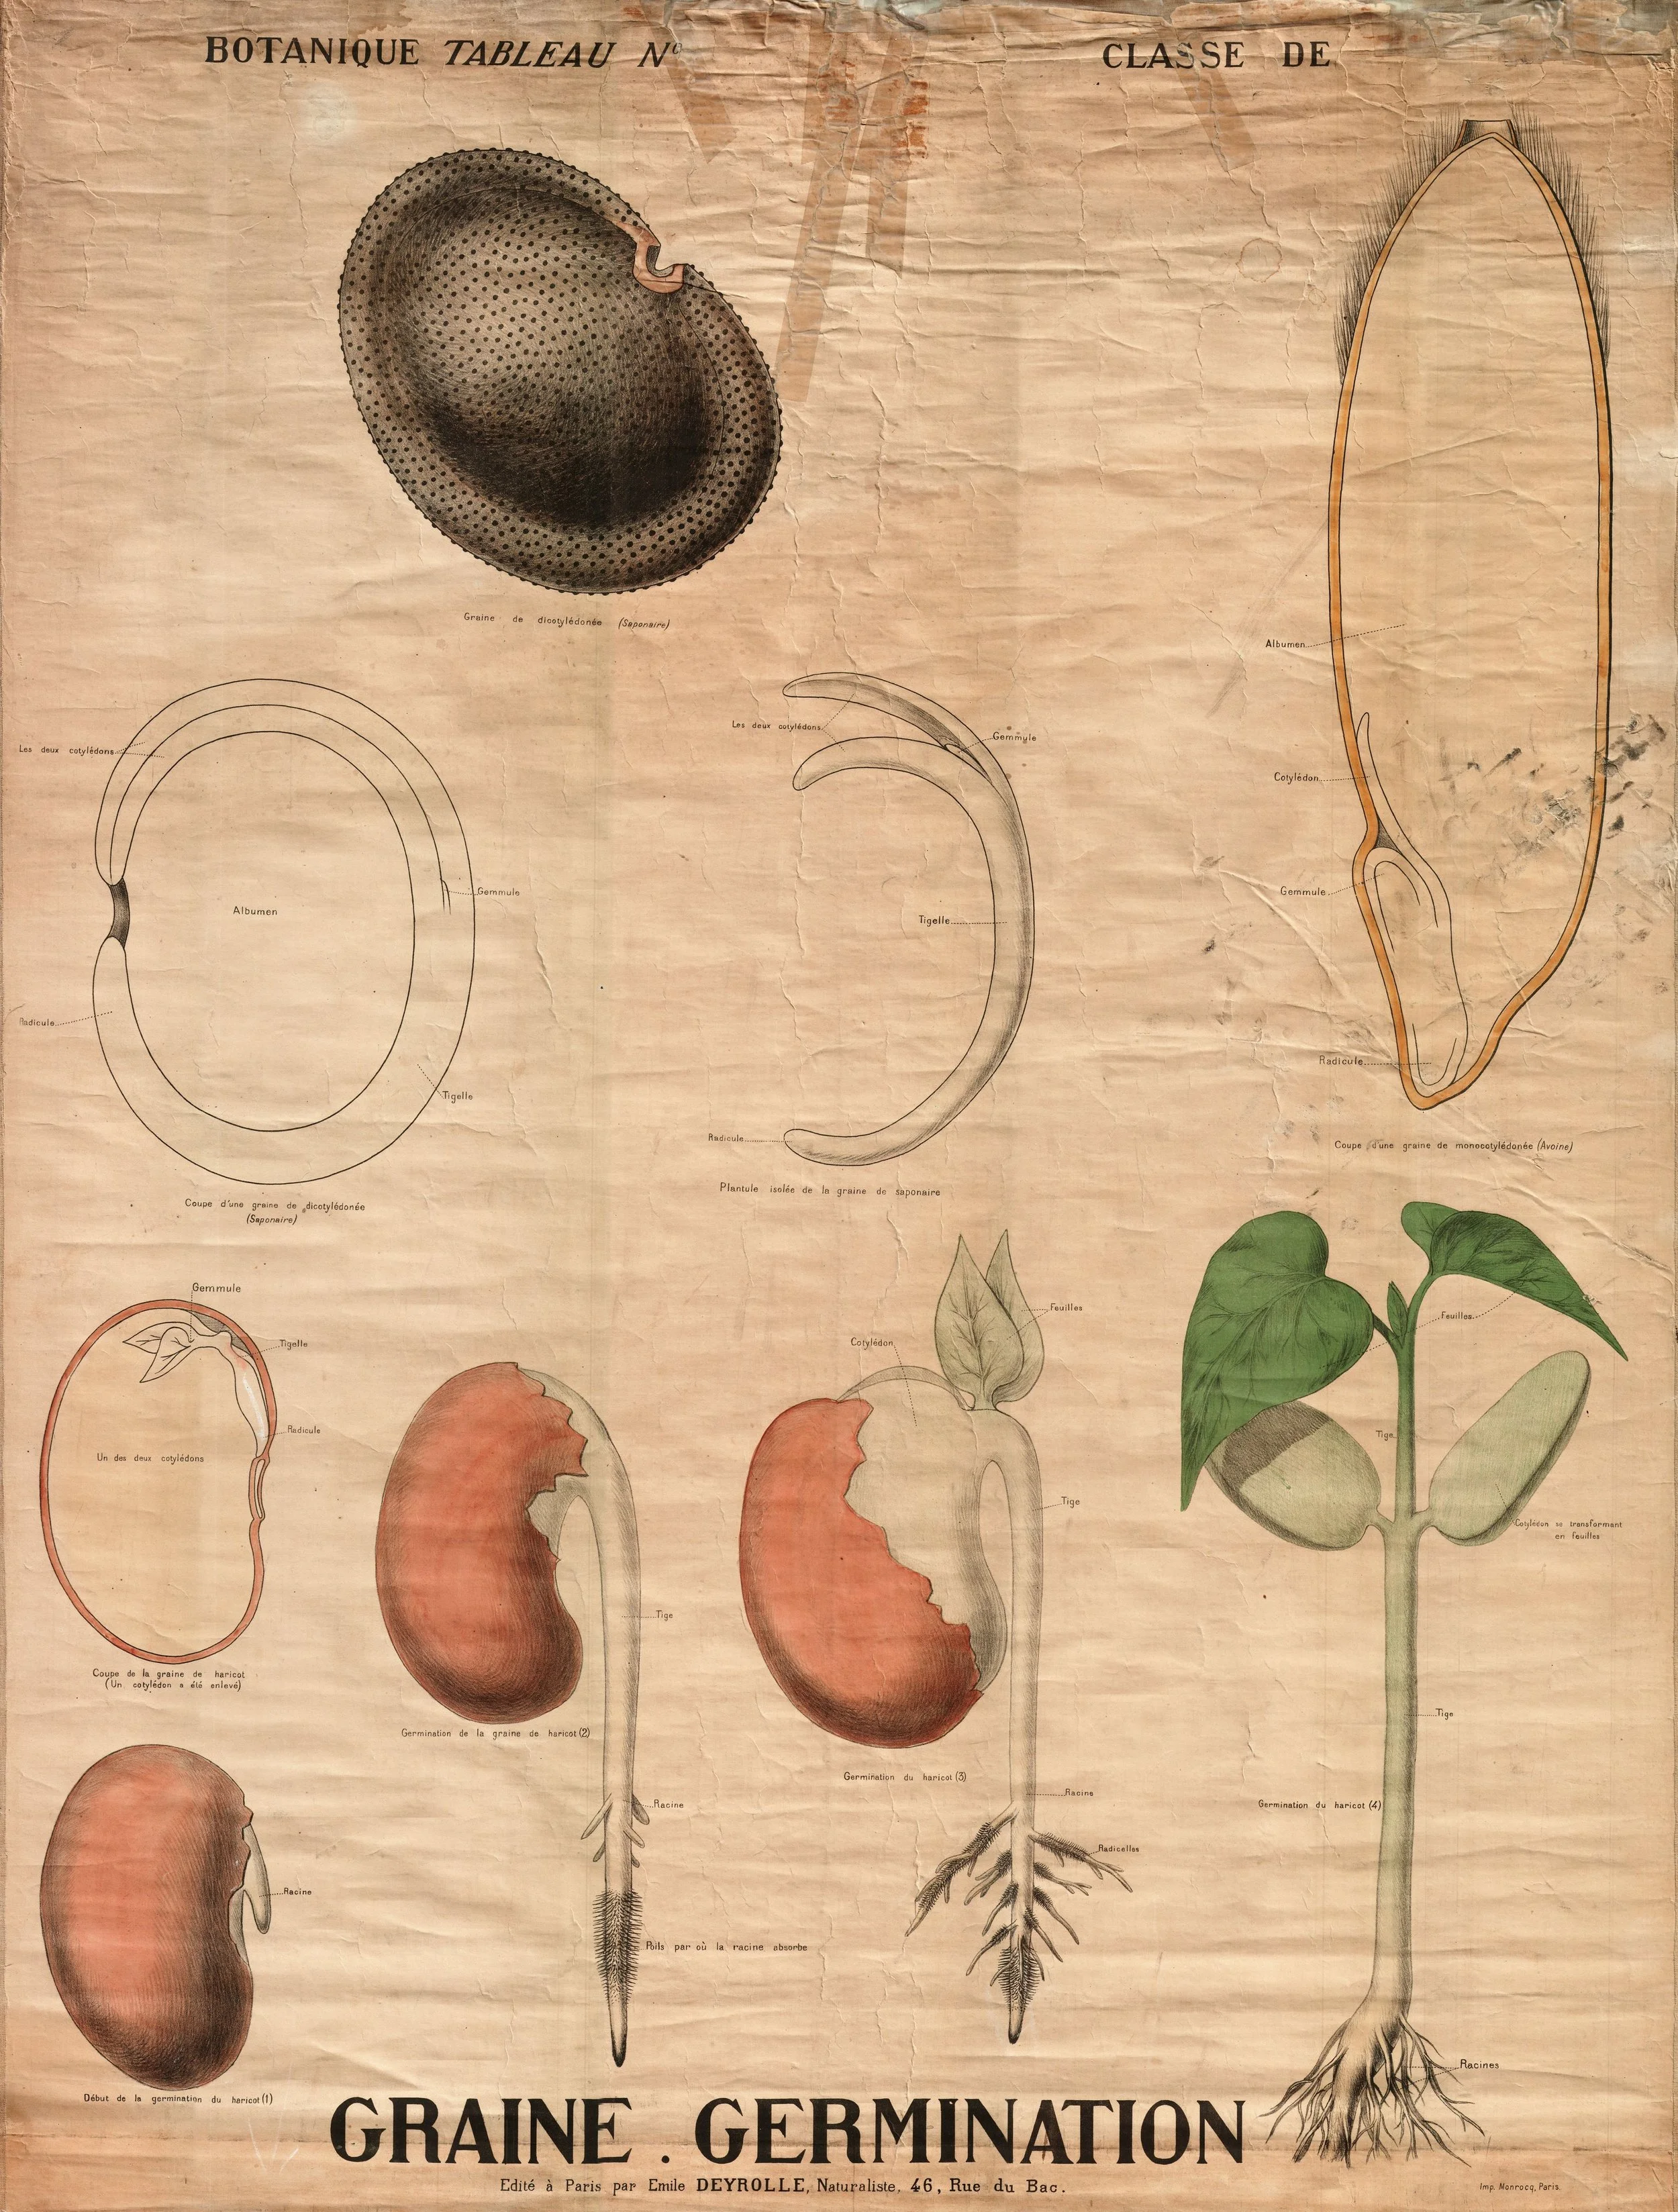
A seed, opened, and a bean, waking: Deyrolle's classroom wall chart "Graine — Germination." The sections at the top name the seed's parts — coat, stored food (albumen), and the embryo with its radicle, the first root. Below, a bean germinates in four stages: root first, then the shoot, the cotyledons carried up spent from feeding it, and at last true leaves open and making food of their own. The chart's labels are French; every term is one this lesson teaches in English.
Wall chart edited by Émile Deyrolle, Paris (Bibliothèque Numérique de l'Université d'Artois copy). Public domain.
A seed is a plant in a state of suspended patience. Inside the seed coat sits an embryo, a tiny unformed plant, along with a store of food to fuel its first growth. The seed can wait in this state for months or years. What it cannot do is wait forever and then grow on nothing. When the right conditions arrive, the seed spends its stored food in one great effort: germination.
★ Every seed, from the dust-fine seed of a foxglove to the great heft of a bean, needs the same three things to begin.
Water. A dry seed is a locked seed. Water softens the seed coat and wakes the embryo's cells, which begin to swell and divide. Without water, nothing starts. But water is also the easiest of the three to get wrong, because a seed that sits in soaking wet mix can rot before it ever sprouts. The goal is steady dampness, like a wrung-out sponge, not a puddle.
Oxygen. Living tissue needs to breathe, even tissue as small as a seed embryo. This is why sowing depth matters and why soggy mix kills seeds: waterlogged soil has no air spaces left in it, and a drowning seed cannot germinate. A light, open starting mix holds both moisture and air at once, which is exactly the balance seeds need.
Warmth. Seeds germinate within a range of temperatures, and most common garden seeds prefer the same temperatures people find comfortable: roughly 65 to 75 degrees Fahrenheit. Too cold, and the seed simply waits. Too warm, and it may cook. A room-temperature windowsill suits most seeds very well, with no special equipment required.
Light is the interesting exception. Most seeds germinate perfectly well in darkness, underground being the natural place for it. But some seeds, lettuce among them, need light to trigger germination and should barely be covered at all. Your seed packet will tell you when light matters. When in doubt, the packet is always right.
Check in: Name the three conditions every seed needs to germinate — and explain why a seed sitting in soaking-wet mix can still fail, and why lettuce breaks the cover-it rule.
❦ In your workbook: record what a seed is waiting for in your own way — water, oxygen, and warmth, and the light exception — copy, sketch, or note what matters.
The Two-Times Rule
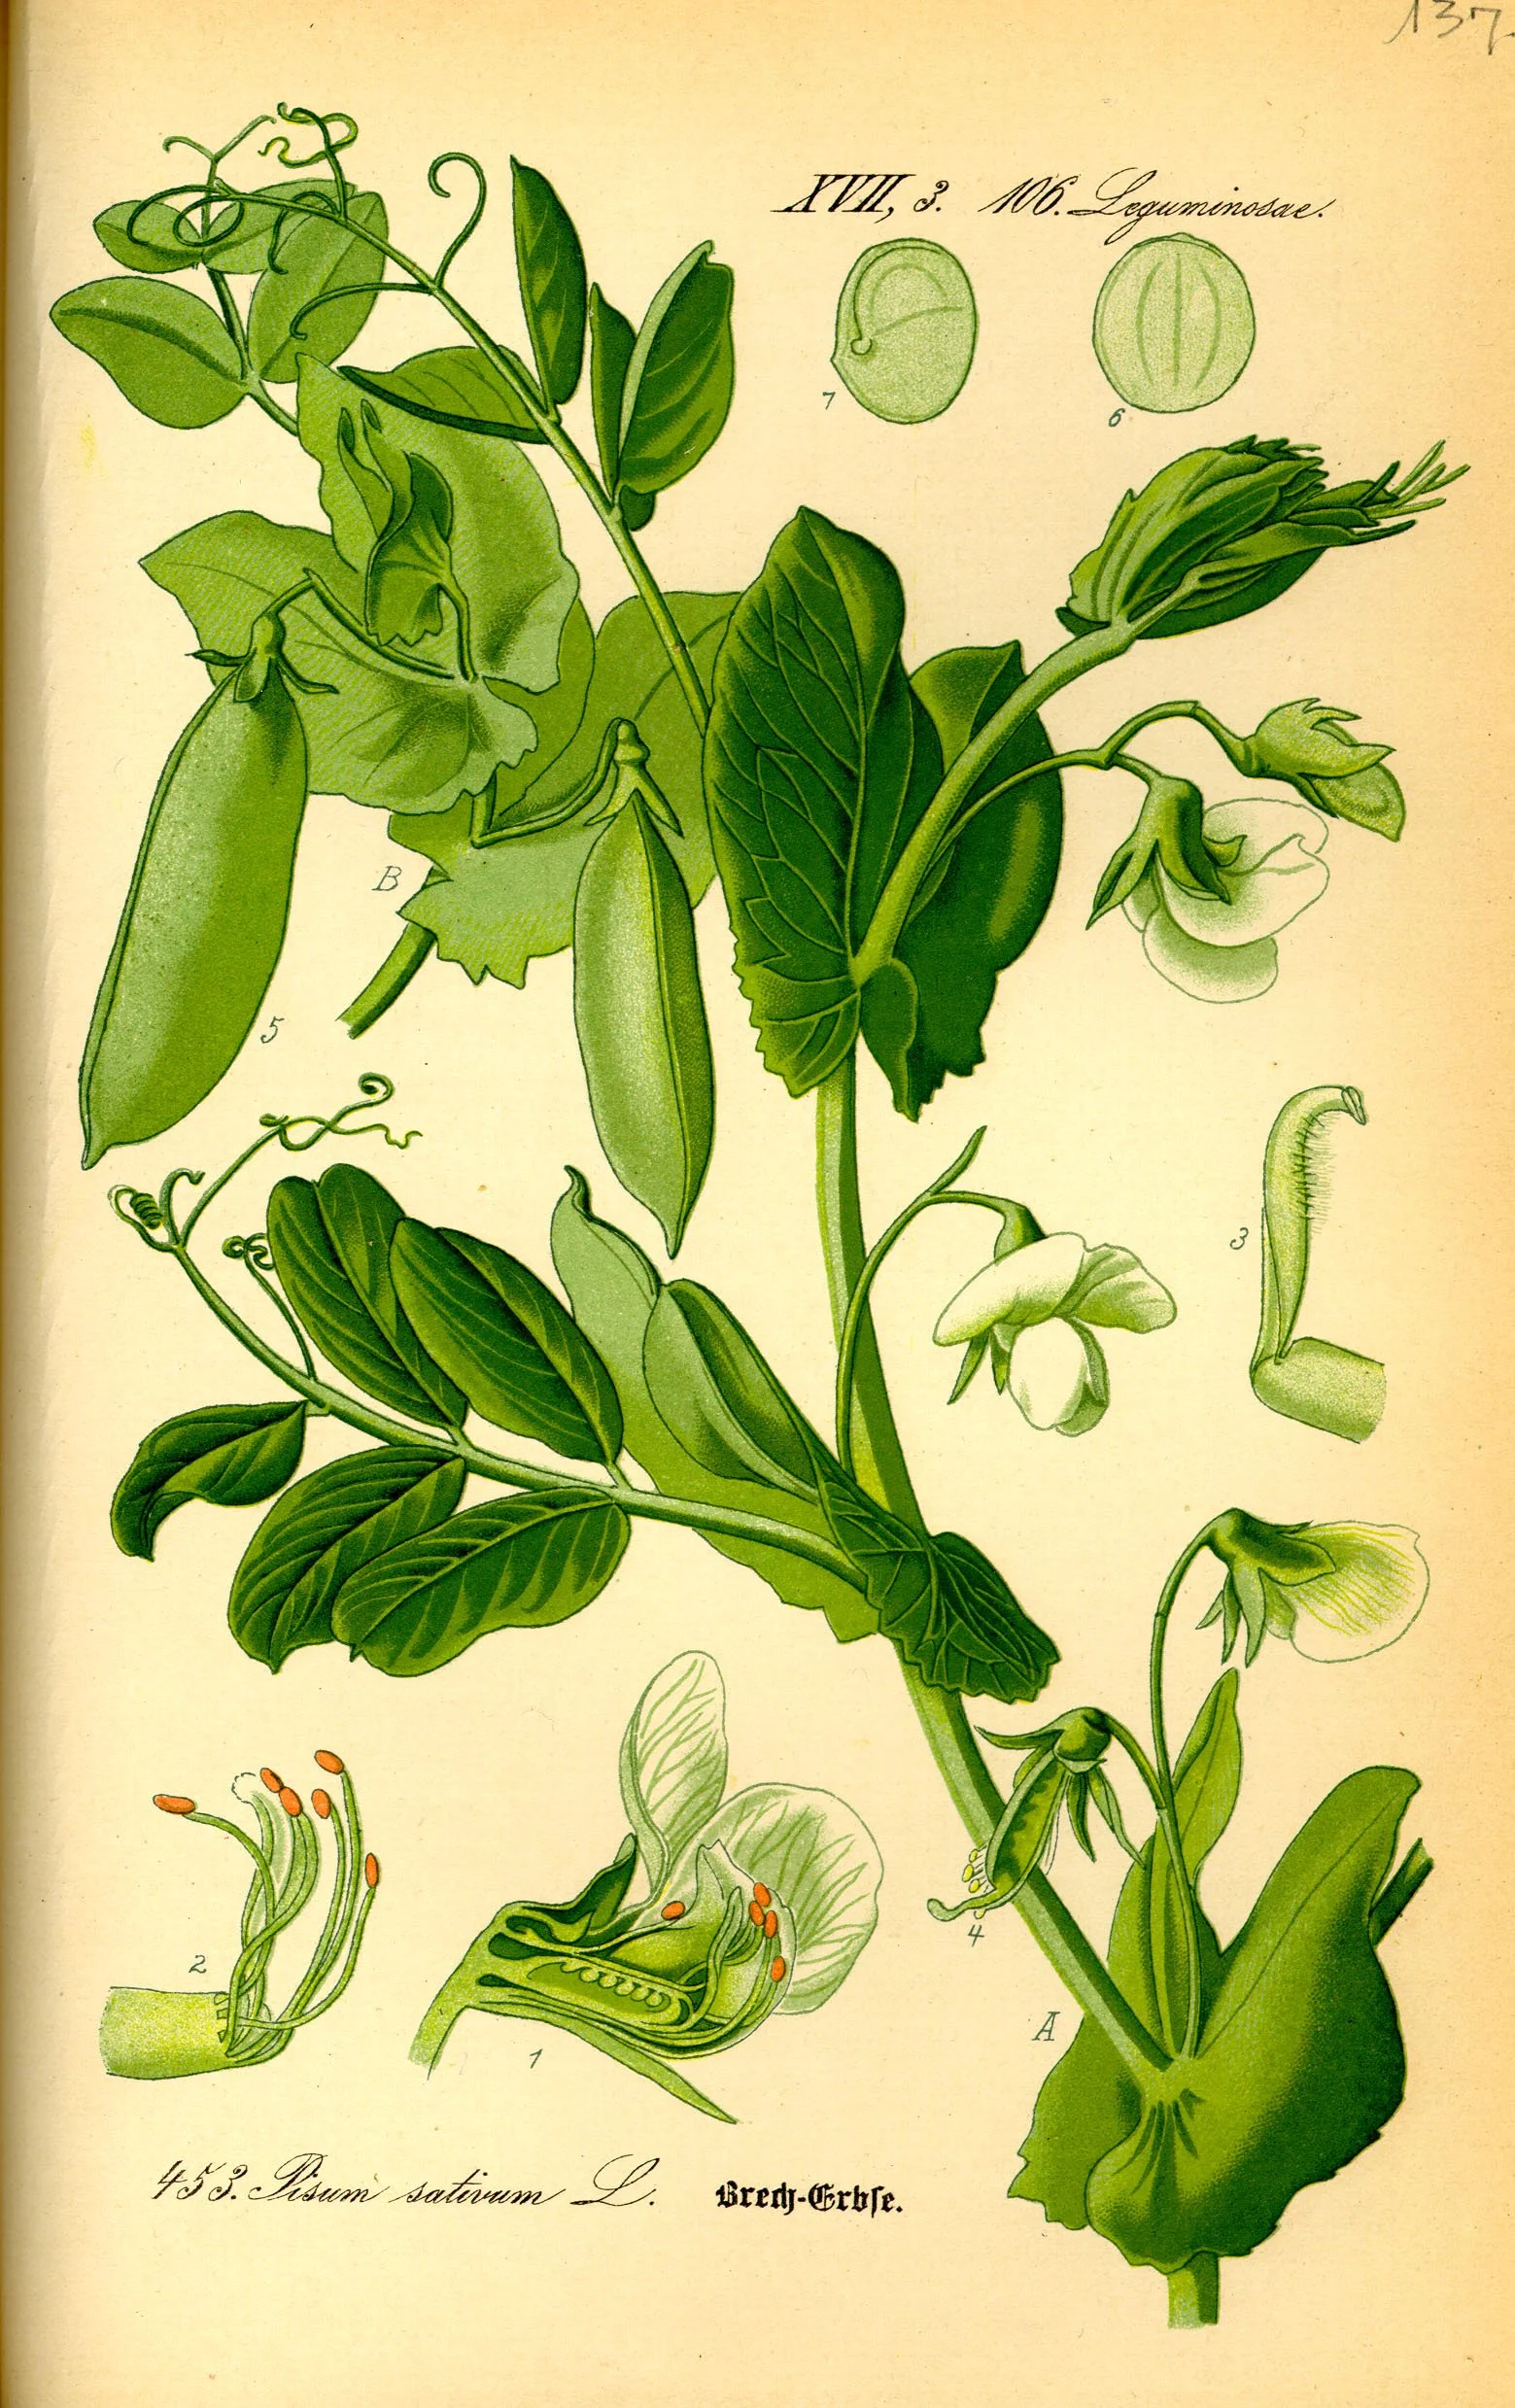
The garden pea (Pisum sativum), Thomé plate 453. The lesson's large-seed example is the seed this plant makes: a pea as wide as a fingernail goes a full inch down, by the two-times rule. The two small studies at the top right show why depth is worth judging at all — inside that round seed sits the whole folded embryo (fig. 7), waiting on water, air, and warmth.
From Prof. Dr. Otto Wilhelm Thomé, Flora von Deutschland, Österreich und der Schweiz (1885), plate 453 (name as printed on the sheet). Public domain.
★ Here is the most useful rule in all of seed starting, and it fits in one sentence: sow a seed twice as deep as the seed is wide.
A radish seed the size of a pinhead goes a quarter inch down. A bean as wide as your fingernail goes a full inch deep. The seed itself is the ruler. This rule works because it places the seed in the zone where moisture is steady and oxygen still reaches it, deep enough to stay damp, shallow enough to breathe and push through.
Tiny seeds like basil or lettuce need only the barest dusting of mix over them, or in the case of light-requiring seeds, nothing at all beyond a gentle pressing into the surface. Large seeds like peas and beans go deeper, where the temperature stays stable. When a packet gives a specific depth, follow the packet. When it does not, the two-times rule will carry you.
Check in: A seed is as wide as your fingernail. How deep do you sow it — and what rule gave you the answer? What changes for a dust-fine lettuce seed?
❦ In your workbook: record the two-times rule in your own way — the seed itself is the ruler — copy, sketch, or note what matters.
The Starting Mix and the Container
★ Seeds do not need garden soil. In fact, garden soil is one of the poorer choices for starting seeds indoors. It is heavy, it drains unevenly, and it can carry the fungi that cause damping off, the great seedling killer we will meet shortly. What seeds want is a seed-starting mix: light, clean, and made for the job.
A good starting mix is usually built from fine peat or coir, vermiculite or perlite for air space, and very little else. It holds water without holding too much, and it offers almost no resistance to a tiny emerging root. You can buy it bagged at any garden center. Do not use mix from last year that has sat open and damp; fresh, clean mix is part of preventing disease.
The container matters less than you might think, as long as it drains. Trays, pots, yogurt cups with holes poked in the bottom, all serve. What the container must have is a way for excess water to leave. Seeds started in a container with no drainage sit in water, and sitting in water is how seeds die. Set your containers on a tray or saucer to catch what drains through.
Before sowing, moisten the mix thoroughly and let the excess drain away. Mix that starts dry can be strangely resistant to wetting, and seeds sown into dry mix may float or shift when you water afterward. Dampen first, sow second.
Check in: Why is garden soil a poor choice for starting seeds indoors? Name the reasons the lesson gives — and say what every container must have, whatever it is made of.
Now, scholars, a word about patience, which is the true subject of this lesson. You have prepared the bed. You have sown at the right depth. And now there is nothing to do but wait, which is the hardest gardening skill of all. Check your containers daily, keep the mix damp, and resist the urge to dig up a seed to see how it is doing. The seed knows its business. Your business is to provide the conditions and then step back.
— Professor Beryl Fernfoot, Herbology Greenhouse • Master Herbalist • Head of House Oriens
❦ In your workbook: record the starting mix and the container in your own way — fresh, clean, drained, and dampened first — copy, sketch, or note what matters.
The Sowing
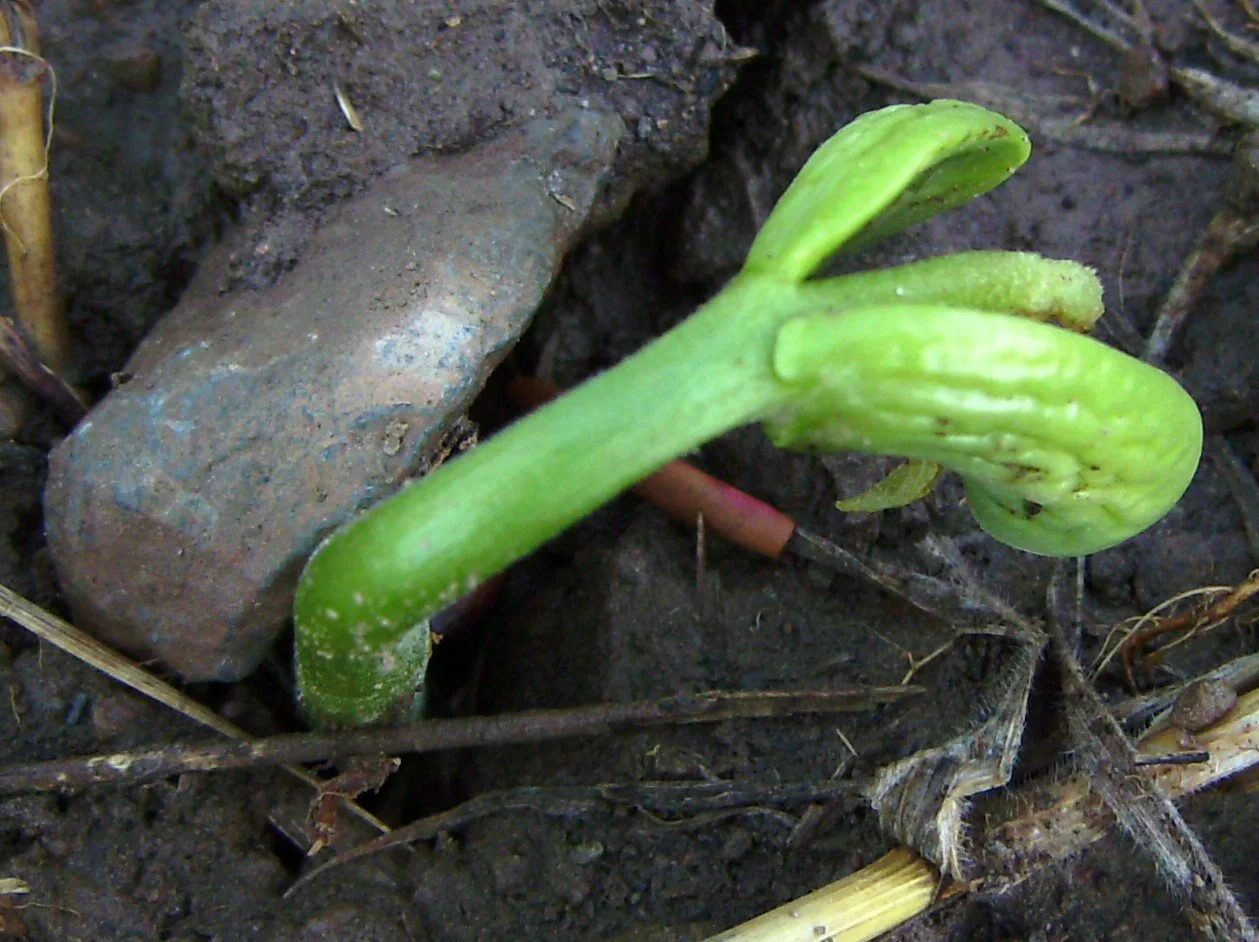
The first thing you see is not the first thing that happened. A bean shoot breaks the surface bent double, a shepherd's crook protecting its growing tip as it pushes up — while below ground, out of sight, the radicle has already gone down and anchored the plant. This is the sign the daily check is watching for: crack, loop, crook, then green.
Photograph by Victor M. Vicente Selvas, released to the public domain. The file page identifies the plant as bean (Phaseolus vulgaris, cultivar Contender) at germination, cotyledons coming out of the ground.
★ Sowing itself is simple, and that simplicity is worth honoring. Fill your container with dampened mix, firm it gently so there are no large air pockets, and make your sowing holes or furrows at the depth the two-times rule gives you. Place the seeds, cover them with mix, and press very lightly so the seed makes good contact with the damp mix around it. Seed to soil contact is what lets water move into the seed.
Water once more, gently. A spray bottle or a fine rose on a watering can wets the surface without washing tiny seeds away or carving craters in the mix. Then cover the container loosely with a clear lid or a sheet of plastic. This is not to keep the seeds warm, particularly; it is to hold humidity steady so the surface does not dry out between checkings. Lift the cover daily to look, to let fresh air in, and to mist if the surface is drying.
Place the container where it will stay at room temperature and out of harsh direct sun while you wait. Strong sun through a cover can cook the air inside. A bright room, not a hot windowsill, is the place for germination.
Then watch. The first sign is often a crack in the mix, or a pale loop pushing up. The root, called the radicle, actually emerges first and grows downward before you ever see it. What you see is the shoot, often bent like a shepherd's crook, pulling the seed leaves up into the light.
❦ In your workbook: record the sowing in your own way — dampen, sow, cover, press, water gently, and wait — copy, sketch, or note what matters.
In your packet: Exercise I — The First Sowing ⚒ begins here. Work it now, or mark the place and take it as homework — your choice.
Cotyledons and True Leaves
The first leaves you see are not true leaves. They are cotyledons, the seed leaves, and they were packed inside the seed all along. Their job is to feed the seedling from stored food while it gets established. They often look nothing like the plant's real leaves: a basil seedling's cotyledons are plain ovals, while its true leaves will be toothed and fragrant.
★ True leaves are the second set, and they look like miniature versions of the adult plant's foliage. Their arrival is a milestone. It means the seedling has spent its packed lunch and is now making its own food from light. Once true leaves appear, the seedling needs what every green plant needs: strong light, and lots of it.
This is the moment to move your seedlings to your brightest window or under a lamp, and to remove any cover for good. Seedlings grown too dim grow tall, pale, and floppy, stretching toward light that is not there. Gardeners call this legginess, and while a slightly leggy seedling can often be saved with more light, prevention is far kinder.
Check in: Your seedling's first leaves look nothing like the plant it will become. What are they, what is their job — and what changes the moment the second set arrives?
❦ In your workbook: record cotyledons and true leaves in your own way — the packed lunch, then the plant feeding itself — copy, sketch, or note what matters.
In your packet: Exercise II — The Germination Watch ◐ begins here. Work it now, or mark the place and take it as homework — your choice.
Thinning: The Kindest Cut
You sowed more seeds than you need. That was deliberate. Not every seed germinates, and sowing extra is insurance. But once seedlings are up and growing, a crowded container becomes a problem: seedlings compete for light, water, and air, and crowded stems invite disease.
★ Thinning means removing the extra seedlings so the remaining ones have room. Wait until the seedlings have their first true leaves, then choose the strongest in each spot and snip the rest at the soil line with small scissors. Snip; do not pull. Pulling disturbs the roots of the seedling you meant to keep.
It feels ruthless the first time. Every gardener remembers it. But a thinned seedling with room to grow will always outdo three crowded ones fighting over the same inch of soil. Fernfoot's rule: be decisive, be gentle, and compost the thinnings without guilt.
Check in: Why do you snip the extras at the soil line instead of pulling them out — and what happens to three crowded seedlings left to fight over the same inch of soil?
❦ In your workbook: record thinning in your own way — the kindest cut, snipped and never pulled — copy, sketch, or note what matters.
In your packet: Exercise III — The Thinning ⚒ begins here. Work it now, or mark the place and take it as homework — your choice.
Damping Off: Know Your Enemy
Sometimes seedlings collapse for no visible reason. One morning they stand; the next, they lie flat, pinched and darkened at the soil line. This is damping off, and it is the most common heartbreak in seed starting.
★ Damping off is caused by soil fungi, chiefly Pythium, Rhizoctonia, and Fusarium, which thrive in cool, wet conditions. They attack at or just below the soil line, and once a seedling has collapsed, it cannot be saved. The infected seedling should be removed at once so the trouble does not spread.
Prevention is everything, and every prevention is something you already know from this lesson:
- Start with fresh, clean seed-starting mix, never garden soil, never reused mix.
- Use clean containers with drainage holes.
- Do not overwater. Damp, not wet.
- Give seedlings air. Do not crowd them, and remove covers once they sprout.
- Keep things reasonably warm. Cold, wet mix is where damping off begins.
Seedlings that reach true leaves with sturdy stems have largely outgrown the danger. The vulnerable window is short, and good habits close it.
Check in: A seedling has collapsed at the soil line. Can it be saved — and what does your answer tell you about the gardener's whole approach to this disease?
❦ In your workbook: record damping off in your own way — the enemy, its fungi, and the five preventions — copy, sketch, or note what matters.
When Seedlings Are Ready
A seedling is ready to move on, whether to a larger pot or to the garden, when it has several sets of true leaves and a stem sturdy enough to stand on its own. For most vegetables and herbs, this takes a few weeks from sowing. Rushing this step plants a baby in a world it cannot handle yet; waiting too long leaves it starved in a tiny container.
★ If the seedling is bound for the outdoors, it needs one more lesson first: hardening off, the gradual introduction to sun, wind, and cool nights over a week or more. A seedling raised in the shelter of your windowsill will scorch or sulk if carried straight into full weather. Begin with an hour of shade, lengthen the visits daily, and let the plant adjust at its own pace.
And that is seed starting, from dry seed to sturdy seedling. In our next lesson, we will meet the seeds that refuse these gentle methods, the hard-coated sleepers that need scarification to wake. But most seeds ask only for what you have just learned to give: water, air, warmth, the right depth, and a gardener with patience.
Check in: Why must a windowsill seedling be hardened off before it lives outdoors — and how does the lesson stage the introduction?
❦ In your workbook: record when seedlings are ready in your own way — several true leaves, a sturdy stem, and the gradual road outdoors — copy, sketch, or note what matters.
Safety Notes
- Dampen seed-starting mix before handling it to keep dust down. Dry mix dust irritates lungs; a simple dust mask helps if you are sensitive.
- Wash your hands after handling soil, mix, and seedlings.
- Younger students should ask an adult for help with scissors and with carrying trays of wet mix, which are heavier than they look.
❦ In your workbook: record the safety notes in your own way — mix dampened before handling, hands washed, adult help with scissors and heavy trays — copy, sketch, or note what matters.
Guided Observation: The Daily Check — Watching for the First Green
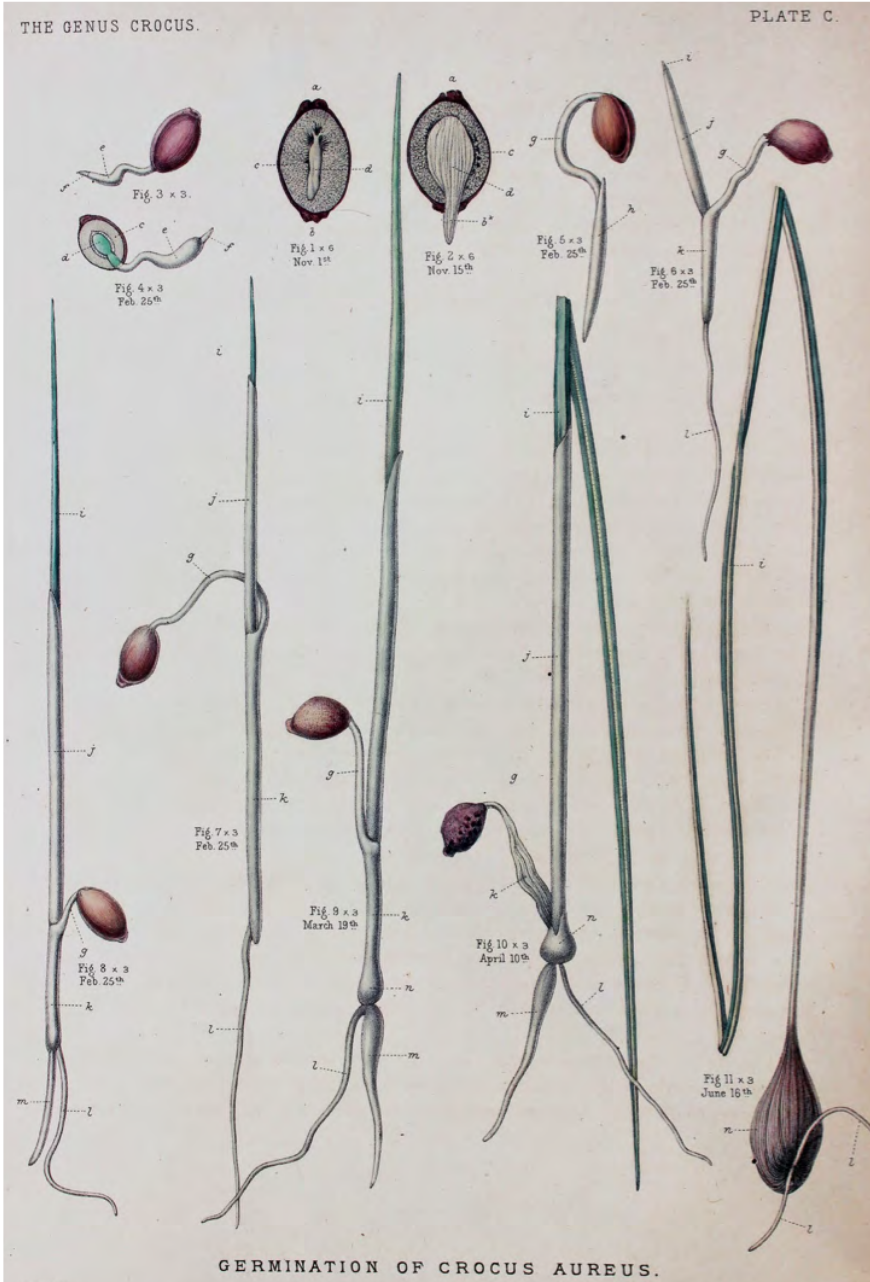
A germination watch, kept in 1886: Maw's plate records one crocus seed from November to June, figure by figure, date by date — sections first, then root, then leaf, then the new corm. Your Germination Watch keeps the same kind of record on a faster plant: the date of sowing, the date of the first loop, the cotyledons, the true leaves. A dated record is what turns watching into knowing.
George Maw, A Monograph of the Genus Crocus (1886), Plate C. Public domain.
This lesson's observation is the sowing watch itself: the daily check the lesson teaches, worked on your own Exercise I container from the day you sow until the first true leaves stand. It asks for no equipment beyond the container you have already sown, and it works in any season, because this sowing lives indoors.
You will need:
- your sown container from Exercise I, covered loosely as the lesson directs
- a spray bottle, for misting the surface if it dries
- your sowing journal and a pencil
Lift the cover daily. Lift the cover daily to look, to let fresh air in, and to mist if the surface is drying. The cover's work is to hold humidity steady so the surface does not dry out between checkings — it is not to keep the seeds warm, particularly.
Keep the mix damp, not wet. The goal is steady dampness, like a wrung-out sponge, not a puddle. A seed that sits in soaking wet mix can rot before it ever sprouts, and cold, wet mix is where damping off begins.
Watch for the first signs. The first sign is often a crack in the mix, or a pale loop pushing up. The root, the radicle, actually emerges first and grows downward before you ever see it; what you see is the shoot, often bent like a shepherd's crook, pulling the seed leaves up into the light. Resist the urge to dig up a seed to see how it is doing.
Answer emergence at once. Remove the cover once seedlings emerge and move the container to strong light. Seedlings grown too dim grow tall, pale, and floppy, stretching toward light that is not there.
Consider:
- How many days passed between sowing and the first crack or loop in the mix?
- Did the surface dry between your checkings, or did the cover hold the dampness steady?
- What did you see first — and what does the lesson say had already happened below the surface before you saw anything?
No sowing of your own yet — out of season, out of space, or out of seed? Work the watch on paper: rule the journal page the watch would fill, one row per day, and write beside each day the sign the lesson says to expect, in order — the crack, the loop, the shepherd's crook, the cotyledons, the true leaves. When your sowing day comes, the page is ruled and your eye is already trained.
Materials
Required (Level One — household items)
- Seeds: radish, basil, or lettuce — fast, forgiving, and quick to reward patience.
- Seed-starting mix: a bag of sterile starting mix from any garden center. Not garden soil.
- Containers with drainage holes: trays, pots, or yogurt cups with holes poked in the bottom. A tray or saucer beneath to catch drainage.
- A spray bottle: for gentle watering that will not wash tiny seeds away.
- Clear cover: a plastic lid, cling film, or a clear plastic bag to hold humidity while seeds germinate.
- Small scissors: for thinning seedlings at the soil line.
- Notebook and pencil: your sowing journal for dates, varieties, and observations.
Suggested (Level Two — historically closer)
- Cell trays with a humidity dome: the standard nursery setup, giving each seedling its own cell.
- A waterproof seedling heat mat: holds steady bottom warmth for slow or heat-loving seeds, as professional growers use.
- A full-spectrum grow light on a timer: 14 to 16 hours of steady light, the indoor grower's sun.
Safety notes: Dampen seed-starting mix before handling to keep dust down. A simple dust mask helps if you are sensitive to dust. Wash your hands after handling mix, soil, and seedlings. Younger students: ask an adult for help with scissors and with carrying trays of wet mix, which are heavier than they look.
Reflection Questions
Answer the following questions in your workbook.
- Why does a seed need oxygen to germinate, and how does this explain why waterlogged mix kills seeds?
- A friend buries lettuce seeds half an inch deep and none sprout. Using what you learned about light requirements and the two-times rule, explain what went wrong.
- Why must thinning be done by snipping rather than pulling?
- Damping off cannot be cured once it appears. What does this tell you about the gardener's approach to seedling disease?
- How does the arrival of true leaves change what a seedling needs from you?
Workbook Checklist — Lesson 17
In my workbook I have:
- ☐ named the three conditions of germination — water, oxygen, and warmth — and why each one matters
- ☐ sown at the correct depth using the two-times rule, following the packet where it gives a specific depth
- ☐ prepared a container with fresh seed-starting mix, moistened first, with drainage holes
- ☐ told cotyledons from true leaves, and moved my seedlings to strong light when the true leaves arrived
- ☐ thinned by snipping at the soil line, never by pulling, and recorded how many I removed and how many remain
- ☐ stated how damping off is prevented: fresh clean mix, clean drained containers, damp not wet, air, and reasonable warmth
- ☐ kept the safety notes: mix dampened before handling it, hands washed after handling soil, mix, and seedlings, adult help with scissors and heavy wet trays
- ☐ completed the First Sowing, the Germination Watch, and the Thinning — or their workbook paths
☐ Lesson completed Date: ___ Signature: ___
The Professor's Closing Note
You have learned the first and most-used skill of the propagation arts, scholars, and I am proud of you. A gardener who can raise a seedling can raise anything, because everything else is a variation on this same theme: learn what the plant needs, provide it, and get out of the way with grace.
Keep your first sowing journal close. Write down what you sowed, when, and what happened. Years from now, when you are coaxing difficult seeds awake with hot water and sandpaper, you will look back on this simple sowing and smile at how far you have come.
— Professor Beryl Fernfoot, Herbology Greenhouse • Master Herbalist • Head of House Oriens
Cross-Class Connections

Creative Arts · Unit V, Lesson 22 — Garden Structures: Supports, Cold Frames & Garden Models
Mind the step up to the bench, scholars. Fernfoot has your seedlings started early, and early starts need shelter that admits the sun and refuses the frost — that shelter is my bench's work. Bring your seed trays to the Workshop and we will build the mini cold frame that houses them: a bottomless box, a sloping glazed lid, a venting prop for warm days. Build it true, and your starts will harden off under glass instead of shivering on a sill.

Celestial Studies · Unit I, Lesson 3 — The Tilted Year: Why We Have Seasons
Scholars, you have learned to give a seed water, air, and warmth indoors, in any month you choose. Come to the Tower and I will show you why the outdoors keeps a stricter calendar: the tilt that lengthens the days, warms the soil, and at last makes direct sowing — planting seed straight into its final outdoor place — safe. Your windowsill defies the season; the garden obeys it — and both facts hang on the same tilted earth.
Further Reading & Sources
- Germinating Seeds — WVU Extension — the three requirements of germination, clearly explained.
- A Gardener's Guide to Plant Propagation, Part III: Propagating Plants from Seed — UF/IFAS Extension — seed anatomy and sowing depth guidance.
- Seed Starting 101 — Washington State University Extension (PDF) — moisture, temperature, and depth fundamentals.
- How Deep to Plant Seeds Sown Indoors — Horticulture Magazine — the two-times rule and indoor sowing practice.
- How to Prevent Seedling Damping Off — University of Minnesota Extension — prevention-first disease management.
Browse the Herbology shelf in the school Library for readable editions of these works.
Plants from this lesson stand in the Materia Botanica, the school's shared archive — each kept with its lessons, its keepings, and its cautions. This lesson's company:
FoxgloveRadish The whole Materia BotanicaPROFESSOR BERYL FERNFOOT · HERBOLOGY GREENHOUSE
Submit your work for this lesson using the form below.
CONTINUE IN THE HERBOLOGY GREENHOUSE
← Previous · Lesson 16: The Unit II Practical Project: The Growing Plan Next · Lesson 18: The Mechanics of Seed Scarification →
Unit III — Propagation, Pruning & Plant Stewardship Herbology Greenhouse — All 37 Lessons
The rest of Unit III: Lesson 18 · Seed Scarification · Lesson 19 · Stem Cuttings · Lesson 20 · Root Division · Lesson 21 · Layering & Runners · Lesson 22 · Pruning Geometry · Lesson 23 · Selective Pruning · Lesson 24 · Pests & Disease · Lesson 25 · Repotting & Root Bound · Lesson 26 · Stewardship Project