

POTIONS
Unit III · Lesson 18ROOTS, BARK & RESINS
Professor Crimblebrew Muddlenook
Master Apothecary • Potions
Head of House Meridies • School of Evershade
Professor's Introduction

Sealed with the wax of Professor Crimblebrew Muddlenook, Master Apothecary of the Potions Laboratory, Head of House Meridies.
In order, scholars,
For six lessons you have studied the delicate: petals that bruise at a touch, leaves that fade in a week, fragrances that vanish on the wind. Now the laboratory turns to the dense, and the rules change.
A root does not bruise like a petal. It resists. A bark does not fade like a leaf. It endures. A resin — a hardened plant secretion, sticky when fresh, that hardens on exposure to air — does not evaporate like a fragrance. It hardens, waits, and keeps its character for years, sometimes for centuries. These are the heavy shelves of the apothecary, and they reward a different kind of attention: patient, structural, and precise.
You will not grow these materials in this class. That work belongs to the Herbology Greenhouse, and Professor Fernfoot's scholars do it beautifully. Our work begins when the material arrives at the laboratory door: dried, dense, and waiting to be judged. Learn to judge it well, and every extraction — drawing compounds out of a material with a liquid — and formulation you attempt for the rest of this course will begin on solid ground.
Orderly shelves, orderly mind.
— C.M.
Potions map — the class base map, unmarked for this lesson.
Lesson Objectives
By the end of this lesson, you will be able to:
- Explain why dense botanical materials (roots, bark, resins) demand different handling than delicate flowers and leaves.
- Describe how density, moisture retention, and fracture behavior affect laboratory preparation.
- Identify roots, bark, and resins by structure and judge their quality as received materials.
- Handle, store, and document dense specimens according to laboratory discipline.
- Complete a structured dense-specimen study and enter it in your archive.
Reading this lesson: ★ marks the passages to remember. They return on the unit quiz and the class test. Check in questions ask the material back as you go; answer them in your workbook when you meet them.
Working this lesson: Your assignment packet is the first download on this page. Work in it as the lesson moves along, answering each exercise as its subject is taught — or read the lesson through for your notes and take the exercises as homework afterward. Both are proper ways to sit this class. Signposts in the reading tell you where each exercise belongs. Written answers are short answers in your own words; a few honest lines are worth more than a filled page.
Your Assignment Packet
This lesson's exercises live in its packet: the Lexicon Handout (every term, course terms marked ◆), Materials, Guided Practice — the seven-step Dense Specimen Study, printed in full so you can work through it specimen by specimen — the Assignment Manual with its self-check, the Reflection Questions, and the Workbook Checklist. Download the packet before you begin and keep it beside you as you read.
Safety Briefing
Before any dense material leaves its jar, the laboratory's safety discipline applies in full.
Dust. Grinding, crushing, or even snapping dry roots and bark produces fine dust. Do not breathe it directly. Work in a ventilated area, keep your face back from the mortar, and dampen nothing unless the procedure calls for it; simply do not inhale over your work. A simple dust mask is sensible for extended grinding.
Resin dust and flame. Powdered resin is flammable. Never grind resins near open flame, pilot lights, or lit candles, and never store resin powder beside the hearth. Whole resin tears are far less hazardous than their dust; the danger grows as the particle size shrinks.
Skin and hands. Some barks and resins stain skin and irritate sensitive hands. Wash your hands after handling, and wear simple gloves if your skin is sensitive.
Sharp tools. If you cut bark or section a root, cut away from your body on a stable surface, with adult supervision for younger students.
Label everything. Every jar, every bag, every specimen: name, date received, source. An unlabeled dense material is a mystery, and mysteries do not belong on laboratory shelves.
Check in: Why does the briefing treat powdered resin as a greater danger than whole resin tears — and what two storage and grinding rules follow from it?
❦ In your workbook: record the safety briefing in your own way — dust and the face kept back, resin dust away from flame, washed hands and gloves for sensitive skin, cutting away from the body with an adult for younger students, and every jar labeled with name, date received, and source — copy, sketch, or note what matters.
Why Dense Materials Are a Different Discipline
Unit II taught you to handle fragility. A petal's enemy is bruising; a leaf's enemy is moisture; a fragrance's enemy is time itself. Dense materials invert every one of these relationships.
A root's enemy is not bruising but uneven drying: thick tissue dries from the outside in, and if the surface seals while the center stays damp, mold grows inside where you cannot see it. A bark's enemy is not fading but misidentification: inner bark and outer bark are different materials, and a careless apothecary who confuses them prepares the wrong thing. A resin's enemy is not time but heat and carelessness: resins keep for years, yet their dust can catch fire, and their sticky surfaces collect every speck of dust in the laboratory if stored open.
★ Three properties govern all dense-material work. Learn them now; they will return in every lesson of this unit.
Density is the material's compactness: how much substance is packed into a given piece. Denser materials resist grinding, absorb solvents slowly, and release their character gradually. A dense root may need weeks of steeping where a petal needs hours. Density is not a flaw. It is information. It tells you how much work the material will demand.
Moisture retention is how stubbornly a material holds water. Thick roots, fleshy bark, and fresh resin all arrive with water locked inside their tissues. That water must be managed, because trapped moisture breeds mold, and mold ruins a batch silently. The apothecary judges moisture by feel, by weight, by the snap of a broken piece, and by the smell of the storage jar when it is first opened.
Fracture behavior is how a material breaks. Snap a cinnamon quill and it breaks cleanly along its curl. Snap a piece of dried ginger and it splinters fibrously. Press a frankincense tear between your fingers and it yields, then shatters. How a material breaks tells you about its internal structure, and its internal structure tells you how it will grind, how it will steep, and how it will behave in every preparation to come.
Check in: Name the three properties that govern all dense-material work — and the enemy each dense material family carries that the delicate materials of Unit II did not.
❦ In your workbook: record the three governing properties in your own way — density, moisture retention, and fracture behavior, with what each one tells the apothecary — copy, sketch, or note what matters.
Roots: The Underground Harvest
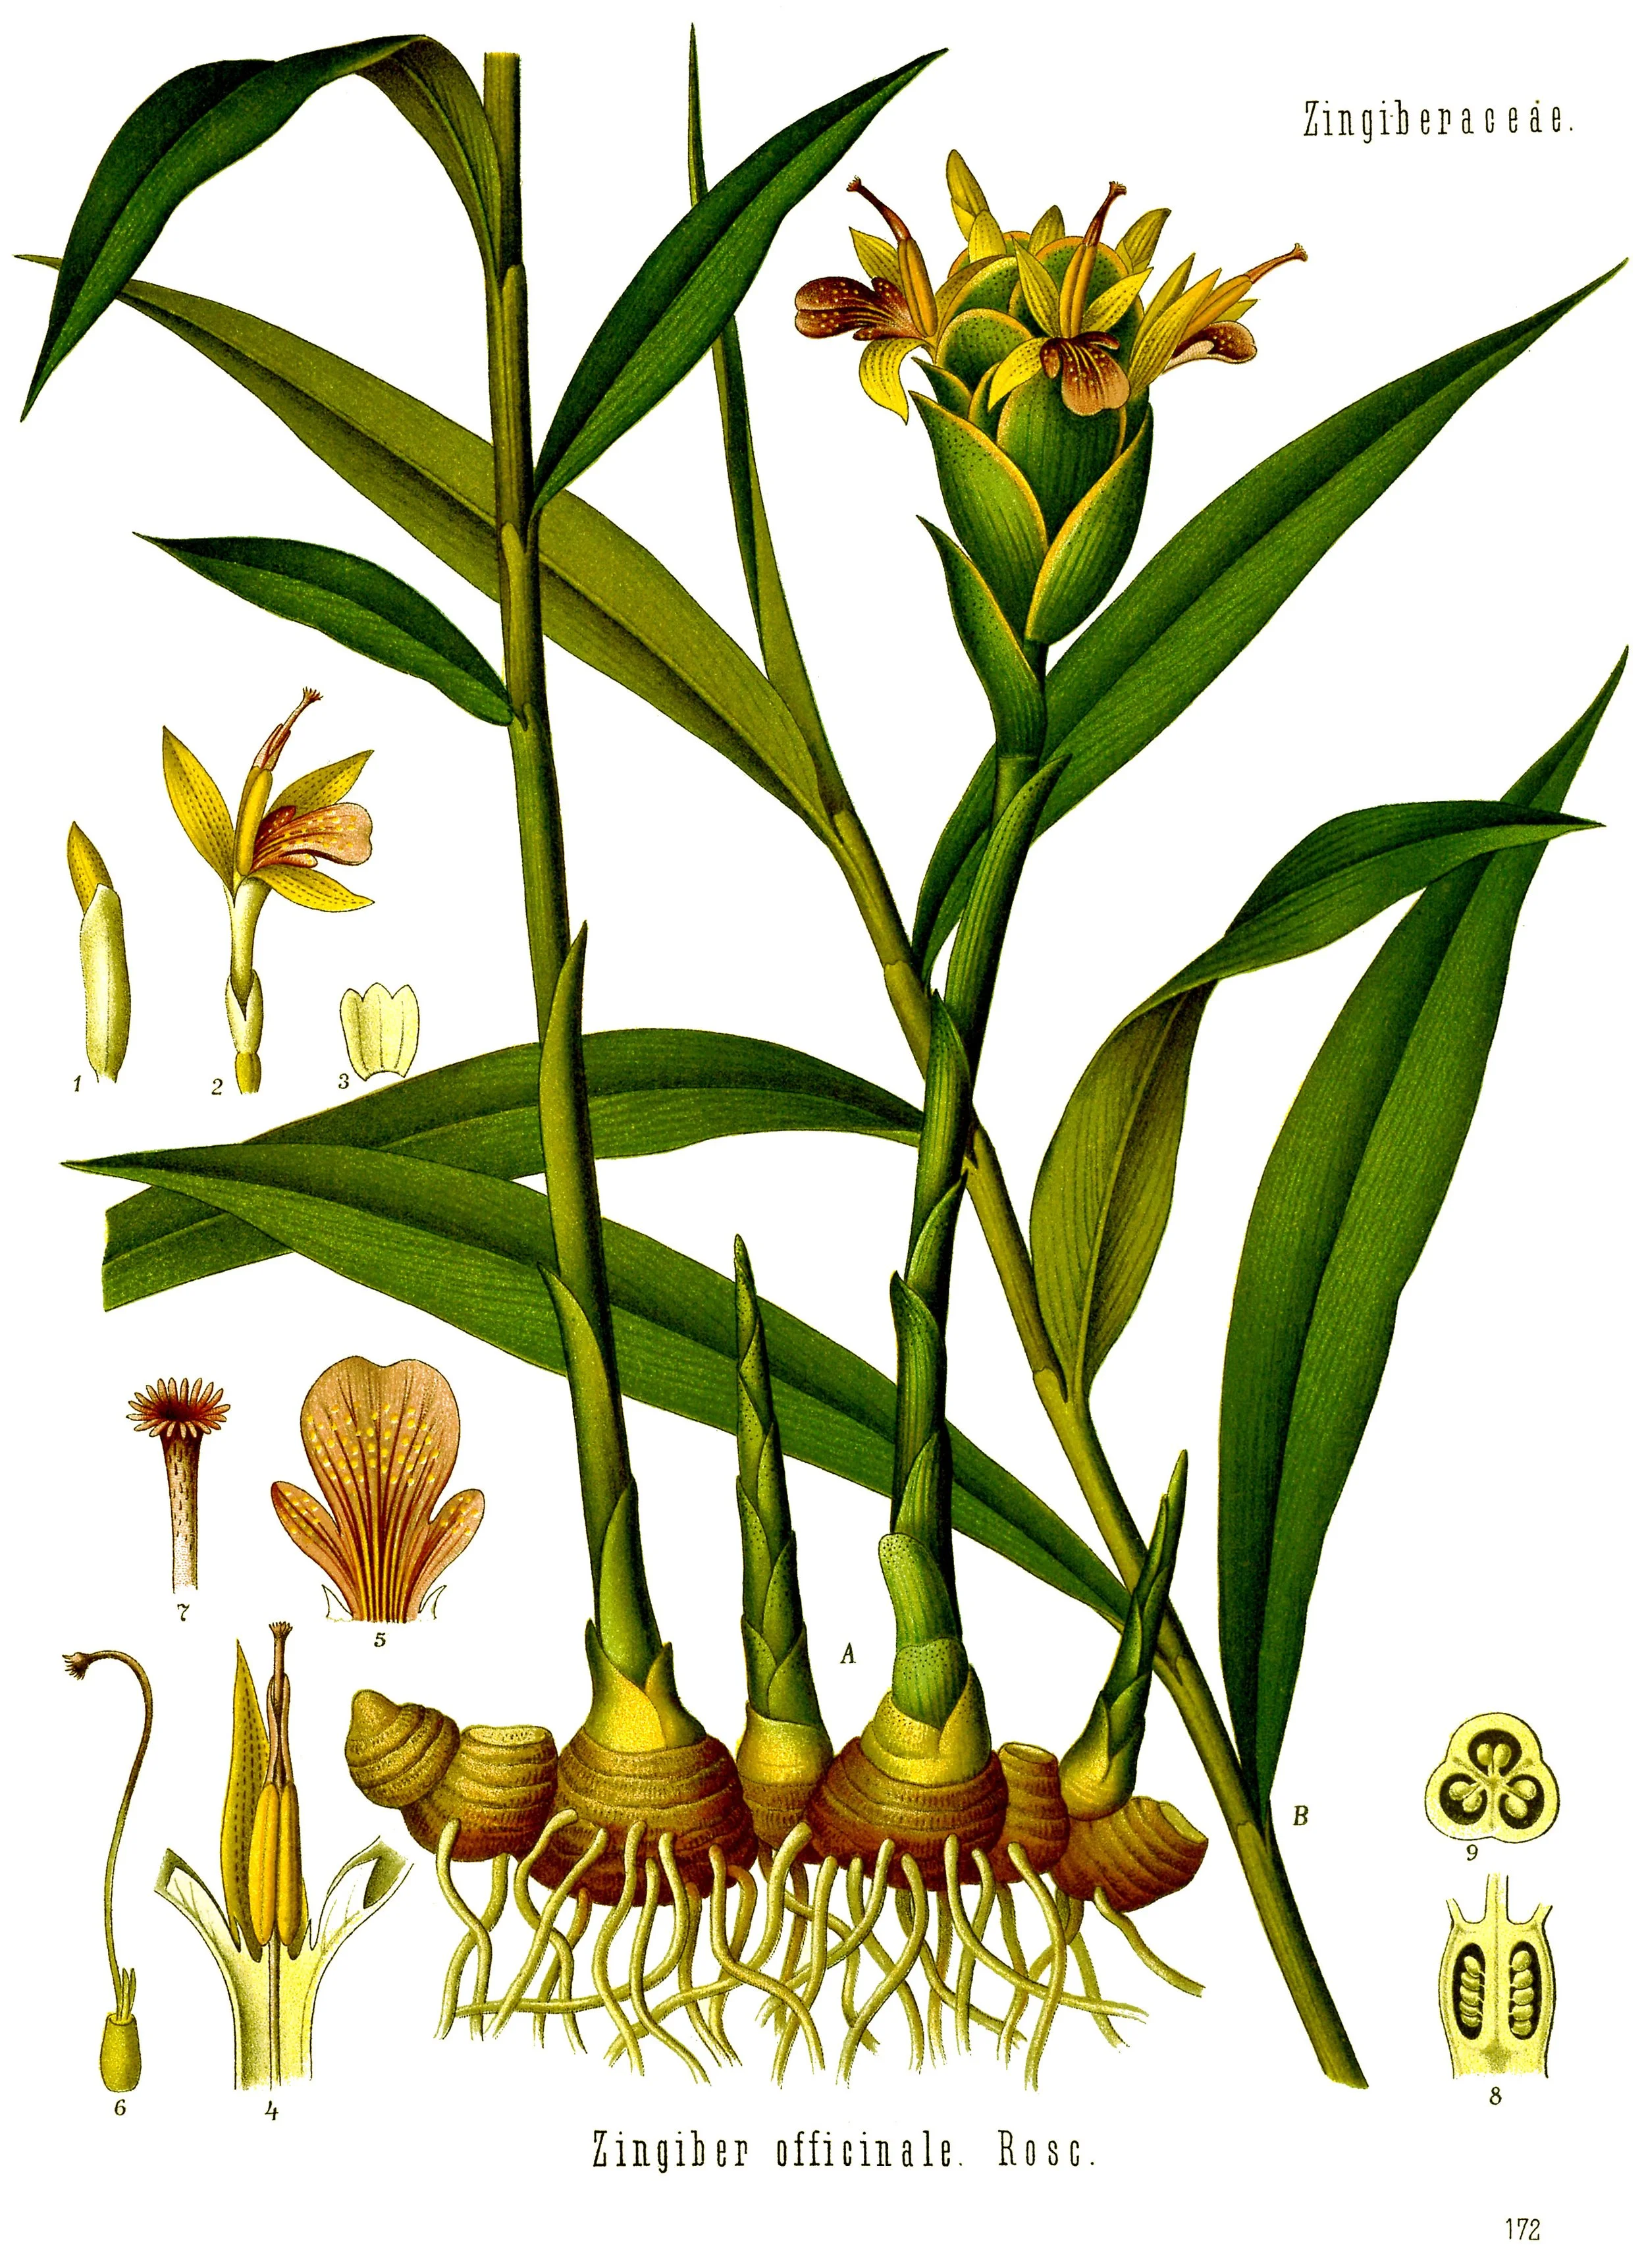
Ginger (Zingiber officinale), plate 172 of Köhler's Medizinal-Pflanzen: the living plant drawn whole, its thick underground rhizome and roots exposed at the foot — the dense material that reaches this laboratory dried, wrinkled, and splintering fibrously when snapped. A study portrait; the root on your plate is judged by weight, snap, interior, and smell, never by a picture.
Franz Eugen Köhler, Köhler's Medizinal-Pflanzen (1887–1914), plate 172, via Wikimedia Commons. Public domain.
A root is the plant's anchor and its storehouse. Underground, away from light and wind, roots grow thick with stored starches and compounds, wrapped in protective outer tissue. By the time a root reaches your laboratory, it has been dug, washed, and dried, and what arrives is dense, heavy for its size, and often wrinkled from the drying.
You will meet two structural families, and you already know their names from the Herbology Greenhouse. The taproot system (see Lesson 18 Lexicon) grows one strong central root downward, like a carrot or a dandelion. The fibrous root system spreads many slender roots outward, like grasses. In the laboratory, the distinction matters because taproots arrive as single dense pieces that must be sectioned, while fibrous roots arrive as tangled masses that must be sorted and cleaned.
Judging a dried root is a skill of the senses:
- Weight. A good dried root feels substantial for its size. An unexpectedly light root may have dried unevenly or begun to decay internally.
- Snap. Break a small piece. It should snap crisply, not bend. Bending means residual moisture, and residual moisture means mold risk.
- Interior. Look at the broken face. It should be uniform in color, without dark streaks, soft spots, or hollow centers.
- Smell. A clean, characteristic smell is right. Mustiness is wrong. ★ Mustiness means the batch is compromised, and a compromised batch is discarded, not debated.
Roots age after drying, and aging changes them. Freshly dried roots are at their most aromatic; over months and years, volatile character fades while the dense structure remains. The apothecary records the date of receipt on every root jar, because a root's age is part of its identity.
Check in: You break a small piece of dried root and it bends instead of snapping. What does the bending mean, and what risk rides on it?
❦ In your workbook: record judging a dried root in your own way — weight, snap, interior, and smell, and the date of receipt written on every jar — copy, sketch, or note what matters.
Bark: The Tree's Armor
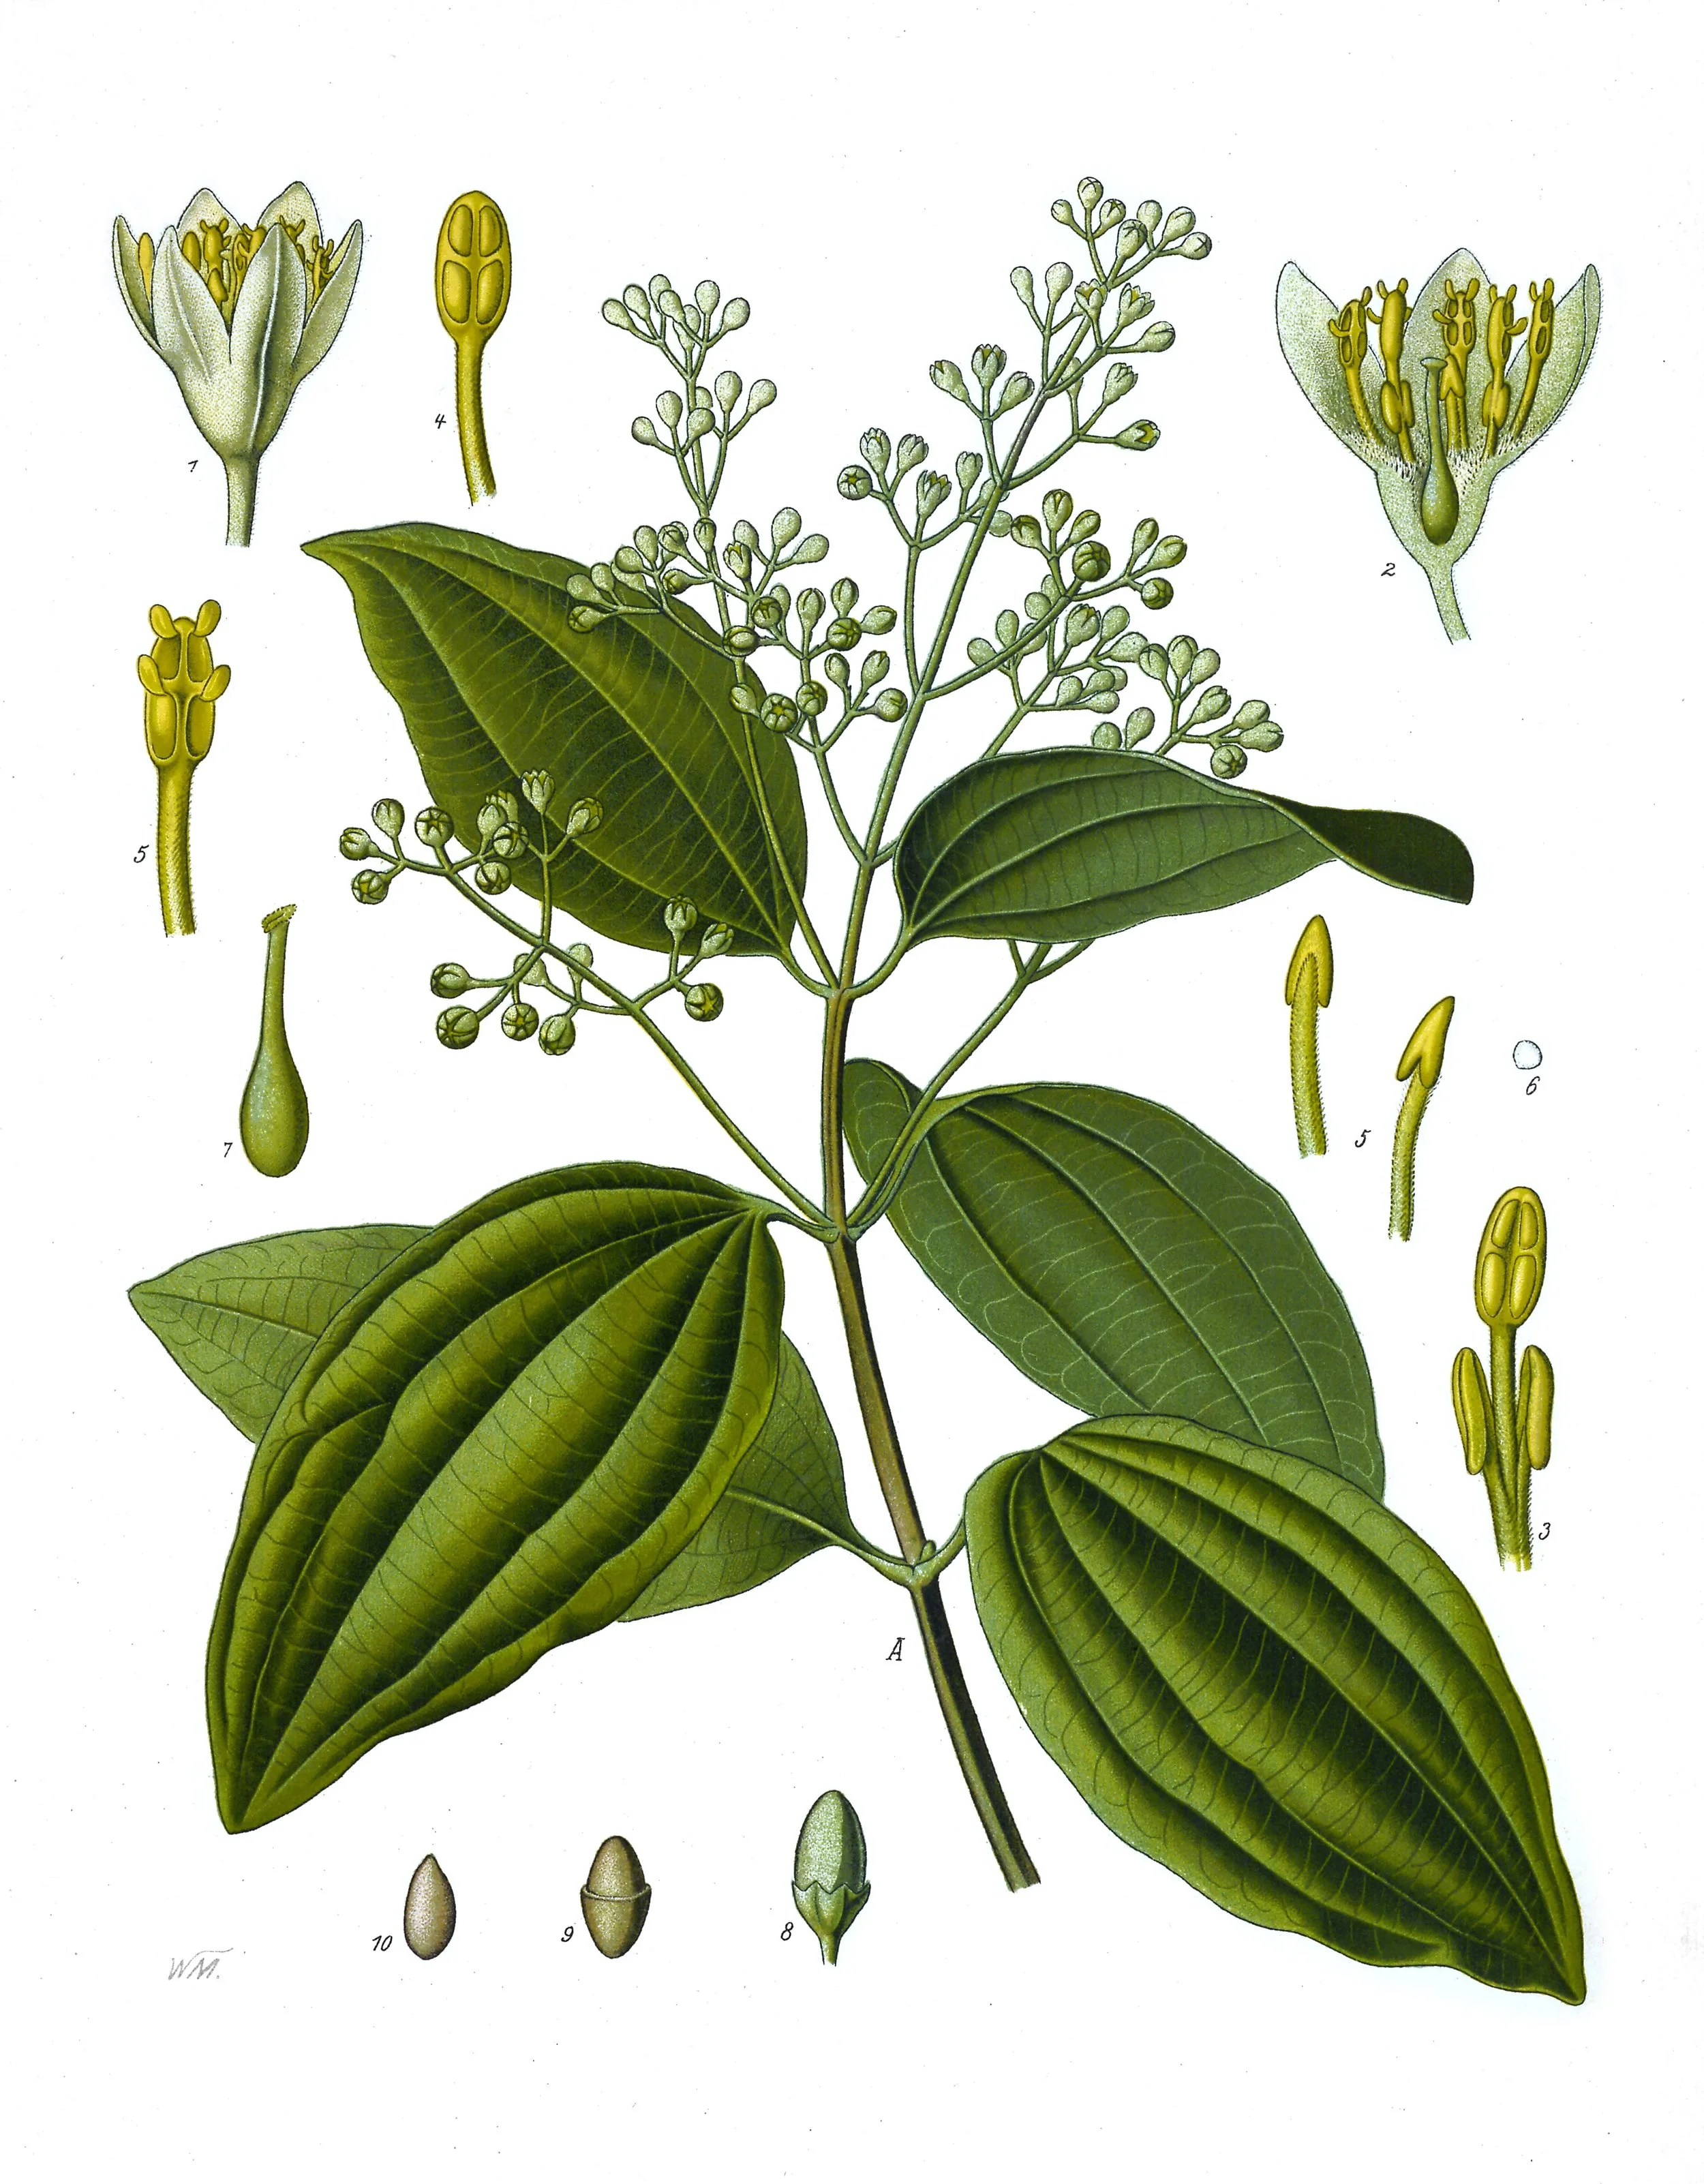
True cinnamon (Cinnamomum verum), from Köhler's Medizinal-Pflanzen — the living tree whose thin inner bark, dried into delicate quills that crumble easily, is this lesson's standard of a bark judged rightly. The quills themselves are judged on the bench, by fracture and feel; this plate is the tree they came from. A study portrait, not an identification guide.
Franz Eugen Köhler, Köhler's Medizinal-Pflanzen (1887–1914), plate 182 (artist: Walther Otto Müller), via Wikimedia Commons. Public domain.
Bark is the tree's protective skin, and like all armor, it is built in layers. The outer bark is rough, weathered, and largely protective tissue. The inner bark (the phloem layer, in the botanist's language) is the living transport tissue beneath, and it is usually the inner bark that the apothecary wants.
★ This distinction is not academic. It is the whole lesson.
Cinnamon, the most familiar bark in any kitchen, demonstrates it perfectly. True cinnamon (Cinnamomum verum) is made from the thin inner bark, dried into delicate quills that crumble easily. Cassia (Cinnamomum cassia), its common substitute, is thicker, harder, and breaks with a woody snap. Both are "cinnamon" in the marketplace; they are different materials on the laboratory shelf, with different fracture behavior, different density, and different character. The apothecary who cannot tell them apart cannot prepare either one correctly.
Fracture is your diagnostic tool. Snap a piece of bark and read the break:
- A clean, short break suggests brittle, well-dried material.
- A fibrous, splintering break suggests tough inner fibers; expect resistant grinding.
- A bending, flexible piece suggests moisture; set it aside and investigate before use.
★ Store bark whole whenever possible. Bark keeps its character far longer unground than powdered, because grinding exposes vast new surface to air and moisture. The mortar is for the day of preparation, not the day of receipt.
Check in: True cinnamon and cassia are both sold as "cinnamon." Name two ways the laboratory tells them apart — and say which layer of bark each one comes to the shelf as.
❦ In your workbook: record the bark lesson in your own way — outer bark against inner bark, the three breaks and what each one reads, and bark stored whole until the day of preparation — copy, sketch, or note what matters.
Sealed with the wax of Professor Crimblebrew Muddlenook, Master Apothecary of the Potions Laboratory, Head of House Meridies.
Scholars, a note on patience. You will be tempted to grind everything the day it arrives, because powdered material feels like progress. It is not progress. It is the beginning of decay. Whole roots, whole bark, whole resin — a hardened plant secretion, sticky when fresh, that hardens on exposure to air — tears keep for months and years. Powders keep for weeks. The master apothecary grinds only what the week's work requires, and the shelves stay full of whole, patient material. Restraint is a laboratory skill.
— C.M.
Resins: Hardened Light
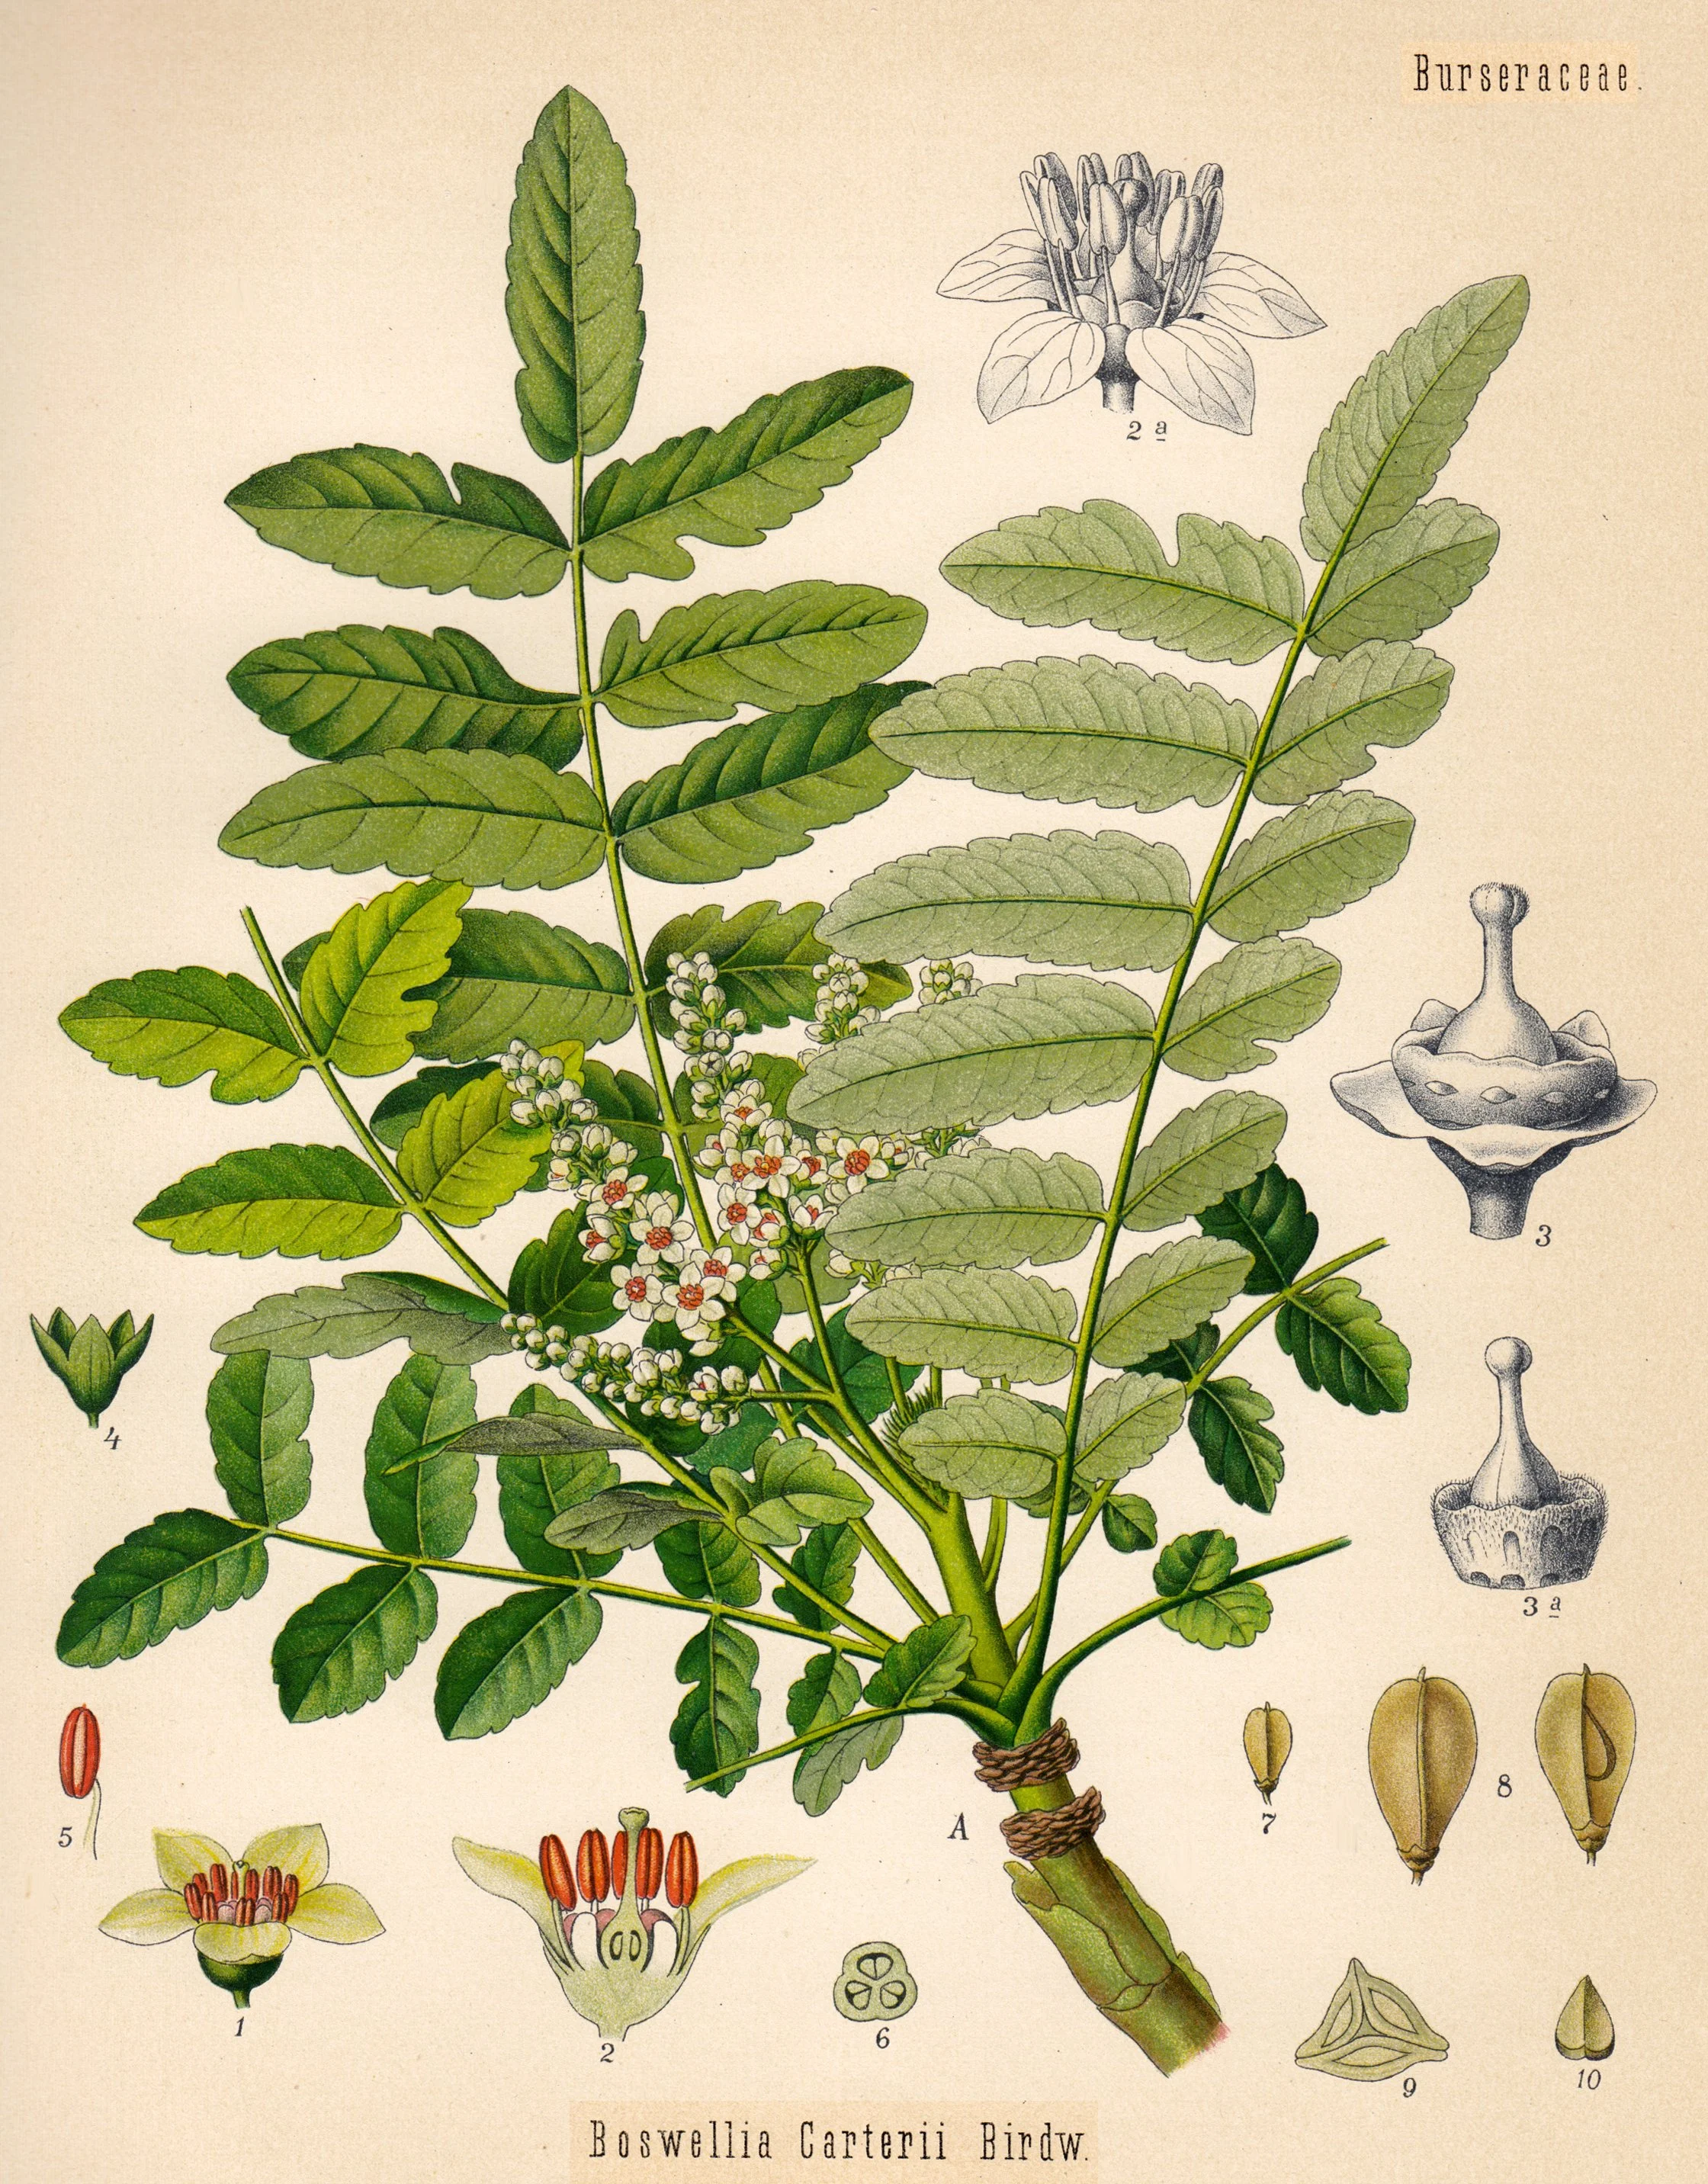
A frankincense tree (Boswellia carterii), from Köhler's Medizinal-Pflanzen — one of the Boswellia trees whose wounded bark weeps the sticky secretion that hardens, on exposure to air, into the frankincense tears of the next picture. A study portrait of the resin's source, not an identification guide.
Köhler's Medizinal-Pflanzen (1887–1914), via Wikimedia Commons. Public domain.
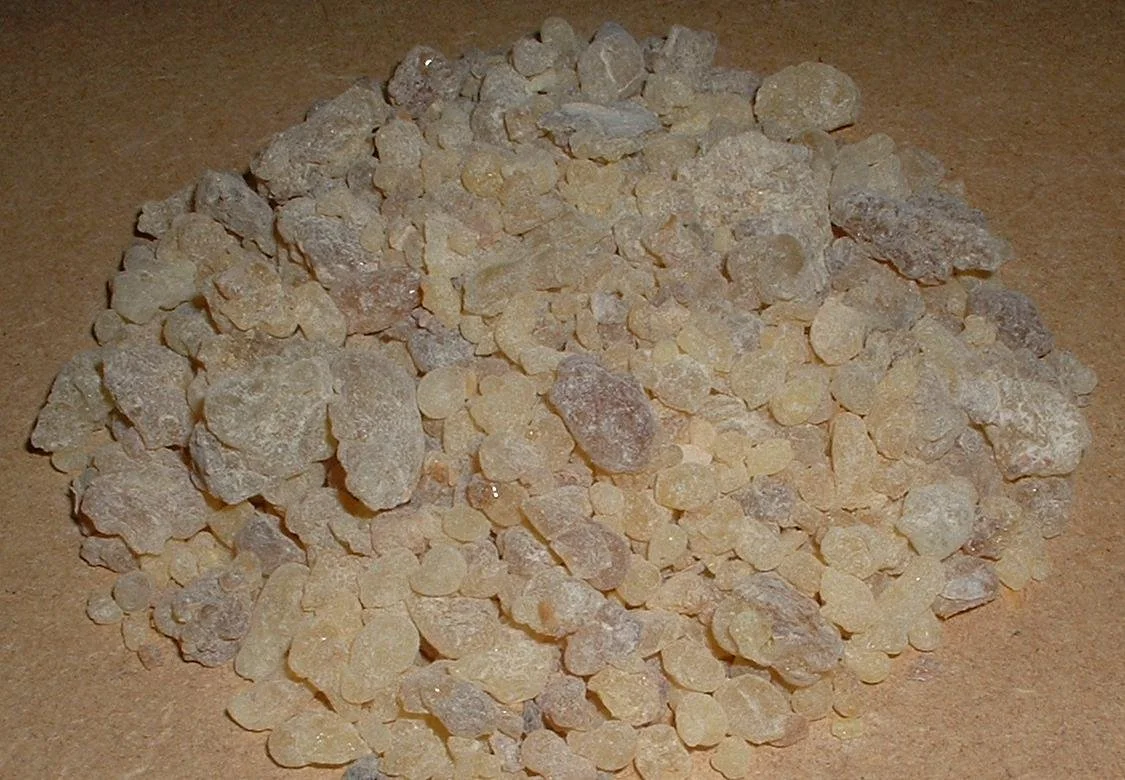
Frankincense as it arrives at the laboratory door: translucent, pale gold tears, judged by clarity, aroma, and cleanliness exactly as the lesson teaches — dusty, opaque, or musty pieces are inferior, and every incoming lot is graded and recorded. Whole tears like these keep for years; it is their dust that burns.
Frankincense resin, photograph via Wikimedia Commons (author assumed Gaius Cornelius, per the Commons record). Public domain.
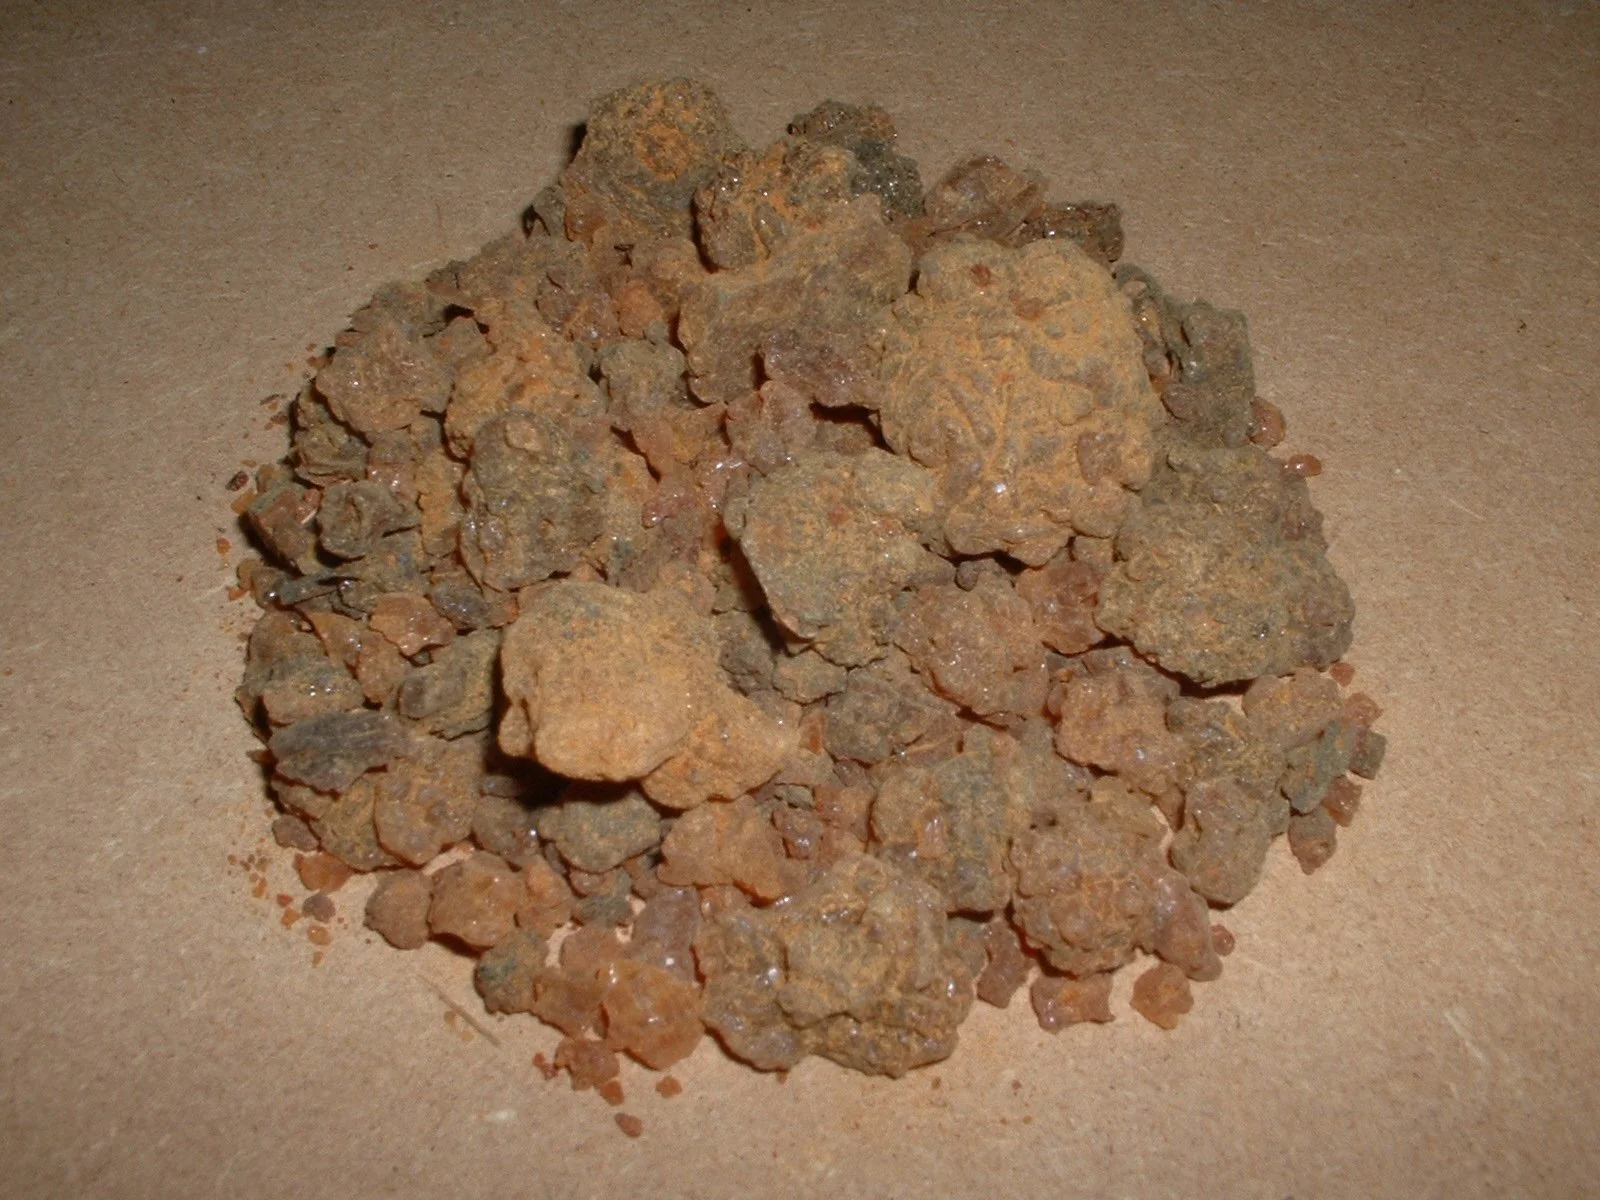
Myrrh, the lesson's oleoresin — a natural mixture of resin and essential oil, softer and more aromatic than resin proper, arriving as rough tears and lumps like these. Handled and stored like all resins here: sealed, with dry hands, and its dust kept from flame.
Myrrh resin, photograph via Wikimedia Commons (author assumed Gaius Cornelius, per the Commons record). Public domain.
Resins are the most storied materials on the heavy shelves. They begin as sticky secretions, flowing from wounded trees to seal and protect the injury, and they harden on exposure to air into tears, lumps, and glassy masses that can survive for centuries. Archaeologists have found resin in ancient tombs still fragrant after thousands of years. No petal can make that claim.
Know the family by its three branches:
- A resin proper is the hardened secretion itself, soluble in alcohol but not in water. Frankincense, the dried tears of Boswellia trees, is the classic example.
- An oleoresin is a natural mixture of resin and essential oil, softer and more aromatic. Myrrh, from Commiphora trees, behaves this way.
- A gum resin mixes resin with water-soluble gums, so it forms a cloudy mixture with water rather than dissolving cleanly.
In the laboratory, resins demand respect for two reasons. First, they are adhesive: they stick to fingers, tools, and jar lids, and they collect dust if left exposed. Store them sealed, handle them with dry hands or simple tools, and clean the mortar promptly after grinding. Second, as the Safety Briefing warned, ★ resin dust is flammable. Grind resins away from flame, in small quantities, with ventilation.
Judge resins by clarity, aroma, and cleanliness. Good frankincense tears are translucent, pale gold to greenish, with a clean pine-lemon scent. Dusty, opaque, or musty pieces are inferior. The apothecary grades every incoming lot and records the grade, because resin quality varies enormously by harvest and handling.
Check in: Frankincense, myrrh, and a gum resin stand in three jars. Which branch of the family is each — and what single test with water separates the gum resin from a resin proper?
❦ In your workbook: record the resin family in your own way — resin, oleoresin, and gum resin, with frankincense and myrrh placed, and the two laboratory respects: adhesive, and dust that burns — copy, sketch, or note what matters.
In your packet: Exercise II — The Fracture & Density Log ◐ begins here. Work it now, or mark the place and take it as homework — your choice.
Mise en Place
Gather before you begin. The laboratory does not tolerate mid-procedure improvisation.
Level One: household items.
- Two or three dense specimens from the kitchen or market: cinnamon sticks (compare true cinnamon quills with cassia if you can find both), dried ginger root, whole cloves, or a piece of dried turmeric root.
- A clean white plate or sheet of paper for examination.
- A small notebook and pencil: your specimen study sheet.
- A hand lens or magnifying glass, if available.
- Small jars or bags with labels for storage after the study.
Level Two: historically closer.
- Frankincense tears and myrrh pieces from an apothecary supplier, for the full resin study.
- Orris root or quassia chips, classic dense apothecary materials.
- A brass or ceramic mortar and pestle for the fracture-and-grind comparison.
- Glass specimen jars with cork or screw lids, labeled in the archival hand.
Check in: Which Level One specimen lets you compare the lesson's two "cinnamons" against each other — and what must be ready, labeled, before the study ends?
❦ In your workbook: record the mise en place in your own way — the Level One bench and the Level Two bench, gathered before you begin — copy, sketch, or note what matters.
Procedure: The Dense Specimen Study
Work through each specimen in turn. Do not rush. Dense materials reward slow attention.
Step 1. Receive. Place the specimen on the white plate. Record its name, source, and the date in your notebook. This is your intake record, the same record every historical apothecary kept.
Step 2. Weigh in the hand. Heft it. Note whether it feels substantial or suspiciously light for its size. Record your impression in plain words.
Step 3. Examine. Look closely, with the lens if you have one. Note color, surface texture, shape, and any visible structure: the curl of a quill, the wrinkles of a dried root, the translucency of a resin tear.
Step 4. Smell. Hold the specimen near, not in, your nose. Note the aroma in your own words. Then, if the material is suitable (bark, root, whole spice), scratch or snap a small piece and smell the fresh surface. The difference between the outer and freshly exposed aroma is information.
Step 5. Fracture. Break a small piece and read the break: clean, fibrous, or bending. Record what the fracture tells you about density and dryness.
Step 6. Grade. Assign the specimen a simple grade: sound, acceptable, or reject. A musty smell, a bending break, or visible mold means reject, without sentiment.
Step 7. Store. Return each specimen to its labeled jar or bag. Whole pieces stay whole. Nothing is ground today; grinding belongs to Lesson 21.
Check in: A specimen smells musty and its broken piece bends. At which step is each fault caught — and what grade do the two together earn, without sentiment?
❦ In your workbook: record the seven steps in your own way — receive, weigh, examine, smell, fracture, grade, store — copy, sketch, or note what matters.
In your packet: Exercise I — The Dense Specimen Study ⚒ begins here. Work it now, or mark the place and take it as homework — your choice.
Observation & Recording
Your specimen study sheet should hold, for each material: name and source, date received, weight impression, appearance notes, aroma notes (outer and fractured), fracture description, grade, and storage location. Write in complete sentences. The archive you are building must be readable by a stranger in ten years, because the whole point of an archive is that it outlives your memory.
❦ In your workbook: record the study sheet's eight fields in your own way — and the rule that the archive must be readable by a stranger in ten years — copy, sketch, or note what matters.
Cleanup
Brush all fragments and dust from the plate into the waste, not back into the jars. Wipe the work surface; resin dust in particular should not be left to accumulate. Wash your hands. Return tools to their places. A laboratory that is not cleaned after every procedure is a laboratory that cannot be trusted.
❦ In your workbook: record the cleanup in your own way — fragments to the waste, never back into the jars, resin dust wiped away, hands washed, tools returned — copy, sketch, or note what matters.
Archive Entry
Transfer your specimen study sheet into your potions journal. Each dense material earns a full entry: identification, sensory observations, fracture and density notes, grade, and storage record. These entries are the foundation of the reference work you will build across this entire course. One book, two classes, every plant entered once.
❦ In your workbook: record the archive entry in your own way — the five parts each dense material earns, and the one book it joins — copy, sketch, or note what matters.
In your packet: Exercise III — Materia Botanica Entries ✎ begins here. Work it now, or mark the place and take it as homework — your choice.
Guided Observation: The Dense Specimen Study
This lesson's observation is the study itself, done slowly at the plate: you receive each dense specimen the way the historical apothecary received it, and you judge it with every sense the lesson has taught — because dense materials reward slow attention, and a judgment written down is the only kind the archive can keep.
Work through each specimen in turn, in order.
Step 1. Receive. Place the specimen on the white plate. Record its name, source, and the date in your notebook. This is your intake record, the same record every historical apothecary kept.
Step 2. Weigh in the hand. Heft it. Note whether it feels substantial or suspiciously light for its size. Record your impression in plain words.
Step 3. Examine. Look closely, with the lens if you have one. Note color, surface texture, shape, and any visible structure: the curl of a quill, the wrinkles of a dried root, the translucency of a resin tear.
Step 4. Smell. Hold the specimen near, not in, your nose. Note the aroma in your own words. Then, if the material is suitable (bark, root, whole spice), scratch or snap a small piece and smell the fresh surface. The difference between the outer and freshly exposed aroma is information.
Step 5. Fracture. Break a small piece and read the break: clean, fibrous, or bending. Record what the fracture tells you about density and dryness.
Step 6. Grade. Assign the specimen a simple grade: sound, acceptable, or reject. A musty smell, a bending break, or visible mold means reject, without sentiment.
Step 7. Store. Return each specimen to its labeled jar or bag. Whole pieces stay whole. Nothing is ground today; grinding belongs to Lesson 21.
Your specimen study sheet should hold, for each material: name and source, date received, weight impression, appearance notes, aroma notes (outer and fractured), fracture description, grade, and storage location. Write in complete sentences. The archive you are building must be readable by a stranger in ten years, because the whole point of an archive is that it outlives your memory.
Consider:
- Which of your specimens changed its judgment between the outer smell and the freshly fractured smell — and what did the difference tell you?
- Which break — clean, fibrous, or bending — was hardest to read, and what would a second specimen of the same material teach you?
- Which specimen earned the grade you were least expecting when you first hefted it?
❦ In your workbook: record the guided observation in your own way — the seven steps worked specimen by specimen, and the eight fields of the study sheet — copy, sketch, or note what matters.
Materials
Everything in its place, before we begin. For this lesson you will need:
Required (Level One — household items)
- Two or three dense specimens from the kitchen or market: cinnamon sticks (compare true cinnamon quills with cassia if you can find both), dried ginger root, whole cloves, or a piece of dried turmeric root.
- A clean white plate or sheet of paper for examination.
- A small notebook and pencil: your specimen study sheet.
- A hand lens or magnifying glass, if available.
- Small jars or bags with labels for storage after the study.
Suggested (Level Two — historically closer)
- Frankincense tears and myrrh pieces from an apothecary supplier, for the full resin study.
- Orris root or quassia chips, classic dense apothecary materials.
- A brass or ceramic mortar and pestle for the fracture-and-grind comparison.
- Glass specimen jars with cork or screw lids, labeled in the archival hand.
Reflection Questions
Answer the following questions in your workbook.
- Why does uneven drying pose a greater danger to thick roots than to thin leaves?
- What is the practical difference between inner bark and outer bark for the apothecary, and how does cinnamon demonstrate it?
- Explain why the lesson instructs you to store bark and roots whole rather than grinding them on receipt.
- A jar of dried root smells musty when first opened. What is your judgment, and what do you do?
- Why is resin dust treated as a fire hazard while whole resin tears are not?
Workbook Checklist — Lesson 18
In my workbook I have:
- ☐ explained why dense materials demand different handling than delicate flowers and leaves, in terms of their enemies: uneven drying, misidentification, and heat and carelessness
- ☐ recorded the three governing properties — density, moisture retention, and fracture behavior — and what each tells the apothecary
- ☐ judged dried roots by weight, snap, interior, and smell, and discarded a musty, compromised batch without debating it
- ☐ told true cinnamon's thin inner-bark quills from cassia's thicker, woodier bark, and read bark by its break: clean, fibrous, or bending
- ☐ placed frankincense, myrrh, and gum resins in the resin family, stored resins sealed, and kept resin dust away from flame
- ☐ completed the seven-step dense specimen study on three materials, with all eight record fields on each study sheet, and stored every specimen whole in its labeled jar
- ☐ written formal Materia Botanica entries for my three specimens — identification, sensory observations, fracture and density notes, grade, storage record, and date of entry
☐ Lesson completed Date: ___ Signature: ___
The Professor's Closing Note
Sealed with the wax of Professor Crimblebrew Muddlenook, Master Apothecary of the Potions Laboratory, Head of House Meridies.
You have now met the heavy shelves. Roots that resist, bark that armors, resins — hardened plant secretions, sticky when fresh, that harden on exposure to air — that outlast centuries. Treat them with the structural respect they deserve: judge before you trust, store whole, grind late, and label everything.
Next lesson, we turn to the mediums that will carry these materials into preparation: oils, waxes, and botanical bases. The dense materials you studied today will meet their solvents — liquids able to dissolve or draw out other materials — soon enough. For now, let them rest in their labeled jars, orderly and patient, as all good laboratory residents should be.
— C.M.
Cross-Class Connections

Herbology · Unit I, Lesson 3 — Anatomical Architecture: Root Vaults
Sealed with the wax of Professor Beryl Fernfoot, Master Herbalist of the Herbology Greenhouse, Head of House Oriens.
Come down to the Greenhouse first, scholars, before the heavy shelves ask their questions of you. In my Root Vaults you will learn the two great designs while the roots are still alive: the taproot that reaches for deep water and the fibrous mat that drinks the surface rain, and the underground pantries where plants pack their starch away. Professor Muddlenook judges the dried root at his laboratory door; I teach you what that root was, and did, while it grew. Know the living system, and his sectioning and sorting will make sense in your hands.
Herbology · Unit IV, Lesson 28 — Drying Herbs the Traditional Way
Sealed with the wax of Professor Beryl Fernfoot, Master Herbalist of the Herbology Greenhouse, Head of House Oriens.
His bench judges the results of drying; mine teaches the drying itself. Come to the Greenhouse and learn to hang, screen, and crisp-test the harvest the traditional way, in dark, moving air — and to dry only sound material, for a fault carried into drying is a fault kept. Then carry your dried bundles to his laboratory door, and let his weight, snap, and smell tests tell you how honestly the work was done in my room.
Herbology · Unit V, Lesson 36 — The Materia Botanica: Building Your Herbal
Sealed with the wax of Professor Beryl Fernfoot, Master Herbalist of the Herbology Greenhouse, Head of House Oriens.
One book, two classes, every plant entered once — and your Exercise III entries belong in it. Come up to the Greenhouse and build the growing half of our shared Materia Botanica: my scholars write how each plant grows, and Professor Muddlenook's scholars write how each plant arrives, grades, and stores. Bring your dense-specimen entries with their fracture and density notes, and we will set them beside the living plant's record, where they belong.
PROFESSOR BERYL FERNFOOT
Herbology Greenhouse • Master Herbalist • Head of House Oriens
Further Reading & Sources
- Kew Gardens: Useful Plants and Fungi Portal — Royal Botanic Gardens, Kew. Reference for plant material uses.
- The Cinnamon Story: True Cinnamon vs Cassia — Encyclopaedia Britannica. Botanical background on Cinnamomum species.
- Frankincense: Boswellia Trees and Resin Harvest — Royal Botanic Gardens, Kew. How frankincense resin is produced.
- Resins in History: The Plant Resins Collection — Royal Botanic Gardens, Kew. Historical resin uses and trade.
- Apothecary Jars and the History of Pharmacy Storage — Smithsonian Institution. Historical context for apothecary organization.
Browse the Potions shelf in the school Library for readable editions of these works.
Submit your work for this lesson using the form below.
CONTINUE IN THE POTIONS LABORATORY
← Previous · Lesson 17: Consolidating the Potions Journal Next · Lesson 19: Oils, Waxes & Botanical Bases →
Unit III — Dense Materials & Preparation Potions Laboratory — All 52 Lessons
The rest of Unit III: Lesson 19 · Oils & Waxes · Lesson 20 · Salts & Clays · Lesson 21 · Grinding & Processing · Lesson 22 · Filtration · Lesson 23 · Preparing for Extraction · Lesson 24 · Master Portfolio · Lesson 25 · Preparation Manifest